13-25
Cisco ASA Series Firewall CLI Configuration Guide
Chapter 13 Inspection of Basic Internet Protocols
Instant Messaging Inspection
Procedure
Step 1
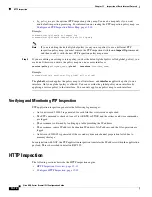
If necessary, create an L3/L4 class map to identify the traffic for which you want to apply the inspection.
class-map
name
match
parameter
Example:
hostname(config)# class-map im_class_map
hostname(config-cmap)# match access-list im
In the default global policy, the inspection_default class map is a special class map that includes default
ports for all inspection types (
match default-inspection-traffic
). If you are using this class map in
either the default policy or for a new service policy, you can skip this step.
For information on matching statements, see
Identify Traffic (Layer 3/4 Class Maps), page 11-13
.
Step 2
Add or edit a policy map that sets the actions to take with the class map traffic.
policy-map
name
Example:
hostname(config)# policy-map global_policy
In the default configuration, the global_policy policy map is assigned globally to all interfaces. If you
want to edit the global_policy, enter global_policy as the policy name.
Step 3
Identify the L3/L4 class map you are using for IM inspection.
class
name
Example:
hostname(config-pmap)# class inspection_default
To edit the default policy, or to use the special inspection_default class map in a new policy, specify
inspection_default
for the
name
. Otherwise, you are specifying the class you created earlier in this
procedure.
Step 4
Configure IM inspection.
inspect im
[
im_policy_map
]
Where
im_policy_map
is the optional IM inspection policy map. You need a map only if you want
non-default inspection processing. For information on creating the IM inspection policy map, see
Configure an Instant Messaging Inspection Policy Map, page 13-22
Example:
hostname(config-class)# no inspect im
hostname(config-class)# inspect im im-map
Note
If you are editing the default global policy (or any in-use policy) to use a different IM inspection
policy map, you must remove the IM inspection with the
no inspect im
command, and then
re-add it with the new IM inspection policy map name.
Step 5
If you are editing an existing service policy (such as the default global policy called global_policy), you
are done. Otherwise, activate the policy map on one or more interfaces.
service-policy
policymap_name
{
global
|
interface
interface_name
}
Содержание ASA 5508-X
Страница 11: ...P A R T 1 Access Control ...
Страница 12: ......
Страница 60: ...4 14 Cisco ASA Series Firewall CLI Configuration Guide Chapter 4 Access Rules History for Access Rules ...
Страница 157: ...P A R T 2 Network Address Translation ...
Страница 158: ......
Страница 204: ...9 46 Cisco ASA Series Firewall CLI Configuration Guide Chapter 9 Network Address Translation NAT History for NAT ...
Страница 232: ...10 28 Cisco ASA Series Firewall CLI Configuration Guide Chapter 10 NAT Examples and Reference DNS and NAT ...
Страница 233: ...P A R T 3 Service Policies and Application Inspection ...
Страница 234: ......
Страница 379: ...P A R T 4 Connection Management and Threat Detection ...
Страница 380: ......
Страница 400: ...16 20 Cisco ASA Series Firewall CLI Configuration Guide Chapter 16 Connection Settings History for Connection Settings ...
Страница 414: ...17 14 Cisco ASA Series Firewall CLI Configuration Guide Chapter 17 Quality of Service History for QoS ...


