background image


3-5

Cisco 1760 Modular Access Router Hardware Installation Guide

78-13342-03

Chapter 3      Troubleshooting

Recovering a Lost Password

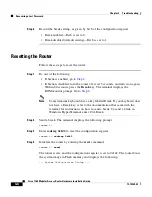
Step 5

Enter 

no

 in response to the prompts until the following message is displayed:

Press RETURN to get started! 

Step 6

Press 

Return

. The following prompt appears:

Router>

Step 7

Enter the 

enable

 command to enter privileged EXEC mode. Configuration 

changes can be made only in this mode. 

Router> 

enable

The prompt changes to the privileged EXEC prompt:

Router#

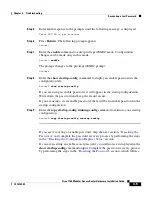
Step 8

Enter the 

show startup-config

 command to display an enable password in the 

configuration file:

Router# 

show startup-config

If you are using an enable password, it will appear in the startup configuration. 
Write down the password and keep the record secure. 

If you are using a secret enable password, there will be no enable password in the 
startup configuration.

Step 9

Enter the 

copy startup-config running-config

 command to return to your startup 

configuration:

Router# 

copy startup-config running-config 

If you are recovering an enable password, skip the next section, “

Resetting the 

Password

,” and complete the password recovery process by performing the steps 

in the 

“Resetting the Configuration Register Value”

 section.

If you are resetting an enable secret password, you will not see it displayed in the 

show startup-config

 command output. Complete the password recovery process 

by performing the steps in the 

“Resetting the Password”

 section, which follows. 

Содержание 1760 - VPN Bundle Router

Страница 1: ...170 West Tasman Drive San Jose CA 95134 1706 USA http www cisco com Tel 408 526 4000 800 553 NETS 6387 Fax 408 526 4100 Cisco 1760 Modular Access Router Hardware Installation Guide Customer Order Number DOC 7813342 Text Part Number 78 13342 03 ...

Страница 2: ...difying the equipment without Cisco s written authorization may result in the equipment no longer complying with FCC requirements for Class A or Class B digital devices In that event your right to use the equipment may be limited by FCC regulations and you may be required to correct any interference to radio or television communications at your own expense You can determine whether your equipment ...

Страница 3: ...ent IOS IP TV iQ Expertise the iQ logo iQ Net Readiness Scorecard LightStream Linksys MeetingPlace MGX the Networkers logo Networking Academy Network Registrar Packet PIX Post Routing Pre Routing ProConnect RateMUX ScriptShare SlideCast SMARTnet StrataView Plus TeleRouter The Fastest Way to Increase Your Internet Quotient and TransPath are registered trademarks of Cisco Systems Inc and or its affi...

Страница 4: ......

Страница 5: ...xxii Cisco com xxiii Documentation DVD xxiii Ordering Documentation xxiii Documentation Feedback xxiv Cisco Product Security Overview xxiv Reporting Security Problems in Cisco Products xxv Obtaining Technical Assistance xxv Cisco Technical Support Website xxvi Submitting a Service Request xxvi Definitions of Service Request Severity xxvii Obtaining Additional Publications and Information xxviii C ...

Страница 6: ...talling the Router 2 1 Mounting the Router in a Rack 2 2 Attaching Brackets to the Router 2 3 Attaching Brackets to the Rack 2 5 Attaching the Optional Cable Guide 2 5 Connecting the Router to Your Local Network 2 6 Installing WICs and VICs 2 8 Safety Information 2 8 Connecting Power to the Router 2 11 Verifying the Installation 2 12 Optional Installation Steps 2 13 Connecting a PC 2 13 Connecting...

Страница 7: ...12 Troubleshooting ISDN 3 13 Fan Behavior 3 15 A P P E N D I X A Technical Specifications A 1 A P P E N D I X B Cabling Specifications B 1 Ethernet Cables B 1 Ethernet Network Cabling Guidelines B 2 Console Cable and Adapter B 3 VIC Cables and Pinouts B 3 Cables and Pinouts for 2 Port ISDN BRI Card B 5 A P P E N D I X C Installing and Upgrading Memory and Packet Voice Data Modules C 1 Safety Infor...

Страница 8: ...ostatic Discharge Damage D 3 Installing the VPN Module in a Cisco 1760 Router D 4 Opening the Cisco 1760 Chassis D 4 Installing the VPN Module D 6 Closing the Cisco 1760 Chassis D 9 A P P E N D I X E Installing the Echo Canceler Expansion Modules on Cisco Interface Cards E 1 Multiflex Trunk Interface Cards E 1 Echo E 2 Echo Canceler Expansion Modules E 2 Installing and Configuring the Echo Cancele...

Страница 9: ...sers are familiar with the terminology and concepts of local Ethernet and wide area networking This guide describes the functional and physical features of the Cisco 1760 router and provides installation procedures troubleshooting information technical specifications and cable and connector guidelines and specifications Organization This guide is organized as follows Chapter 1 Cisco 1760 Router Ov...

Страница 10: ...es that are available for use on the 1 port RJ 48 T1 E1 multiflex trunk VWIC2 1MFT T1 E1 and on the 2 port RJ 48 T1 E1 multiflex trunk VWIC2 2MFT T1 E1 interface cards Related Documentation The following publications provide related information on this product Quick Start Guide for Installing Your Cisco 1760 Modular Access Router which came with your router explains how to install voice hardware a...

Страница 11: ...IOS CLI commands and how to use them as well as information on designing and configuring LANs and WANs Conventions This guide uses the following conventions for information and instructions Notes Cautions and Warnings Notes cautions and warnings use the following conventions and symbols Note Means reader take note Notes contain helpful suggestions or references to materials not contained in this m...

Страница 12: ...n situatie die lichamelijk letsel kan veroorzaken Voordat u aan enige apparatuur gaat werken dient u zich bewust te zijn van de bij elektrische schakelingen betrokken risico s en dient u op de hoogte te zijn van de standaard praktijken om ongelukken te voorkomen Gebruik het nummer van de verklaring onderaan de waarschuwing als u een vertaling van de waarschuwing die bij het apparaat wordt geleverd...

Страница 13: ...et Gefahr Sie befinden sich in einer Situation die zu Verletzungen führen kann Machen Sie sich vor der Arbeit mit Geräten mit den Gefahren elektrischer Schaltungen und den üblichen Verfahren zur Vorbeugung vor Unfällen vertraut Suchen Sie mit der am Ende jeder Warnung angegebenen Anweisungsnummer nach der jeweiligen Übersetzung in den übersetzten Sicherheitshinweisen die zusammen mit diesem Gerät ...

Страница 14: ...ausadora de lesões corporais Antes de iniciar a utilização de qualquer equipamento tenha conhecimento dos perigos envolvidos no manuseio de circuitos elétricos e familiarize se com as práticas habituais de prevenção de acidentes Utilize o número da instrução fornecido ao final de cada aviso para localizar sua tradução nos avisos de segurança traduzidos que acompanham este dispositivo GUARDE ESTAS ...

Страница 15: ...inner dig i en situation som kan leda till personskada Innan du utför arbete på någon utrustning måste du vara medveten om farorna med elkretsar och känna till vanliga förfaranden för att förebygga olyckor Använd det nummer som finns i slutet av varje varning för att hitta dess översättning i de översatta säkerhetsvarningar som medföljer denna anordning SPARA DESSA ANVISNINGAR ...

Страница 16: ...em uma situação em que há risco de lesões corporais Antes de trabalhar com qualquer equipamento esteja ciente dos riscos que envolvem os circuitos elétricos e familiarize se com as práticas padrão de prevenção de acidentes Use o número da declaração fornecido ao final de cada aviso para localizar sua tradução nos avisos de segurança traduzidos que acompanham o dispositivo GUARDE ESTAS INSTRUÇÕES ...

Страница 17: ... dig i en situation med risiko for legemesbeskadigelse Før du begynder arbejde på udstyr skal du være opmærksom på de involverede risici der er ved elektriske kredsløb og du skal sætte dig ind i standardprocedurer til undgåelse af ulykker Brug erklæringsnummeret efter hver advarsel for at finde oversættelsen i de oversatte advarsler der fulgte med denne enhed GEM DISSE ANVISNINGER ...

Страница 18: ...Preface Conventions xx Cisco 1760 Modular Access Router Hardware Installation Guide 78 13342 03 ...

Страница 19: ...xxi Cisco 1760 Modular Access Router Hardware Installation Guide 78 13342 03 Preface Conventions ...

Страница 20: ... Guide Convention Description boldface Commands and keywords italic Command input that is supplied by you Keywords or arguments that appear within square brackets are optional x x x A choice of keywords represented by x appears in braces separated by vertical bars You must select one or Ctrl Represent the key labeled Control For example when you read D or Ctrl D you should hold down the Control ke...

Страница 21: ...mentation DVD is updated regularly and may be more current than printed documentation The Documentation DVD package is available as a single unit Registered Cisco com users Cisco direct customers can order a Cisco Documentation DVD product number DOC DOCDVD from the Ordering tool or Cisco Marketplace Cisco Ordering tool http www cisco com en US partner ordering Cisco Marketplace http www cisco com...

Страница 22: ...man Drive San Jose CA 95134 9883 We appreciate your comments Cisco Product Security Overview Cisco provides a free online Security Vulnerability Policy portal at this URL http www cisco com en US products products_security_vulnerability_policy ht ml From this site you can perform these tasks Report security vulnerabilities in Cisco products Obtain assistance with security incidents that involve Ci...

Страница 23: ...t is compatible with PGP versions 2 x through 8 x Never use a revoked or an expired encryption key The correct public key to use in your correspondence with PSIRT is the one that has the most recent creation date in this public key server list http pgp mit edu 11371 pks lookup search psirt 40cisco com op index ex act on In an emergency you can also reach PSIRT by telephone 1 877 228 7302 1 408 525...

Страница 24: ... link under Documentation Tools Choose Cisco Product Identification Tool from the Alphabetical Index drop down list or click the Cisco Product Identification Tool link under Alerts RMAs The CPI tool offers three search options by product ID or model name by tree view or for certain products by copying and pasting show command output Search results show an illustration of your product with the seri...

Страница 25: ...at all service requests are reported in a standard format Cisco has established severity definitions Severity 1 S1 Your network is down or there is a critical impact to your business operations You and Cisco will commit all necessary resources around the clock to resolve the situation Severity 2 S2 Operation of an existing network is severely degraded or significant aspects of your business operat...

Страница 26: ...of the latest industry trends technology breakthroughs and Cisco products and solutions as well as network deployment and troubleshooting tips configuration examples customer case studies certification and training information and links to scores of in depth online resources You can access Packet magazine at this URL http www cisco com packet iQ Magazine is the quarterly publication from Cisco Sys...

Страница 27: ...ardware Installation Guide 78 13342 03 Preface Obtaining Additional Publications and Information World class networking training is available from Cisco You can view current offerings at this URL http www cisco com en US learning index html ...

Страница 28: ...Preface Obtaining Additional Publications and Information xxx Cisco 1760 Modular Access Router Hardware Installation Guide 78 13342 03 ...

Страница 29: ... to in this guide as the router and covers the following topics Key Features Ports and LEDs Router Memory Unpacking the Router Additional Required Equipment Figure 1 1 shows the Cisco 1760 router Figure 1 1 Cisco 1760 Router 60944 Cisco 1700 Series 10 100 ETHERNET AUX CONSOLE PVDM0 OK OK PWR 1 0 SLOT0 OK PVDM1 OK MOD OK 1 0 SLOT1 OK LINK 100 FDX ACT COL 1 0 SLOT2 OK 1 0 SLOT3 OK ...

Страница 30: ...of the router Table 1 1 Key Features Feature Description One Fast Ethernet 10 100BASE TX port Operates in full or half duplex mode with software override support Supports autosensing for 10 or 100 Mbps operation with software override support Cisco interface cards Supports two slots slots 0 and 1 for either WICs or voice interface cards VICs Supports two slots slots 2 and 3 for VICs only Supports ...

Страница 31: ...r over a WAN connection Table 1 1 Key Features continued Feature Description 1 Interface Card Slot 0 WIC VIC 9 Ethernet Port 2 Interface Card Slot 1 WIC VIC 10 Ethernet LEDs 3 Console Port 11 Interface Card Slot 1 LEDs 4 Interface Card Slot 2 VIC only 12 Interface Card Slot 0 LEDs 5 Interface Card Slot 3 VIC only 13 MOD OK LED 6 Interface Card Slot 3 LEDs 14 PVDM 0 1 OK LEDs 7 Interface Card Slot ...

Страница 32: ...k Modem connection for remote configuration using Cisco IOS software Console port CONSOLE light blue Terminal or PC connection for local configuration using Cisco IOS software WIC VIC slot SLOT 0 Supports either a Cisco WIC or a Cisco VIC For detailed information refer to the Cisco WAN Interface Cards Hardware Installation Guide WIC VIC slot SLOT 1 Supports either a Cisco WIC or a Cisco VIC For de...

Страница 33: ... Green On when the router has successfully booted up and the software is functional This LED blinks during the power on self test POST See Table 3 1 in the Troubleshooting chapter for how to use this LED in router diagnostics PVDM 0 OK Green On when a packet voice data module PVDM is correctly inserted in PVDM card slot 0 PVDM 1 OK Green On when a packet voice data module PVDM is correctly inserte...

Страница 34: ...en the Ethernet link is up Table 1 4 Ethernet LEDs continued LED Label Color Description Table 1 5 WIC VIC LEDs LED Color Cards Supported LED Meaning SLOT 0 OK Green On when either a WIC or a VIC is correctly inserted in the card slot 0 Green ISDN On when the first ISDN B channel is connected Serial and CSU DSU Blinks when data is being sent to or received from port 0 in slot 0 For the VIC 2BRI ST...

Страница 35: ...ceived from port 1 in slot 0 VIC 2E M VIC 2FXO VIC 2FXS VIC 2BRI NT TE VIC 2DID SLOT 1 OK Green On when either a WIC or a VIC is correctly inserted in the card slot 0 Green ISDN On when the first ISDN B channel is connected Serial and CSU DSU Blinks when data is being sent to or received from port 0 in slot 1 2 port serial VIC 2E M VIC 2FXO VIC 2FXS VIC 2BRI NT TE VIC 2DID WIC 1ADSL WIC 1ENET Tabl...

Страница 36: ...ved from port 1 in slot 1 VIC 2E M VIC 2FXO VIC 2FXS VIC 2BRI NT TE VIC 2DID SLOT 2 OK Green On when a VIC is correctly inserted in the card slot 0 Green VIC 2E M Blinks when data is being sent to or received from port 0 in slot 2 VIC 2FXO VIC 2FXS VIC 2BRI NT TE VIC 2DID 1 Green VIC 2E M Blinks when data is being sent to or received from port 1 in slot 2 VIC 2FXO VIC 2FXS VIC 2BRI NT TE VIC 2DID ...

Страница 37: ...torage memory for the router DRAM is also called working storage and contains the dynamic configuration information The router stores a working copy of Cisco IOS software dynamic configuration information and routing table information in DRAM Nonvolatile RAM NVRAM This type of memory contains the startup configuration SLOT 3 OK Green On when a VIC is correctly inserted in the card slot 0 Green VIC...

Страница 38: ...w version command to view the amount of DRAM NVRAM and Flash memory stored in your router The following example shows the output of the show version command Router show version Cisco Internetwork Operating System Software IOS tm C1700 Software C1700 SV3Y M Version 12 2 2 XK EARLY DEPLOYMENT RELEASE SOFTWARE fc1 TAC Support http www cisco com tac Copyright c 1986 2001 by cisco Systems Inc Compiled ...

Страница 39: ... 32K bytes of non volatile configuration memory 8192K bytes of processor board System flash partition 1 Read Write 8192K bytes of processor board System flash partition 2 Read Write Configuration register is 0x0 Unpacking the Router Table 1 6 lists the items that come with your router All these items are in the accessory kit that is inside the box that your router came in Table 1 6 Router Box Cont...

Страница 40: ... WIC installed The router supports up to two cards You can either order the cards when you order the router and they will be installed for you or you can order the cards separately after you receive the router and install them yourself Cisco VIC To make a voice connection the router must have a supported VIC installed The router supports up to three cards You can either order the cards when orderi...

Страница 41: ...or detailed information about serial cable types refer to the Cisco WAN Interface Cards Hardware Installation Guide that comes with every card NT1 Some ISDN service providers require a Network Termination 1 NT1 device to connect an ISDN S T port to the ISDN line Asynchronous modem To configure the router from a remote location connect a modem to the AUX port on the router Table 1 7 Additional Requ...

Страница 42: ...Chapter 1 Cisco 1760 Router Overview Additional Required Equipment 1 14 Cisco 1760 Modular Access Router Hardware Installation Guide 78 13342 03 ...

Страница 43: ...ng WICs and VICs Connecting Power to the Router Verifying the Installation Optional Installation Steps Before Installing the Router The router is shipped ready for rack mounting Before making the power and network connections mount the router in a rack as described in the next section Be sure to read the safety information in the Regulatory Compliance and Safety Information for Cisco 1700 Routers ...

Страница 44: ... unit in a rack you must take special precautions to ensure that the system remains stable The following guidelines are provided to ensure your safety This unit should be mounted at the bottom of the rack if it is the only unit in the rack When mounting this unit in a partially filled rack load the rack from the bottom to the top with the heaviest component at the bottom of the rack If the rack is...

Страница 45: ... screws you use depend on whether a 19 inch rack or a 24 inch rack will be used Use two of the supplied screws to attach each bracket according to the following guidelines For a 19 inch rack use the supplied number 8 Phillips flat head screws to attach the long side of the bracket to the router For a 24 inch rack use the supplied number 8 Phillips truss head screws to attach the short side of the ...

Страница 46: ...Installation Guide 78 13342 03 Figure 2 2 Attaching Brackets for 19 and 24 Inch Racks PVDM0 OK OK PWR 1 0 SLOT0 OK PVDM1 OK MOD OK 1 0 SLOT1 OK Phillips flat head screws 19 Configuration 60942 PVDM0 OK OK PWR 1 0 SLOT0 OK PVDM1 OK MOD OK 1 0 SLOT1 OK Phillips truss head screws 24 Configuration 60943 ...

Страница 47: ...sis are not blocked Figure 2 3 Attaching Brackets to the Rack Attaching the Optional Cable Guide Cisco recommends attaching the cable guide to prevent the cables from obscuring the front panel of the router and the other devices installed in the rack If the router is in a 19 inch or 24 inch rack use the supplied black screw as shown in Figure 2 4 to attach the cable guide to the left or right brac...

Страница 48: ...SELV circuits should only be connected to other SELV circuits Because BRI circuits are treated like telephone network voltage avoid connecting the SELV circuits to the telephone network voltage TNV circuits To see translated versions of this warning refer to the Regulatory Compliance and Safety Information for Cisco 1700 Routers document that came with the router Caution Always connect the Etherne...

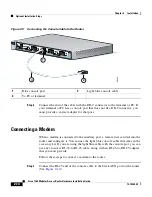
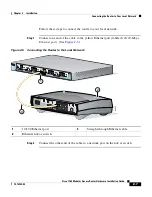
Страница 49: ...t port See Figure 2 5 Figure 2 5 Connecting the Router to the Local Network Step 2 Connect the other end of the cable to a network port on the hub or switch 1 10 100 Ethernet port 3 Straight through Ethernet cable 2 Ethernet hub or switch Cisco 1700 Series 10 100 ETHERNET AUX CONSOLE ETHERNET SPEED 1 5 2 6 3 7 4 8 LED 100BaseTX SOLID 10BaseT BLINK 1X 2X 3X 4X 5X 6X 7X MDI MDI X 8X PVDM0 OK OK PWR ...

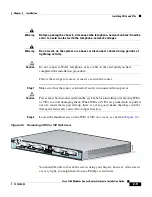
Страница 50: ...ace with Cisco IOS software refer to the Cisco WAN Interface Cards Hardware Installation Guide that came with the cards Safety Information This section lists safety warnings that you should be aware of before installing WICs or VICs in the router To see translated versions of these warnings refer to the Regulatory Compliance and Safety Information for the Cisco 1700 Routers document that came with...

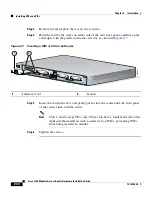
Страница 51: ...he router is turned off and is disconnected from power Caution Power must be disconnected from the system before installing or removing WICs or VICs to avoid damaging them When WICs or VICs are pushed into or pulled out of a router that is powered up there is a very good chance that they could be damaged electrically and will no longer function Step 2 Loosen the thumbscrews on the WIC or VIC slot ...

Страница 52: ...nserting a WIC or VIC in the Router Step 5 Insert the card in the slot and gently push it into the router until the front panel of the card is flush with the router Note Slots 2 and 3 accept VICs only These slots have a small metal tab on the right side that interferes with a similar tab on WICs preventing WICs from being inserted by mistake Step 6 Tighten the screws 1 Interface Card 2 Guides Cisc...

Страница 53: ...the building s installation for short circuit overcurrent protection Ensure that a fuse or circuit breaker no larger than 120VAC 15AU S 240VAC 16A international is used on the phase conductors all current carrying conductors Warning This equipment needs to be grounded Use a green and yellow 14 AWG ground wire to connect the host to earth ground during normal use Follow these steps to connect power...

Страница 54: ...firm that the router has power by checking that the PWR LED is on Verifying the Installation You can verify that you have correctly installed the router by checking the following LEDs PWR On when power is being supplied to the router OK On when the router software is loaded and functional Blinking means that the router is performing a power on self test POST ETH ACT Blinking when there is network ...

Страница 55: ...tion steps that you might or might not use depending on your site and how you are configuring the router Connecting a PC Connecting a Modem Connecting a PC If you want to configure the router through the Cisco IOS command line interface CLI you must connect the router console port to a terminal or PC The cable required for this connection is included with the router The PC must have some type of t...

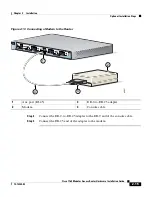
Страница 56: ...user can dial into the router and configure it You can use the light blue console cable that came in the accessory kit If you are using the light blue cable with the console port you can use any crossover RJ 45 to RJ 45 cable along with an RJ 45 to DB 25 adapter that you must provide Follow these steps to connect a modem to the router Step 1 Connect the RJ 45 end of the console cable to the black ...

Страница 57: ...outer Step 2 Connect the DB 9 to DB 25 adapter to the DB 9 end of the console cable Step 3 Connect the DB 25 end of the adapter to the modem 1 Aux port RJ 45 3 DB 9 to DB 25 adapter 2 Modem 4 Console cable Cisco 1700 Series 10 100 ETHERNET AUX CONSOLE PVDM0 OK OK PWR 1 0 SLOT0 OK PVDM1 OK MOD OK 1 0 SLOT1 OK LINK 100 FDX ACT COL 1 0 SLOT2 OK 1 0 SLOT3 OK 1 3 4 2 60947 ...

Страница 58: ...Chapter 2 Installation Optional Installation Steps 2 16 Cisco 1760 Modular Access Router Hardware Installation Guide 78 13342 03 ...

Страница 59: ...Recovering a Lost Password Problem Solving Contacting Your Cisco Reseller If you cannot locate the source of a problem contact your local reseller for advice Before you call you should have the following information ready Chassis type and serial number Maintenance agreement or warranty information Cisco IOS release installed on your router Date you received the router Brief description of the prob...

Страница 60: ...f you are using an enable secret password you enter a new password with this process You then restore the router to its prior configuration Resetting the Configuration Register Value If you are using an enable password you use this process to restore the router to its prior configuration Note See the Hot Tips section on Cisco com for additional information on replacing enable secret passwords Dete...

Страница 61: ...00 Software C1700 SV3Y M Version 12 2 4 XL EARLY DEPLOYMENT RELEASE SOFTWARE fc1 Router uptime is 2 days 1 minute System returned to ROM by reload Running default software cisco 1760 MPC860 processor revision 0x00 with 62260K 3276K bytes of memory Processor board ID 0000 1314672220 with hardware revision 0000 MPC860 processor part number 5 mask 2 Bridging software X 25 software Version 3 0 0 Basic...

Страница 62: ... Break key The terminal displays the ROM monitor prompt Go to Step 3 Note Some terminal keyboards have a key labeled Break If your keyboard does not have a Break key refer to the documentation that came with the terminal for instructions on how to send a break To send a break in Windows HyperTerminal enter Ctrl Break Step 2 Send a break The terminal displays the following prompt rommon 2 Step 3 En...

Страница 63: ...u are using an enable password it will appear in the startup configuration Write down the password and keep the record secure If you are using a secret enable password there will be no enable password in the startup configuration Step 9 Enter the copy startup config running config command to return to your startup configuration Router copy startup config running config If you are recovering an ena...

Страница 64: ...ister value that you recorded in Step 5 in the Determining the Configuration Register Value section on page 3 2 Step 4 Press Ctrl Z to exit configuration mode Router config Ctrl Z Step 5 Save your configuration changes Router copy running config startup config Step 6 Reboot the router and enter the enable secret password Resetting the Configuration Register Value Follow these steps to restore the ...

Страница 65: ...ards Hardware Installation Guide that comes with each card Cables Check all the external cables that connect the router to the network Power system Check the external power source power cable router power supply and circuit breaker Check for inadequate ventilation or air circulation that might cause overheating ISDN configuration Consider ISDN specific hardware and software configurations ISDN BRI...

Страница 66: ... 00 00 00 00 02 04 FF FF FF FF 0x20 FF FF FF FF FF FF FF FF FF FF FF FF FF FF FF FF 0x30 FF FF FF FF FF FF FF FF FF FF FF FF FF FF FF FF 0x40 FF FF FF FF FF FF FF FF FF FF FF FF FF FF FF FF 0x50 FF FF FF FF FF FF FF FF FF FF FF FF FF FF FF FF 0x60 FF FF FF FF FF FF FF FF FF FF FF FF FF FF FF FF 0x70 FF FF FF FF FF FF FF FF FF FF FF FF FF FF FF FF Packet Voice DSP Module Slot 0 Hardware Revision 2 ...

Страница 67: ... Deviation Number 0 0 Fab Version 02 PCB Serial Number ICP0326001Y RMA Test History 00 RMA Number 0 0 0 0 RMA History 00 Processor type 02 Number of DSP s 1 Type of DSP TMS320C549 EEPROM format version 4 EEPROM contents hex 0x00 04 FF 40 01 5A 41 02 02 82 49 0E 9D 01 42 41 30 0x10 80 00 00 00 00 02 02 C1 8B 49 43 50 30 33 32 36 0x20 30 30 31 59 03 00 81 00 00 00 00 04 00 09 02 FF WIC VIC Slot 0 Se...

Страница 68: ...00 RMA number 00 00 00 Connector type WAN Module EEPROM format version 1 EEPROM contents hex 0x20 01 0E 01 01 01 2B 65 38 50 09 BD 02 00 00 00 00 0x30 58 00 00 00 00 05 15 01 FF FF FF FF FF FF FF FF VIC Slot 3 Dual NT or TE BRI Voice Interface Card Hardware revision 1 0 Board revision B0 Serial number 0022850526 Part number 800 07272 01 Test history 0x00 RMA number 00 00 00 Connector type PCI EEPR...

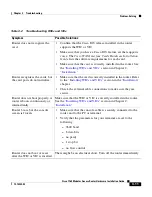
Страница 69: ...card ports do not initialize Make sure that the card is correctly installed in the router Refer to the Installing WICs and VICs section in the Installation chapter Check the external cable connections to make sure they are secure Router does not boot properly or router reboots continuously or intermittently Make sure that the WIC or VIC is correctly installed in the router See the Installing WICs ...

Страница 70: ...t be a problem with the WIC or VIC cables Consult your Cisco reseller for warranty information Table 3 2 Troubleshooting WICs and VICs continued Symptom Possible Solutions Table 3 3 Troubleshooting the Power System Symptom Possible Solutions Router shuts down after being on for a short time The router may be overheating Make sure that nothing is blocking the fan vents on the side of the router Mak...

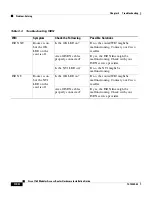
Страница 71: ... interface bri1 0 For routers with an ISDN U WIC use the clear controller command to terminate any active ISDN calls to reset the ISDN BRI interface and to reset the ISDN line between the router and the central office switch Do this for each ISDN port installed in the router Router clear controller bri0 Router clear controller bri1 Table 3 4 lists troubleshooting methods for ISDN specific problems...

Страница 72: ... might be malfunctioning Contact your Cisco reseller Are all ISDN cables properly connected If yes the ISDN line might be malfunctioning Check with your ISDN service provider Is the NT1 LED on If no the NT1 might be malfunctioning ISDN U Router is on but the NT1 LED on the card is off Is the OK LED on If no the router WIC might be malfunctioning Contact your Cisco reseller Are all ISDN cables prop...

Страница 73: ...he show controller bri0 command to check for the message CO RUNNING LOOPBACK TESTS or CO TESTING If you receive either message contact your ISP If Layer 1 status is active does Layer 3 status say 2 Active Layer 3 calls Router might have called itself Check destination phone number configured with the dialer map command or the dialer string command If Layer 1 status is active does Layer 3 status sa...

Страница 74: ...Chapter 3 Troubleshooting Problem Solving 3 16 Cisco 1760 Modular Access Router Hardware Installation Guide 78 13342 03 ...

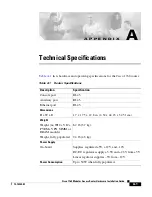
Страница 75: ...tion Specification Console port RJ 45 Auxiliary port RJ 45 Ethernet port RJ 45 Dimensions H x W x D 1 7 x 17 5 x 12 8 in 4 32 x 44 45 x 32 51 cm Weight Weight no WICs VICs PVDMs VPN SIMM or DRAM module Weight fully populated 8 2 lb 3 7 kg 9 4 lb 4 3 kg Power Supply On board Supplies regulated 5V 12V and 12V DC DC regulators supply 3 3V and 2 5V from 5V Linear regulator supplies 5V from 12V Power C...

Страница 76: ...Router Hardware Installation Guide 78 13342 03 Operating Specifications Operating temperature Storage temperature Operating humidity 32 to 104 F 0 to 40 C 40 to 149 F 40 to 65 C 10 to 85 noncondensing Table A 1 Router Specifications continued Description Specification ...

Страница 77: ...nd Pinouts Cables and Pinouts for 2 Port ISDN BRI Card Note For detailed information about cables used with Cisco WICs and VICs refer to the Cisco WAN Interface Cards Hardware Installation Guide that comes with each of the cards Ethernet Cables This section describes the Ethernet cables that you use to connect the router to your local Ethernet network A 10 100BASE TX router such as the Cisco 1760 ...

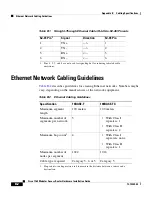
Страница 78: ... 5 7 and 8 are not used for signaling but for reducing radiated cable emissions Signal Direction RJ 45 Pin 1 TX 1 2 TX 2 3 RX 3 6 RX 6 Table B 2 Ethernet Cabling Guidelines Specification 10BASE T 100BASE TX Maximum segment length 100 meters 100 meters Maximum number of segments per network 5 With Class I repeaters 1 With Class II repeaters 2 Maximum hop count1 1 Hop count routing metric used to me...

Страница 79: ...inouts This section describes the VIC cables and pinouts for foreign exchange station FXS foreign exchange office FXO and recEive and transMit or ear and mouth E M connectors Use the following cables to connect the VICs to the network Standard RJ 11 modular telephone cable to connect FXS VIC ports gray to a telephone or fax machine Standard RJ 11 modular telephone cable to connect FXO VIC ports pi...

Страница 80: ...ds Hardware Installation Guide Figure B 1 shows how to connect the VICs to the network Figure B 1 Connecting VICs to the Network Table B 4 lists the pinouts for FXS and FXO VIC connectors Note Pins that are not used should not be connected SEE MANUAL BEFORE INSTALLATION VIC E M IN USE IN USE 1 0 SEE MANUAL BEFORE INSTALLATION VIC FXO IN USE IN USE 1 0 SEE MANUAL BEFORE INSTALLATION VIC FXS IN USE ...

Страница 81: ... 45 cable to connect the 2 port ISDN BRI card to an ISDN network through a telephone wall outlet or other device Note When an interface configured as network termination NT is connecting to a terminal equipment TE device the cable must have the transmit and receive pins swapped crossover cable See Table B 6 Table B 5 E M Pinouts Pin Signal Description 1 SB 48V signaling battery 2 M lead Signaling ...

Страница 82: ... 1760 Modular Access Router Hardware Installation Guide 78 13342 03 Table B 6 Interface Pin Numbers and Functions ISDN BRI NT TE NT Interface straight through cable TE Interface crossover cable Pin 3 T Pin 3 R Pin 3 T Pin 4 R Pin 4 T Pin 4 R Pin 5 R Pin 5 T Pin 5 R Pin 6 T Pin 6 R Pin 6 T ...

Страница 83: ...dules in your router and contains the following sections Safety Information Opening the Chassis Locating Modules Installing a DIMM Installing a SIMM Installing a PVDM Closing the Chassis Safety Information This section contains safety information that you should read before installing or upgrading memory in the router Warning Before working on a system that has an on off switch turn off the power ...

Страница 84: ...tages are present within the power supply when the power cord is connected Warning Before working on equipment that is connected to power lines remove jewelry including rings necklaces and watches Metal objects will heat up when connected to power and ground and can cause serious burns or weld the metal object to the terminals Warning Only trained and qualified personnel should be allowed to insta...

Страница 85: ...river to remove the screws that hold the top and bottom of the chassis together as shown in Figure C 1 Note Some Cisco 1760 routers have five chassis screws in the rear assembly but most models have three screws in the rear assembly Figure C 1 Removing the Cisco 1760 Chassis Screws Step 3 Gently slide the top cover of the router toward you as shown in Figure C 2 Figure C 2 Removing the Top Cover o...

Страница 86: ...le inline Flash memory module SIMM and packet voice data modules PVDMs on the motherboard Figure C 3 Cisco 1760 Motherboard Module Locations Installing a DIMM You can install a DIMM to increase the amount of dynamic RAM DRAM in the router DIMMs are available in the following sizes 16 MB Cisco 1700 Series 10 100 ETHERNET AUX CONSOLE PVDM0 OK OK PWR 1 0 SLOT0 OK PVDM1 OK MOD OK 1 0 SLOT1 OK LINK 100...

Страница 87: ...avoid ESD damage to the router Do not directly touch the backplane with your hand or any metal tool or you could shock yourself Step 1 Locate the DIMM slot on the motherboard See Figure C 3 on page C 4 Step 2 Remove any existing DIMM by pulling the DIMM slot guides shown in Figure C 4 away from the DIMM and down toward the motherboard Figure C 4 Installing a DIMM Step 3 Insert the DIMM into the DI...

Страница 88: ...t directly touch the backplane with your hand or any metal tool or you could shock yourself Step 1 Locate the SIMM slot on the motherboard See Figure C 3 on page C 4 Step 2 Remove any existing SIMM by pulling the locking spring clips on both sides outward and tilting the SIMM free of the clips Step 3 Face the front panel of the router Hold the SIMM with the component side toward you Caution Handle...

Страница 89: ...K 16 Supports up the four DSPs PVDM 256K 20 Supports up to five DSPs Each DSP supports two analog voice ports or one ISDN BRI port Each analog VIC used with the Cisco 1760 router has two voice ports and requires a single DSP The 2 port ISDN Voice BRI requires two DSPs Table C 1 shows the possible combinations of PVDMs and voice ports for the Cisco 1760 router 65287 1 Insert the SIMM into the socke...

Страница 90: ...tall a PVDM on the router motherboard Warning During this procedure wear grounding wrist straps to avoid ESD damage to the router Do not directly touch the backplane with your hand or any metal tool or you could shock yourself Step 1 Locate the PVDM slots on the motherboard See Figure C 3 Step 2 Remove any existing PVDM modules by pulling the PVDM snaps away from the module See Figure C 6 Table C ...

Страница 91: ...he PVDM slot Orient the module so that the indexing slot in the connector bottom edge of the module is lined up with the indexing tab inside the PVDM slot and so that all electrical connections are made Caution Handle PVDMs by the edges only PVDMs are ESD sensitive components and can be damaged by mishandling Step 5 Holding the module firmly in the slot rotate it toward the rear of the router unti...

Страница 92: ...ory or data modules on the motherboard close the chassis by following these steps Step 1 Slide the top cover of the router back on the bottom of the chassis by pushing it in the opposite direction from that shown in Figure C 2 Removing the Top Cover of the Router on page C 3 Step 2 Replace the screws that you removed when you opened the chassis See Figure C 1 Removing the Cisco 1760 Chassis Screws...

Страница 93: ...he Virtual Private Network VPN module in your Cisco 1760 router Before You Begin This section describes important safety information and the tools required to install the VPN module Read this section before installing the VPN module in a Cisco 1760 router VPN Module Parts These parts are needed for installation and are included with the VPN module Two metal standoffs Four screws ...

Страница 94: ...he power cord is connected For systems with a power switch line voltages are present within the power supply even when the power switch is off and the power cord is connected For systems without a power switch line voltages are present within the power supply when the power cord is connected Warning Read the installation instructions before you connect the system to its power source Warning Ultima...

Страница 95: ...icity that can damage equipment and impair electrical circuitry It occurs when electronic components are improperly handled and can result in complete or intermittent failures The following are guidelines for preventing ESD damage Before opening the chassis turn the router power switch to off O Disconnect the power cable to the router Always use an ESD preventive wrist or ankle strap and ensure th...

Страница 96: ...tal tool or you could shock yourself Installing the VPN Module in a Cisco 1760 Router This section describes how to install the VPN module in a Cisco 1760 router It contains these sections Opening the Cisco 1760 Chassis Installing the VPN Module Closing the Cisco 1760 Chassis Opening the Cisco 1760 Chassis Follow these steps to open the chassis Step 1 Make sure that the router is turned off and is...

Страница 97: ... Removing the Cisco 1760 Chassis Screws Step 3 Gently slide the top cover of the router toward you as shown in Figure D 2 Figure D 2 Removing the Top Cover of the Router Step 4 Place the router bottom on an antistatic mat and begin installing the VPN module 100 240V 1 5 MAX 1 5A MAX 50 60 Hz 60956 Chassis screw 100 240V 1 5 MAX 1 5A MAX 50 60 Hz Pull the top cover off in this direction 60957 ...

Страница 98: ... Hardware Installation Guide 78 13342 03 Installing the VPN Module Follow the steps in this section to install the VPN module Step 1 Install the two standoffs on the module as shown in Figure D 3 Figure D 3 Installing the Standoffs on the VPN Module Screw Screw Standoff Standoff is installed into the hole just behind the large connector 46084 ...

Страница 99: ...igure D 4 VPN Module Location Step 3 Pushing down as indicated in Figure D 5 plug the VPN module into the socket Figure D 5 Seating the VPN Module Cisco 1700 Series 10 100 ETHERNET AUX CONSOLE 60955 PVDM0 OK OK PWR 1 0 SLOT0 OK PVDM1 OK MOD OK 1 0 SLOT1 OK LINK 100 FDX ACT COL 1 0 SLOT2 OK 1 0 SLOT3 OK Standoffs Cisco 1700 Series 10 100 ETHERNET AUX CONSOLE 60954 PVDM0 OK OK PWR 1 0 SLOT0 OK PVDM1...

Страница 100: ...0 Router D 8 Cisco 1760 Modular Access Router Hardware Installation Guide 78 13342 03 Step 4 Turn the chassis over and attach the standoffs to it by using the screws provided as shown in Figure D 6 Figure D 6 Securing the Standoff to the Router Motherboard 45919 Standoff screws Bottom of the board ...

Страница 101: ...r installing the VPN module on the motherboard close the chassis by following these steps Step 1 Slide the top cover of the router back on the bottom of the chassis by pushing it in the opposite direction from that shown in Figure D 2 Removing the Top Cover of the Router on page D 5 Step 2 Replace the screws that you removed when you opened the chassis See Figure D 1 Removing the Cisco 1760 Chassi...

Страница 102: ...Appendix D Installing the Virtual Private Network Module Installing the VPN Module in a Cisco 1760 Router D 10 Cisco 1760 Modular Access Router Hardware Installation Guide 78 13342 03 ...

Страница 103: ...s The following multiflex trunk interface cards on the Cisco 1760 support hardware based echo cancellation features through an optional echo canceler expansion module installed on the main board of the interface card 1 Port RJ 48 Multiflex Trunk T1 E1 VWIC2 1MFT T1 E1 with voice only support 2 Port RJ 48 Multiflex Trunk T1 E1 VWIC2 2MFT T1 E1 with voice only support Note For additional information...

Страница 104: ...nerates and transmits a signal that is sent back to the caller to cancel out the echo The amount of time that it takes the echo canceler to locate the echo and to generate its opposite signal is called convergence time typically a few seconds During convergence the caller hears echo which should gradually decrease in amplitude to zero when convergence is complete For additional information about e...

Страница 105: ...unk EC MFT 32 64 channel echo canceler expansion module for multiflex trunk EC MFT 64 Installing and Configuring the Echo Canceler Expansion Modules For information about installing the echo canceler expansion modules on the 1 port RJ 48 T1 E1 multiflex trunk and on the 2 port RJ 48 T1 E1 multiflex trunk interface cards refer to the Installing Echo Canceler Expansion Modules on Cisco Interface Car...

Страница 106: ...Appendix E E 4 Cisco 1760 Modular Access Router Hardware Installation Guide 78 13342 03 ...

Страница 107: ...ter 3 4 C cable guide attaching 2 5 to 2 6 cables 2 port ISDN BRI card B 5 console B 3 Ethernet 2 6 B 1 included with router 1 11 required 1 12 to 1 13 specifications B 1 to B 6 VIC B 3 to B 4 caution definition xiii chassis closing C 10 D 9 dimensions A 1 opening C 3 D 4 to D 5 clear controller command 3 13 clear interface command 3 13 command conventions xxii commands clear controller 3 13 clear...

Страница 108: ...ole port connecting to a terminal or PC 2 13 to 2 14 description 1 2 1 4 figure 1 3 specification A 1 contacts Cisco reseller 3 1 conventions command xxii text xiii copy command 3 5 3 6 D dialer map command 3 15 dialer string command 3 15 digital signal processor C 7 DIMM installing C 4 to C 6 location on router C 4 documentation included with router xii related xii DRAM description 1 9 DSP C 7 E ...

Страница 109: ...cription 1 10 location on router C 4 upgrading C 6 to C 7 front panel connectors 1 3 to 1 4 LEDs 1 3 ports 1 3 FXO VIC port B 3 FXS VIC port B 3 I indicators See LEDs installation additional required equipment 1 12 to 1 13 verifying using LEDs 2 12 to 2 13 installing DIMM C 4 to C 6 PVDM C 7 to C 9 SIMM C 6 to C 7 VPN D 6 to D 8 interface cards description 1 2 IOS See Flash memory ISDN troubleshoo...

Страница 110: ... 2 3 to 2 4 multiflex trunk interface cards E 1 N note definition xiii NVRAM description 1 9 O OK LED description 1 5 diagnostics 3 7 to 3 8 opening chassis C 3 D 4 to D 5 operating specifications A 1 P password recovering 3 2 PC connecting to router 2 13 to 2 14 terminal emulation settings 2 13 pinouts console cable B 3 E M VIC connectors B 5 Ethernet cable B 1 to B 2 FXS and FXO VIC connectors B...

Страница 111: ...onnecting to a PC 2 13 to 2 14 memory 1 9 to 1 11 overview 1 2 to 1 3 resetting 3 4 to 3 5 specifications A 1 to A 2 unpacking 1 11 to 1 11 S safety C 1 to C 2 D 2 to D 3 serial cable description 1 13 show controller command 3 15 show isdn status command 3 15 show startup config command 3 5 show tech support command 3 1 show version command 1 10 3 3 C 5 SIMM installing C 6 to C 7 location on route...

Страница 112: ... 1 6 to 1 9 pinouts B 3 problem solving 3 7 required 1 12 router slots 1 4 supported cards 1 2 troubleshooting 3 8 3 11 to 3 12 VoFR support 1 3 voice interface cards See VICs voice traffic echo E 2 echo cancellation E 2 VoIP support 1 3 VPN module installing D 6 to D 8 location on router D 7 W WAN interface cards See WICs WIC VIC LEDs 1 6 to 1 9 slots 1 4 WICs installing 2 8 LEDs 1 6 to 1 9 probl...

Отзывы: