background image


DOC. N. CIMATICII 

REV. 7 


ED. 08.2021


Chapter 6. USE OF THE MACHINE  


6.1 Start up


These are the procedures to follow in order to put the CiMatic II into operation:  

a.


Turn “ON” main power switch 

(1- Fig.2)

b.


Ensure that the air supply is turned on and connected 

(8- Fig.2)


c.


Check that the seal drum temperature is properly set 

(2- Fig.2)


d.


Allow seal drum to reach operating temperature. 

CiMatic will not run if temperature is not 

equal to pre-set temperature


e.


Thread film into machine 

(Fig.4)

.  Pass the film between the film idler roll and into the cavity 

of the tray holder pallet.  

f.


Jog conveyor forward 

(12-Fig.3)


until the film is “roughly” located under the sealing head. 


g.


Load trays into the pallets 

(5- Fig.2)


h.


Push the start button 

(13- Fig.3)


i.


After a few trays the film will run without wrinkles. 

j.


Continue feeding trays into the pallets 
 

6.2 Shut Down 

 
The following procedure should be followed when turning off the CiMatic II: 

a.


Stop placing trays into tray holders. 

b.


Let machine cycle until the last tray is ejected onto the discharge rails. 

c.


Press stop button 

(13-Fig.3)


d.


Turn main power switch to “OFF” 

(1- Fig.2)


6.3 Tray Discharge 
 

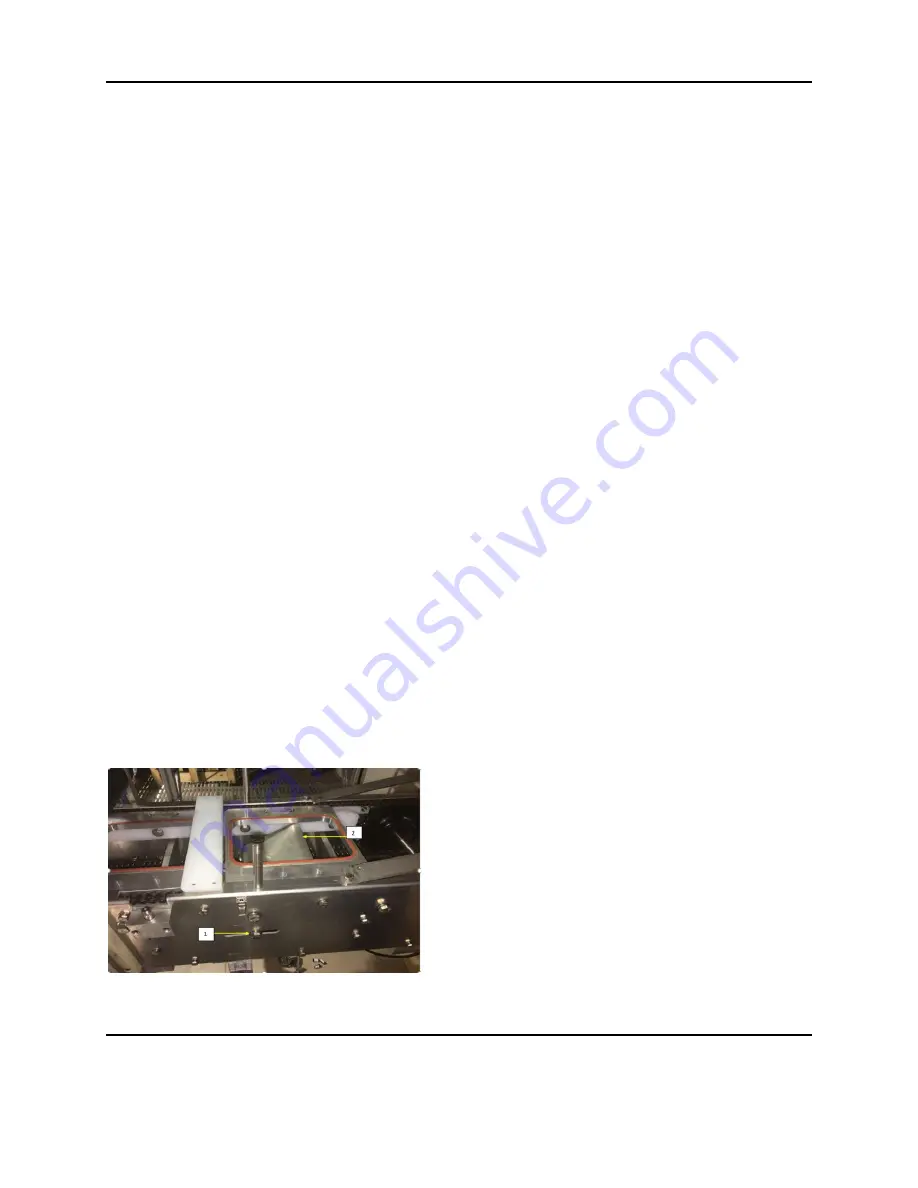
The exit ramp can be adjusted to smoothly lift the trays out of the pallet and transferred to the upper 
ramps.  Changing from one tray style to another may necessitate the exit ramp be modified.  The trays 
will line up on the upper ramps and must be removed by the operator. 


After loosening the bolt 

(1 - Fig.5) 

you then can adjust the exit ramp 

(2 - Fig.5)  

 
Figure 5.


Chapter 6. USE OF THE MACHINE  


6.4 Changing Pallet Styles: 
 

Содержание CiMatic II

Страница 1: ...DOC N CIMATICII REV 7 ED 08 2021 CiMatic II Tray Sealer Operator s Manual Carefully read this booklet before installing and using the machine...

Страница 2: ...DOC N CIMATICII REV 7 ED 08 2021...

Страница 3: ...5 4 Drive System 10 5 5 Speed Controller 10 5 6 Master Roll 11 5 7 Film Loading 11 Chapter 6 USE OF THE MACHINE 6 1 Start Up 13 6 2 Shut Down 13 6 3 Tray Discharge 13 6 4 Changing the Pallet Styles 1...

Страница 4: ...and well established and the validity of the technological concepts as well as the quality of the components and materials used in the production and test process are the best guarantee for proper op...

Страница 5: ...rams General danger It shows a danger involving the risk of a serious accident for the user Mind your hands Moving parts can crush or cut Pinch Points Present Pinch Point keep hands clear during opera...

Страница 6: ...7 ED 08 2021 In any communication with the manufacturer always specify the machine model and serial number which may be found on the label applied at the back left side of the machine when looking fro...

Страница 7: ...nd through the cutting system Always be careful around any production equipment Legend Figure 2 1 Main switch 2 Temperature controller for rotary sealer 3 Speed controller for conveyor 4 Control panel...

Страница 8: ...ntroduce the trays into the rotary sealer through the cutter as well as unload them through the opening at the exit of the machine 2 2 Technical data Voltage and frequency 110 120V 60 Hz Installed pow...

Страница 9: ...any civil and criminal liability The same conditions will apply if any protection which may be fastened by the screws is removed without having stopped the machine in advance 3 2 Specific precautions...

Страница 10: ...maintenance Permitted conditions in the rooms where the machine is placed temperature from 36 F 2 C to 85 F 30 C humidity from 30 to 90 without any condensate 4 2 Final inspection before Start Up Tran...

Страница 11: ...e temperature value At start up seal drum will reach the correct operating temperature in about 20 30 minutes The CiMatic II will not operate if the temperature is below the low preset temperature 5 4...

Страница 12: ...caps and insert them in the new roll Checking to make sure that the film is unwinding in the correct direction The inside of the roll is normally the sealing side 4 Lower the unwind roll back into the...

Страница 13: ...DOC N CIMATICII REV 7 ED 08 2021 You can also adjust the tension by tightening or loosening the two plastic thumbscrews Located on top of each roll holder...

Страница 14: ...ys into the pallets 5 Fig 2 h Push the start button 13 Fig 3 i After a few trays the film will run without wrinkles j Continue feeding trays into the pallets 6 2 Shut Down The following procedure shou...

Страница 15: ...Remove the knife set integrated with the current pallet style Completely loosen the setscrews located on each knife bearing use 3mm size hex key in your toolbox one setscrew per side 6 4 Changing Pall...

Страница 16: ...e at the lowest speed to make sure the knife doesn t hit the plates when it s rotating forward and backward Also make sure the knife bearings have sat well on the blocks with the locating pin Tighten...

Страница 17: ...to easily loosen the 3 bolts 7 16ths 1 Fig 6 holding the knife The bolts do not need to be unscrewed completely c Replace the knife with the new one make sure to put the new knife the same direction a...

Страница 18: ...ear chain a little with your thumb c Angle the pallet up from the rear and then remove from the front chain d Replacement is the opposite of the above remembering that the space between the front and...

Страница 19: ...installed backwards Remove and reverse film roll Pressure is not set high enough Increase pressure at the regulator Speed is too high Turn down the speed Drum does not get hot Temperature controller...

Страница 20: ...s Dirty seal drum surface clean as described in Maintenance section Film is wrinkled on film roll film tension correctly set Poor quality seals Film and tray material not compatible The CiMatic II has...

Страница 21: ...ugh to represent a burning danger 7 2 Chain Tension and Regular Maintenance Check as follows at regular intervals the tension of the conveyor chain off of the white plastic chain guides should be no m...

Страница 22: ...tray and film located between any food and this system On a daily basis Use a cloth and an approved mild cleaner to remove any residual food which may have fallen onto the system Inspect the silicone...

Страница 23: ...while system is running Figure 16 Lubricate the bushings on the infeed end of the CiMatic II Figure 17 Figure 16 Figure 17 CAUTION DO NOT USE OILS OR LUBRICANTS CONTAINING POLYCHLORINATED BIPHENYL Re...

Страница 24: ...ling Head has cooled any dirty should easily be wiped off with a damp non abrasive cloth 7 4 Cleaning of Sealing Pallets It is not normal to have to clean the Sealing Pallets There should always be a...

Страница 25: ...s and Circuit Breakers Identification Description Value Fuse type F1 Emergency stop 1 A CC Fuses F2 24 V Power Supply 1 5 A CC Fuses F3 Motor drive 15 A CC Fuses F4 Temperature controller 1 A CC Fuses...

Страница 26: ...dered to be the performance of the guarantee The guarantee is voided 1 in case of inappropriate installation power supply misuse and mishandling by unauthorized persons 2 in case of changes made to th...

Страница 27: ...the selection and disposal of every single element The first essential concept consists in subdividing all pieces and components made of steel aluminium etc and in transporting them to the collection...

Отзывы: