31
Setup
3.8
Remote-control setup
The TWIN allows the independent set-up for each of 2 channels;
memorize a different code on each button, and a channel to select (A, or B) also if they
are not on the same code.
The set-up operation has to be repeated for each of the 2 buttons of the radio-
control.
In order to start the set-up phase you have to push both the buttons for some
seconds
+
For
insert
the code you have to access with digit the following sequence:
"1" - "1" - "0" - "0”
During the insert of each code the LED will switch off for some seconds.
!
For insert the
!
The LED switch off at the end of the set-up.
*
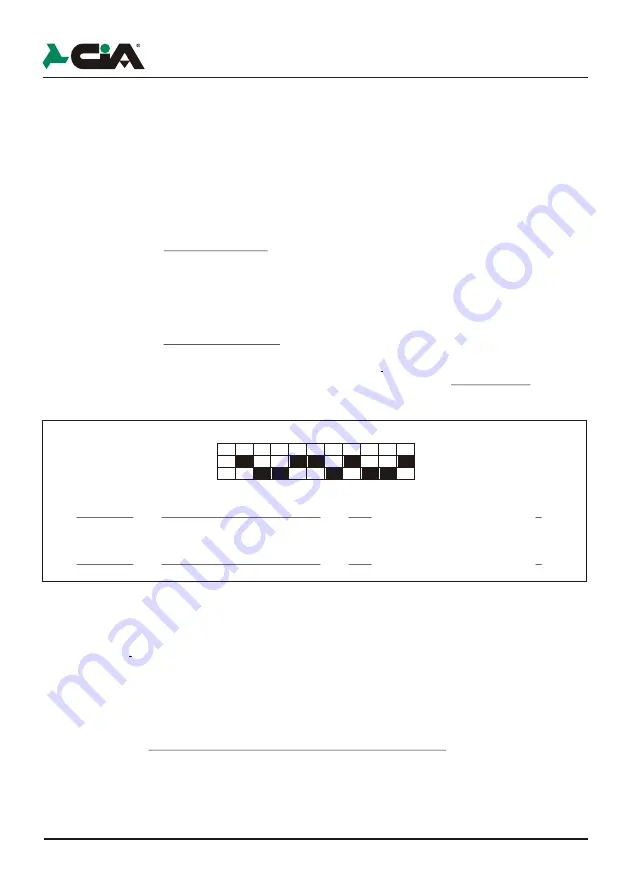
For example, to setup a new code or duplicate a TWIN of previous version that has dip-switch setted as below:
You have to digit the following buttons sequence:
1
1
0
0
1
0
0
1
1
0
1
0
0
1
1
0
(fast flash of the LED)
1
Access
code
channel A
assigned to left button
1
1
0
0
1
0
0
1
1
0
1
0
0
1
1
0
(fast flash of the LED)
0
Access
code
channel B
assigned to left button
+
For read the code you have to digit
!
In order to start the set-up phase you have to push both the buttons for some
seconds
uring the set-up, if you don’t push on any button for at least 5 seconds
the LED switch off and the setting phase finish automatically. the following
sequence:
"1" - "0" - "1" -"0"
!
Push on the button that you want to know the code (A or B)
!
The LED switch off and it start one series of 12 flashes:
?
A brief flash means
?
A long flash means
It’s possible to
, until the LED remains on, then you have to leave them:
!
For
insert the
10 digit of the code
use:
?
“0”
(
right
button ): It means dip-switch
"OFF"
for the previous TWIN
versions*
?
“1”
(
left
button): It means dip-switch
"ON"
for the previous TWIN
versions*
2 digit of the channel
use:
?
Channel
A
"1"
-
"0"
: It means the left button for the previous TWIN versions
?
Channel
B
"1"
-
"1"
: It means the right button for the previous TWIN versions
!
Push the button that you want to assign at the code.
, d
"0"
"1”
Unscrew the screw on the bottom of the radio-control to open the plastic cover, take off the old battery
and insert a new one according with the polarities indicated on the plastic cover.
Check the correct operation of the two buttons after to close the plastic cover.
ON
OFF
1
2
3
4
5
6
7
8
9 10
30
PCM100 / PCM130 - User Manual
3.7
Remote-control receiver setup
Visualization of the programmed code
!
Keep pressed
P1
and
P2
buttons (page 21 and 22) for at least 2 seconds and not more
than 5 seconds, up to the two LEDs (page 21 and 22) light on.
!
Pressing the
P1
button it will be displayed the 12-bit code of "A" channel by a sequence of
blinkings of the LEDs:
!
one blink of
LED button P1
(page 21 and 22)indicates dip switch
ON
!
one blink of
LED button P2
(page 21 and 22) indicates dip switch
OFF
!
At the end of the sequence, it will exit automatically the setup mode.
NOTE:
If no buttons is pressed in 5 seconds, the produre is stopped and no code will be
displayed.
NOTE:
To visualize the code of the
“B”
channel, repeat the same procedure using
the P2
button.
Auto-learning of the remote-control code
!
Keep pressed
P1
and
P2
buttons (page 21 and 22) for at least 5 seconds up to the two
LEDs start to blink (
LED button P1
and
LED button P2
at page 21 and 22).
!
Press
P1
button, only LED
LED button P1
starts to blink.
!
During the blinking, within 5 seconds press the
"A"
button of the remote-control to let
acquire the code.
!
The
LED button P1
starts a sequence of blinkings to indicate that the code has been
acquired and it will exit automatically the setup mode.
NOTE:
If no remote-control is activated in 10 seconds, the setup is stopped and no code will
be programmed.
NOTE:
For the acquisition of the code of the channel
"B”
of the remote-control, repeat the
procedure using
P2
buttons and LED
LED button P2
.
Summary of setup accessing times
0 sec.
2 sec.
5 sec.
LED “1” and “2”
light
LED “1” and “2”
blink
Time of simultaneous pressure of P1 e P2 buttons:
LED “1” and “2”
turn off
Release P1 and P2
buttons to enter in Code
Display Mode.
Release P1 and P2
buttons to enter in
Auto-acquisition Code
Mode
LED Status
Function
No action


