background image

35

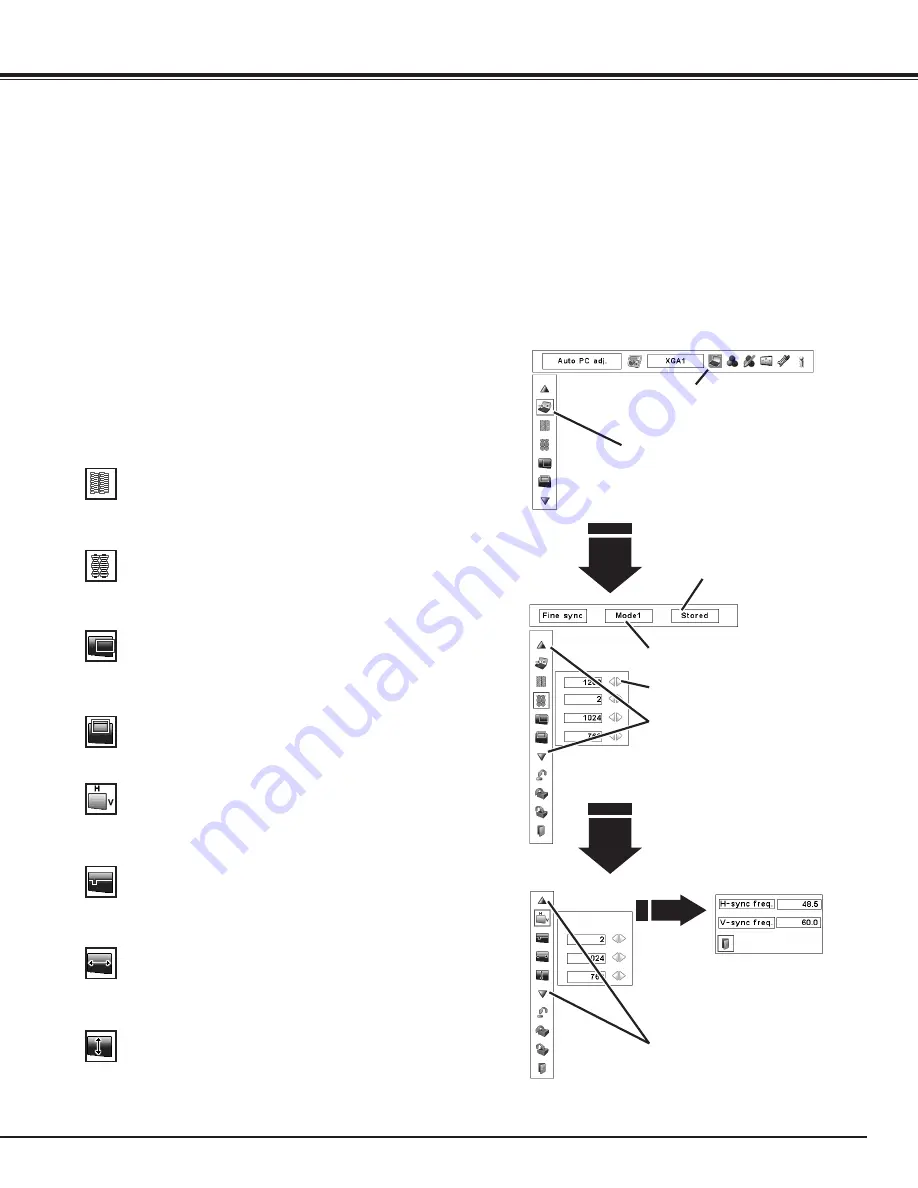
Manual PC Adjustment

Some computers employ special signal formats which may not be tuned by Multi-Scan system of this projector. 

Manual PC Adjustment enables you to precisely adjust several parameters to match those special signal 

formats. The projector has 10 independent memory areas to store those parameters manually adjusted. It 

allows you to recall the setting for a specific computer. 

Note:

   The PC Adjust Menu cannot be operated when the digital signal input on the DVI terminal is selected on 

PC System Menu. 

Press the MENU button to display the On-Screen Menu. 
Use the Point 

7 8

 buttons to move the red frame pointer 

to the PC Adjust Menu icon.

1

2

Use the Point 

ed

 buttons to move the red frame pointer 

to the desired item and then press the SELECT button 
to display the adjustment dialog box. Use the Point 

7 8


buttons to adjust the setting value.

Use  the  Point 

7 8 

buttons  to  adjust  the  value,  eliminating  a 

flicker from the image displayed (from 0 to 31).

Fine sync

Use the Point 

7 8

 buttons to adjust the number of total dots in 

one horizontal period to match your PC image.

Total dots

Use  the  Point 

7  8

  buttons  to  adjust  the  horizontal  picture 

position.

Position H

Use the Point 

7 8

 buttons to adjust the vertical picture position.

Position V

Press the SELECT button to show H-sync freq. and V-sync freq. 

of  the connected computer.

Current mode

Use the Point 

7 8

 buttons to adjust the clamp level. When the 

image has dark bars, try this adjustment.

Clamp

Press the SELECT 

button at Current 

mode icon to show 

the information of the 

connected computer.

Current mode

Use the Point 

7 8

 buttons to adjust the horizontal area displayed 

by this projector.

Display area H

Use the Point 

7 8

 buttons to adjusts the vertical area displayed 

by this projector.

Display area V

Move the red frame pointer to the 
desired item and press the SELECT 
button.

Press the Point 

7 8

 buttons to adjust 

the value.

Press the SELECT button at this icon 

to adjust “Clamp,” “Display area H,” or 

“Display area V.”

Selected Mode

Status (Stored/Free) of the 

Selected Mode.

Press the SELECT button at this icon 

to display the previous items.

PC ADjUST MENU

PC Adjust Menu icon

Computer Input

Содержание 103-013100-01

Страница 1: ...Projection lens is optional User s Manual 103 013100 01...

Страница 2: ...Key lock function you can lock the operation on the side control or remote control p 53 PIN code lock functions prevents unauthorized use of the projector pp 52 53 This projector has many useful func...

Страница 3: ...er Cord 22 Basic Operation 23 Turning On the Projector 23 Turning Off the Projector 24 How to Operate the On Screen Menu 25 Menu Bar 26 Operating with Projector Control 27 Operating with Remote Contro...

Страница 4: ...nimum space required If the projector is to be built into a compartment or similarly enclosed these minimum distances must be maintained Do not cover the ventilation slots on the projector Heat build...

Страница 5: ...hrough cabinet slots as they may touch dangerous voltage points or short out parts that could result in a fire or electric shock Never spill liquid of any kind on the projector Do not install the proj...

Страница 6: ...exhaust vent especially screws and metallic parts These areas will become hot while the projector is being used Do not put anything on the cabinet Objects put on the cabinet will not only get damaged...

Страница 7: ...ut the projector on either side to project an image IMPORTANT Filter Maintenance The projector uses a lamp which generates significant heat The cooling fans and air vents are provided to dissipate the...

Страница 8: ...a case before it is cooled enough Safety Instructions For safety be sure to hold Carrying Handles on both sides by 2 or more people when moving a projector Moving it improperly may result in damage of...

Страница 9: ...ch case the user will be required to correct the interference at his own expense Do not make any changes or modifications to the equipment unless otherwise specified in the instructions If such change...

Страница 10: ...Hot air is exhausted from the exhaust vent Do not put heat sensitive objects near this side 0 Exhaust Vent 1 Infrared Remote Receiver Rear 2 Lamp Cover 3 Indicator Front 4 Air Intake Vent 5 Adjustabl...

Страница 11: ...ojector to this terminal u 5 BNC INPUT JACKS Connect the component or composite video output signal from video equipment to VIDEO Y Pb Cb and Pr Cr jacks or connect the computer output signal 5 BNC Ty...

Страница 12: ...ton Select an item or adjust the value in the On Screen MENU Pan the image in DIGITAL ZOOM mode p 39 Side Control and Indicators u LENS SHIFT button Select the LENS SHIFT function p 27 1 IMAGE SEL but...

Страница 13: ...ator This LAMP REPLACE indicator lights orange when any of projection lamps is nearing its end and flashes when any of them becomes out Check which lamp needs to be replaced on Lamp Status Display pp...

Страница 14: ...ust the computer image to its optimum setting pp 28 34 1 NO SHOW button Temporarily turn off the image on the screen p 29 2 SELECT button Execute the selected item Expand or compress the image in the...

Страница 15: ...replaced by an incorrect type Dispose of used batteries according to the instructions Point the remote control toward the projector to Infrared Remote Receivers when pressing the buttons Maximum opera...

Страница 16: ...ote control See Remote control in the Setting Menu on page 50 1 2 Remote Control Code Part Names and Functions Check the Reset Switch to Use position in the compartment lid on the back of the remote c...

Страница 17: ...ion refer to the installation manual accompanying a Projector When setting a projector after lens installation be sure to replace a Lens Cap to protect a surface And when carrying or holding up the pr...

Страница 18: ...tract the handle REAR ADJUSTABLE FEET Refer to p 10 Projection lens can be moved from side to side and up and down with the motor driven lens shift function This function makes the positioning of imag...

Страница 19: ...o fit Plug into Socket 3 4 ANALOG G B R H HV V DIGITAL DVI D INPUT 1 R C JACK USB RESET INPUT 2 INPUT 3 INPUT 4 SERIAL PORT IN SERIAL PORT OUT L VIDEO Y Pb Cb Pr Cr S VIDEO INPUT OUTPUT TERMINALS Scre...

Страница 20: ...or Output Desktop type Laptop type Terminals of a Projector Monitor Output DVI Cable BNC Cable Monitor Output Unplug the power cords of both the projector and external equipment from the AC outlet bef...

Страница 21: ...video output equipment such as DVD player or high definition TV source Component Video Output BNC Cable Terminals of a Projector Digital Output HDCP compatible DVI Cable SCART VGA Cable DIGITAL Unplug...

Страница 22: ...is designed to work with single phase power systems having a grounded neutral conductor To reduce the risk of electrical shock do not plug into any other type of power system If you are not sure of th...

Страница 23: ...a new PIN code write down the number in a column on page 75 of this manual and keep it at hand Should the PIN code be missing or forgotten consult your dealer or service center After the OK icon disap...

Страница 24: ...EADY indicator lights green and then you can turn on the projector To unplug the AC power cord wait until the projector is completely cooled down Power off disappears after 4 seconds Note When the On...

Страница 25: ...Point ed buttons to select an item in the selected menu Press the SELECT button to show the item data Use the Point 7 8 buttons to adjust the values To close the On Screen Menu press the MENU button a...

Страница 26: ...Brightness Color Tint Color management Auto picture control Color temp White balance R G B Offset R G B Sharpness Gamma Noise reduction Progressive Reset Store Quit pp 44 46 Used to select the system...

Страница 27: ...m on the screen Use the ZOOM ed buttons to zoom in and out the image Zoom Adjustment Display Focus on the screen Use the FOCUS ed buttons to adjust focus of the image Focus Adjustment Side Control Zoo...

Страница 28: ...ils Press and hold the SCREEN button for more than 5 seconds to return all the screen size adjustment setting to the factory default setting SCREEN button Press the ZOOM buttons on the remote control...

Страница 29: ...ton on the remote control The Timer display 00 00 appears on the screen and starts to count time 00 00 59 59 To stop the P TIMER press the P TIMER button To cancel the P TIMER press the P TIMER button...

Страница 30: ...AND BY INPUT 1 2 INPUT 3 4 Side Control INPUT 1 2 button Press the INPUT 1 2 or INPUT 3 4 button on the side control It switches to INPUT 1 and INPUT 2 or INPUT 3 and INPUT 4 as you press the INPUT bu...

Страница 31: ...CP Menu Operation Input Selection Input 1 INPUT MENU Move the pointer red arrow to the desired source and press the SELECT button Source Select Menu Input Menu icon Move the pointer red arrow to Input...

Страница 32: ...S video and press the SELECT button Source Select Menu Video Input Source Selection Input Selection When connecting to video equipment select the type of Video source in the Source Select Menu Input 1...

Страница 33: ...uter Check the connection between your computer and the projector See Troubleshooting on page 64 Auto PC System Menu icon Selected system is displayed PC SYSTEM MENU Selecting Computer System Manually...

Страница 34: ...f certain computers cannot be fully adjusted with the Auto PC Adjustment function When the image is not provided properly with this operation manual adjustments are required pp 35 36 Auto PC Adjustmen...

Страница 35: ...Use the Point 7 8 buttons to adjust the number of total dots in one horizontal period to match your PC image Total dots Use the Point 7 8 buttons to adjust the horizontal picture position Position H...

Страница 36: ...return to their previous figures To store the adjusted data To clear the adjusted data To clear the adjusted data select Mode free and then press the SELECT button Move the red arrow pointer to the Mo...

Страница 37: ...ved halftone for graphics Real User preset picture adjustment in the Image Adjust Menu p 46 IMAGE 1 10 Image Level Selection Menu Operation Image Select Menu icon Move the red frame pointer to the des...

Страница 38: ...deo aspect ratio 16 9 by expanding the image width uniformly This function can be used to provide the squeezed video signal at 16 9 Full screen Provides the full screen image Screen Menu icon Move the...

Страница 39: ...se the keystone correction when the AC power cord is unplugged To correct keystone distortion press the Select button The Keystone dialog box appears Use the Point ed7 8 buttons to correct keystone di...

Страница 40: ...and adjusts itself to optimize its performance When the Video System is 1035i or 1080i select the system manually If the projector cannot reproduce proper video image select a specific component video...

Страница 41: ...press the SELECT button Image Select Menu icon Normal picture level preset on the projector Standard Picture level adjusted with fine tone Cinema User preset picture adjustment in the Image Adjust Me...

Страница 42: ...modified based on the aspect ratio Position H V Adjust the Horizontal Vertical screen position Common Save the adjusted scale to all the inputs Press the SELECT button at Common to display a confirmat...

Страница 43: ...istortion p 29 Ceiling Rear Ceiling When this function is set to On the picture is top bottom and left right reversed This function is used to project the image from a ceiling mounted projector Rear W...

Страница 44: ...ace these colors with other colors if required You can store up to eight 8 color management data 1 Use the Point ed buttons to move the red frame pointer to Color Management and then press the SELECT...

Страница 45: ...urn to the COLOR SELECTION mode so that you can readjust the setting for the color in that line This option is not available if the check mark is cleared Select the DEL box if you want to delete the a...

Страница 46: ...ss the Point 8 button to deepen red green blue tone of the black level of an image from 0 to 63 Offset Red Green Blue Exit the Image Adjust Menu To store the adjusted data move the red frame pointer t...

Страница 47: ...is function is used to adjust the On Screen Menu display position Press the SELECT button and the adjustment screen appears arrows appear Use the Point ed7 8 buttons to adjust the position After makin...

Страница 48: ...not captured Select Yes to capture the projected image This function decides on the starting up display from among the following options User Show the image you captured Default Show the factory set...

Страница 49: ...etting refer to PIN code lock on pages 52 53 Logo PIN Code Lock Enter a Logo PIN code Use the Point 7 8 buttons to switch On Off and then press the Point d button to move the pointer to Quit Press the...

Страница 50: ...utton corresponding times to the number of the remote control code for the projector See page 16 To reset the code for the remote control Slide the Reset Switch to Reset position in the compartment li...

Страница 51: ...ctor is not used for a certain period If the input signal is interrupted and no button is pressed for more than 30 seconds the timer display with No signal appears It starts the countdown until the la...

Страница 52: ...uthorized persons and provides the following setting options for security Off Unlocked On1 Enter the PIN code every time turning on the projector On2 Enter the PIN code to operate the projector once t...

Страница 53: ...box appears Enter a PIN code Setting Use the Point 7 8 buttons to adjust the Projector ID Projector ID 1 999 Factory default setting Projector ID 1 This feature allows users to set serial communicati...

Страница 54: ...t Setting Select Yes to activate it This function is used to set a frequency for the filter cleaning When the projector reached a specified time between cleanings a Filter warning icon appears on the...

Страница 55: ...g on the optical elements inside the projector Should the filter become clogged with dust particles it will reduce cooling fans effectiveness and may result in internal heat buildup and adversely affe...

Страница 56: ...becomes unnatural replace lamp LAMP REPLACE indicator lights orange LAMP REPLACE indicator flashes orange Projection lamp is defective or fails to be turned on Restart a projector on and make sure la...

Страница 57: ...MP 2 LAMP 3 LAMP 4 CAUTION DO NOT OPERATE A PROJECTOR WHILE ANY OF LAMPS IS REMOVED IT MAY RESULT IN MALFUNCTIONS FIRE HAZARD OR OTHER ACCIDENTS NOTES ON LAMP REPLACEMENT To maintain quality of pictur...

Страница 58: ...the Lamp counter without replacing the lamp Be sure to reset the Lamp counter only after replacing the lamp Press the MENU button to display the On Screen Menu Use the Point 7 8 buttons to move the r...

Страница 59: ...degradation as a result of hours of use as its lifetime draws to an end Risk of explosion may differ according to the environment or conditions in which the projector and lamp are being used IF A LAMP...

Страница 60: ...of the lens Cleaning the Projector Cabinet Unplug the AC power cord before cleaning Gently wipe the projector body with a soft dry cleaning cloth When the cabinet is heavily soiled use a small amount...

Страница 61: ...te space for the projector to be ventilated Check the installing condition to see if the air vents of the projector are not blocked Has the projector been installed near an Air Conditioning Heating Du...

Страница 62: ...cannot be turned on See TURNING ON OFF THE PROJECTOR section on pages 23 24 Check the projection lamp Refer to page 57 Image is out of focus Adjust focus of the projector Check Projection Lens to see...

Страница 63: ...nd Computer Input has a limit on selectable menus The power is turned off automatically Power management function runs by initial setting Check SETTING section on page 51 You can not operate with the...

Страница 64: ...tor or the service center Specify the model number and explain about the problem We will advise you how to obtain service This symbol on the nameplate means the product is Listed by Underwriters Labor...

Страница 65: ...ol code Quit 0 63 0 63 Off On Film Image Adjust Contrast Brightness Color Tint Red Green Blue Sharpness Reset Store Gamma Progressive 0 63 0 63 0 63 0 31 0 15 Image 1 Yes No Quit Off On Noise reductio...

Страница 66: ...System Menu varies depending on the input signal Note The Menu display varies depending on the input signal SVGA 1 SVGA 2 SVGA 3 Rear Keystone Ceiling Reset Store On Off On Off Custom H V Scale Posit...

Страница 67: ...hange Quit RC sensor Ready Off Shut down 1 30 Min Quit On Off On start Key lock Security Off Projector Remote Control PIN code lock Off On1 On2 PIN code change Used time Filter counter Yes No Factory...

Страница 68: ...d by or the projection lamp is being cooled down The projector cannot be turned on until cooling is completed and the READY indicator lights green The projector is in the Power management mode The pro...

Страница 69: ...turning on the projector the WARNING TEMP indicator stops blinking Check and clean the filter Any of 4 lamps becomes out Lamp Mode is changed over from 4 lamps to 2 lamps And when any of 2 lamps are...

Страница 70: ...960 XGA 13 1024x768 46 900 58 200 XGA 14 1024x768 47 000 58 300 XGA 15 1024x768 58 030 72 000 MAC 19 1024x768 60 240 75 080 SXGA 1 1152x864 64 200 70 400 SXGA 2 1280x1024 62 500 58 600 SXGA 3 1280x10...

Страница 71: ...360 60 000 D WXGA 4 1360x768 56 160 72 000 D WXGA 5 1366x768 46 500 50 000 D WXGA 6 1280x768 47 776 59 870 D WXGA 7 1280x768 60 289 74 893 D WXGA 8 1280x768 68 633 84 837 D WXGA 9 1280x800 49 600 60 0...

Страница 72: ...rminal Digital D Sub 15 pin Terminal Analog Input 2 BNC Type x 5 R Pr G Y B Pb H HV and V S Video Other Jacks Serial port in D sub 9 Serial port out D sub 9 USB port and Wired Remote Jack Power Voltag...

Страница 73: ...he sales dealer Appendix The specifications are subject to change without notice LCD panels are manufactured to the highest possible standards Even though 99 99 of the pixels are effective a tiny frac...

Страница 74: ...3 4 5 6 7 8 DIGITAL DVI D DVI 24 PIN 1 9 17 2 10 18 3 11 19 4 12 20 5 13 21 6 14 22 7 15 23 8 16 24 T M D S Data2 No Connect T M D S Data2 No Connect T M D S Data2 Shield DDC Clock DDC Data No Connec...

Страница 75: ...e station Factory default set No 1 2 3 4 Factory default set No 4 3 2 1 Should the four digit number be changed the factory set number will be invalid Put the label below supplied on in a prominent pl...

Страница 76: ...5 1 38 35 10 61 269 5 7 01 178 7 01 178 8 27 210 1 57 40 8 27 210 3 66 93 22 93 582 5 17 56 446 3 26 82 8 9 72 247 9 9 251 5 2 36 60 5 7 9 90 251 5 20 58 522 7 1 28 32 5 9 90 251 5 5 18 131 5 22 87 5...

Страница 77: ...l Free 1 800 407 7727 Toll Free 1 800 333 3816 CHRISTIE DIGITAL SYSTEMS Inc ViewPoint 200 Ashville Way Wokingham Berkshire U K RG41 2PL Telephone 44 118 977 8000 Fax 44 118 977 8100 sales europe chris...

Отзывы: