18
19
ken, torn or missing.
• Do not use accessories or replacement parts other
than those approved by the manufacturer.
• Never use the chair booster seat on broken or unstable
chairs, folding chairs, rocking chairs or chairs with
armrests.
• Do not use the chair booster seat with more than one
child at a time.
• Never use the chair booster seat without its cover.
• Before fastening the chair booster seat to the chair, al-
ways check that the floor and chair seat are perfectly
horizontal; never install the product on chairs which
are positioned on a sloping surface.
• Do not let other children play unattended near the
chair booster seat.
• Do not use the product to transport the child in the car.
• It is dangerous to use this product on an elevated surface.
• Do not leave on chair booster seat small objects that
can be swallowed by children.
• Do not use the chair booster seat in proximity of cur-
tain cords, windows or heat sources.
• Never use the product as a swimming aid or floating
chair in a swimming pool.
• Do not use the chair booster seat positioned directly
on the floor.
• Do not use the chair booster seat without the seat
and/or backrest padding.
• Prolonged exposure to direct sunlight can cause the
colours of the fabric to fade. After a prolonged expo-
sure of the product to high temperatures, wait a few
minutes prior to putting your child in it.
• Opening, adjusting and closing operations of the chair
booster seat must be carried out exclusively by an adult.
• During the opening or closing operations, make sure
that your child is at a safe distance. During adjusting op-
erations, make sure the moving parts of the chair boost-
er seat do not come into contact with the child’s body.
• The tray alone does not guarantee the safety of your
child. Always use the safety harness.
• When not in use, keep the tray out of the reach of
children.
• Do not open and close the chair booster seat when the
child is sitting on it.
• When not in use, the chair booster seat must be kept
out of the reach of children.
HOW TO USE THE CHAIR BOOSTER SEAT
The product may be used as chair booster seat from
an age at which the child can sit up unaided, until 36
months (FIG.33).
To use the product as chair booster seat:
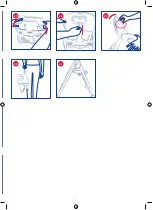
- release the seat C from the seat base B pressing the
release buttons C1 on the sides of the seat;
- keeping the C1 buttons pressed, partially turn upwards
the front part of the seat and lift it until it is completely
released from the base (FIG.25);
- turn the seat upside down to facilitate the subsequent
operations (FIG.26);
- open the feet C10 by using the release devices C11
(FIG.27). Remove the buckles and the harness C14a-b
from their slot compartments C12 as shown in FIG.28
to be able to mount the seat on the adult chair;
- place the backrest, locking it in vertical position;
- to raise the seat, turn the feet C10 outwards until
locked in their position, releasing them by using the
devices C11 (FIG.27A). If the seat does not need to
be raised, after having removed the harness and the
buckles, close the feet, using the release devices C11
and make sure that they are correctly fastened in their
closing position (FIG.26).
WARNING:
while opening and closing the feet, make
sure to always use the release devices C11 to avoid
damage to the product.
WARNING:
when used as chair booster seat, always use
the backrest in vertical position only, to guarantee the
safety of your child.
WARNING:
when used as chair booster seat, make sure
that both feet are correctly fastened in the open position.
Place the chair booster seat on the chair.
WARNING:
when used as chair booster seat, make sure
that both feet are correctly fastened in the open posi-
tion and that the seat fixing harness is inserted inside
the holes on the feet.
To use this product, check if the chair has the minimum
sizes indicated in FIG.29. Attach the rear fastening straps
C14a, by passing them behind the chair’s backrest, as
shown in FIG.30 and the lower fastening straps C14b
around the seat as shown in FIG.31; attach the straps
through the appropriate buckles, making sure that the
click signalling the correct attachment is heard.
Pull the free end of the straps to adjust the length until
they are well pulled and the chair booster seat is secure-
ly fastened in place (FIG. 32).
Once the chair booster seat is fastened securely to the
chair’s seat and backrest, you can place your child in it
as follows:
- Release the buckles of the five-point safety harness
C13.
- Position the child on the chair booster seat, fastening
them in with the safety harness C13. Check that the
buckles of the harness are fastened properly.
- Adjust the length of the harness so it suits the child.
The tray may be used, fastening it to the armrests ob-
serving the indications of the corresponding chapter
reported previously.
COMPACT CHAIR BOOSTER SEAT (6m+)
HOW TO USE THE COMPACT CHAIR BOOSTER SEAT
In this mode, all indications reported in paragraph “Using
the chair booster seat” shall apply.
Additionally, the upper backrest C5 may be removed,
following the indications below:
- Open the zipper D3 on the front part of the fabric cov-
er D, in order to separate the upper backrest C5 from
the fixed backrest C4, until it is completely released
(FIG.34);
- The upper backrest C5 may be removed, by pushing
the C8 tab located on the rear side of the backrest C5
(FIG.35) and turning the backrest C5 forward to release
the inserts C7 from their slots C6 located on the side of
the backrest C4 (FIG.36);
WARNING:
when used as chair booster seat, make sure
that both feet are correctly fastened in the open posi-
tion and that the seat fixing harness is inserted inside
the holes on the feet.
- If the rear zipper D4 is closed, open it to fit the main
cover D1 on the fixed backrest C4 (FIG.37);
- Then close the zipper D4 (FIG.38).
WARNING:
When used as compact chair booster seat,
always use the backrest in vertical position only, to guar-
antee the safety of your child.
For transportation purposes, the fixed backrest C4 may
be tilted, using the specific tilting button C9, turning it
completely forward (FIG.39) to be carried in vertical po-
sition (FIG.40).
STOOL (36 m+)
STOOL WARNING
•
WARNING:
Never leave the child unattended.
•
WARNING:
Do not use the stool unless all components
are correctly fitted and adjusted.
•
WARNING:
Before use, always check the safety and
stability of the stool
• This product is suited for children older than 3 years or
weighing up to 30 kg.
•
WARNING:
Do not allow children to play unsuper-
vised near the stool, or to climb onto it.
•
WARNING:
Do not use the stool for purposes other
than the intended ones
•
WARNING:
to avoid the risk of open fires, do not place
the stool near fans, electric bar fires, gas fires and other
sources of heat.
•
WARNING:
Do not place the stool near windows or
walls, where strings, curtains or other objects may be
used by the child to climb out of the stool or that can
pose the risk of suffocation or choking.
•
WARNING:
Do not place the stool by the windows;
it may be used by the child to climb and fall over the
window
• Before assembly, check that the product and all of its
components have not been damaged during trans-
portation. Should any part be damaged, do not use it
and keep it out of reach of children.
• The stool must only be opened, adjusted and closed by
an adult.
• Do not use components, replacement parts, or acces-
sories not supplied or approved by the manufacturer.
• When not in use, the stool must be kept out of the
reach of children.
• Never move the stool while the child is seated on it.
• Always use under adult supervision.
• Do not allow more than one child at a time to sit on the
stool so as not to compromise its stability.
•
WARNING:
Check that the space in which stool will be
used is free of objects or furniture that may obstruct or
compromise the correct use.
•
WARNING:
Do not use in the vicinity of staircases,
raised, slanting, uneven surfaces or swimming pools.
•
WARNING:
Do not use on raised surfaces (tables,
Содержание Polly Progres5 79336
Страница 2: ......
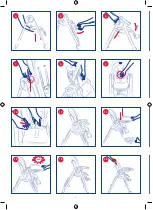
Страница 4: ...4 4 7 PULL 10 CLACK 13 5 8 11 14 1 2 6 9 12 15 ...
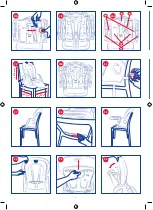
Страница 5: ...5 16 19 22 1 2 25 17 20 23 26 PUSH 18 1 2 3 4 21 24 27 ...
Страница 6: ...6 27A 210 mm 380 mm 430 mm 29 29A 32 35 28 30 33 36 C15 C12 C16 C10 C11 28A 31 34 ...
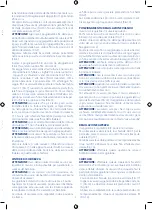
Страница 7: ...7 38 41 39 40 37 ...
Страница 115: ...мя ...

