14
15
WARNING: BEFORE USE, REMOVE AND DISPOSE
ALL PLASTIC BAGS AND PACKAGING MATERIALS
AND KEEP THEM OUT OF REACH OF CHILDREN.
This high chair is designed to be used in different ways:
• Reclined baby bouncing chair: from 0 months
• How to use the high chair: from 6 months
• How to use the chair booster seat: from 6 months
• How to use the first seat: from 6 months
• How to use the compact chair booster seat: from 6
months
• How to use the stool: from 36 months
COMPONENTS
A.
Frame
A1. Front legs
A2. Rear legs
A3. Scratch-resistant front wheels (2x)
A4. Tray locking slots
A5. Open/close buttons
A6. Rear wheels (x2)
B.
Seat base
B1. Height adjustment buttons
B2. Legrest
B3. Footrest
B4. Legrest adjusting/tilting buttons
B5. Seat fastening slots
C.
Seat
C1. Buttons to release seat from the base
C2. Armrests
C3. Armrest tilting buttons
C4. Fixed backrest
C5. Removable upper backrest
C6. Upper backrest fastening slots
C7. Upper backrest fastening inserts
C8. Upper backrest fastening tab
C9. Backrest tilting button
C10. Chair booster seat height adjustment feet
C11. Feet release devices for height adjustment (open-
ing/closing)
C12. Chair booster seat fastening belt slot compartments
C13. Child safety harness with 5-point buckle
C14a. Backrest fastening straps for chair booster seat use
C14b. Seat fastening straps for chair booster seat use
C15. Rear pin for fastening the seat to the base
C16. Front pins for fastening the seat to the base
D.
Cover
D1. Main cover
D2. Upper cover
D3. Zipper for upper cover removal
D4. Zipper for compact chair mounted seat use
E.
Tray
E1. Tray covers
E2. Fastening/adjustment central button
E3. Fastening hooks
TIPS FOR CLEANING AND MAINTENANCE
The cleaning and maintenance operations shall only be
carried out by an adult.
Cleaning
Clean the fabric cover with a soft cloth soaked in water
or a neutral detergent. To remove the fabric cover from
the high chair repeat, in reverse order, the operations
described to fix the fabric cover to the structure. Clean
the plastic parts with a soft cloth soaked in water. Nev-
er use abrasive detergents or solvents. If the high chair
comes into contact with water, dry the metal parts to
prevent the formation of rust.
Maintenance
Keep the high chair in a dry place.
To avoid friction that may compromise the correct func-
tion of the high chair, ensure that all the moving plastic
parts located along the metal frame are free from dust,
dirt or sand.
If necessary, lubricate the moving parts with dry silicone
lubricant.
WARNING:
Check that the fabric and stitching are in
good condition each time you wash it.
Outer cover: PVC
Padding: Polyester
FIRST USE/OPENING
WARNING:
The product is inserted in the packaging
wrapped in protective film. When removing, make sure
you avoid damaging the product and its additional
components with sharp instruments. Once the product
is open, remove the packaging components immedi-
ately and keep out of the reach of children. Insert the
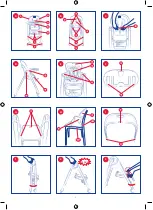
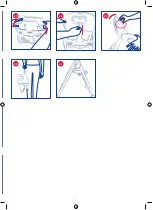
rear wheels (A6) in the specific slots (Fig.1), pushing
them in as far as they will go.
EN
INSTRUCTIONS FOR USE
IMPORTANT WARNING:
PLEASE READ THESE INSTRUCTIONS CARE-
FULLY AND KEEP FOR FUTURE REFERENCE.
To open the frame, press simultaneously the A5 open-
ing/closing buttons, distancing the front legs A1 from
the rear legs A2 (FIG.1A) until the click indicates the
complete opening (FIG.2).
WARNING:
Pressing the two B4 buttons at the same
time, will release the legrest B2 from the rest position.
After having released the legrest from the rest position,
turn the legrest B2 towards the front part of the seat
base until reaching the desired position for use (FIG.3).
Adjust the height of the seat base bringing it to the high-
est position, supporting the base from below (FIG.4).
Insert the footrest B3 in one of the three slots (FIG.5)
turning it until it locks.
To reattach the chair booster seat to the structure:
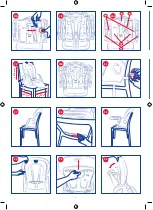
- Reposition the buckles and the harness C14a-b from
their slot compartments C12 and close the compart-
ments as shown in FIG.26.
Fasten the seat C to the base (FIG.6) firstly inserting the
rear pin C15 in the fastening slot B5. Then, press the
buttons C1 (FIG.7) at the same time, turning the seat to-
wards the front part until the front pins C16 are locked
into position. To put the cover on the seat C, the cover D
must be fitted from the top to the bottom until it fits in
the upper removable backrest part C5.
WARNING:
Ensure that the elastic on the back of the
flaps and the cover always remains inside, in the space
between the fixed backrest C4 and the back of the cover.
Now insert the safety harness C13 fixed to the backrest
by passing it through the corresponding holes on the
cover surface D.
WARNING:
For the correct movement of the safety har-
ness C13, do not close the zipper D4.
WARNING:
For a complete fixing of the seat, the buck-
les and the harness must be placed in the special com-
partments.
WARNING:
Make sure that the seat is correctly fastened
to the base before placing the child on it.
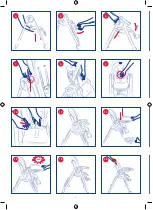
Put the fabric cover D on the seat C, inserting the safety
harness C13 in the appropriate slots (FIG.8). Make sure
that the positions of the holes on the fabric cover corre-
spond to those on the backrest.
SAFETY HARNESS
WARNING:
The use of the safety harness with fabric
crotch strap is essential to guarantee your child’s
safety.
WARNING:
The tray alone does no guarantee the safety
of your child. Always use the safety harness!
The high chair has a 5-point safety harness.
Release the safety harness, put the child on the high
chair and secure the child with the harness, adjusting its
length in order to suit to the child.
The safety harness can be adjusted to two height po-
sitions.
The buckle may be released by pressing the forks (FIG.9).
The width of the waist belts can be adjusted using the
relevant sliding rings (FIG.10).
TRAY POSITIONING/ADJUSTMENT
The tray can be adjusted to 4 different positions.
Содержание Polly Progres5 79336
Страница 2: ......
Страница 4: ...4 4 7 PULL 10 CLACK 13 5 8 11 14 1 2 6 9 12 15 ...
Страница 5: ...5 16 19 22 1 2 25 17 20 23 26 PUSH 18 1 2 3 4 21 24 27 ...
Страница 6: ...6 27A 210 mm 380 mm 430 mm 29 29A 32 35 28 30 33 36 C15 C12 C16 C10 C11 28A 31 34 ...
Страница 7: ...7 38 41 39 40 37 ...
Страница 115: ...мя ...


