SKU 90672
PAGE 7
13.
Note: Check vehicle owner’s manual for tightening sequence. Insert
the Socket (23, 24, 25, 26) onto the first wheel lug nut and, while
maintaining a firm grip on the Impact Wrench with both hands,
squeeze the Trigger (1) until the wheel lug nut is firmly tightened onto
the wheel lug bolt. Release pressure on the Trigger to turn the
Impact Wrench off. Then, repeat this Step to tighten the remaining
wheel lug nuts onto the lug bolts.
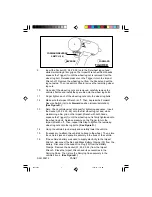
(See Figure D.)
14.
Using the vehicle’s jack, slowly and carefully lower the vehicle.
15.
If necessary, re-attach the vehicle’s hubcap to the wheel. Then, store
the vehicle’s jack and spare tire securely in the trunk of the vehicle.
16.
If the vehicle’s battery was used to supply electricity to the Impact
Wrench, disconnect the Red and Black Battery Clamps (30) from the
battery. Disconnect the Lead Wire Plug (19) from the Battery
Clamps. Remove the Socket (23, 24, 25, 26) from the Impact
Wrench. Place the Impact Wrench and its accessories in the
Carrying Case. Then, store the Carrying Case securely in the
vehicle’s trunk.
(See Figure B.)
R
F
REVERSE
FORWARD
FORWARD/REVERSE
SWITCH (16)
FIGURE D
9.
Insert the Socket (23, 24, 25, 26) onto the first wheel lug nut and,
while maintaining a firm grip on the Impact Wrench with both hands,
squeeze the Trigger (1) until the wheel lug nut is removed from the
wheel lug bolt. Release pressure on the Trigger to turn the Impact
Wrench off. Remove the wheel lug nut from the Socket and set the
lug nut aside. Then, repeat this Step to remove the remaining wheel
lug nuts.
10.
Once all of the wheel lug nuts are removed, carefully remove the
vehicle’s flat tire and install the spare tire onto the wheel lug bolts.
11.
Finger tighten each of the wheel lug nuts onto the wheel lug bolts.
12.
Make sure the Impact Wrench is off. Then, depress the Forward/
Reverse Switch (16) to its
Forward
position (clockwise rotation).
(See Figure D.)
90672.p65
11/20/03, 11:13 AM
7


