


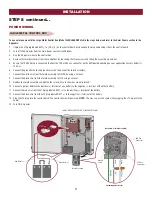


15
INSTALLATION
WIRELESS DUAL GATES
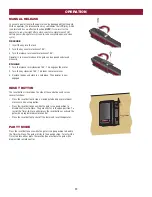
INSTALL A SECOND OPERATOR ARM AND CONTROL
BOX
Install a second operator arm and control box by following installation
steps 1-5.
TO ACTIVATE THE WIRELESS FEATURE
1. Choose a control box to be the network primary operator. All wireless
accessories will need to be programmed to the primary control board.
NOTE:
We recommend that all accessories and board configurations
are set on the primary control board.
2. Press and release the LEARN button on the primary control board.
The green XMITTER LED will light.
NOTE:
The operator will time out
of programming mode after 180 seconds.
3. Press and release the LEARN button again on the primary control
board. The yellow NETWORK LED will light.
4. Press and release the OPEN test button to assign this operator as
network primary.
5. Press and release the LEARN button on the secondary control board.
The green XMITTER LED will light.
6. Press and release the LEARN button again on the secondary control
board. The yellow NETWORK LED will light.
7. Press and release the CLOSE test button to assign this operator as
network secondary.
Both operators will beep and the yellow NETWORK LEDs will turn off
indicating programming is successful.
STEP 6
DUAL GATES ONLY
There are two options for dual gate communication: wired or wireless. Follow the directions according to your application. Do not use wired and
wireless communication simultaneously.
Wired dual gate applications will have a longer battery standby time than wireless applications. Wireless
dual gates will require the installation of two control boxes, one for each operator arm.
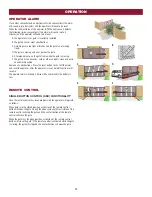
TO DEACTIVATE THE WIRELESS FEATURE:
1. Press and release the LEARN button on either control board. The
green XMITTER LED will light.
2. Press and release the LEARN button again on the same control board.
The yellow NETWORK LED will light.
3. Press and hold the LEARN button for 5 seconds. The yellow
NETWORK LED will blink (operator will beep) then turn off indicating
successful deactivation.
Repeat the steps for the other control board.
Содержание Liftmaster Elite LA500
Страница 2: ......