background image

ADJUSTMENT STEP 2

Adjust Force

DO NOT USE FORCE ADJUSTMENTS TO
COMPENSATE FOR A BINDING OR
STICKING GARAGE DOOR EXCESSIVE

FORCE WILL INTERFERE WITH THE PROPER
OPERATION OF THE SAFETY REVERSE SYSTEM OR
DAMAGE THE GARAGE DOOR.

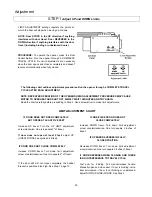
Force Adjustment Controls are located on rear panel of
opener. FORCE ADJUSTMENT settings regulate amount
of the power required to open and close door.

NOTE: The door STOPS in the UP direction if
anything interferes with its  travel. Door REVERSES
in the DOWN direction if anything interferes with its
travel (including binding or unbalanced doors).

If the force adjustments are set too light, door travel may
be interrupted by nuisance reversals in DOWN direction
and stops in UP direction. Weather conditions can affect
the door movement, so occasional adjustment may  be
needed.

Maximum force adjustment range is 260 degrees, about
3/4 of a complete turn. Do not force controls beyond that
point. Turn force adjustment controls with a screwdriver.

Adjustment 

Label

FORCE ADJUSTMENT CHART

TEST DOWN (CLOSE) FORCE

Grasp the door handle or door bottom when door is about
halfway through DOWN (CLOSE) TRAVEL. Door should
reverse. If the door is hard to hold or doesn't
reverse,decrease 

DOWN 

(CLOSE) FORCE by turning the

control in a counterclockwise direction. Make 10 degree
turn adjustments until door reverses normally. After each
adjustment, run opener through a complete cycle.

PROCEED TO STEP 3

IF DOOR DOESN'T OPEN AT LEAST 5 FEET

Increase UP (OPEN) FORCE by turning the control in a
clockwise direction. Make 10 degree turn adjustments until
door opens completely.Readjust UP LIMIT if necessary.
After each adjustment, run opener through a complete
travel cycle.

IF DOOR REVERSES DURING DOWN

(CLOSE) CYCLE

Increase DOWN (CLOSE) FORCE by turning control
clockwise. Make 10 degree turn adjustments until door
completes close cycle. After each adjustment, run the
opener through a complete travel cycle.

21

Содержание 1140-1/4HP

Страница 1: ...ence that may be received including interferencethat may cause undesired operation FASTEN THIS MANUAL NEAR THE GARAGE DOOR AFTER INSTALLATION PERIODIC CHECKS OF THE OPENER ARE REQUIRED TO INSURE SATIS...

Страница 2: ...Model 66LM KEYLESS ENTRY SYSTEM Enables homeowner to operate garage door opener from outside by entering code on specially designed keypad THE PROTECTOR SYSTEM Provides auxiliary support to the safety...

Страница 3: ...e 10 Increase DOWN travel Turn down limit adjustment screw counterclockwise One turn equals 2 inches of travel IF OPENER REVERSES IN FULLY CLOSED POSITION Decrease DOWN travel Turn down limit adjustme...

Страница 4: ...4 of a complete turn Do not force controls beyond that point Turn force adjustment controls with a screwdriver Adjustment Label FORCE ADJUSTMENT CHART TEST DOWN CLOSE FORCE Grasp the door handle or d...

Страница 5: ...When the door reverses on the one inch obstacle remove the obstruction and run the opener through a complete travel cycle Door MUST NOT reverse in closed position Repeat Adjustment Steps 1 2 and 3 if...

Страница 6: ...to access the code switches in your single function remote control and any new remote control Place remote controls side by side as shown and set code switches in ALL remotes to matching positions 0...

Страница 7: ...41A3593 12V Battery 10A14 2 Strand Bell Wire 217A238 4 Strand Bell Wire 217A241 Multi Function Control Panel 41A3586 Door Bracket 12B374 Door Bracket Plate 12B380 Header Bracket Plus Clevis and Faste...

Страница 8: ...4 h p Capacitor bracket Terminal block w screws 12 41D3058 Universal replacement motor bracket assy Complete with Motor worm bracket bearing assembly RPM sensor 13 14 15 16 17 18 19 20 41A3583 2 41A35...

Страница 9: ...age damage caused by unreasonable use including abuse failure to provide reasonable and necessary maintenance or any alterations to the product labor charges for dismantling or reinstalling of a repai...

Отзывы: