background image

-

4-                            


INTRODUCTION 


Thank you for investing in a Challenger XL recreational scooter. This scooter is the 
latest innovation in electric mobility providing absolute safety; for both its rider and 
the environment. 
 
This scooter features a sleek design while maintaining safety standards that are 
required of any mobility product. Its internal components have been designed to 
provide optimal performance while maintaining high-efficiency. The Challenger XL 
also includes multiple features that increase overall functionality, yet simple to 
manage. These include: lights, turn signals, horn, and easily accessible charging port 
and much more. 
 
In order to get the most of your Challenger XL, please read and follow all 
instructions, warnings, and notes in this owner’s manual and all other accompanying 
literature before using it for the first time. Improper use of the scooter could result in 
harm, or traffic accidents.  
The manufacturer disclaims all responsibilities for any personal injury or property 
damage which may occur as a result of improper or unsafe use of this product. 
 
This owner’s manual includes operation instructions for every aspect of the scooter 
including assembly, safety instructions, as well as instructions for how to deal with 
possible accidents. 
 
If there is any information in this manual which you do not understand, or if you 
require additional assistance for setup or operation, please contact your authorized 
dealer.  
 
By accepting delivery of this product, you promise that you will not change, alter, or 
modify this product or remove or render inoperable or unsafe any guards, shields, or 
other safety features of this product; fail, refuse, or neglect to install any retrofit kits 
from time to time provided by Challenger Mobility to enhance or preserve the safe 
use of this product. 


Please keep this owner’s manual in a proper place or on the scooter. If other people 
use the scooter, please be sure to provide this copy. 
 

NOTICE:


This owner’s manual is compiled from the latest specifications and product 
information available at the time of publication. We reserve the right to make 
changes as they become necessary. As designs change, some illustrations and 
pictures in the manual may not correspond to the scooter that you purchased.  
Any changes to our products may cause slight variations between the illustrations 
and explanations in this manual and the product you have purchased. The 
latest/current version of this manual is available on this website: 

www.ChallengerMobility.com


Содержание J90FL

Страница 1: ...USER S MANUAL CHALLENGER XL ELECTRIC RECREATIONAL VEHICLE MODEL J90FL Please read the manual completely before riding your scooter www ChallengerMobility com...

Страница 2: ...2...

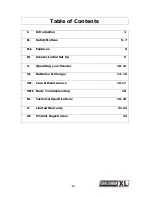
Страница 3: ...ces 5 7 III Features 8 IV Scooter Initial Set Up 9 V Operating your Scooter 10 13 VI Batteries Charger 14 15 VII Care Maintenance 16 17 VIII Basic Troubleshooting 18 IX Technical Specifications 19 20...

Страница 4: ...ooter including assembly safety instructions as well as instructions for how to deal with possible accidents If there is any information in this manual which you do not understand or if you require ad...

Страница 5: ...lines 1 Please set the speed dial to the lowest speed initially 2 Be sure someone is accompanying you and watches for traffic while you are driving on the road for the first time 3 Be sure you are abl...

Страница 6: ...n turns while drive on gravel roads or ramps Maximum Weight Limitation Refer to Maximum Weight Capacity in the SPECIFICATIONS section for details Exceeding the scooter weight limit will lead to damage...

Страница 7: ...dless phones laptop computers AM FM radios TV sets CD players and cassette players and small appliances such as electric shavers and hair dryers so far as we know are not likely to cause problems to t...

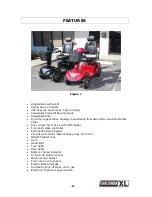
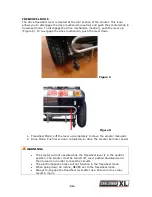
Страница 8: ...o mechanical disk brake Rear wheel direct drive with differential Fully solid state controller External Battery Charger 24 volt permanent magnet heavy duty DC motor ON OFF switch lock Horn Head light...

Страница 9: ...cure them 3 Join the battery terminals with the receptacle from the controller box 4 Join all cables with the same labeling except the wire for turning lights 5 Lift up the rear shroud and connect the...

Страница 10: ...electromechanical brake will automatically engage to hold the scooter in position on horizontal surface or an incline of up to 15 degrees Quick smooth stops are made possible by the dynamic braking b...

Страница 11: ...ever possible avoid making turns When going down a ramp or slope keep the speed settings on slow This will ensure there is a safe controlled descent When the hand throttle is released the scooter wil...

Страница 12: ...l consume the power more quickly Suggestions It is recommended that you charge the batteries immediately when the battery gauge is in the orange area After charging or replacing new batteries drive th...

Страница 13: ...eel Mode Lift the lever up completely to move the scooter manually 2 Drive Mode Push lever down completely to drive the scooter by motor power WARNINGS The scooter will not operate while the freewheel...

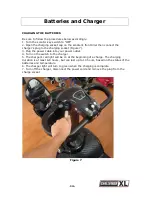
Страница 14: ...Figure 7 3 Plug the power cable into your power outlet 4 Turn on the switch to the charger 5 The charger s red light will be on at the beginning of a charge The charging duration is at least 6 8 hour...

Страница 15: ...a space where it is humid or subject to rainfall or morning dew Do not cover the scooter with any waterproof cloth or other objects while charging Do not charge in temperatures lower than 14 F or high...

Страница 16: ...come on when switched ON Is the remaining power enough for your trip Horn Button Does the horn work Turn signals Do the turn signals work Headlights and Taillights Do the taillights and headlights wor...

Страница 17: ...ash water directly onto your scooter as this could lead to a malfunction of the electric system Do not use gasoline solvents or vaporizing solution as the shroud may be deformed or damaged Do not use...

Страница 18: ...on All plugs and connectors are firmly fixed Battery level shows full charge The charger is not connected to an outlet or the charge socket Freewheeling device is in the drive position If the free whe...

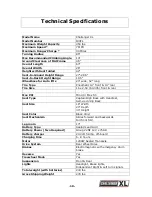
Страница 19: ...4 305 front rear Max PSI Min 40 Max 50 Seat Type Captain High Back with Headrest Semi reclining Back Seat Size 18 Width 20 Depth 30 Height Seat Color Black Vinyl Seat Mechanism Slides forward and back...

Страница 20: ...eries Disclaimer 1 The information contained herein is correct at the time of publication we reserve the right to alter specifications without prior notice 2 Speed range vary with user weight terrain...

Страница 21: ...shipping will be at the expense of the purchaser SHIPPING INTERNATIONAL Parts will be provided under warranty at no charge but shipping to any offshore and or international location will be the respo...

Страница 22: ...atteries carry a limited warranty which is subject to a stringent wear and tear clause Any battery faults due to a defect in the original manufacture will normally become obvious within the first two...

Страница 23: ...0FL Scooter Serial Number Date Purchased Owner s Name Address Street City State ZIP Phone E mail Address Dealer s Name Dealer s Phone Comments Mailing address 8135 State Road 52 Hudson FL 34667 Fax Nu...

Страница 24: ...24...

Отзывы: