HELPLINE NO 08448012949
10
OrIgINaL INstructIONs
60 grade) and change to a higher, finer grade
(i.e. 100 or 120) for finishing. If you use a fine
grade for rough surfaces it will soon clog and
need changing.
4. At all times, let the sander do the work-do
not force it or apply excessive pressure to
the sanding paper or it could wrinkle or tear.
Preferably, use a light circular motion.
5. If the surface shows excessive making from
the abrasive motion, you may be using a grit
which is too coarse or applying too much
pressure.
MaINtENaNcE
remove the plug from the socket before
carrying out any adjustment, servicing or
maintenance.
Your power tool requires no additional lubrication
or maintenance. There are no user serviceable
parts in your power tool. Never use water or
chemical cleaners to clean your power tool. Wipe
clean with a dry cloth. Always store your power
tool in a dry place. Keep the motor ventilation
slots clean. Keep all working controls free of dust.
Occasionally you may see sparks through the
ventilation slots. This is normal.
If the supply cord is damaged, it must be replaced
by the manufacturer, its service agent or similarly
qualified persons in order to avoid a hazard.
trOuBLEsHOOtINg
1. If your sander will not operate, check the
power at the mains plug.
2. If the sander does not abrade surface,
checking the sanding paper. If the sanding
paper has been worn, replace the new paper
and try again. The paper must be kept in a
dry place, if it is allowed to become damp, the
abrasive particles will lose their adhesion to
the backing paper and will not abrade.
3. If the sander does not move smoothly, the
sanding paper may be loose, damaged or
wrinkled. Replace and try again.
4. If a fault can not be rectified return the sander
to an authorized dealer for repair.
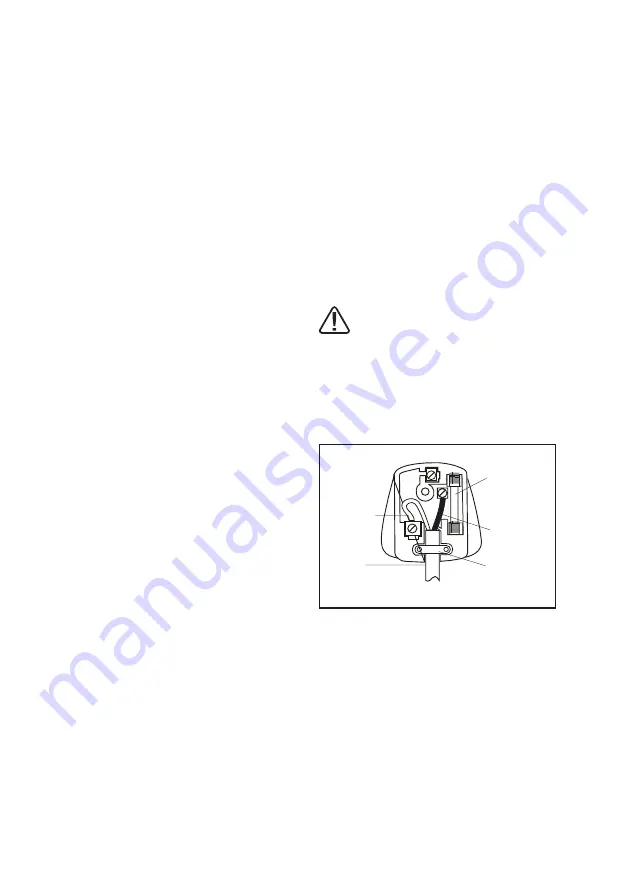
PLug rEPLacEMENt
(uK & IrELaND ONLY)
If you need to replace the fitted plug then follow
the instructions below.
IMPOrtaNt
The wires in the mains lead are colored in
accordance with the following code:
Blue = Neutral
Brown= Live
As the colors of the wires in the mains lead of this
appliance may not correspond with the colored
markings identifying the terminals in your plug,
proceed as follows. The wire which is colored
blue must be connected to the terminal which is
marked with
N
. The wire which is colored brown
must be connected to the terminal which is
marked with
L
.
WarNINg:
Never connect live or neutral
wires to the earth terminal of the plug.
Only fit an approved 13A BS1363/A plug and the
correct rated fuse.
NOtE:
If a moulded plug is fitted and has to
be removed take great care in disposing of the
plug and severed cable, it must be destroyed to
prevent engaging into a socket.
BLUE
(N
EUTRAL)
N
OUTER
SLEEVE
13 AMP
FUSE
BROW
N
(LIVE)
L
CABLE GRIP
Содержание PFS200F
Страница 1: ...PFS200F ORIGINAL INSTRUCTIONS 200W Sheet Sander...
Страница 5: ...HELPLINE NO 08448012949 5 Original instructions 1 2 3 4 5 6...
Страница 12: ......


