background image

Wireless Network Setup

Use the Network Setup when connecting 

y

our TV to a wireless network.

1. 

Plug the connected devices into the mains socket before switching on the TV.

2. 

Press the

 STANDBY

 button on the  right side 


  of the TV or the


 button on the remote control to turn on 

y

our TV.

3. 

Press the

   I-Player

 button on the remote control to enter 

i-Player

When 

y

ou 

 enter 

i-Player

 there is a dela

y

 whilst the network card 

boots. Please be patient.

5. 

If 

y

ou have 

t

y

 connecting or there is a "No Internet Connection" 

message on the screen. Press the 

IP

 button on the remote control. The 

Network SETUP

 menu will be displa

y

ed.

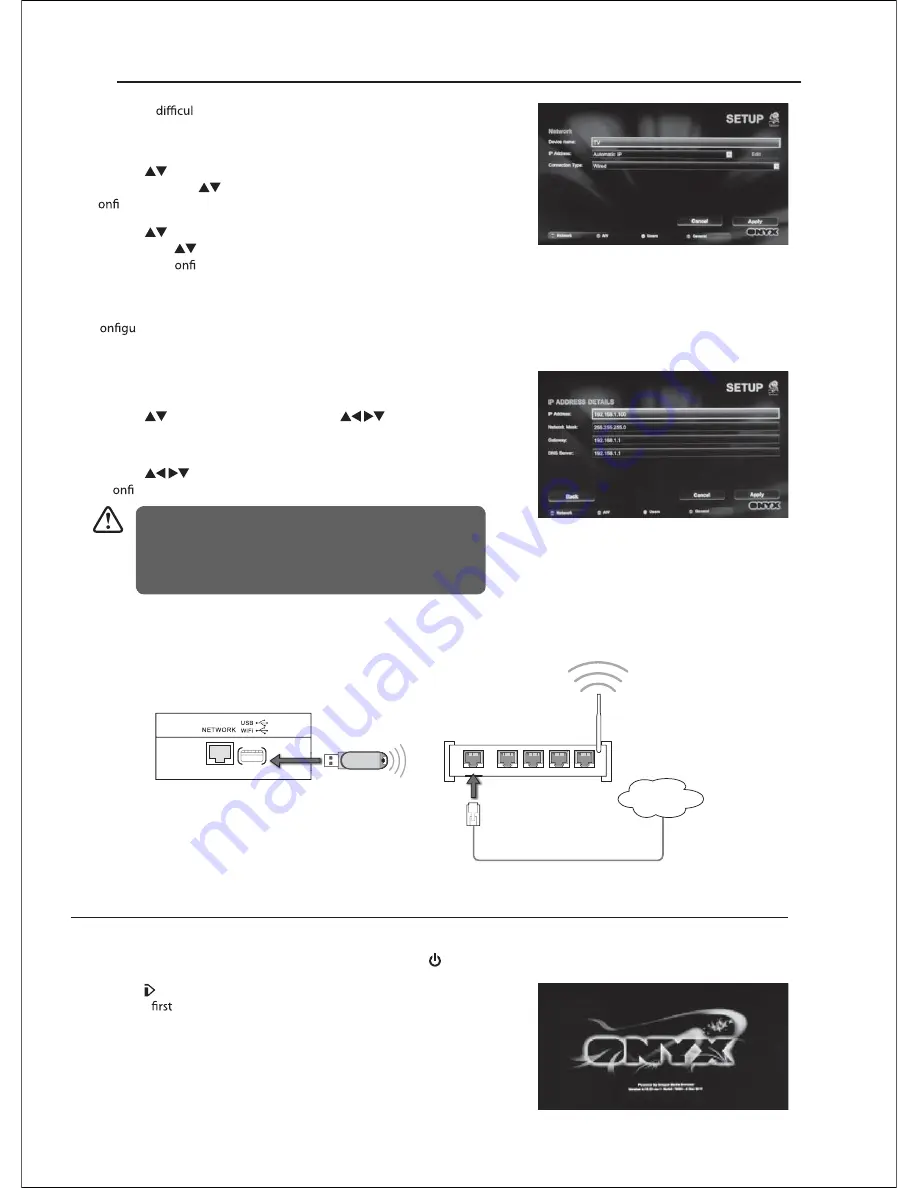
6. 

Press the 

 buttons to select 

Connection Type

. Press the 

OK

 button 

and then press the 

 buttons to select 

Wired

. Press the 

OK

 button to 

c

rm.

7. 

Press the 

 buttons to select 

IP Address

. Press the 

OK

 button and 

then press the 

 buttons to select 

Automatic IP

 or 

Fixed IP

. Press the 

OK

 button to c

rm.

Automatic IP


Select this if the network supports is a DHCP (D

y

namic Host 

C

ration Protocol). The IP address will automaticall

y

 be determined.

Fixed IP


Select this if there is no DHCP server on the network or 

y

ou want to set 

the IP address manuall

y

 Press 

the   buttons to select 

Edit

. Use the 


 buttons to navigate 

IP Address / Network Mask / Gateway / DNS Server

 and then press the 

0-9

 buttons to enter 

y

our IP address details.

8. 

Press the 


 buttons to select 

Apply

 and then press the 

OK

 button 

to c

rm.

Connecting to a Wireless Network

Use the Wireless LAN adapter to connect the TV’s USB / WIFI socket.

In wired mode the TV is connected to the router automaticall

y


as soon as the connection is made. You will see a message 
"Not connected" change to "Connected" at the top of the 
screen. This means 

y

ou are connected to 

y

our local network. 

LAN1

WAN

LAN2

LAN3

LAN4

Rear Left Side View of TV

Wireless Router

Wireless LAN Adapter

(not included)

Internet

Содержание C32227DVBIPTVT2-LED

Страница 1: ...C32227DVBIPTVT2 LED ...

Страница 2: ......

Страница 3: ... ...

Страница 4: ...2 27 27 28 28 28 28 36 37 37 38 38 39 39 40 42 41 40 4 4 4 4 4 4 4 Connecting to Network 29 31 Personal Account Setup 32 Access Personal Account 32 Using the i Player 33 36 ...

Страница 5: ...3 User 0DQXDO Quick Start Guide Warranty Card ROG DUH IPTV Manual 6WDQG DVH 6FUHZV 79 WKHUQHW DEOH 3RZHU GDSWHU ...

Страница 6: ...7R LQVWDOO WKH EDVH VWDQG ILUVW PDNH VXUH RX SRVLWLRQ WKH IURQW RI WKH EDVH VWDQG IDFLQJ WRZDUGV WKH IURQW RI WKH 79 DQG WKHQ XVH WKH VXSSOLHG VFUHZV WR IL WKH VWDQG EDVH WR WKH 79 PP 0 6FUHZ VL H 0 ...

Страница 7: ...3 ...

Страница 8: ...4 1 2 NETWORK USB WiFi WiFi DIGITAL AUDIO OUT COAXIAL the Wireless LAN Adaptor broadband router ...

Страница 9: ...or battery leakage which could cause fire personal injury or damage to property t Only use the battery type indicated in this manual t When the batteries are exhausted the remote will not function Replace both batteries at the same time with new ones t Do not install new batteries with used ones and do not mix different types of batteries t Do not dispose of used batteries as domestic waste Dispos...

Страница 10: ...all TV channels It will take up to 10 minutes 10 Search t Return to the previous viewing channel ATV DTV mode t Search on the internet Internet Player mode 11 Exit Exit the OSD menu 12 Guide Displays the EPG Electronic Programme Guide DTV mode 13 Info t Display the present channel information such as the current time and channel name ATV DTV mode t Display the present disc information DVD mode t D...

Страница 11: ...ion to the network Internet Player mode 28 To skip to the beginning of the previous chapter track photo DVD Media mode Day Press to view the schedule of the previous day 29 To skip to the beginning of the next chapter track photo DVD Media mode Day Press to view the schedule of the next day 30 Coloured buttons Access the TELETEXT items or channel edit when using Digital Freeview TV Channels ATV DT...

Страница 12: ......

Страница 13: ...1366 768 ...

Страница 14: ... ...

Страница 15: ......

Страница 16: ......

Страница 17: ......

Страница 18: ... Just scan ...

Страница 19: ......

Страница 20: ... ...

Страница 21: ... ...

Страница 22: ... ...

Страница 23: ... ...

Страница 24: ...3DXVH 79 3DXVH79 ...

Страница 25: ...3DXVH 79 3DXVH 79 3DXVH 79 ...

Страница 26: ...3DXVH 79 USB WiFi NETWORK ...

Страница 27: ... ...

Страница 28: ... ...

Страница 29: ... ...

Страница 30: ... ...

Страница 31: ...may require the TV network settings to be adjusted For most home networks the TV will connect to automatically without any adjustments t Since there are various connection c rations please follow the ations and instruction of your telecommunication carrier internet service provider and router setting user manual R Broadband Router Wireless Router Ethernet Cable included LAN1 WAN LAN2 LAN3 LAN4 Int...

Страница 32: ...d then press the buttons to select Automatic IP or Fixed IP Press the OK button to c rm Automatic IP Select this if the network supports is a DHCP Dynamic Host C ration Protocol The IP address will automatically be determined Fixed IP Select this if there is no DHCP server on the network or you want to set the IP address manually Press the buttons to select Edit Use the buttons to navigate IP Addr...

Страница 33: ...button on the remote control to display the online keyboard and then use the buttons and the OK button to select the desired characters to enter the Network Name SSID Press the buttons to select the icon and then press the OK button to c rm 9 Press the buttons to select Encryption Type and then press the SD1 button on the remote control to display the online keyboard Press the buttons to select th...

Страница 34: ...or c rmation 14 Press the buttons to select Store User Data and press the OK button to c rm Personal Account Setup Use the setup a personal account 11 In iPTV mode press the User button to display the LOGIN screen Press the buttons to select the Create New User and then press the OK button 2 1 UHDWH 1HZ 8VHU DQFHO 86 5 352 8VHU 1DPH 3 1 7R NHHS RXU DFFRXQW VHFXUH D 3 1 OHQJWK RI DW OHDVW GLJLWV LV...

Страница 35: ...layer 2 The i Player Main Menu will be displayed IPTV Services Widgets Widgets Press the buttons to select erent Widgets or Apps Press the YELLOW or BLUE button to select erent pages of each Widget 3 During watching IPTV Services press the Menu button to return to the i Player Main Menu 4 Press the TV button on the remote control to exit the i Player and return to TV mode ...

Страница 36: ...ntrol to display the online keyboard 4 Press the buttons and the OK button to enter the desired characters Press the buttons to select the icon and then press the OK button to enter the name of your search You do not need to type the full name It will search for that contain the letters you type within the name 2 Press the BLUE button on the remote control to select General SETUP menu Slideshow De...

Страница 37: ...s the SD1 button to display the online keyboard and enter the desired characters As delivered the TV will report the weather for the region where it is connected to the internet This may not close to where you live d Press the buttons to select SEARCH and then press the OK button e Your location will be displayed on the map If this is correct press the buttons to select Apply Authorise the Faceboo...

Страница 38: ...hen press the OK button to select YES Upgrade successful message will be displayed when d If do not want to upgrade press the buttons and then press the OK button to select X The upgrade is available message will disappear The message will display again when i Player is turned on next time 7KHUH DUH XSGDWHV DYDLODEOH IRU GRZQORDG GR RX ZLVK WR XSJUDGH 2 Do not turn the TV or interupt the upgrade o...

Страница 39: ... ...

Страница 40: ... ...

Страница 41: ... ...

Страница 42: ... ...

Страница 43: ... ...

Страница 44: ... ...

Страница 45: ... 3 ...

Страница 46: ... 4 ...

Страница 47: ... 5 ...

Страница 48: ...46 RJ ...

Страница 49: ...4 ...

Страница 50: ...48 ...

Страница 51: ...4 ...

Страница 52: ......

Отзывы: