10
q
uiCK
-a
liGn
Quick-Align uses all the date and time information entered at
startup to align the telescope . However, instead of slewing to
the alignment stars for centering and alignment, the telescope
bypasses this step and simply models the sky based on the
information given . This will allow you to roughly slew to the
coordinates of bright objects like the moon and planets and
gives the telescope the information needed to track objects in
any part of the sky (depending on accuracy of polar alignment) .
Quick-Align is not meant to be used to accurately locate small
or faint deep-sky objects or to track objects accurately for
photography .
To use Quick-Align, simply select Quick Align from the
alignment options and press ENTER . The telescope will
automatically use the entered date/time parameters to align
itself with the sky and display
Alignment Successful
.
NOTE: Once a Quick-Align has been done, you can use
the Re-alignment feature (see below) to improve your
telescopes pointing accuracy.
l
aSt
a
liGnMEnt
The Last Alignment method will automatically recall the last
stored index positions to continue using the alignment that was
saved when the telescope was last powered down . This is a
useful feature should your telescope accidentally lose power or
be powered down .
NOTE: Just like with Quick-Align, you can use the Re-
alignment feature (see below) to improve your telescopes
pointing accuracy after using the Last Alignment method.
To maintain a more accurate alignment over a series of
observing sessions, use the Hibernate feature described
later in this chapter.
r
E
-a
liGnMEnt
The telescopes has a re-alignment feature which allows you to
replace any of the original alignment stars with a new star or
celestial object . This can be useful in several situations:
• If you are observing over a period of a few hours, you may
notice that your original two alignment stars have drifted
towards the west considerably . (Remember that the stars are
moving at a rate of 15º every hour) . Aligning on a new star
that is in the eastern part of the sky will improve your pointing
accuracy, especially on objects in that part of the sky .
• If you have aligned your telescope using the Quick-Align
method, you can use re-align to align on actual objects in the
sky . This will improve the pointing accuracy of your telescope
without having to re-enter addition information .
• If you have used the computer assisted polar alignment
method and have manually moved the mount, it may be
necessary to re-align the mount for improved pointing
accuracy .
To replace an existing alignment star with a new alignment star:
1 . Select the desired star (or object) from the database and
slew to it .
2 . Carefully center the object in the eyepiece .
3 . Once centered, press the UNDO button until you are at the
main menu .
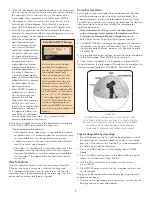
4 . With
CGEM Ready
displayed, press the ALIGN key on the
hand control to select
Alignment Stars
from the list
of options
5 . The display will then ask you which alignment star you want
to replace . Use the UP and Down scroll keys to select the
alignment star to be replaced . It is usually best to replace
the star closest to the new object . This will space out your
alignment stars across the sky .
6 . Press ALIGN to make the change .
o
bjECt
C
ataloG
Selecting an Object
Now that the telescope is properly aligned, you can choose
an object from any of the catalogs in the telescope’s extensive
database . The hand control has a key (4) designated for each
of the catalogs in its database . There are two ways to select
objects from the database: scrolling through the named object
lists and entering object numbers .
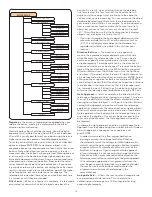
Pressing the LIST key on the hand control will access all objects
in the database that have common names or types . Each list
is broken down into the following categories: Named Stars,
Named Object, Double Stars, Variable Stars, Asterisms and
CCD Objects . Selecting any one of these catalogs will display
a numeric-alphabetical listing of the objects under that list .
Pressing the Up and Down keys (10) allows you to scroll through
the catalog to the desired object .
When scrolling through a long list of objects, holding down
either the Up or Down key will allow you to scroll through
the catalog more rapidly by only displaying every fifth
catalog object.
Pressing any of the other catalog keys (M, CALD, NGC, or
STAR) will display a blinking cursor below the name of the
catalog chosen . Use the numeric key pad to enter the number
of any object within these standardized catalogs . For example,
to find the Orion Nebula, press the “M” key and enter “042” .
Slewing to an Object
Once the desired object is displayed on the hand control
screen, choose from the following options:
•
Press the INFO Key.
This will give you useful information
about the selected object such as R .A . and declination,
magnitude size and text information for many of the most
popular objects .
•
Press the ENTER Key.
This will automatically slew the
telescope to the coordinates of the object .
Caution:
Never slew the telescope when someone is looking
into the eyepiece . The telescope can move at fast
slew speeds and may hit an observer in the eye .
Object information can be obtained without having to do a
star alignment . After the telescope is powered on, pressing
any of the catalog keys allows you to scroll through object lists
or enter catalog numbers and view the information about the
object as described above .
Finding Planets
Your telescope can locate all 8 of our solar systems planets plus
the Moon . However, the hand control will only display the solar
system objects that are above the horizon (or within its filter
limits) . To locate the planets, press the PLANET key on the hand
control . The hand control will display all solar system objects
that are above the horizon:
• Use the
Up
and
Down
keys to select the planet that you wish
to observe .
• Press
INFO
to access information on the displayed planet .
• Press
ENTER
to slew to the displayed planet .
Содержание CGEM DX
Страница 1: ...INSTRUCTION MANUAL CGEM DX Computerized Mount ENGLISH...
Страница 29: ...27 Appendix D Maps Of Time Zones...
Страница 30: ...28...
Страница 31: ...29 Sky Maps...
Страница 32: ...30...
Страница 33: ...31...
Страница 34: ...32...
Страница 35: ...33...
Страница 36: ...34...

