background image

28 


With your telescope set up, you are ready to use it for observing. This section covers visual observing hints for 
both solar system and deep sky objects as well as general observing conditions which will affect your ability to 
observe.  


O

O

b

b

s

s

e

e

r

r

v

v

i

i

n

n

g

g


t

t

h

h

e

e


M

M

o

o

o

o

n

n


Often, it is tempting to look at the Moon when it is full. At this 
time, the face we see is fully illuminated and its light can be 
overpowering. In addition, little or no contrast can be seen during 
this phase.  
 
One of the best times to observe the Moon is during its partial 
phases (around the time of first or third quarter). Long shadows 
reveal a great amount of detail on the lunar surface. At low power 
you will be able to see most of the lunar disk at one time. Change 
to higher power (magnification) to focus in on a smaller area. 
Choose the 

lunar

 tracking rate from the hand control's MENU 

tracking rate options to keep the moon centered in the eyepiece 
even at high magnifications.  


L

L

u

u

n

n

a

a

r

r


O

O

b

b

s

s

e

e

r

r

v

v

i

i

n

n

g

g


H

H

i

i

n

n

t

t

s

s


y


To increase contrast and bring out detail on the lunar surface, use eyepiece filters. A yellow filter works well 
at improving contrast while a neutral density or polarizing filter will reduce overall surface brightness and 
glare. 


O

O

b

b

s

s

e

e

r

r

v

v

i

i

n

n

g

g


t

t

h

h

e

e


P

P

l

l

a

a

n

n

e

e

t

t

s

s


Other fascinating targets include the five naked eye planets. You can see Venus 
go through its lunar-like phases. Mars can reveal a host of surface detail and 
one, if not both, of its polar caps. You will be able to see the cloud belts of 
Jupiter and the great Red Spot (if it is visible at the time you are observing). In 
addition, you will also be able to see the moons of Jupiter as they orbit the giant 
planet. Saturn, with its beautiful rings, is easily visible at moderate power.  


P

P

l

l

a

a

n

n

e

e

t

t

a

a

r

r

y

y


O

O

b

b

s

s

e

e

r

r

v

v

i

i

n

n

g

g


H

H

i

i

n

n

t

t

s

s


y


Remember that atmospheric conditions are usually the limiting factor on how much planetary detail will be 
visible. So, avoid observing the planets when they are low on the horizon or when they are directly over a 
source of radiating heat, such as a rooftop or chimney. See the "

Seeing Conditions

" section later in this 

section. 

y


To increase contrast and bring out detail on the planetary surface, try using Celestron eyepiece filters. 


O

O

b

b

s

s

e

e

r

r

v

v

i

i

n

n

g

g


t

t

h

h

e

e


S

S

u

u

n

n


Although overlooked by many amateur astronomers, solar observation is both rewarding and fun. However, 
because the Sun is so bright, special precautions must be taken when observing our star so as not to damage your 
eyes or your telescope. 


Never project an image of the Sun through the telescope. Tremendous heat build-up may result inside the 
optical tube. This can damage the telescope and/or any accessories attached to the telescope. 

 
For safe solar viewing, use a Celestron solar filter (see 

Optional Accessories

 section of manual) that reduces the 

intensity of the Sun's light, making it safe to view. With a filter you can see sunspots as they move across the solar 
disk and faculae, which are bright patches seen near the Sun's edge.  

Содержание 114LCM

Страница 1: ...L LC CM M S Se er ri ie es s I IN NS ST TR RU UC CT TI IO ON N M MA AN NU UA AL L 6 6 0 0 L L C C M M 8 8 0 0 L L C C M M 1 1 1 1 4 4 L L C C M M ENGLISH ...

Страница 2: ...14 Auto Two Star Align 16 Two Star Alignment 16 One Star Align 17 Solar System Align 17 Re Alignment 18 Object Catalog 18 Selecting an Object 18 Slewing to an Object 19 Finding Planets 19 Tour Mode 19 Constellation Tour 19 Direction Buttons 20 Rate Button 20 Set Up Procedures 20 Tracking Mode 20 Tracking Rate 21 View Time Site 21 User Defined Objects 21 Get R A DEC 21 Goto R A DEC 21 Identify 22 S...

Страница 3: ...8 Observing the Planets 28 Planetary Observing Hints 28 Observing the Sun 28 Solar Observing Hints 29 Observing Deep Sky Objects 29 Seeing Conditions 29 Transparency 29 Sky Illumination 29 Seeing 30 TELESCOPE MAINTENANCE 31 Care and Cleaning of the Optics 31 Collimation 31 OPTIONAL ACCESSORIES 33 APPENDIX A TECHNICAL SPECIFICATIONS 35 APPENDIX B GLOSSARY OF TERMS 36 APPENDIX C TIME ZONE MAPS 39 SK...

Страница 4: ...manual before embarking on your journey through the Universe It may take a few observing sessions to become familiar with your telescope so you should keep this manual handy until you have fully mastered your telescope s operation The LCM hand control has built in instructions to guide you through all the alignment procedures needed to have the telescope up and running in minutes Use this manual i...

Страница 5: ... Base 9 Star Diagonal 3 On Off Switch 10 Eyepiece 4 Tripod 11 StarPointer Finderscope 5 Accessory Tray 12 Altitude Clutch Knob 6 Tripod Leg Extension Clamp 13 Telescope Mounting Bolt 7 Hand Control 10 1 2 9 7 3 4 13 5 6 8 11 12 60 80LCM Telescope ...

Страница 6: ...nd Control 2 Focuser Knob 8 Motorized Base 3 StarPointer Finderscope 9 Altitude Clutch Knob 4 On Off Switch 10 Telescope Tube 5 Tripod 11 Telescope Mounting Bolt 6 Accessory Tray 114LCM Telescope 1 2 7 3 4 9 11 5 6 8 10 ...

Страница 7: ...isual accessories the telescope tube and mount should be attached to the tripod First install the accessory tray onto the tripod legs 1 Remove the tripod from the box and spread the legs apart until the center leg brace is fully extended 2 Locate the accessory tray and place it on top of the tripod center support brace in between the tripod legs see figure 2 1 3 Rotate the accessory tray so that t...

Страница 8: ... tripod it is a good idea to use the included bubble level to more accurately level the telescope 1 Place the bubble level on the top of the motorized base 2 Adjust the tripod legs until the bubble level shows the base to be level A At tt ta ac ch hi in ng g t th he e T Te el le es sc co op pe e t to o t th he e B Ba as se e Your telescope optical tube has a built on dovetail mounting bar used to ...

Страница 9: ... diagonal so it does not obstruct the inner diameter of the eyepiece end of the diagonal Remove the protective dust cap from the star diagonal s barrel 2 Slide the chrome portion of the low power 25mm eyepiece into the star diagonal 3 Tighten the thumbscrew to hold the eyepiece in place For 114 models 1 Loosen the thumb screw on the eyepiece adapter at the end of the focuser barrel and remove the ...

Страница 10: ... a long life 3 volt lithium battery CR1620 Like all finderscopes the StarPointer must be properly aligned with the main telescope before it can be used The alignment procedure is best done at night since the LED dot will be difficult to see during the day Install the Battery 1 Unscrew the battery cover on the StarPointer finderscope 2 Insert battery with side facing out 3 Replace battery cover Ali...

Страница 11: ... front of the battery compartment and remove the cover 2 Gently remove the battery holder from inside the battery compartment 3 Place 8 AA batteries user supplied inside the battery holder 4 Return the battery holder back inside the base and replace the cover 5 Flip the power switch to the On position The light on the power button and hand control should come on In case of a loss of power the opti...

Страница 12: ...M to use a selected star or object as an alignment position 3 Direction Keys Allows complete control of the telescope in any direction Use the direction keys to center objects in the StarPointer finderscope and eyepiece 4 Catalog Keys The hand control has a key on the hand control to allow direct access to each of the catalogs in its 4 000 object database The hand control contains the following ca...

Страница 13: ...rent menu and display the previous level of the menu path Press Undo repeatedly to get back to a main menu or use it to erase data entered by mistake 9 Menu Displays the many setup and utilities functions such as tracking rate and user defined objects and many others 10 Scroll Keys Used to scroll up and down within any of the menu lists A double arrow symbol on the right side of the LCD indicates ...

Страница 14: ...f the objects in its 4 000 object database Before the telescope is ready to be aligned it should be set up in an outside location with all accessories eyepiece diagonal and finderscope attached and lens cover removed as described in the Assembly section of the manual To begin Sky Align 1 Power on the LCM by flipping the switch located on the side of the base to the on position Once turned on the h...

Страница 15: ...use the arrow button to center the object in the finderscope and press ENTER Then once centered in the eyepiece press the ALIGN button 6 Repeat the process for the third alignment star When the telescope has been aligned to the final stars the display will read Match Confirmed Press UNDO to display the names of the three bright objects you aligned to or press ENTER to accept these three objects fo...

Страница 16: ...ed slewing the display will ask you to use the arrow buttons to align the selected star with the red dot of the finderscope Once centered in the finder press ENTER The display will then instruct you to center the star in the field of view of the eyepiece When the star is centered press ALIGN to accept this star as your second alignment star When the telescope has been aligned to both stars the dis...

Страница 17: ...oTo performance by using solar system objects Sun Moon and planets to align the telescope with the sky Solar System Align is a great way to align your telescope for daytime viewing as well as a quick way to align the telescope for night time observing Never look directly at the sun with the naked eye or with a telescope unless you have the proper solar filter Permanent and irreversible eye damage ...

Страница 18: ...scope is properly aligned you can choose an object from any of the catalogs in the LCM s database The hand control has a key designated for each of the catalogs in its database There are two ways to select objects from the database scrolling through the named object lists and entering object numbers y Pressing the LIST key on the hand control will access all objects in the database that have commo...

Страница 19: ...plus the Sun and Moon However the hand control will only display the solar system objects that are above the horizon or within its filter limits To locate the planets press the PLANET key on the hand control The hand control will display all solar system objects that are above the horizon y Use the Up and Down keys to select the planet that you wish to observe y Press INFO to access information on...

Страница 20: ...ed rate To use this feature simply press the arrow button that corresponds to the direction that you want to move the telescope While holding that button down press the opposite directional button This will increase the speed to the maximum slew rate S Se et t U Up p P Pr ro oc ce ed du ur re es s The LCM contains many user defined setup functions designed to give the user control over the telesco...

Страница 21: ...ustom tour of database objects by allowing you to record the current position of the telescope and save the name of the object by selecting it from any one of the database catalogs These objects then can be accessed by selecting GoTo Sky Object Save Land Object The LCM can also be used as a spotting scope on terrestrial objects Fixed land objects can be stored by saving their altitude and azimuth ...

Страница 22: ...higher value may be necessary for photographic guiding Positive backlash compensation is applied when the mount changes its direction of movement from backwards to forwards Similarly negative backlash compensation is applied when the mount changes its direction of movement from forwards to backwards When tracking is enabled the mount will be moving in one or both axes in either the positive or neg...

Страница 23: ...rdinates of a celestial object for a future date you would need to turn the GPS module off in order to manually enter a date and time other than the present Light Control This feature allows you to turn off both the red key pad light and LCD display for daytime use to conserve power and to help preserve your night vision Factory Setting Returns the LCM hand control to its original factory setting ...

Страница 24: ...s the amount of distance and time it takes for the mount to complete its final slow Goto when slewing to an object Changing the balance of the telescope can prolong the time it takes to complete the final slew Goto Calibration takes into account any slight imbalances and changes the final Goto distance to compensate Set Mount Position The Set Mount Position menu can be used to recover an alignment...

Страница 25: ...ment Object 2 Center Alignment Object 1 UNDO to Edit SKY ALIGN Saved Site ENTER if OK Center Star 2 Center Star 1 Select Star 1 UNDO to Edit AUTO TWO STAR ALIGN Saved Site ENTER if OK CENTER STAR 2 SELECT STAR 2 CENTER STAR 1 SELECT STAR 1 UNDO to Edit TWO STAR ALIGNMENT Saved Site ENTER if OK Center Star 1 Select Star 1 UNDO to Edit ONE STAR ALIGNMENT Saved Site ENTER if OK Center Object Select O...

Страница 26: ...erted When observing through the LCM 114 a reflecting telescope the image will be rotated when looking through the eyepiece For astronomical viewing out of focus star images are very diffuse making them difficult to see If you turn the focus knob too quickly you can go right through focus without seeing the image To avoid this problem your first astronomical target should be a bright object like t...

Страница 27: ...n Accessory Catalog 93685 G Ge en ne er ra al l O Ob bs se er rv vi in ng g H Hi in nt ts s When working with any optical instrument there are a few things to remember to ensure you get the best possible image y Never look through window glass Glass found in household windows is optically imperfect and as a result may vary in thickness from one part of a window to the next This inconsistency can a...

Страница 28: ...can reveal a host of surface detail and one if not both of its polar caps You will be able to see the cloud belts of Jupiter and the great Red Spot if it is visible at the time you are observing In addition you will also be able to see the moons of Jupiter as they orbit the giant planet Saturn with its beautiful rings is easily visible at moderate power P Pl la an ne et ta ar ry y O Ob bs se er rv...

Страница 29: ... can see through your telescope during an observing session Conditions include transparency sky illumination and seeing Understanding viewing conditions and the effect they have on observing will help you get the most out of your telescope T Tr ra an ns sp pa ar re en nc cy y Transparency is the clarity of the atmosphere which is affected by clouds moisture and other airborne particles Thick cumul...

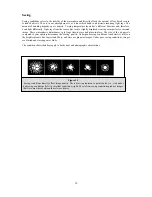
Страница 30: ...ric disturbances vary from time to time and place to place The size of the air parcels compared to your aperture determines the seeing quality Under good seeing conditions fine detail is visible on the brighter planets like Jupiter and Mars and stars are pinpoint images Under poor seeing conditions images are blurred and stars appear as blobs The conditions described here apply to both visual and ...

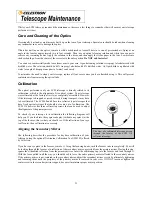
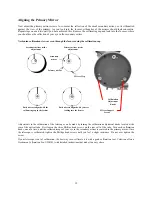
Страница 31: ...as completely assembled However if the telescope is dropped or jarred severely during transport it may have to be collimated The LCM 60 and 80 are two refractor type telescopes that have fixed optical systems that should not come out of collimation The LCM 114 however has three collimation screws that can be used to adjust the alignment of the primary mirror To check if your telescope is in collim...

Страница 32: ...e optical tube First loosen the three Phillips head screws on the rear cell of the tube Turn each collimation knobs one at a time until the reflected image of your eye in the secondary mirror is centered in the primary mirror Once the telescope is collimated tighten the Phillips head screws until you feel a slight resistance Do not over tighten the screw If your telescope is out of collimation the...

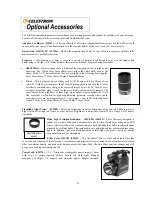
Страница 33: ...he excellent refractive properties of these high grade optical elements make the X Cel line especially well suited for high magnification planetary viewing where sharp color free views are most appreciated X Cel eyepiece come in the following focal length 2 3mm 5mm 8mm 10mm 12 5mm 18mm 21mm 25mm Flashlight Night Vision 93588 Celestron s premium model for astronomy using two red LEDs to preserve ni...

Страница 34: ...ad map and you don t need to try to navigate the night sky without a map either Even if you already know your way around the major constellations these maps can help you locate all kinds of fascinating objects Vibration Suppression Pads 93503 These pads rest between the ground and tripod feet of your telescope They reduce the amplitude and vibration time of your telescope when shaken by the wind o...

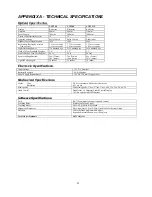
Страница 35: ... E E El lle e ec c ct t tr r ro o on n ni iic c c S S Sp p pe e ec c ci iif f fi iic c ca a at t ti iio o on n ns s s Input Voltage 12 V DC Nominal Batteries Required 8 AA Alkaline Power Supply Requirements 12 VDC 750 mA Tip positive M M Me e ec c ch h ha a an n ni iic c ca a al ll S S Sp p pe e ec c ci iif f fi iic c ca a at t ti iio o on n ns s s Motor Type Resolution DC Servo motors with encode...

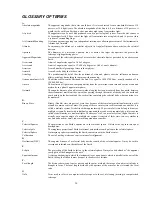
Страница 36: ...e vertical line passing through the center of the sky and the north and south points on the horizon and the vertical line containing the celestial body whose position is to be measured B Binary Stars Binary Double stars are pairs of stars that because of their mutual gravitational attraction orbit around a common center of mass If a group of three or more stars revolve around one another it is cal...

Страница 37: ...va Although Latin for new it denotes a star that suddenly becomes explosively bright at the end of its life cycle O Open Cluster One of the groupings of stars that are concentrated along the plane of the Milky Way Most have an asymmetrical appearance and are loosely assembled They contain from a dozen to many hundreds of stars P Parallax Parallax is the difference in the apparent position of an ob...

Страница 38: ...etween new and full when its illuminated portion is increasing Z Zenith The point on the Celestial Sphere directly above the observer Zodiac The zodiac is the portion of the Celestial Sphere that lies within 8 degrees on either side of the Ecliptic The apparent paths of the Sun the Moon and the planets with the exception of some portions of the path of Pluto lie within this band Twelve divisions o...

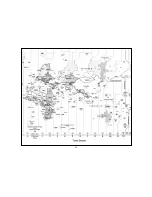
Страница 39: ...39 APPENDIX D MAPS OF TIME ZONES ...

Страница 40: ...40 ...

Страница 41: ......

Страница 42: ......

Страница 43: ......

Страница 44: ......

Страница 45: ......

Страница 46: ......

Страница 47: ...ducts or instructions may change without notice or obligation This device complies with Part 15 of the FCC Rule Operation is subject to the following two conditions 1 This device may not cause harmful interference and 2 This device must accept any interference received including interference that may cause undesired operations 22050 INST 09 09 Printed in China 10 00 ...

Отзывы: