


14
A
A
l
l
i
i
g
g
n
n
m
m
e
e
n
n
t
t
P
P
r
r
o
o
c
c
e
e
d
d
u
u
r
r
e
e
In order for the LCM to accurately point to objects in the sky, it must first be aligned to known positions (stars) in the
sky. With this information, the telescope can create a model of the sky, which it uses to locate any object with known
coordinates. There are many ways to align the LCM with the sky depending on what information the user is able to
provide:
SkyAlign
uses your current date, time and city to create an accurate model of the sky. Then the user can
simply point the telescope to any three bright celestial objects to accurately align the telescope with the sky.
Auto
Two-Star Align
will ask the user to choose and center the first alignment star, then the LCM will automatically select
and slew to a second star for alignment.
Two-Star Alignment
requires the user to identify and manually slew the
telescope to the two alignment stars.
One-Star Align
is the same as Two-Star Align however only requires you to
align to one known star. Although not as accurate as the other alignment methods, One-Star Align is the quickest way
to find and track bright planets and objects in Altazimuth mode. Finally,
Solar System Align
will display a list of
visible daytime objects (planets and the moon) available to align the telescope. Each alignment method is discussed in
detail below.
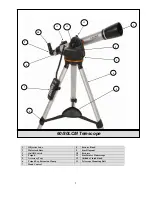
"Altazimuth" or "Alt-Az" refers to a type of mounting that allows a telescope to move in both altitude (up and down)
and azimuth (left and right) with respect to the ground.
This is the simplest form of mounting in which the telescope is
attached directly to a tripod.
S
S
k
k
y
y
A
A
l
l
i
i
g
g
n
n
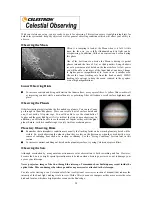
Sky Align is the easiest way to get your telescope aligned and ready to observe. Even if you do not know a single star
in the sky, the LCM will have you aligned in minutes by asking for basic information like the date, time and location.
Then you simply need to aim the telescope to any three bright celestial objects in the sky. Since Sky Align requires no
knowledge of the night sky it is not necessary to know the name of the stars at which you are aiming. You may even
select a planet or the moon. The LCM is then ready to start finding and tracking any of the objects in its 4,000+ object
database. Before the telescope is ready to be aligned, it should be set up in an outside location with all accessories
(eyepiece, diagonal and finderscope) attached and lens cover removed as described in the Assembly section of the
manual. To begin Sky Align:
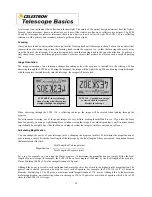
1.
Power on the LCM by flipping the switch located on the side of the base, to the "on" position. Once turned on the
hand control display will say
LCM Ready
. Press ENTER to choose
Sky Align
. Pressing the ALIGN key will
bypass the other alignment options and the scrolling text and automatically begins
Sky Align.
2.
Once
Sky Align
has been selected, the hand control will display “Enter if OK”, “Undo to edit” and “Saved Site”.
The bottom line of the LCD will display either the current time or the time when you last used the telescope.
Since this is your first time using the LCM, press UNDO to enter current time/site information.
The hand control display will then ask for the following information:
Location
- The hand control will display a list of cities to choose from. Choose the city from the database that is
closest to your current observing site. The city you choose will be remembered in the hand controls memory so that it
will be automatically displayed the next time an alignment is done. Alternatively, if you know the exact longitude and
latitude of your observing site, it can be entered directly into the hand control and remembered for future use as well.
To choose a location city:
Use the Up and Down scroll keys to choose between
City Database
and
Custom Site. City Database
will allow
you to select the closest city to your observing site from a list of either international or U.S. location.
Custom Site
allows you to enter the exact longitude and latitude of your observing site. Select
City Database
and press
ENTER.
The hand control will allow you to choose from either U.S. or international locations. For a listing of U.S.
locations by state and then by city, press ENTER while
United States
is displayed. For international locations,
use the Up or Down scroll key to select
International
and press ENTER.
Use the Up and Down Scroll buttons to choose your current state (or country if International locations was
selected) from the alphabetical listing and press ENTER.
Use the Up and Down Scroll buttons to choose the closest city to your location from the displayed list and press
ENTER.
Definition


