Getting Started
Here’s everything you need to set up
your personal CEIVA Digital Photo
Frame
™
and begin displaying photos.
In the box
CEIVA Digital Photo Frame
•
CEIVA Wireless Adapter
•
™
Two CEIVA specific screws
•
Quickstart Guide
•
What You Need to
Install Your CEIVA
Phillips screwdriver
•
Your memory card—if you plan to display
•
pictures from a memory card
Your home wireless network informa-
•
tion—if you plan to enhance your CEIVA
with Media Server and/or PicturePlan®
capabilities
(see page 4)
The name of your wireless network
•
(SSID)
Your network key, or password, if your
•
network requires one
Is Something Missing or Damaged?
Locate the 12-digit serial number, which is visible under the LCD panel when the door of the CEIVA is open.
Call 1-877-MYCEIVA (1-877-692-3482) to speak with the CEIVA
®
Customer Care Team. The team member
will first ask you for the serial number of your CEIVA.
NOTE: Please keep the original product packaging in case you need to return your CEIVA for repairs.
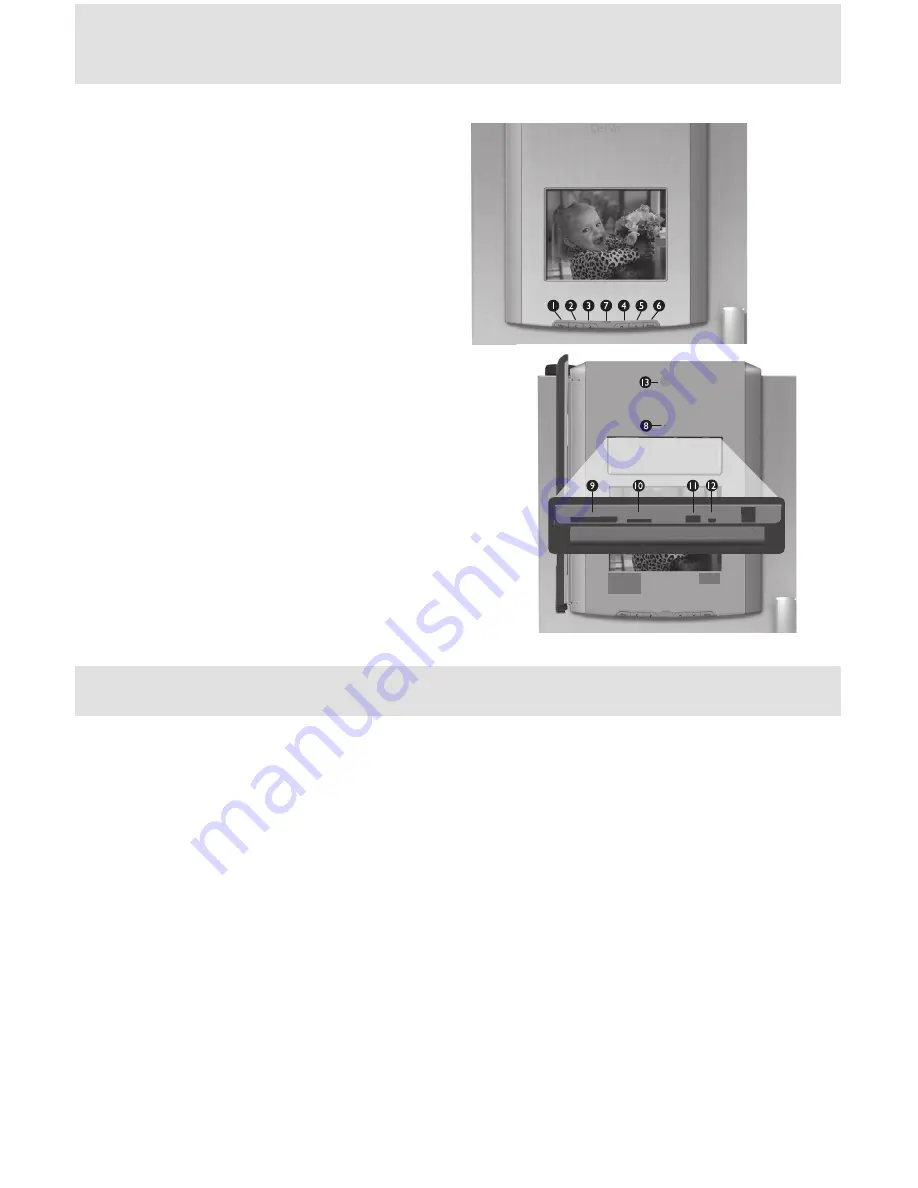
Menu Button
1.
Left Arrow Button
2.
Right Arrow Button
3.
Up Arrow Button
4.
Down Arrow Button
5.
Select Button
6.
New Photo Indicator
7.
Power Light
8.
CF I/CF II Slot
9.
(for Compact Flash
®
or Microdrive memory card)
SD/MMC/MS Slot
10.
(for Secure Digital
™
, MultiMedia Card
™
, Memory
Stick®, Memory Stick PRO®, Memory Stick
Duo
™
, Memory Stick PRO Duo
™
, SmartMedia
™
,
xD-Picture Card
™
, miniSD
™
*Some memory cards may require adapter;
please visit
http://help.ceiva.com
)
C-Port 1
11.
C-Port 2
12.
Power Button
13.
Components
2


