background image

ENGLISH

26

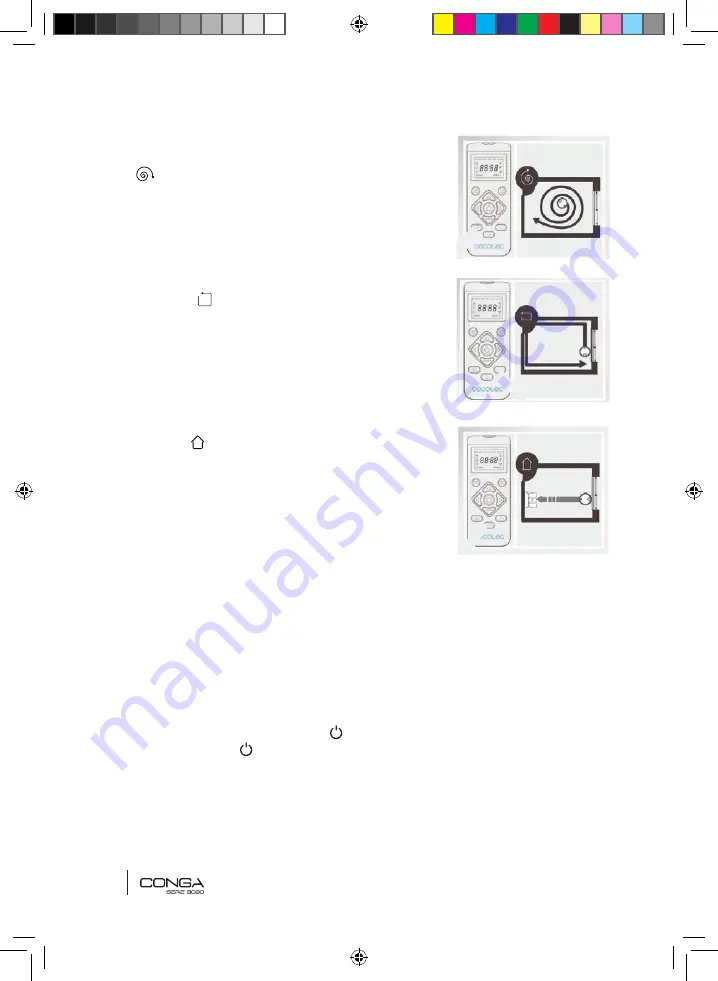
2. Spot-cleaning mode

While the robot is paused or in standby mode, press  

 on the remote control to activate Spot-cleaning 

mode. The robot will clean within a 2*2 space. This 
mode is commonly used to clean floors where dust is 
concentrated.  

3. Edge mode  

Press the    on the remote control for the robot to 
start cleaning under this mode. It will automatically 
start cleaning along walls, around furniture etc. 

Note: 

press 

POWER

 button to switch between the 3 

modes: Turbo/Normal/Eco

4. Back-home mode

Press the   button on the remote control to send the 
robot to the charging base. This mode can be activated 
during any other cleaning cycle and the robot will 
automatically return to the charging base and stop the 
cleaning process. 
The robot will take the shortest route back to the 
charging base thanks to its map memorizing and the 
smart back-home function. 
When a cleaning cycle has been completed or the robot’s battery is low, the robot will 
also return to the charging base to avoid running out of battery. 

Warnings:

• 

Remove the water tank from the robot before charging it. 

• 

If there are obstacles in the room being cleaned, the robot might not be able to reach 
the charging base. In this case, take the robot manually. 

PAUSE

While the robot is operating, press    on the App, the remote control or on the robot to 
pause it and press    to resume cleaning.

SLEEPING

The robot will automatically enter sleeping mode after 5 minutes of no operation. Press  

Conga Serie 3090_Manual_GE.indd   26

1/8/18   10:45

Содержание Conga 3090 Series

Страница 1: ...myRobotcenter The expert for robots in your home With one click to the online shop myRobotcenter eu myRobotcenter co uk...

Страница 2: ...Manual de instrucciones Instruction manual Manuel d instructions Bedienungsanleitung Manuale di istruzioni Manual de instru es Conga Serie 3090_Manual_GE indd 1 1 8 18 10 44...

Страница 3: ...Conga Serie 3090_Manual_GE indd 2 1 8 18 10 44...

Страница 4: ...aintenance 6 Battery replacement and charging 7 Troubleshooting 8 Technical specifications 9 Disposal of old electrical appliances 10 Technical support service and warranty INDICE 1 Pezzi e componenti...

Страница 5: ...er Light indicator 5 Operating steady blue light 6 Recharging low power yellow light blinks slowly 7 Charging yellow light oscillates 8 Network configuration blue light flashes slowly 9 Start up firmw...

Страница 6: ...brush 5 Driving wheel 6 Free fall sensor 7 Omnidirectional wheel 8 Main brush 9 Main brush cover Water tank 1 Dripping holes 2 Water tank 3 Velcro 4 Water tank release button 5 Water filling hole 6 M...

Страница 7: ...where it can fall or be pushed into water or allow it to come into contact with water or other liquids Do not operate outdoors Do not use the charging base if it has a damaged cord or plug or if it i...

Страница 8: ...ing the safety distance indicated in the below picture and connect it to a power supply Warning do not expose the charging base to direct sun light 2 2 Press the button for 3 seconds when the light in...

Страница 9: ...ng it is properly fixed 5 To remove it press the water tank release button and pull from the water tank Note remove the water tank when the robot is charging or not in use Warning in order to achieve...

Страница 10: ...an the cleaning route this stop will vary depending on the house conditions 2 SPOT cleaning While the robot is paused or in standby mode press the LASER button to activate Spot cleaning mode The robot...

Страница 11: ...h areas it has cleaned and which ones it has not The robot will plan the cleaning route automatically as it is cleaning If during this mode the robot is directed manually it will re plan the route and...

Страница 12: ...robot will automatically return to the charging base and stop the cleaning process The robot will take the shortest route back to the charging base thanks to its map memorizing and the smart back hom...

Страница 13: ...ith a schedule function in order to provide a maximum efficiency cleaning The time settings and the cleaning schedules must be carried out from the remote control Once the robot has been scheduled it...

Страница 14: ...ing when the remote control s batteries are replaced the clock and schedule times must be set again 4 3 APP In order to access all the robot s functions from anywhere it is suggested to download the C...

Страница 15: ...ter sleeping mode and the Wi Fi light indicatorwill blink fast indicating connection error Retry connecting the robot again following the steps in the before section 2 If the connection fails again ch...

Страница 16: ...t the dust tank 2 Take the HEPA filter s cover out and empty the dust 3 Install the HEPA filter pack in its place 4 Introduce the dust tank back into the robot fold the handle down and put the cover b...

Страница 17: ...ce the side brushes every 3 months 6 BATTERY REPLACEMENT AND CHARGING Do not use any other battery power adapter or charging base than the one provided Do not dismantle or repair the battery or the ch...

Страница 18: ...eaks from the robot The dust tank is full Empty it and clear the HEPA filter if it is blocked The main brush is tangled with foreign matter please clear it up The robot could not connect to Wi Fi The...

Страница 19: ...under warranty for 2 years from the date of purchase as long as the proof of purchase is submitted the product is in perfect physical condition and it has been given proper use as explained in this in...

Страница 20: ...Conga Serie 3090_Manual_GE indd 94 1 8 18 10 46...

Страница 21: ...Conga Serie 3090_Manual_GE indd 95 1 8 18 10 46...

Страница 22: ...Grupo Cecotec Innovaciones S L C de la Pinadeta s n 46930 Quart de Poblet Valencia Spain www cecotec es Conga Serie 3090_Manual_GE indd 96 1 8 18 10 46...

Отзывы: