background image

SHOWER SOFTENER-CEASA 19 


c.


Use a braided hose or corrugated pipe to connect the water inlet to the unit, 

connect one outlet to the inlet of the water heater and another outlet to the cold 

water port of the water mixing valve. 

Please  keep  in  mind  that  the  product  will  have  no  water  flow  during 

regeneration.  If  the  users  need  water  during  regeneration,  then  we  suggest 

reserving  a  spare  outlet  when  installing  the  domestic  water  supply  pipe.  For 

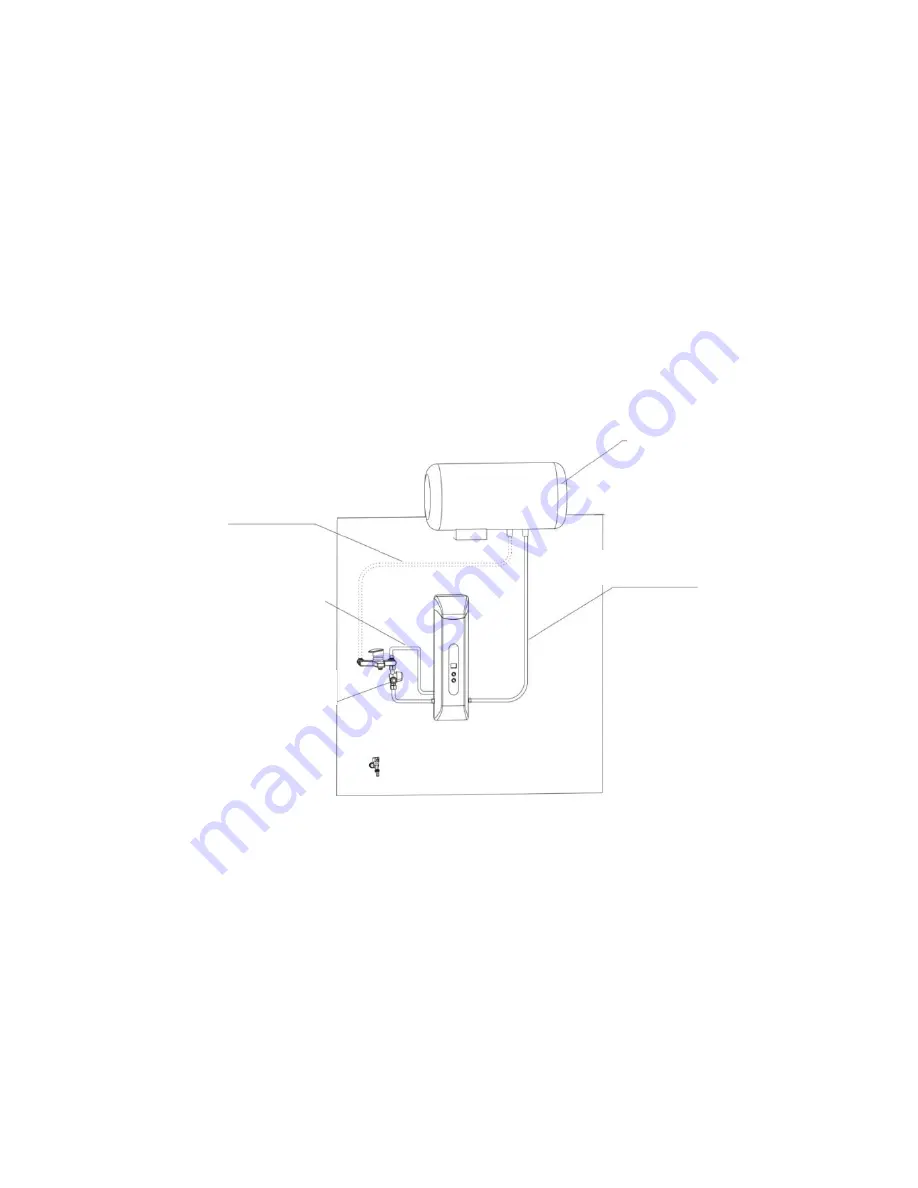
customer  reference,  figure  19  and  figure  20  show  a  common  installation 

diagram. Figure 21 shows a closeup of the cold water connection. 


Figure 19. Diagram of installation before the water heater 


Embedded pipe installed 

Water heater 

Outlet connected to cold water 

connection 

Outlet connected to water heater 

Cut-off filter valve 

Water heater 

Содержание SET&SOFT

Страница 1: ...SHOWER SOFTENER CEASA 1 ...

Страница 2: ...irdressing salons washing machines etc The softener water is not drinkable Please note 1 Due to occasional updates some of the text or designs in the manual may differ from the actual product Please refer to the actual product 2 All data has been carefully checked If there are any printing or content errors we reserve the right of interpretation ...

Страница 3: ...stallation Instructions 3 3 1 Installation after Water Heater 3 3 2 Installation before Water Heater 3 3 3 Drain Pipeline Installation 3 3 4 Power Wire Installation 4 Trial Run 22 5 Regeneration Operation 22 5 1 Water Capacity 5 2 Regeneration Salt Consumption 5 3 Regeneration Process 6 Resin Replacement 25 7 Parameter Setting 28 7 1 Product Control Panel Overview 7 2 Main Board Socket Overview 7 ...

Страница 4: ...h a water pressure of 0 1 0 6 Mpa and a water temperature of 5 70 Not permitted for use outside this range 6 The product is only suitable for indoor installation and use It must be installed in a cool and dry place away from direct sunlight Avoid exposing the pipe connected to the product to light heat corrosive environments and impact from sharp objects 7 This product should be installed at aroun...

Страница 5: ...cessories Name Quantity Remarks Braided hose 1 600mm Cut off filter 1 Drain pipe 3 Cold water connector 1 Installation before the water heater Hot water connector 1 Installation before the water heater Elbow 1 Installation before the water heater 1 PRODUCT LIST Note Optional accessories are required to install the product before the water heater If needed please purchase from your distributor ...

Страница 6: ...eminder next regeneration time display Automatic backwash function that reduces resin hardening and strainer blockage to improve resin service life Built in quick connector for easier maintenance and resin replacement Outlet with check valve to prevent the backflow of water from the water heater Data saved after power off 2 2 Technical Parameters Item Requirements Work Pressure 0 1 0 6MPa Water Te...

Страница 7: ...water processors 2001 All operating parameters for this product have been measured under standard test conditions total water hardness test in CaCO3 200 mg and will change under different operating conditions 2 3 Technological Processing of Water Tap Water Na cationic resin Soft water 2 4 Appearance and Dimensions Product Diagram Drain pipe Outlet Inlet ...

Страница 8: ...t to prevent scaling in the water heater save energy and protect the environment and soften the bathing water B Installation after the water heater Advantage The installation after the water heater is convenient for pipeline installation softens the bathing water and is suitable for users looking to decorate Salt tank cover Soluble salt tank Resin Riser pipe Resin tank Control valve 3 INSTALLATION...

Страница 9: ...r and percussion drill 3 2 2 Installation Position For details on the product installation method to determine the installation position and pipe connection please refer to the pipe installation instructions in the user manual When this product fails to use the resin salt needs to be added for the regeneration In order to add salt the user can choose at what height to hang the product based on the...

Страница 10: ...he stainless steel plate can be installed using just four expansion screws in a diagonal pattern in soft walls such as wood lime Installation under other special conditions may require more screws Please refer to figure 1 2 4 Insert the expansion screw tube into the drilled hole then use a screwdriver to fix the plate to the wall as shown in figure 2 with the raised side facing outwards 2 5 Instal...

Страница 11: ... no water flow during regeneration Please reserved a spare outlet for this purpose during installation Installation steps 1 1 Close the water mixing valve use an adjustable wrench to unscrew the hand held shower nozzle and the nut from the water mixing valve connection as shown in figure 4 Tighten the nut of the shower head to the outlet of the unit as shown in figure 5 Fixed unit Plate mounted on...

Страница 12: ...To select the installation location for the unit determine the water pipe connection This manual describes several common installation methods as a reference for the user a If the surrounding space already has a spare faucet installed the unit can be installed to the left or the right of the water mixing valve depending on the space available as shown in figure 6 and figure 7 Unscrew the nut with ...

Страница 13: ...lation diagram of the unit on the right side of the water mixing valve Bellows joint recommended Figure 6 Installation diagram of the unit on the left side of the water mixing valve Use bellows joint or tube Suggested distance less than 300mm ...

Страница 14: ...talling the unit on the reserved outlet in the water mixing valve outlet pipe to the left or the right of the water mixing valve depending on the space requirements as shown in figure 8 and figure 9 Figure 8 Installation diagram of the unit on the right side of the water mixing valve using the reserved outlet Reserved outlet ...

Страница 15: ...e Water Heater Note Installation before the water heater is relatively complicated and requires some accessories that must be purchased from a dealer Required accessories No Name Diagram Remarks 1 Hot water connector On the connector engraved with H 2 Cold water connector On the connector engraved with C 3 Cut off filter valve Selection 4 Elbow Reserved outlet ...

Страница 16: ... the wrench to connect the cold water connector of the water mixing valve to the cold water connection and the hot water connector to the hot water connection taking care to maintain the integrity of the flat gasket as shown in figure 12 d Following the diagram of the installed water mixing valve and the signs on the connection place the cold water outlet facing down as shown in figure 13 e In ord...

Страница 17: ...tor Figure 12 Installation of cold and hot water connectors Figure 13 Appearance after installation Figure 14 Installation diagram of cut off filter valve Eccentric connector Water mixing valve Flat gasket Water mixing valve Flat gasket Hot water port connector Cold water port connector flat gasket Cut off filter valve ...

Страница 18: ...he unit as shown in figure 16 Take out the articulated elbow from the accessories box and tighten it to the outlet as shown in figure 17 with the flat gasket Appearance after installation is shown in figure 18 b Choose the appropriate position to hang the unit on the wall with reference to the previous product installation instructions Figure 16 Figure 17 Figure 18 Back outlet End cap Flat gasket ...

Страница 19: ...ing regeneration If the users need water during regeneration then we suggest reserving a spare outlet when installing the domestic water supply pipe For customer reference figure 19 and figure 20 show a common installation diagram Figure 21 shows a closeup of the cold water connection Figure 19 Diagram of installation before the water heater Embedded pipe installed Water heater Outlet connected to...

Страница 20: ...ded because the water pipe is farther or for other reasons please use the 1 4 quick connector Pay attention to the flow control connector The drain hose is correctly installed when connected as shown in figure 22 Please contact your distributor if you lose it Back pipe Reserved outlet Cut off filter valve Connection to cold water Connection to water heater Cold water connection to mixing water val...

Страница 21: ...eeds the power supply to be located far away from water mist when the device is installed The power plug uses a seal design For installation please tighten the power wire connector nut as shown in figure 23 Figure 23 Quick connector Flow control Drain pipe Power wire connector nut ...

Страница 22: ... coming from the outlet This is a normal phenomenon that occurs because the resin is new and should disappear after rinsing 5 1 Water Capacity Water capacity is related to water hardness Bathing water consumption is calculated based on 40 L per day for a family of three Water hardness Water capacity Time until regeneration 200mg L 750L About 6 days 400 mg L 320L About 3 days The user can make calc...

Страница 23: ...sidential softener One regeneration needs 400g of salt Reminder Using other salts may have adverse effects 5 3 Regeneration Process When water capacity reaches a certain value resin fails and regeneration salt needs to be used for regeneration Method 1 1 The unit needs water supply for the regeneration The user needs to open the water mixing valve if installed after the water heater and let cold w...

Страница 24: ... The system will automatically flush itself after the regeneration The process takes about 1h and doesn t need to be supervised After the regeneration is completed if the program selected is the front installation mode the system will switch to the water supply if the back end installation mode is selected the system will go into standby mode The user will need to press the switch to select the wa...

Страница 25: ...in line flow control put it down carefully to avoid losing it c Take out the front cover from the unit and handle with care to avoid causing damage d Using a cross head screwdriver screw out the 4 screws that fix the resin tank to the back cover One key to start regeneration Wait for the buzzer to sound Remove the upper cover Unscrew the salt tank cover System in regeneration Place the cover Tight...

Страница 26: ...to the resin tank i Install the shower softener according to the above steps noting the following during the installation process 1 The tread on the resin tank and the O ring should be clean 2 If the riser pipe drops out it needs to be cleaned before placing it inside the resin tank 3 Please make sure the drain line flow control is intact when installing the drain pipe d Take out back cover screw ...

Страница 27: ...ENER CEASA 27 Press the riser pipe and pour resin f Take out resin tank assembly Take out resin tank and valve assembly e Unscrew resin tank cover Resin tank cover g Take out top strainer Top strainer h Pour resin ...

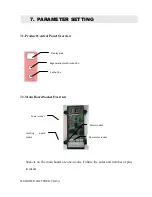
Страница 28: ...ew 7 2 Main Board Socket Overview Sockets on the main board are one to one Follow the color and number of pins to insert Regeneration confirm button Display area Set button Power socket Locating board socket Flow meter socket Motor socket 7 PARAMETER SETTING ...

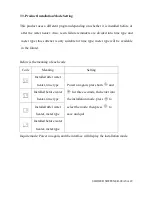
Страница 29: ... type meter type will be available in the future Below is the meaning of each code Code Meaning Setting Installed after water heater time type Power on again press both and for three seconds then enter into the installation mode press to select the mode then press to save and quit Installed before water heater time type Installed after water heater meter type Installed before water heater meter ty...

Страница 30: ... in the service position This will enter the settings menu where you can adjust the number from 5 to 50 5 equals 50 ppm 6 equals 60 ppm and 50 means 500 ppm Based on this information you can adjust the water hardness and the system will calculate the water treatment capacity automatically When the shower softener is operational the LED display shows a value like 1111 to indicate how much of the tr...

Страница 31: ...ation 1 Regenerate resin 2 Replace with new resin 3 Check if the drain line is blocked or use the special regeneration salt Unsuccessful regeneration 1 Special regeneration salt was not used 2 The drain is blocked 3 Water inlet wasn t open during regeneration 1 Use the special regeneration salt 2 Open up the drain line flow control 3 Open the water inlet and perform regeneration again E1 flashes 1...

Страница 32: ...er the below conditions 1 Warranty period expired one year 2 Damage resulting from use maintenance and upkeep not in accordance with the instructions 3 Damage resulting from repairs carried out by unauthorized maintenance personnel 4 The contents of the proof of warranty cannot be verified with the label or have been altered 5 Damage caused by force majeure Product Name RUNLUCKY SHOWER SOFTENER Mo...

Страница 33: ...AÑÍA EUROPA DEL AGUA S A ADDRESS C R F Alemania 21 25 Polígono Industrial Rosanes Castellví de Rosanes Barcelona Postal code 08769 TEL 00 34 937 766 344 FAX 00 34 937 766 344 WEB http www ceasaespana com E mail info ceasaespana com ...

Отзывы: