background image

10

Installation 

When installing this product we recommend you seek the help of 
another individual. This product may have some sharp edges. Please 
take care and wear adequate PPE when handling.

Installation preparation - height

When the extractor is to be installed above an 

electric hob

, the 

minimum distance between the hob and 

the bottom edge of the 

extractor

 must exceed 495mm.

When the extractor is to be installed above a 

gas hob

, the minimum 

distance between 

the bottom edge of the extractor

 and hob must 

exceed 495mm.

If the instructions provided with your gas hob state that the 
required distance between the hob and extractor must be greater 
than our measurement, then that is the distance that should be 
observed; this is a legal requirement and may lead to your hob 
being disconnected from the gas supply and the installation being 
reported under RIDDOR (the height should be measured from the 
top of the burners).

IN THE ABSENCE OF ANY INSTRUCTIONS SUPPLIED WITH THE 
GAS HOB, THE MINIMUM DISTANCE BETWEEN THE HOB AND 
EXTRACTOR MUST BE AT LEAST 760mm. The width of any hob 
must not be greater than the width of the extractor installed above 
it.

Содержание EXA60

Страница 1: ...www cda eu EXA60 EXA80 Extractors Installation use and maintenance...

Страница 2: ...lter s 9 Changing the light 10 17 Installation 10 Installation preparation height 12 Ducting and ventilation 14 Mounting the extractor 16 Alternative to the chimney sections 16 Using the T piece for r...

Страница 3: ...edge about it unless they have had supervision or instructions on how to use the appliance by someone who is responsible for their safety Under no circumstances should any external covers be removed f...

Страница 4: ...esources As a reminder of the need to dispose of household appliances separately the product is marked with a crossed out wheeled dustbin Please note Under no circumstances should the extractor be con...

Страница 5: ...f less than 36m3 Steam cleaners must not be used when cleaning this appliance The performance of your extractor will vary depending on a number of factors These include type of extraction length of du...

Страница 6: ...key to switch the unit on Adjust the speed as necessary using keys B and C The circular indicators will illuminate progressively for the first second third or intensive speed levels to indicate which...

Страница 7: ...he extractor such as a hob with clean dry towels or similar cushioning items before carrying out any cleaning or maintenance in case of falling parts items Removing and cleaning the grease filter The...

Страница 8: ...e grease filter repeat the steps in reverse Changing the charcoal filter re circulating only Fig 2 To ensure best performance of your extractor you should replace the charcoal filter every four to six...

Страница 9: ...bs These are not user replaceable In the unlikely event of a failure please contact CDA Customer Care using the details on page 22 Do not touch bulbs or adjacent areas during or straight after prolong...

Страница 10: ...dge of the extractor and hob must exceed 495mm If the instructions provided with your gas hob state that the required distance between the hob and extractor must be greater than our measurement then t...

Страница 11: ...XA60 EXA80 Taking into account the extractor dimensions and the advice regard ing installation height as per page 10 roughly mark the centre line for the extractor Use the supplied template to finalis...

Страница 12: ...otor for horizontal through a wall ducting follow the steps below Whilst supporting the motor group remove all screws shown in Fig 4 Ensure that there is no power being supplied to the appliance durin...

Страница 13: ...13 Before cutting drilling through any surfaces ensure that adequate measures have been taken to ensure no electrical cables or similar lie behind Fig 4 Fig 5...

Страница 14: ...extractor yet These should be fitted to the wall as per Fig 6 They will act as support hooks for the extractor body When both brackets have been firmly secured to the wall manoeuvre the extractor bod...

Страница 15: ...who can hold the cover open for you Remove the grease filter and fit two screws with one each side as per Fig 8 Please note when preparing for connecting the extractor to the mains power supply that t...

Страница 16: ...fit them as per page 17 should you wish If you decide not to use the chimney sections fit the outlet grid as shown in Fig 9 IMPORTANT If the motor outlet is still positioned vertically pages 12 and 13...

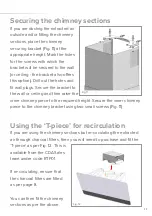
Страница 17: ...the wall or ceiling and then raise the inner chimney piece to the required height Secure the inner chimney piece to the chimney bracket using two small screws Fig 11 Using the T piece for recirculatio...

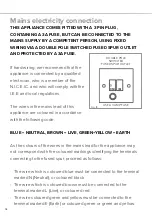
Страница 18: ...ppliance are coloured in accordance with the following code BLUE NEUTRAL BROWN LIVE GREEN YELLOW EARTH As the colours of the wires in the mains lead for the appliance may not correspond with the colou...

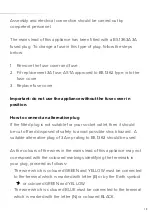
Страница 19: ...g If the fitted plug is not suitable for your socket outlet then it should be cut off and disposed of safely to avoid possible shock hazard A suitable alternative plug of 3 Amp rating to BS 1363 shoul...

Страница 20: ...t a qualified electrician Do not shorten the supply cable the appliance may require removal for servicing Do not mount the plug or the isolation switch behind the chimney section It is a requirement t...

Страница 21: ...rk contact CDA Customer Care If the performance is not matching the demands of cooking Increase the speed if possible and open the extractor cover as far as the hydraulic strut allows to see if this h...

Страница 22: ...his is not a fault After 30 hours of usage all speed indicators will flash to signal that the grease filter needs to be cleaned Press the timer key to reset after cleaning If any of the potential reso...

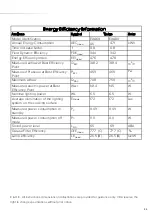
Страница 23: ...st Efficiency Point QBEP 381 2 381 4 m3 h Measured Pressure at Best Efficiency Point PBEP 459 Maximum airflow QMAX 748 m3 h Measured electric power at Best Efficiency Point WBEP 141 4 Nominal lighting...

Страница 24: ...9HY T 01949 862 012 F 01949 862 003 E customer care cda eu For service or queries relating to your product please contact The Customer Care Department on 01949 862 012 or email customer care cda eu Fo...

Отзывы: