7
FITTING YOUR EXTRACTOR TO
THE WALL:
Before commencing, remove the grease filter as shown
above.
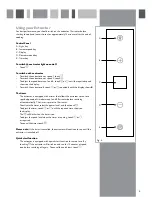
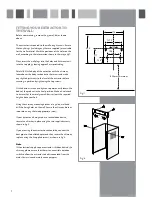
The extractor is mounted to the wall using 4 screws. Ensure
that any fixings (including any that are supplied) are suitable
for the wall material. Mark the positions of the holes on the
wall, according to the information shown in the image fig 7.
Next, insert the wall plugs into the holes and fit two screws
into the top plugs, leaving approx 5mm protruding.
Carefully lift the body of the extractor with the chimney
located over the body section onto the screws and make
any slight adjustments to the level of the extractor before
securing in position by tightening the top screws.
Fit the bottom screws and tighten to permanently locate the
body of the product in the final position. Make a final check
to ensure that the metal grease filter is at least the required
height above your hob.
Using the chimney mounting bracket as a guide, mark and
drill the fixing holes on the wall. Secure the chimney bracket
in position using the two appropriate screws.
If your extractor is being used as a recirculation device,
secure the chimney in place using the two supplied screws,
shown in fig 8.
If you are using the extractor to vent outside, connect the
duct pipe to the outlet adapter and then secure the chimney
in place using the 2 supplied screws, as shown in fig 8.
Note:
If the electrical supply to your extractor is hidden behind the
chimney, please ensure that there is an accessible isolation
switch to allow the extractor to be disconnected from the
mains for service and maintenance purposes.
Fig. 8
Fig. 7
318
530
317
650mm Minimum
106
137.5
126
150


