


VX 820 ITS
Installation & service manual (version 1.0)
v1.0, Internal
Step
Explanation
8
Checking whether the PIN pad
operates correctly
After installation of the PIN pad, check whether the PIN pad operates
correctly. To do this, you carry out a day opening (if necessary!) and a
test transaction.
2.6
Step 1: preparing for installation
Before installation, check the following:
•
whether all necessary facilities are available on the location of installation (see section
2.2
);
•
whether all positioning instructions have been met (see section
2.3
);
•
whether you have all necessary information at hand (see section
2.4
).
2.7
Step 2: installing AdminLight
Install AdminLight
.
For more information about installing AdminLight, please refer to the AdminLight user manual (see
section
1.6
).
2.8
Step 3: configuring the communication settings of the PIN pad
First, configure the communication settings for the VX 820 ITS PIN pad. In order to carry out this step, you need the
following information. This information should be available from the supplier of the cash register or at the customer’s!
•
Terminal IP address
•
Subnet mask
•
Gateway
Connect the VX 820 ITS PIN pad to the LAN network and a power supply connected to a wall socket with 220-230V. Then
carry out the following actions to configure the communication settings of the PIN pad:
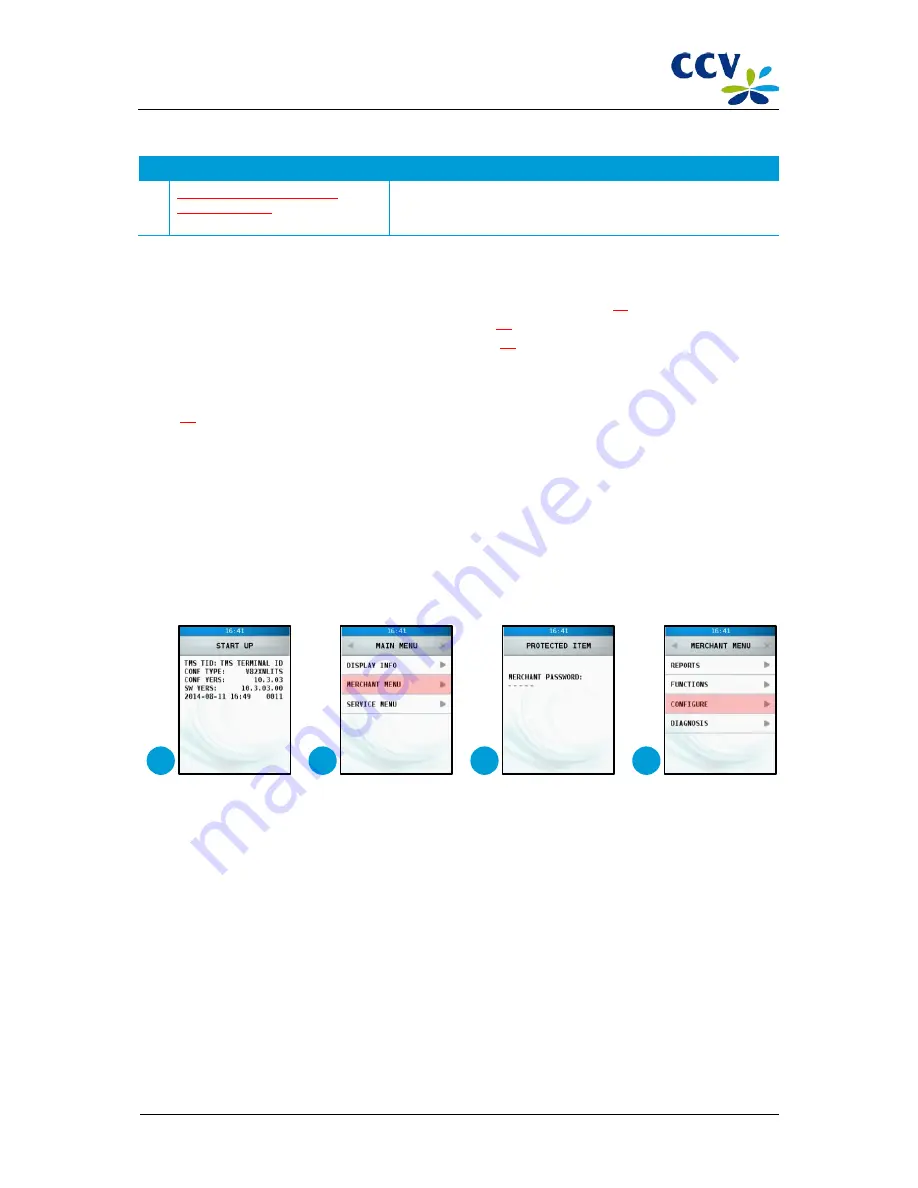
1
Type in <
*
>, <
#
> and three times <
OK
> as soon as the notification 'START UP' appears on the display. Wait until
the menu structure appears on the display and continue on to action 3. It may take a little while before the menu
structure appears on the display!
2
Choose the menu option <
MERCHANT MENU
>.
3
Enter the password of the merchant menu (
99999
) and confirm with <
OK
>.
4
Choose the menu option <
CONFIGURE
>.
1
2
3
4
CID087A/15042015
© CCV Services B.V.
10 / 45


