background image


14 

Part III: Setup and Operate 

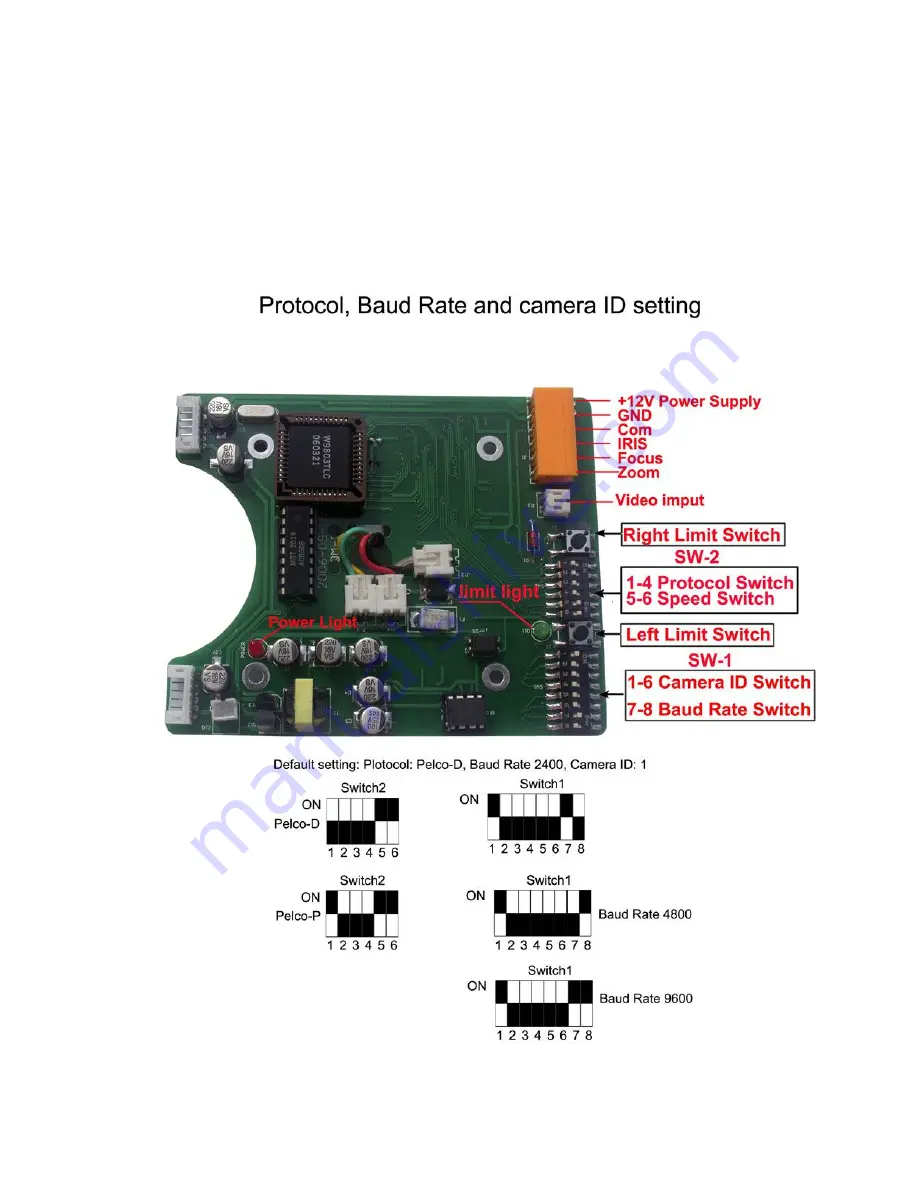
3-1 Protocol, Baud Rate, Address and Speed setup 

It is important to setup the protocol, baud rate and camera address for controlling, 

Both of the dome camera and controller must be setting same in the protocol, baud rate 
and camera address 


Содержание JE900BN

Страница 1: ...User s Manual for Smart Constant Speed Dome Camera Please read the manual carefully before installing and using the unit Model JE900BN JE900BNC...

Страница 2: ...2 7 POWER SUPPLY ADAPTER INSTALLATION 11 2 8 INSTALLATION FOR EMBEDDED DOME CAMERA 12 2 9 CONNECTING POWER AND SIGNAL CABLE 12 PART III SETUP AND OPERATE 14 3 1 PROTOCOL BAUD RATE ADDRESS AND SPEED S...

Страница 3: ...system 1 2 Characteristics 1 Precise conductive slip ring is adopted which 360 pan endless running and all direction monitoring is realized and cable twisting problem with common constant speed domes...

Страница 4: ...onditions If not operated after 5 minutes it will automatically monitor the preset position 1 3 Main Technical Data 1 Electric Index Power supply DC14V 15V 2A Dome motor DC14V 15V 0 5A Camera lens mot...

Страница 5: ...ance Auto OFF BLC Auto OFF Electric shutter 1 50 1 12000s S N Ratio 50dB Video Output Composite 1 0 0 2Vp p 1 4 Styles of Installation and Ancillary Components Item installation Bracket Heater fan Wal...

Страница 6: ...ra block 1 Firstly make sure the size of the selected video camera is within the acceptable range Then follow the direction indicated on the camera suspender and fix the camera to it with special scre...

Страница 7: ...signal of the camera lens Corresponding outlet on PCB panel Camera power supply 12VDC GND Lens Zoom ZOOM Lens Focus FOCUS Lens Iris IRIS Lens Controlling public ground COM 3 Connect Video Cable Connec...

Страница 8: ...e socket on the module Then fit the parts shown with dotted lines on the module into the indentation shown with dotted lines on the peg board See the above figure Step 2 Hold the module then turn it t...

Страница 9: ...using please don t merely pull the power video and controlling integrated cable to lift the unit with which operation the connecting ports of the integrated cable may be pulled out or even worse the c...

Страница 10: ...about 20 degrees till it stops moving See the above figure 2 5 Housing and Wall mount Bracket installation Push the power video and controlling integrated cable through the bracket hole then direct th...

Страница 11: ...Pole Bracket Select the where you want to installing and make sure the place can be sustained its weight Pencil the relative positions of the three bores of the bracket on the ceiling and fix the bra...

Страница 12: ...de the arm bracket or next to the PTZ camera to avoid the drop of voltage due to there is a big internal resistor in the DC circuit Step 1 Put the power adaptor into the well connected wall bracket an...

Страница 13: ...pper housing to a reinforced structure of the ceiling The wire rope is required to bear at least 5 times the weight of the dome camera 2 9 Connecting Power and Signal Cable The connection of cables be...

Страница 14: ...C14V 15V Users can choose according to the condition Please refer to the connecting sketch of the Temperature Controlling Devices for the connection 4 Connection of Video Cable Please weld a BNC conne...

Страница 15: ...1 Protocol Baud Rate Address and Speed setup It is important to setup the protocol baud rate and camera address for controlling Both of the dome camera and controller must be setting same in the proto...

Страница 16: ...001 57 111001 10 001010 26 011010 42 101010 58 111010 11 001011 27 011011 43 101011 59 111011 12 001100 28 011100 44 101100 60 111100 13 001101 29 011101 45 101101 61 111101 14 001110 30 011110 46 101...

Страница 17: ...camera is in the state of pan auto scanning the scanning should be stopped through the controlling device to avoid possible friction or collision between camera cable and inner housing caused by inap...

Страница 18: ...rticular short command for operate the PTZ camera with protocol Pelco D1 Code No Definition Code No Definition 120 begin with left right limiting position setup 110 Begin with the tour setup 121 Finis...

Страница 19: ...on and press the PRESET key then you have set up the preset position successfully Example Set up preset position No 1 a Use the joystick to move the dome camera to the desired position b Enter 1 c Pre...

Страница 20: ...umber and press the PREVIEW key the second preset position is successfully added Up to 16 preset positions can be added in the same way c After all the required preset positions having been added in t...

Страница 21: ...beginning position as Left Limiting Position and one terminal position as Right Limiting Position Remark If the beginning position and the terminal position is the same position the speed dome will s...

Страница 22: ...has a default position The user can set up default position for a key monitoring area according to actual requirement If not operated after 5 minutes the dome camera will automatically monitor the de...

Страница 23: ...85 bus connection Mechanical failure Repair Camera inclined Reinstall Abnormal self check image with motor noise Power supply not enough Replace placing the adaptor nearby the unit is recommended Bad...

Страница 24: ...23...

Отзывы: