background image

EN-64

Getting Ready

9.

First, 

u

se the two screws 

 to sec

u

re the 

b

ack of the piano (

b

oth left and right side) to 

the stand. 

N

ext, 

u

se the two screws 

 to 

sec

u

re the front of the piano (

b

oth left and 

right side).

If you have trouble insert the 

 screws, better align 

the back of the piano unit and the stand side panels 
(at the position marked 

 in the illustration).

• The screws 

 keep the piano from slipping off the 

stand. 

N

ever 

u

se the piano witho

u

t the screws 


installed.

10.

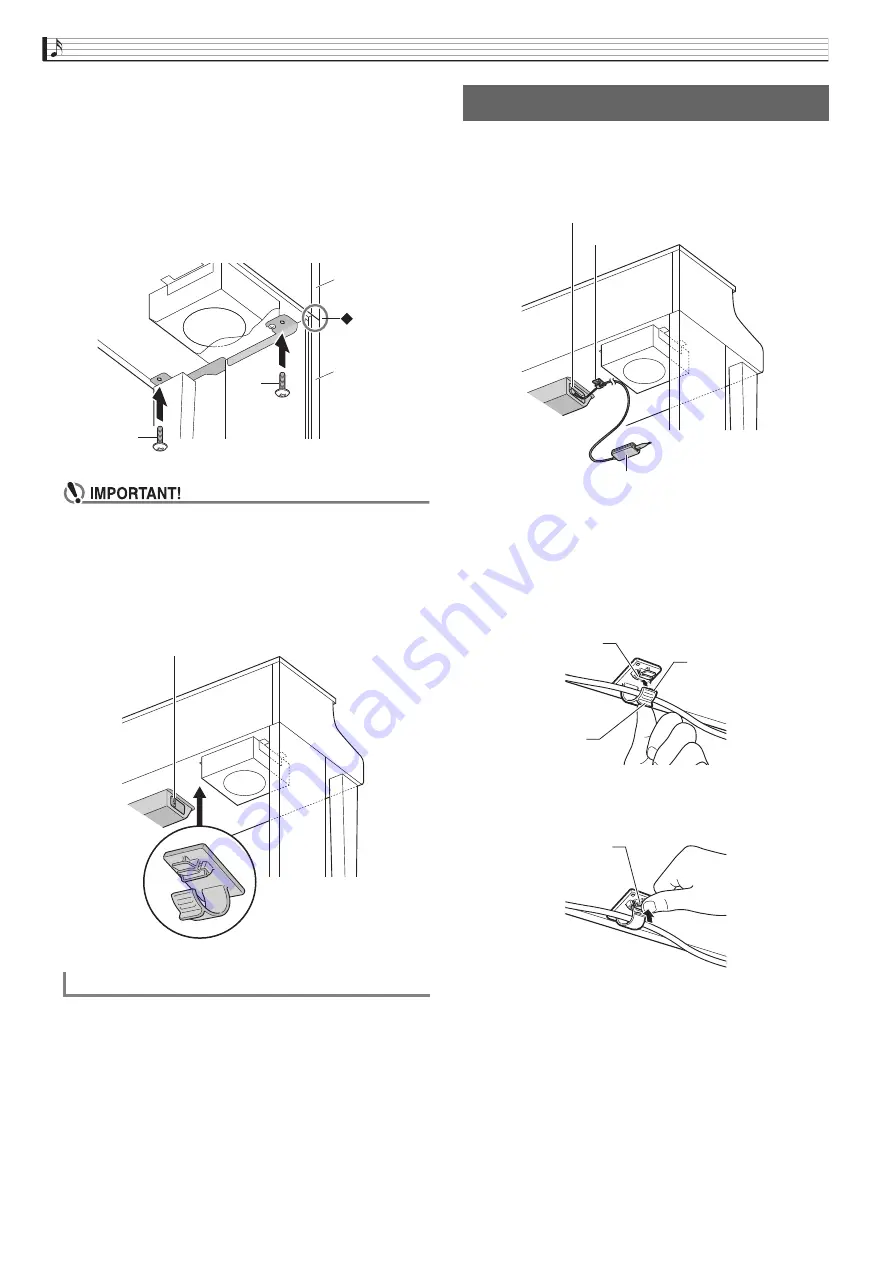
Affix the adaptor cord clip 

 next to the 

power terminal (

DC 24V

).

Be sure to insert felt or other material between the 
rubber feet and flooring. Do not allow direct contact 
between them. Some types of flooring material may 
become discolored or damaged by direct contact with 
the rubber feet.

1.

Insert the pl

u

g of the AC adaptor that comes 

with the Digital Piano into its power terminal 
(

DC 24V

).

Usin

g

 the Clip 

To fasten the clip
As shown in the illustration, press down on (a) to 
force the tip of the clip into the slot. Press down until 
you hear the clip click securely into place.

To release the clip
As shown in the illustration, press (b) in the 
direction indicated by the arrow.

Handlin

g

 Precautions

Back of piano

Stand side panel

DC 24V

 terminal

To connect the cables

Clip 

AC adaptor pl

u

g

S

u

pplied AC adaptor

¨á©

Slot

Tip

¨â©

Содержание CELVIANO GP-510

Страница 1: ...uarde toda información para tener como referencia futura Safety Precautions Before trying to use the piano be sure to read the separate Safety Precautions Precauciones de seguridad Antes de intentar usar el piano asegúrese de leer las Precauciones de seguridad separadas English Español GP 510 GP 510 ...

Страница 2: ...sture does not operate normally or has been dropped The apparatus shall not be exposed to dripping or splashing and that no objects filled with liquids such as vases shall be placed on the apparatus The power indicator being unlit does not mean the apparatus is completely disconnected from the MAINS When you need to have the apparatus completely disconnected from the MAINS you must unplug the powe...

Страница 3: ... the nearby QR code or the URL below About Music Score data You can download music score data as a PDF file from the CASIO website which you can access using the URL or QR code below You will then be able to view music scores on your smart device https support casio com global en emi manual GP 510 EN 1 ...

Страница 4: ...8 To adjust the volume balance between two layered tones EN 19 To change the octave of each layer EN 19 Splitting the Keyboard between Two Different Tones EN 20 To modify split settings EN 21 Using the Metronome EN 21 To start and stop EN 21 To configure metronome settings EN 21 Changing Keyboard Response to Touch Pressure Touch Response EN 22 To change touch response sensitivity EN 22 Changing th...

Страница 5: ...ypes Supported by the Digital Piano EN 52 To connect a USB flash drive to and to detach it from the Digital Piano EN 53 To format a USB flash drive EN 54 Saving Standard Song Data to a USB Flash Drive EN 54 Saving Digital Piano Data to a USB Flash Drive EN 55 Loading USB Flash Drive Data into Digital Piano Memory EN 56 Deleting USB Flash Drive File EN 57 Renaming a USB Flash Drive File EN 57 Error...

Страница 6: ...kground the screenshots in this manual are dark figures on a light background LCD display light figures dark background P Power button Tone group button BERLIN GRAND button HAMBURG GRAND button VIENNA GRAND button USB flash drive port SETTING button EXIT button CONCERTPLAY button REC button Arrow buttons ENTER button SONG button LAYER button k Start Pause button METRONOME button VOLUME controller ...

Страница 7: ...hers between the cover and keyboard Particular care is required when children are present Do not let go of the cover while opening or closing it When closing the cover do not press down on its top with your hand Doing so creates the risk of pinching your hand between the folding panels Do not play on the keyboard while the cover incompletely opened 1 Holding the handles on the front of the cover w...

Страница 8: ...Piano for a long time or if there is a lightning storm in your area be sure to unplug the AC adaptor from the power outlet The message Please Wait will remain on the display while a data save operation is in progress Do not perform any other operation while it is displayed Turning off the Digital Piano can cause Digital Piano data to be deleted or become corrupted This Digital Piano is designed to...

Страница 9: ...ettings to their initial factory defaults 1 Press the SETTING button to display the setting screen 2 Use the q and w arrow buttons to select General and then press the ENTER button 3 Use the q and w arrow buttons to select Factory Reset and then press the ENTER button This causes the confirmation message Initialize All to appear 4 Press the ENTER button This will cause the confirmation message Sur...

Страница 10: ...ress the EXIT button A dot 0 or arrow mark to the left of a parameter name indicates that the parameter is selected 1 Use the q and w arrow buttons to move the mark up or down Holding down either button moves the mark at high speed Use the operations in this section to specify a number or to change a value 1 Press the u or i arrow button To return a setting to its initial default press the u and i...

Страница 11: ...33 Audio Recorder To play back data recorded on a USB flash drive page EN 42 1 Press the k button to start playback Holding down the u arrow button during playback fast reverses the track Holding down the i arrow button during playback fast forwards the track Press and releasing the u arrow button causes playback to jump to the beginning of the track 2 Press the k button to pause playback Press th...

Страница 12: ...p names and the names of the tones in each group see the Tone List page A 1 Tone List 1 Press one of the buttons below BERLIN GRAND Berlin grand piano HAMBURG GRAND Hamburg grand piano VIENNA GRAND Vienna grand piano The name of the tone assigned to the button you pressed will appear on the display Pressing the button of the tone group that is currently selected scrolls through the group tones wit...

Страница 13: ...t and sostenuto Pressing the pedals without adjusting the height adjustment screw can result in abnormal noise and or damage to the crosspiece See step 7 under Assembling the Stand on page EN 63 Pedal Functions Damper Pedal Pressing the damper pedal while playing will cause the notes you play to reverberate When grand piano is selected as the tone using this pedal generates harmonic and other reso...

Страница 14: ...se the q and w arrow buttons to select Half Pedal Pos 4 Use the u and i arrow buttons to change the setting value and adjust the half pedal trigger position 1 or greater Deeper trigger position 1 or less Shallower trigger position The setting range is 2 to 2 5 Press the SETTING button to exit the setting screen To adjust the half pedal trigger position H a l f P e d a l P o s ...

Страница 15: ... damper of an acoustic piano separates from the wires pedal when the damper pedal is pressed You can use the settings below to adjust the volume level of damper noise Default Optimum setting for currently selected tone Off Disabled 1 to 10 A larger value increases the noise level D Default Off Disabled 1 to 10 String Resonance String Resonance Playing on an acoustic piano causes the strings that a...

Страница 16: ...ng the keyboard keys of acoustic piano generates piano mechanism operation sound noise You can use the settings below to adjust the volume level of the noise Default Optimum setting for currently selected tone Off Disabled 1 to 10 A larger value increases the noise level D Default Off Disabled 1 to 10 Display Name Description Setting Range 1 Press the SETTING button to display the setting screen 2...

Страница 17: ... Effect and then press the ENTER button 3 Use the q and w arrow buttons to select Hall Simulator 4 Use the u and i arrow buttons to select a Hall Simulator name 5 Use the q and w arrow buttons to select Position 6 Use the u and i arrow buttons to select a position Player Position of the performer seated in front of the piano on the stage of the hall Listener 1 Position of audience seated at the fr...

Страница 18: ...en press the ENTER button 3 Use the q and w arrow buttons to select Brilliance 4 Use the u and i arrow buttons to change the setting 1 or higher Makes the tone brighter 1 or lower Makes the tone darker The setting range is 3 to 3 5 Press the SETTING button to exit the setting screen DSP makes it possible to digitally produce complex acoustic effects The DSP is assigned to each tone whenever you tu...

Страница 19: ... Pan Enabled Left side keyboard play is output from the left speaker and right side play is output from the right speaker The Duet Pan Mode effect is applied only while a grand piano tone is selected Turning on layer page EN 18 automatically exits the Duet Mode 6 Press the SETTING button to exit the setting screen After you are finished using the Duet Mode repeat the above procedure from step 2 an...

Страница 20: ... and set 1 in step 4 5 Press the SETTING button to exit the setting screen Use the following procedure to layer two tones so they sound at the same time 1 Press the LAYER button 2 Use the u and i arrow buttons to display LAYER 3 Select the main tone Use the q and w arrow buttons to select U1 Upper 1 and then press the ENTER button 4 Select a tone and then press the ENTER button See Selecting and P...

Страница 21: ... Upper 1 and Upper 2 volume the same The setting range is 24 to 24 4 To return to the screen you were at prior to step 1 of this procedure press EXIT button You can use the procedure below to change the octave of each layer 1 Hold down the LAYER button until the screen shown below appears 2 Use the q and w arrow buttons to select the layer whose octave you want to change Upper 1 Select Upper1 Octa...

Страница 22: ...tons to select L Lower and then press the ENTER button 4 Select a tone and then press the ENTER button See Selecting and Playing a Tone on page EN 10 for information about how to select a tone 5 Select the tone for the right side range Use the q and w arrow buttons to select U1 and then press the ENTER button 6 Select a tone and then press the ENTER button If you want to use layering for the right...

Страница 23: ...y split settings Display Name Description Setting Range Lower Octave Lower Octave Changes the octave of the left Lower side of a split keyboard in one octave units A value that is 1 or higher raises by the specified number of octaves while a value that is 1 or lower lowers by the specified number of octaves 2 to 2 Lower Volume Lower Volume Adjusts the volume level of the left Lower side of a split...

Страница 24: ...tyle 1 Press the SETTING button to display the setting screen 2 Use the q and w arrow buttons to select Keyboard and then press the ENTER button 3 Use the q and w arrow buttons to select Touch Response Display Name Description Setting Range Beat Beat Specifies the beat setting The first beat of each measure is a bell sound while the remaining beats are clicks A Beat setting of 0 plays a straight c...

Страница 25: ...exactly matches a performance on a CD The tuning feature specifies the frequency of the A4 note You can set a frequency within the range of 415 5 to 465 9 Hz The initial default setting is 440 0 Hz Some CD performances are recorded with instruments that are tuned slightly different from standard 1 Press the SETTING button to display the setting screen 2 Use the q and w arrow buttons to select Keyb...

Страница 26: ...ttons to select Keyboard and then press the ENTER button 3 Use the q and w arrow buttons to select Octave Shift 4 Use the u and i arrow buttons to change the octave 5 Press the SETTING button to exit the setting screen To change the tuning curve Stretch Tuning Display Name Description Default Initial factory default setting Default Use of this setting is recommended because it applies the optimum ...

Страница 27: ...button to select Temper Base Note 6 Use the u and i arrow buttons to select the root key of the selected temperament 7 Press the SETTING button to exit the setting screen Changing the Temperament of the Keyboard No Temperament name Display 00 Equal Temperament Equal 01 Pure Major Pure Major 02 Pure Minor Pure Minor 03 Pythagorean Pythagorean 04 Kirnberger 3 Kirnberger 3 05 Werckmeister Werckmeiste...

Страница 28: ... scene name Holding down the q or w arrow button scrolls the scene names at high speed To jump to the default scene Number 15 press the q and w arrow buttons at the same time 3 Press the ENTER button to apply the currently selected scene If you want to back step to the previous screen without applying the scene press the EXIT button While the screen that appears after you apply a scene is displaye...

Страница 29: ...n asterisk to the left of a number indicates that a setup is already saved to it While the cursor is located at the scene number you can jump to scene number 01 by pressing the q and w arrow buttons at the same time While an alpha character is selected pressing the q and w arrow buttons at the same time will toggle it between upper case and lower case 5 After inputting the number and name you want...

Страница 30: ...ay Play mode only Note that scene song data is retained within a User Scene even if the data of the original song is deleted 1 Press the SETTING button 2 Use the q and w arrow buttons to select Scene and then press the ENTER button 3 Use the q and w arrow buttons to select Clear and then press the ENTER button 4 Use the q and w arrow buttons to select the user scene you want to delete 5 Press the ...

Страница 31: ...rself with the music Step 2 PLAY Play along with the orchestra accompaniment The Concert Play includes 15 songs numbered 1 through 15 A song on a USB flash drive Concert Play song data obtained with a computer etc plugged into the Digital Piano s USB port can be used as Concert Play song You can play back at a slow tempo 80 of the original Use the Digital Piano s metronome is not supported during ...

Страница 32: ...m steps 1 and 2 of the procedure under To listen to a Concert Play Song Listen Mode page EN 29 to select a song 2 Use the CONCERT PLAY button to enter the Play Mode 3 If you want to play back at a slower tempo 80 press the METRONOME button so SLOW is displayed To return to the original tempo press the METRONOME button again to clear SLOW from the display 4 Press the k button to start playback For ...

Страница 33: ...sh drive plugged into the Digital Piano To return to the Digital Piano memory contents press the u arrow button 4 Use the q and w arrow buttons to select a song and then press the ENTER button To find out what you need to do next see the pages below From step 3 under To listen to a Concert Play Song Listen Mode page EN 29 From step 2 under To play along with an orchestra using Concert Play Play Mo...

Страница 34: ...cludes a number of duets While a duet is selected you can turn off the first piano Primo or second piano Secondo tone and play along with the song PREPARATION Select the song you want to practice and adjust the tempo See To configure metronome settings page EN 21 A number of tunes have tempo changes part way through in order to produce specific musical effects 1 Use the SONG button to select the p...

Страница 35: ...tored on it is being accessed by the Digital Piano Doing so can corrupt the data on the USB flash drive and damage the USB flash drive port 1 Press the SONG button 2 Use the u and i buttons to select the song data type you want MIDI file SMF Audio file AUDIO PLAY 3 Use the q and w arrow buttons to select a song and then press the ENTER button You can use the u and i arrow buttons to scroll through...

Страница 36: ...and q arrow buttons to select a song name and then press the ENTER button This starts demo play You can use the u and i arrow keys to scroll through song groups in the following sequence Grand Piano demo songs 3 Concert Play songs 3 Music Library songs Selecting a different song group causes song 1 of the group to be selected For information about the songs in each group see the song lists on page...

Страница 37: ...AND HAMBURG GRAND or VIENNA GRAND until the first demo tune assigned to the tone starts to play There is a total of six grand piano demo songs two for each of the grand piano tones BERLIN GRAND HAMBURG GRAND and VIENNA GRAND When you start playback the two songs are played in a loop one after the other For a list of songs see the Grand Piano Demo Song List page A 3 To change to a different demo so...

Страница 38: ...ance information keyboard keys press release touch pressure etc is recorded as MIDI data The size of MIDI data is much smaller when compared with audio data making it easier to edit later on a computer etc Supported recording capacity Up to 5 000 notes total of tracks 1 and 2 one file only Like a portable music player or tape recorder notes are recorded as audio data Audio data files are much larg...

Страница 39: ...taneously or individually With the MIDI Recorder the Digital Piano automatically performs playback using its internal sound source in accordance with the performance information recorded as MIDI data You can play back audio data from a USB flash drive The Audio Recorder plays back the waveform of sound recorded as audio data What you can do Play on the keyboard along with playback of Tracks 1 and ...

Страница 40: ...nd a count before the start of recording Precount For details about how to configure precount settings see To configure precount settings page EN 39 PREPARATION Select the tone and effects Track 1 only you want to use in your recording Tone page EN 10 Effects page EN 15 1 Press the REC button Rec Wait appears on the display indicating record standby 2 Use the u and i arrow buttons to select MIDI R...

Страница 41: ...n See Using the Metronome on page EN 21 for more information 6 Use the REC button to select a track for recording L Track 1 R Track 2 L and R indicate status information about the left and right tracks as described below If you selected Play in step 3 above Flashing Track to be recorded Lit Track to be played back If you selected Mute in step 3 above Flashing Track to be recorded Unlit Track to be...

Страница 42: ...n below appears 2 Use the q and w arrow buttons to select MIDI Volume 3 Use the u and i arrow buttons to adjust the volume The setting range is 0 to 127 4 Press the EXIT button to exit the setting screen The following procedure deletes a specific track of a song The procedure below deletes all of the data of the selected track Note that the delete operation cannot be undone Check to make sure you ...

Страница 43: ...upt the data on the USB flash drive and damage the USB flash drive port PREPARATION Be sure to format the USB flash drive on the Digital Piano before using it See USB Flash Drive on page EN 50 for more information 1 Insert the USB flash drive into the Digital Piano s USB flash drive port When you plug in a USB flash drive the Digital Piano initially needs to mount the USB flash drive and prepare f...

Страница 44: ...t press the k button Use the steps below to play back the last song you recorded For information about selecting a file for playback see Playing Back Song Data Stored on a USB Flash Drive page EN 33 The playback tempo of an audio file cannot be changed 1 Press the SONG button 2 Use the u and i arrow buttons to select AUDIO PLAY 3 Press the k button to start playback For details about these operati...

Страница 45: ...ng screen shown below appears 2 Use the q and w arrow buttons to select Audio Delete and then press the ENTER button 3 Press the i arrow button to execute the delete operation To cancel the delete operation press the u arrow button The message Please Wait will remain on the display while the operation is being performed Do not perform any operation while this message is on the display Complete app...

Страница 46: ...eter List page EN 45 The shaded cells in the parameter list are top menu items Ent to the right of an item indicates that pressing the ENTER button while that item is selected will display a submenu of parameters 3 Use the u and i arrow buttons to change the currently selected value or setting For details about setting procedures see Changing a Number or a Value in Operations Common to All Modes p...

Страница 47: ...or Duet Play page EN 17 Upper Octave Octave of the right keyboard To change the octaves of the duet keyboards page EN 18 Lower Octave Octave of the left keyboard Acoustic Simulator Ent Acoustic Simulator parameters Hammer Response Hammer Response See the page to the right Adjusting Acoustic Piano Sound Characteristics page EN 13 Lid Simulator Lid Simulator Damper Resonance Damper Resonance Damper ...

Страница 48: ...etch Tuning page EN 24 Tuning Makes fine adjustments in the pitch of notes Fine Tuning Tuning page EN 23 Layer Split Ent Layer parameters and split parameters The editing screen can also be displayed by holding down the LAYER button The editing screen will not appear if the Digital Piano is in the Duet Mode Upper1 Octave Layer Upper 1 octave setting See the page to the right To change the octave o...

Страница 49: ...io Delete Ent Deletes the currently selected Audio Recorder song To delete the currently selected Audio Recorder song data page EN 43 Recorder Ent Record function parameters The editing screen can also be displayed by holding down the REC button Recorded Part Recorded part playback See the page to the right To record the other track of a song page EN 39 Part Clear Ent Track delete To delete record...

Страница 50: ...sabled On Enabled Half Pedal Pos Half pedal position See the page to the right To adjust the half pedal trigger position page EN 12 Headphone Mode Headphone mode The Headphone Mode automatically performs timbre compensation while headphones are being used to reproduce the natural expanse of sound that reaches the ears when an acoustic piano is played The initial default setting is On On Enabled Of...

Страница 51: ...ssure velocity when keyboard keys are pressed or released Turning on this setting outputs to MIDI OUT high resolution velocity information that corresponds to the MIDI standard high resolution velocity prefix Turning off this setting disables MIDI OUT output of high resolution velocity information In this case normal 127 level velocity is output to MIDI OUT The on off setting of this item is appli...

Страница 52: ...tc Concert Play Songs Obtained with a Computer etc page EN 31 Audio Recorder songs Audio Recorder Recording to a USB Flash Drive page EN 41 During recording of an Audio Recorder song the data is stored directly to the USB flash drive so a save operation is not required MIDI Recorder songs User Scene Saving Digital Piano Data to a USB Flash Drive page EN 55 1 2 Loading data into Digital Piano Memor...

Страница 53: ...ital Piano Formatting a USB flash drive Capacity 32GB or less recommended Operation of the above type of USB flash drive has been confirmed but this does not guarantee operation Use a FAT FAT32 format USB flash drive You may not be able to use a USB flash drive that is recognized as multiple drives on your computer A USB flash drive that is recognized as a CD ROM on your computer is not supported ...

Страница 54: ...he original performance in its entirety after re loading the data Note however that CSR file data in not compatible with other musical instrument types and models Saving as an SMF format file Performance information is saved but models specific settings are not saved Because of this playback of a re loaded file will be in accordance with the current Digital Piano setup which may be different from ...

Страница 55: ...eing performed It may take up to 10 or 20 seconds or even longer for a USB flash drive to be mounted Do not attempt to perform any operation on the Digital Piano while a mounting sequence is in progress A USB flash drive needs to be mounted each time it is connected to the Digital Piano To insert a USB flash drive 1 As shown in the illustration below insert the USB flash drive into the Digital Pia...

Страница 56: ... To cancel the format operation press the u arrow button The message Please Wait will remain on the display while the operation is being performed Do not perform any operation while this message is on the display Complete appears on the display after the operation is complete Formatting a large capacity USB flash drive can take several minutes Even when the file format is WAV general audio data or...

Страница 57: ...pear 8 Press the i arrow button to execute the save operation To cancel the save operation press the u arrow button The message Please Wait will remain on the display while the operation is being performed Do not perform any operation while this message is on the display Complete appears on the display after the operation is complete Saving Digital Piano Data to a USB Flash Drive MIDI Recorder Son...

Страница 58: ...s to select USB Flash and then press the ENTER button 4 Use the q and w arrow buttons to select Load and then press the ENTER button 5 Use the q and w arrow buttons to select type of data to be loaded Music Lib or Scene and then press the ENTER button Depending on the data type select either of the options below Music Lib MIDI data Scene Scene 6 Use the q and w arrow buttons to select a USB flash ...

Страница 59: ...1 Insert the USB flash drive into the Digital Piano s USB flash drive port 2 Press the SETTING button 3 Use the q and w arrow buttons to select USB Flash and then press the ENTER button 4 Use the q and w arrow buttons to select Rename and then press the ENTER button 5 Use the q and w arrow buttons to select the file 6 Use the arrow buttons to rename the file Use the u and i arrow buttons to move t...

Страница 60: ...ing USB flash drive file and overwrite it with the new data Use a different USB flash drive Media Full There is not enough space available on the USB flash drive Delete some of the files on the USB flash drive to make room for new data or use a different USB flash drive Too Many Files 1 There are too many files on the USB flash drive 1 Delete some of the files on the USB flash drive to make room f...

Страница 61: ...our computer yet 2 After starting up your computer use a commercially available USB cable to connect it to the Digital Piano 3 Turn on the Digital Piano If this is the first time you are connecting the Digital Piano to your computer the driver software required to send and receive data will be installed on your computer automatically 4 Start up commercially available music software on your compute...

Страница 62: ...manufacturers For details about MIDI parameters see Configuring Settings on page EN 44 and MIDI in the Parameter List on page EN 49 To connect the Digital Piano to another electronic musical instrument for performance using MIDI data use the above USB cable a separately available MIDI cable that is compatible with both connectors or a commercially available MIDI cable to connect them For detailed ...

Страница 63: ... of the stand should be performed by at least two people working together The Digital Piano unit is particularly heavy When moving it get at least one other person to help you and handle with care This stand should be assembled on a flat surface Do not remove the tape securing the keyboard cover in place until assembly is complete Removing the tape can cause the keyboard cover to open and close du...

Страница 64: ...which can strip the threads of the screws Cover the screw heads with the caps 3 Slide back panel into the grooves of the side panels When installing back panel make sure that the high screw holes of the back panel are to the right and the low screw holes are to the left 4 Attach the left side of back panel to the bracket of side panel and the right side to side panel Partially tighten two screws t...

Страница 65: ...sspiece Be sure to adjust height adjustment screw 8 Place the piano onto the stand In order to ensure you do not get your fingers pinched between the piano and the stand grasp the piano on its sides not its ends at the locations marked with stars in the illustration Place the piano onto the stand starting the Digital Piano unit as much to the front of the stand as possible and then slide it into p...

Страница 66: ...t felt or other material between the rubber feet and flooring Do not allow direct contact between them Some types of flooring material may become discolored or damaged by direct contact with the rubber feet 1 Insert the plug of the AC adaptor that comes with the Digital Piano into its power terminal DC 24V Using the Clip To fasten the clip As shown in the illustration press down on a to force the ...

Страница 67: ...he Digital Piano into a household power outlet as shown in the illustration below 1 Install the music stand by inserting its pegs into the holes in the top of the piano 2 Install the headphones hook Pedal plug Household power outlet AC adaptor Power cord To install the music stand and headphones hook 2 1 Insert the headphones hook into the two holes on the bottom of the piano 2 2 Use screw to secu...

Страница 68: ...id has a support bracket indicated by the star in the illustration attached to its inside surface Check to make sure that the support bracket is standing up fully 1 Carefully lift up slightly on the lid 2 Use the fingers of your left hand to press back on the support bracket as you slowly and carefully lower the lid The support bracket is designed to prevent sudden closing of the lid Should the su...

Страница 69: ...a long time Disconnect Protection Precautions 1 Never pull on the cord with excessive force 2 Never repeatedly pull on the cord 3 Never twist the cord at the base of the plug or connector 4 Loop and bundle the power cord but never wind it around the AC adaptor 5 Before moving the Digital Piano be sure to unplug the AC adaptor from the power outlet Locating the AC Adaptor for Use When using the AC ...

Страница 70: ... Mode see Configuring Settings on page EN 44 and General 3 Headphone Mode in the Parameter List on page EN 48 You can connect audio equipment or a music amplifier to the Digital Piano and then play through external speakers for more powerful volume and better sound quality The Digital Piano s Master EQ setting lets you specify either of two timbres built in speaker timbre or LINE OUT timbre When l...

Страница 71: ...lly in this configuration you must set the audio equipment s input selector to the setting that specifies the terminal such as AUX IN to which the piano is connected Use the Digital Piano s VOLUME controller to adjust the volume level Connect the Digital Piano s LINE IN R and LINE IN L MONO terminals to the audio equipment as shown in Figure Use commercially available connection cords that match t...

Страница 72: ... as it will go into the pedal connector on the bottom of the Digital Piano Tones and or effects sound strange Turning power off and then back on again does not eliminate the problem Example Note intensity does not change even though I alter key pressure The Auto Resume feature is turned on Turn off Auto Resume Next turn power off and then back on again EN 48 I cannot transfer data after connecting...

Страница 73: ...ere is a slight change in how effects are applied This happens when the sounds of multiple parts are sounding at the same time while using layer using the Duet Mode playing back a built in tune recording etc Pressing a button when one of these conditions exists will cause the effect setting that is built into the tone to change automatically which causes notes to cut out momentarily or causes a sl...

Страница 74: ...es LISTEN PLAY Music Library Number of Songs 60 User Songs 10 Up to approximately 90KB per song approximately 900KB for 10 songs Based on 1KB 1024 bytes 1MB 10242 bytes Song volume Adjustable Part On Off L R Grand Piano demo song 6 MIDI Recorder Functions Real time recording playback Number of Song 1 Number of Tracks 2 Capacity Approximately 5 000 notes total Recorded Data Protection Built in flas...

Страница 75: ...2 3kΩ Output voltage 1 8V RMS MAX USB port Type B USB flash drive port Type A Pedal connector Acoustics Amp output 30W 2 20W 2 Speakers φ 16cm 2 φ 10cm φ 5cm 2 Other functions Volume sync equalizer 3 types Off Power Requirements AC Adaptor AD E24500LW Auto Power Off Approximately 4 hours after last operation Auto Power Off can be disabled Power Consumption 24V 38W Dimensions Digital Piano and Stan...

Страница 76: ...e electric shock and personal injury Weld Lines Lines may be visible on the exterior of the product These are weld lines that result from the plastic molding process They are not cracks or scratches Musical Instrument Etiquette Always be aware of others around you whenever using this product Be especially careful when playing late at night to keep the volume at levels that do not disturb others Ot...

Страница 77: ...uct 11 Do not allow the electrical load output to exceed the label rating 12 Make sure the surrounding area is dry before plugging into a power source 13 Make sure the product is oriented correctly 14 Unplug the product during lightning storms or when you do not plan to use it for a long time 15 Do not allow product ventilation openings to become blocked Install the product in accordance with the ...

Страница 78: ...RIDE BASS 32 1 35 ELEC BASS 33 0 Tone name Description BERLIN GRAND A well contoured light chic and elegant tone Superior clarity and reverberation play of richly colored beautiful melodies This tone is best for performance of impressionistic period music MELLOW Slightly more subdued BERLIN GRAND tone BRIGHT Slightly brighter BERLIN GRAND tone HAMBURG GRAND A widely expressive richly reverberating...

Страница 79: ...do Asimismo es el tono adecuado para prácticamente cualquier tipo de interpretación y género musical MELLOW Tono HAMBURG GRAND algo más atenuado BRIGHT Tono HAMBURG GRAND algo más brillante VIENNA GRAND Un tono que combina potentes cuerdas de rango bajo con un toque perfectamente suave para una amplia gama de expresividad y un sonido exquisitamente sofisticado Es el tono perfecto para interpretar ...

Страница 80: ... Anna Magdalena Bach 19 Inventio 1 BWV 772 20 Inventio 8 BWV 779 21 Inventio 13 BWV 784 22 Praeludium 1 BWV 846 Das Wohltemperierte Klavier 1 23 Le Coucou 24 Gavotte 25 Sonatina Op 36 1 1st Mov 26 Sonatine Op 20 1 1st Mov 27 Sonate K 545 1st Mov 28 Sonate K 331 3rd Mov Turkish March 29 Rondo K 485 30 Für Elise 31 Marcia alla Turca 32 Sonate Op 13 Pathétique 1st Mov 33 Sonate Op 13 Pathétique 2nd M...

Страница 81: ...ult Initial factory default Berlin Grand tone settings Nocturne Op 9 2 Lista de escenas Nº Pantalla Descripción Nombre de la canción 1 Chopin Ajustes para tocar Chopin y otras músicas del período romántico Valse Op 64 1 Petit Chien 2 Beethoven Ajustes para tocar Beethoven y otras músicas del período clásico Sonate Op 31 2 Tempest 3rd Mov 3 Debussy Ajustes para tocar Debussy y otras músicas del per...

Страница 82: ... 127 O 8nH v 0 127 O 9nH v 1 127 X 9nH v 0 O 8nH v 0 127 Note ON Note OFF Mode Mode 3 X Mode 3 X Default Messages Altered 0 32 1 5 6 38 7 10 11 64 65 66 67 Bank select Modulation Portamento Time Data entry LSB MSB 2 Volume Pan Expression Damper Portamento Switch Sostenuto Soft pedal O O O O O O O O O O O O X X X O X X O X O O Model GP 510 Version 1 0 1 Depends on tone 1 Depende del tono MIDI Imple...

Страница 83: ... High resolution velocity prefix Reverb send 3 Chorus send RPN LSB MSB 2 All sound off Reset all controller Mode 1 OMNI ON POLY Mode 3 OMNI OFF POLY Mode 2 OMNI ON MONO Mode 4 OMNI OFF MONO O Yes X No O O O O O O O O O O X X X X O X X X X O 2 2 For details see MIDI Implementation at the CASIO website page EN 1 3 This Instrument treats a hall simulator as a reverb 2 Si desea más información vea Imp...

Страница 84: ...es that the packaging conforms to the environmental protection legislation in Germany Esta marca de reciclaje indica que el empaquetado se ajusta a la legislación de protección ambiental en Alemania MA1904 A Printed in China C ...

Отзывы: