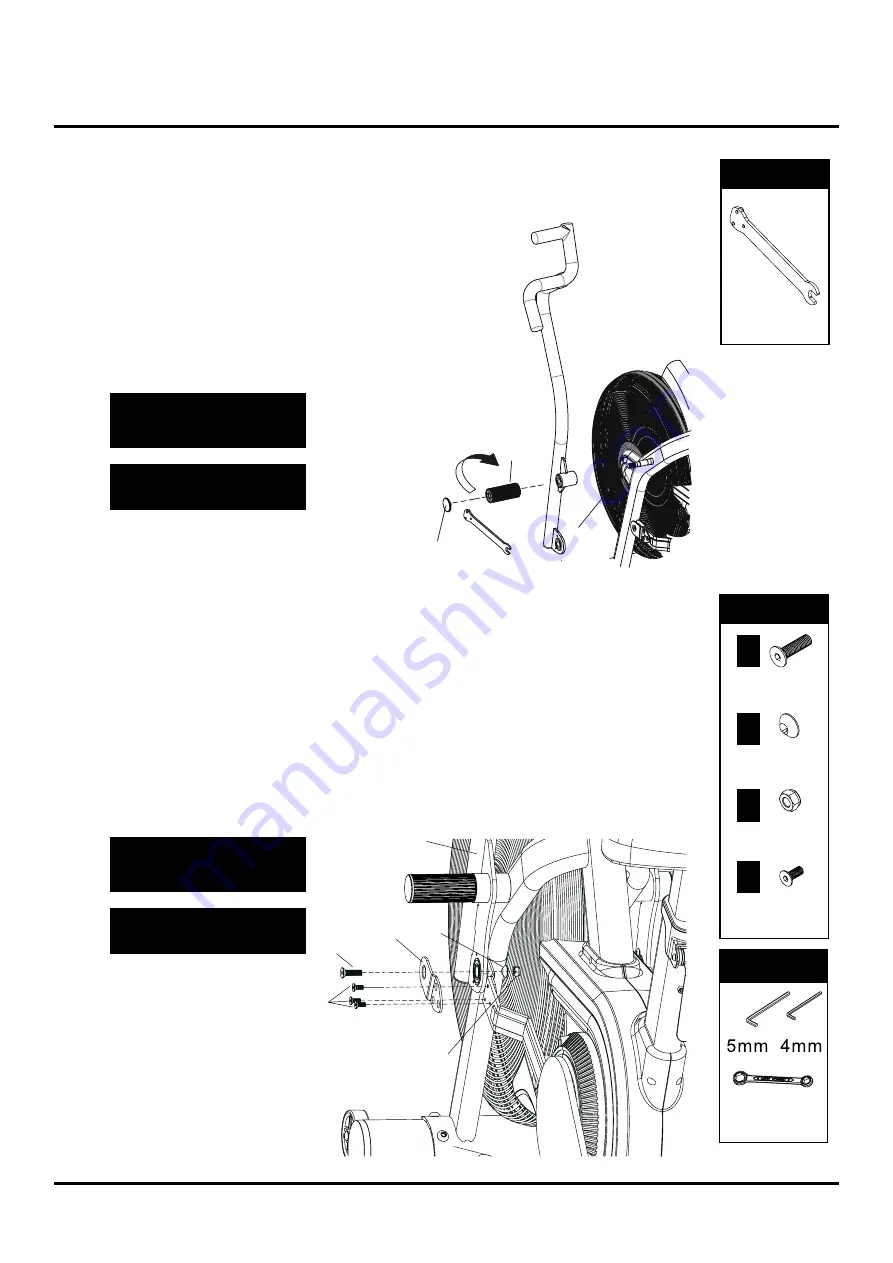
3. Attach the Dual Action Handlebars
Be sure to fit the parts in the
same order as the diagrams
shown.
!
Make sure the screws are fully
tightened with the allen key.
!
FIXINGS:
PARTS:
x
1
Part
No.
J2
Be sure to fit the parts in the
same order as the diagrams
shown.
!
Make sure the foot peg is fully
tightened with the allen key.
!
x
1
Part
No.
J4
x
1
Part
No.
J3
x
3
Part
No.
J5
3-1. Attach the Left Dual Action Handlebar
Slide the
•
left Dual Action Handlebar (D1)
onto the
pivot axle carefully.
Install the
•
Foot Peg (G)
by screwing it on, and tighten
it with the wrench as shown.
Attach the
•
End Cap (J1)
onto the
Foot Peg (G)
securely.
3-2. Install the Fix Plate & Linkage Bar
Connect the
•
left Dual Action Handlebar (D1)
and
Linkage Bar
with Fix Plate (I)
,
Disc Space r (J4)
,
M8x30mm Screw (J2)
and
M8 Nylon Locknut (J3)
and tighten with 5mm Allen Key & 13/17
Wrench.
Doubly secure the
•
Fix Plate (I)
to the Linkage Bar with three
M6x15mm Screws (J5)
and secure with 4mm Allen Key.
( You should be able to fit these three screws for better alignment
by loosening the front screw assembly and try again when all four
screws are in place, tighten with the allen key provided. )
FIXINGS:
TOOLS:
Wrench
13/17
8
J5
I
J2
J4
J3
D1
FIXINGS:
TOOLS:
Wrench
G
A
J1
cascadehealthandfitness.com
Содержание AIR UNLIMITED 402007
Страница 20: ...Exploded Diagram 20 cascadehealthandfitness com...
Страница 22: ...22 Cascade Health and Fitness Warranty cascadehealthandfitness com...
Страница 23: ......
Страница 24: ...H E A L T H F I T N E S S R...


