background image


172 

3.8    Add-Up Transaction 

 
If you press the ADD key instead of the PRINT key, you will initiate the 
ADD-UP process. You can ADD-UP 399 items maximum. 
 

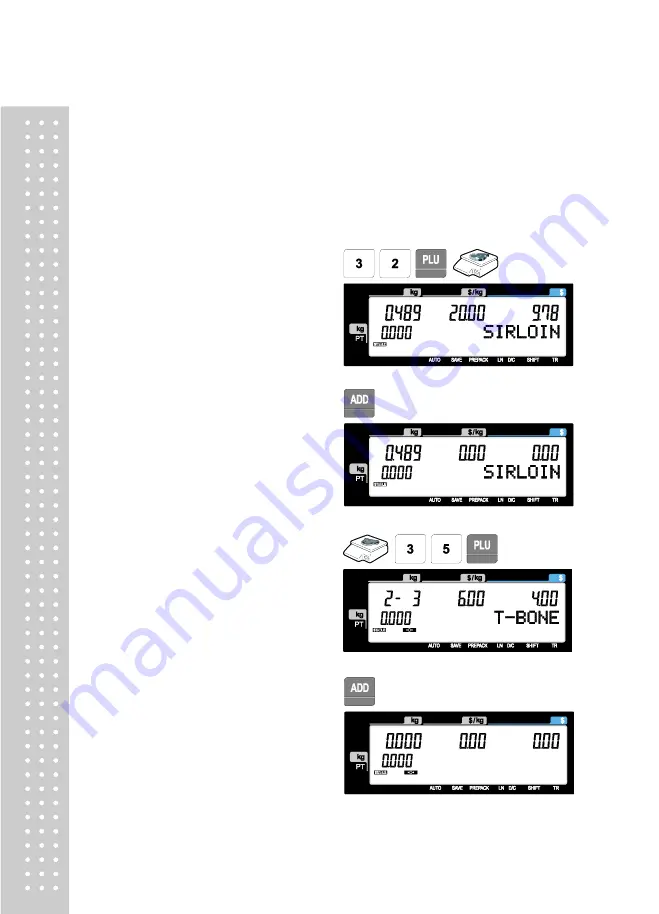
EXAMPLE 2: 

- PLU# 32=SIRLOIN, PLU Type = By-Weight, Unit Price=20.00, 
- PLU# 35=T-bone steak, PLU Type = By-PCS, Pieces=3, Unit Price=6.00


 Call up a PLU and place item on the platter. 


 Press ADD key. PLU is cleared   

automatically. 
You will see the display as below.   
Remove item from the platter. 


 Call up a PLU. 


 Press ADD key.   

PLU is cleared automatically. 
You will see the display as below. 


Содержание CL5200J Series

Страница 1: ...2 ...

Страница 2: ...nucode1143 39 2 1 5 4 SelectingPLU field Items Menu code1144 40 2 1 5 5 PLU SaleCount Menucode1145 40 2 1 6 SamplePrinting Menu code1170 41 2 2 Programming PLU DataTable I 42 2 2 1 Department Menu code1210 42 2 2 1 1 New Edit Department Menucode1211 43 2 2 1 2 Delete Department Menucode1213 44 2 2 2 Group Menu code1220 44 2 2 2 1 New Edit Group Menu code1221 44 2 2 2 2 Delete Group Menu code1223 4...

Страница 3: ...1 New Edit Nutrition Facts Menu code1321 60 2 3 2 2 Delete Nutrition Facts Menu code1323 65 2 4 Discount Programming 66 2 4 1 Discount Menucode1130 66 2 4 1 1 New Edit Discount Menu code1131 66 2 4 1 2 Delete Discount Menu code1133 70 2 5 Gloabal Discount Program 72 2 5 1 GlobalDiscount Menucode1530 72 2 5 1 1 PrioritySetting Menu code1531 72 2 5 1 2 Weight Count PCSDiscount Menu code1532 1533 153...

Страница 4: ...Menucode1710 96 2 9 2 Markdown Menucode1720 98 2 9 3 Printer Hardware Menu code1730 99 2 9 3 1 PrintMode Menucode1731 100 2 9 3 2 Label Size Ticket Size Menu code1732 100 2 9 3 3 SensorCalibration Menu code1733 101 2 9 3 4 Sensor Motor Menucode1734 102 2 9 3 5 Print Intensity Menucode1735 102 2 9 3 6 Adjust Feed Length Menu code1736 103 2 9 3 7 Label Preprint Menucode1737 103 2 9 3 8 AdjustReverse...

Страница 5: ... code1600 129 2 11 3 X1Report Menu code1610 1630 130 2 11 4 X1 Scale SalesReport Menu code1611 1613 130 2 11 5 X1 PLUReport Menu code1612 1632 132 2 11 6 X1MiscellaneousPLU Report Menu code1613 1633 135 2 11 7 X1 GroupReport Menu code1614 1644 137 2 11 8 X1 Department SalesReport Menu code1615 1635 139 2 11 9 X1 HourlySalesReport Menucode 1616 1636 141 2 11 10 X1Clerk SalesReport Menu code 1617 16...

Страница 6: ...Return 171 3 13 Prepack Key 172 3 14 X Key 174 3 14 1By Weight PLU 174 3 14 2 Non Weighed PLU 175 3 15 How to Change Sell By Date Time 176 3 16 How to Change Origin 177 3 17 How to Change PLUType 178 3 18 Direct Discount 179 3 18 1 Fixed Price Key 179 3 18 2 Discount Price Key 180 3 19 PLU Connection 181 3 19 1 Referenced PLU Function 181 3 19 2 Coupled PLU Function 181 3 19 3 Link PLU Function 18...

Страница 7: ...8 3 Window Character Set Information 190 4 ErrorMessage 191 1 GENERAL 1 1 PRECAUTIONS ...

Страница 8: ...9 CE Mark Warning This is a Class A product In a domestic environment this product may cause ...

Страница 9: ...10 radio interference in which case the user may be required to take adequate measures ...

Страница 10: ...of your most demanding needs Remember for proper installation and maintenance please have your Authorized CAS Dealer do the primary installation programming and demonstration Your CAS Authorized Dealer also has a wide variety of supplies accessories and expansion options for whatever your new and increasing demands may require Authorized CAS dealers are trained to help you with every aspect of the...

Страница 11: ...y 36 function key Pole Type P 72 PLU key 36 function key Speed Key 108 PLU 144 PLU Display LCD Preset Tare 4 digit Weight 5 digit Unit Price 6 digit Total Price 6 digit PLU name 12 digit Printer Speed 100 mm sec Printing Resolution 202 dpi Label Size Width 40mm 60 mm Length 30mm 120 mm Barcode Type UPC EAN13 I2OF5 CODE128 Font Small Middle Large Size Free Format Italic Bold Underline Through Line ...

Страница 12: ...axType 9 1 9 Group 99 1 99 Clerk 95 1 95 Discount 99 1 99 Origin 500 1 500 Label Format 30 Fixed 20 Free Format Bitmap Image 14 1 99 Customer 89 1 89 Symbol 8 1 8 Scroll Message 9 1 9 X1 Z1 Report Pay Type 7 Sales Message 99 1 99 Nutrition fact 500 1 500 TareTable 99 1 99 Note Specifications are subject to change without notice We always call PLUs instead of Item Index Numbers ...

Страница 13: ...14 1 4 NAME AND FUNCTIONS OVERALLVIEW ...

Страница 14: ...15 DISPLAY CL5200J P CL5200J B ...

Страница 15: ...16 KEYBOARD CL5200J P CL5200J B ...

Страница 16: ...dicator NET Net weight indicator AUTO Print Mode indicator SAVE Auto clearing status indicator PREPACK Auto clearing status and Print mode indicator D C Discount status indicator SHIFT Speed key shift status indicator TR Data transmission status indicator LN LAN Connection Status ...

Страница 17: ...o sale mode Page up key Used to go to previous page in program mode For key Use this key for by count or by pcs pricing 3 3 FOR 1 00 It toggles between the QTY PIECE and PRICE fields AUTO key Auto print mode Pre Pack key Used to enter Pre Packaging mode in which the scale Auto prints for every transaction and prevents the auto clearing of data Left arrow key Used to go to left character in program...

Страница 18: ...der to print customer totals Feed key Use this key to feed labels or paper through printer Pay key Use this key to calculate change Test key Used to print test pattern Print key Used to manually print transactions and also serves as an ENTER key in programming mode There are 2 of them and they both act the same Return key Used to credit sales for erroneous transactions or returned items Shift Key ...

Страница 19: ... Backspace key Used to backspace and delete text data Space bar Used to go to next line to enter text Special symbol keys Used to type special symbol SeeASCII code table Note X key is only used in sale mode and ESC key is only used in program mode Sale mode X key Program mode ESC key ...

Страница 20: ...el Roll Label Specifications Outer diameter of roll 100mm Inner diameter of roll 40mm Width of receipt roll 40 50 60mm Width of label roll 60mm MAX PrintArea Width of label 60mm MAX Printable width 56mm MAX Length of label 120mm MAX ...

Страница 21: ...22 Toinstallthe labelrollatANYtime youmustfollow thedirections inthissection PresstheFEEDkey ScaleprintstwiceforautoLabeladjustment ...

Страница 22: ... DEL ALL DeleteAll DC 1140 MANAGE Manageme nt 1141 COPY Copy 1142 DEL Delete 1147 DEL PLU Delete by PLU No 1148 DEL DPT Delete by Dept No 1149 DEL ALL DeleteAll 1143 MOVE Move 1144 ITEM Select PLU Items 1145 S COUNT PLU Sale Count 1160 S KEY Speed Key 1170 T LAB Sample Printing 1200 TABLE1 PLU Data Table I 1210 DEPT Department 1211 NEW New Edit department 1213 DEL Delete department 1220 GROUP Grou...

Страница 23: ...e III 1410 STORE Store 1411 EDIT New Edit Store 1413 DEL Delete Store 1420 CUSTOM Customer 1430 SCROLL Scroll Message 1440 CURR Currency 1450 BATCH Job Batch Schedule 1460 B SCAN Scanner 1470 L KEY Label Format Key Table 1500 GLOBAL Global Setting 1510 LABEL Label Format 1520 BAR Barcode 1530 DC Discount 1531 MODE Priority Setting 1532 WEIGHT Weight Discount 1533 COUNT Count Discount 1534 PCS PCS ...

Страница 24: ...t CODE Menu CODE Sub Menu CODE Sub Menu 1700 PRINT Print 1710 ITEM Print Label Item 1720 MARKDN Markdown 1730 HW SET Print Hardware 1731 MODE Print Mode 1732 SIZE Label Ticket Size 1733 SEN CAL Sensor Calibration 1734 SEN MOT Sensor Motor 1735 INTENS Print Intensity 1736 ADJUST Adjust Feed Length 1737 PREPRT Label Preprint 1738 R FEED AdjustReverseFeedLength 1740 S FORM Serial Number Format 1750 A...

Страница 25: ...Configuratio n 1851 EDIT New Edit User 1852 PASSWD Change Password 1854 DEL Delete User 1855 PERMIS Config Permission 1856 C KEY Clerk Key 1860 TEST Test 1861 DISP Display 1862 AD A D 1863 KEY Keyboard 1864 CHESS Chess Printer 1865 SENSOR Printer Sensor 1867 VER Firmware Version 1868 COMM Communication 1870 PARAM Scale Parameter 1871 DISP Display 1872 PRT Printing 1873 SALE Sale setup 1874 CLERK C...

Страница 26: ...232C RS232C 1916 WLAN WLANsetting 1920 APPL Application 1930 LOCK ScaleLock Unlock 1940 CHECK CheckScale 1950 BACKUP BackuptoScale 1960 SLA VE SlaveScale You can see the Program Menu screen by pressing the MENU key You can move a page using PAGE UP or PAGE DOWN keys You can also use the arrow keys to move the page Selectable menu If you want to select PLU simply press 1 ...

Страница 27: ...28 Menucode ...

Страница 28: ... not use Label No Label Formats 1 30 If Global Setting is YES it is not shown 10 LABEL2 0 99 0 Do not use Label No Label2 Formats 1 30 This function prints aux label as saved number of label number 11 ORIGIN Origin No 0 500 0 Do not use origin 12 F WT Fixed Weight The weight is fixed regardless of item 13 PREFIX Enter serial code for PLU 14 CODE Item code 15 F PRICE Fixed Price You can set whether...

Страница 29: ...ulated If you set it to 0 it is not printed 30 S TIME Sell byTime 0 99 If you set it to 0 it is not printed 31 C DATE Cook by Date 0 9999 This is expirations date that is numbered in days and added to the Packed On date in order to be calculated 32 MSG NO 0 999 Enter ingredient No 33 NUTRI 0 500 Enter nutrition fact ID 34 SMSG 0 99 Enter sales message No 35 RF DEPT 0 99 Enter reference department ...

Страница 30: ...SC key Note You may experience different item menus You can modify menu items at menu 1144 1 Create By Weight PLU Department should be set previously EX Department No 1 Default PLU No 1 2 Select PLU Type 1 BY Weight 2 BY Count 3 BY PCS EX BY Weight Item BY Weight PLUs are priced as price per weight for example 3 99 lb or 1 99 kg You must weigh these PLUs before you can execute a sales transaction ...

Страница 31: ... group for this PLU enter 0 EX 1 Meat 5 Select Origin You can use Origin depending on the Menu code 1250 If there is no origin for this PLU enter 0 EX 49 China 6 Enter Prefix If you do not want to use prefix enter 0 EX Do not use prefix 7 Item Code If you do not want to use item code enter 0 EX Item Code 1941 ...

Страница 32: ...Tare You can use Tare Table depending on the setting of Parameter 584 You can set Tare Table Menu code 1270 EX Tare Value 100g 11 Produced Date Print Date minus the Input Value in Days See chart on next page EX 0 No print 1 Print Date 1 day 2 Print Date 2 days 12 Packed Date Print Date plus Input Value in Days See chart on next page EX 0 Today 1 Today 1 day 2 Today 2 days ...

Страница 33: ...Printed 2 Hours 14 Sell By Date Packed Date plus Input Value in Days Minus 1 Day See Chart on next page EX 1 Today 2 Packed date 1 15 Sell By Time Packed Time plus Input Value in Hours See Chart on next page 0 Current Time 1 Packed Time 1 Hour EX 10 Hours 16 Ingredient No You can use Ingredient depending on the Menu code 1310 ...

Страница 34: ...You can preset sales message at menu code 1241 EX Sales Message 1 18 Reference PLU Department If you do not want to use enter 0 EX Reference PLU Department 0 19 Reference PLU No If you do not want to use enter 0 EX Reference PLU No 0 Usage is possible to register the reference key at 1880 in order to use the No 36 37 reference PLU ...

Страница 35: ... You can press the SAVE key at anytime to save the current PLU data and if you want to exit without saving press the ESC key 1 Enter Department No PLU No Department should be set previously EX Department 1 Default PLU 2 2 Select PLU Type 1 By Weight 2 By Count 3 By PCS EX BY Count Item 3 Enter PLU Name 1 EX PEAR ...

Страница 36: ...it Showing only the different parts of PLU field By PCS PLU is used depending on the Parameter 593 You can press the SAVE key at anytime to save the current PLU data and if you want to exit without saving press the ESC key 1 Enter Department No PLU No Department should be set previously EX Department 1 Default PLU 2 ...

Страница 37: ...38 2 Select PLU Type 1 BY Weight 2 BY Count 3 BY PCS EX BY PCS Item 3 Enter PLU Name1 EX CAKE 4 Pieces If you enter 0 it is regarded as 1 EX 10 piece 5 Qty Unit No EX Qty Unit No 6 ...

Страница 38: ... similar PLU you can copy it 1 Select Source Enter the Department No and PLU No that you wish to copy EX Source Department 1 Source PLU 1 Note If PLU number exists in destination department you will be asked to confirm the copy 2 Select Destination Enter the Department number where the New PLU s will be located Enter the PLU number that you wish to copy the Source PLU into EX Destination Departmen...

Страница 39: ... the move 2 1 5 2 Deleting PLU Menu code 1142 MENU 1 PLU 4 Management 2 Delete There are three ways to delete PLU Simply enter the number that you wish to delete 1 Delete by PLU No 2 Delete by Dept No 3 Delete byALL EX Press 1 key to select Delete by PLU No EX Department No 1 PLU No 1 ...

Страница 40: ... the Department No and PLU No which you wish to move EX Source Department 1 Source PLU 1 2 Select Destination Enter the Department number where the PLU s will be located Enter the PLU number that you wish to move the Source PLU into EX Destination Department 2 Destination PLU 1 Note If PLU number exists in destination department you will be asked to confirm the move ...

Страница 41: ...rrow keys to go through each page A list of all available PLU Field Items can be found at the beginning of Section 2 1 2 1 5 5 PLU Sale Count Menu code 1145 MENU 1 PLU 4 Management 5 PLU Sale Count You can count each PLU sale and also you can clear this count The Sale Count function is used to keep track of the number of times a label has been issued for a particular PLU without having to use the ...

Страница 42: ...170 MENU 1 PLU 7 Sample Printing Used to enable printing a sample PLU label EX If set to Yes when editing an existing PLU or creating a new one depressing the SAVE key will result in a label being printed with that PLU s information on it ...

Страница 43: ...The discount price function can be programmed in great detail Programming may be done very easily using the PC software program CL Works 2 2 1 Department Menu code 1210 MENU 2 PLU Data Table I 1 Department The CL5200J series can be programmed to have up to 99 different departments with like PLU numbers in each department The Scale ID setting Menu 1830 determines which PLU s an operator will be abl...

Страница 44: ...data and if you want to exit without saving press the ESC key 1 Department Number Department number is available 1 to 99 EX Department No 2 2 Department Description EX Department Description GROCERY 3 Speed Key Setting Refer to 2 6 Speed Key EX Speed key set no 1 Note You can select from 5 different Speed Key sets Refer to Section 2 6 Speed Key Set No ...

Страница 45: ...u is used to allow PLU s to be grouped regardless of their Department assignments A PLU must be assigned to a Department but does not have to be assigned to a Group The User may assign PLU s to a Group for the purpose of tracking sales promotions manufacturer s information price ranges etc 2 2 2 1 New Edit Group Menu code 1221 MENU 2 PLU Data Table I 1 Group 1 New Edit You Can press the SAVE key a...

Страница 46: ...up Menu code 1223 MENU 2 PLU Data Table I 2 Group 3 Delete 1 Enter group number EX Delete group 1 Note There is no confirmation request when deleting a Group Pressing the PRINT key will cause the Group entered to be deleted ...

Страница 47: ...figuration 2 2 3 1 New Edit Tax Rate Menu code 1231 MENU 2 PLU Data Table I 3 TAX Rate 1 New Edit 1 Enter tax number TAX number is available 1 to 9 EX TAX No 1 2 Set Tax Type See Tax Type table as below EX Internal TAX Type Item Symbol Description Internal TAX 0 Tax is included in total price External TAX 1 Tax is added on total price Refer to menu code 1873 IN TAX on chapter 2 14 7 3 Enter Tax Ra...

Страница 48: ... 3 2 Delete Tax Rate Menu code 1233 MENU 2 PLU Data Table I 3 TAX Rate 3 Delete 1 Enter tax number EX Delete tax number 1 Note There is no confirmation request when deleting a Tax Rate Pressing the PRINT key will cause the Tax Rate entered to be deleted ...

Страница 49: ... 2 4 1 New Edit Sales Message Menu code 1241 MENU 2 PLU Data Table I 4 Sales Message 1 New Edit You can press the SAVE key at anytime to save the current data and if you want to exit without saving press the ESC key 1 Enter Message Number Message number is available 1 to 99 EX Message No 1 2 Enter Message EX Message THANK YOU Note You can use lower case letter and special symbol by pressing shift ...

Страница 50: ...try of Origin on a Label the Label Format being used must contain an Origin Field You can also print the Country of Origin in one of the Commodity Name Lines by using Menu Code 1872 Again your Label Format must have an area available to print the Origin 2 2 5 1 New Edit Origin Menu code 1251 MENU 2 PLU Data Table I 5 Origin 1 New Edit You can press the SAVE key at anytime to save the current data ...

Страница 51: ...ntered to be deleted 2 2 6 Barcode Menu code 1260 MENU 2 PLU Data Table I 6 Barcode Up to 20 different Barcode Formats can be programmed in the CL5200J series Different Barcode Formats can be assigned to individual PLU s or one Barcode Format can be used for all PLU s by enabling the Global Barcode Format Setting Menu 1520 2 2 6 1 New Edit Barcode Menu code 1261 MENU 2 PLU Data Table I 6 Barcode 1...

Страница 52: ...Type 1 EAN 13 type of Barcode No Type Description 1 EAN 13 13digit 4 I20F5 2 24 digit 5 UPCA 12 digit 9 CODE128 2 30 digit 4 Enter Barcode Form You can select from a list of Barcode types or you can create your own custom format Refer to following table EX Barcode Form 1 Change DDIIIIIPPPPPC to GGIIIIIVPPPPC ...

Страница 53: ...cally 5 U unit price 6 W weight 7 Q quantity 8 D department 9 G group 10 K country code For future 11 A ticket counter Only for ticket 12 B scale transaction counter 13 C total barcode check sum It is created automatically 14 F PLU prefix character 15 T text character 16 R transaction counter for each PLU 17 L clerk number 18 v weight check digit It is created automatically 19 O Packed date 20 S T...

Страница 54: ...Data Table I 7 Tare The CL5200J series can be programmed to use a Tare No instead of a numeric value System Parameter 584 If you are using Tare Numbers they should be programmed prior to programming any PLU s that use a Tare weight Note Tare weights for use in Tare No s can be programmed using the known numeric value or by placing the actual container on the scale 2 2 7 1 New Edit Tare Menu code 1...

Страница 55: ...are Type 1 Numeric Type Enter the numeric value using the number keys Ex Tare Type 2 Weight Type Place the container on the platter and press Type of Tare Tare No Type of Tare Description 1 Numeric Tare Enter tare weight by using numeric keys 2 Weight Tare Put a container on the platter 4 Enter Tare Value EX Tare 0 010 Kg ...

Страница 56: ...ssing the PRINT key will cause the Tare No entered to be deleted 2 2 7 4 Tare Key Menu code 1274 MENU 2 PLU Data Table I 7 Tare 4 Tare Key This menu allows you to assign the Tare No s Menu 1271 to Tare Keys Tare Keys must be programmed using Menu 1880 Function Key Define There is a maximum of 9 Tare Function Keys available Note When Special Function Keys are programmed they take the place of PLU S...

Страница 57: ...Weight or By Count PLU s 2 2 8 1 New Edit Unit Symbol Menu code 1281 MENU 2 PLU Data Table I 8 Unit Symbol 1 New Edit You can press the SAVE key at anytime to save the current data and if you want to exit without saving press the ESC key 1 Enter unit number This value can be from 1 to 8 EX Qty Unit No 1 2 Enter unit symbol EX Symbol PCS 3 Exit menu If you want to exit press ESC key ...

Страница 58: ...NU 2 PLU Data Table I 8 Unit Symbol 3 Delete 1 Enter unit symbol number to delete EX Delete unit symbol 1 Note There is no confirmation request when deleting a Unit Symbol No Pressing the PRINT key will cause the Unit Symbol No entered to be deleted ...

Страница 59: ... at anytime to save the current data and if you want to exit without saving press the ESC key 1 Enter ingredient number This value can be from 1 to 1000 EX Ingredient number 1 2 Enter ingredient EX Ingredient Line1 SALT EX To print SUGAR on next line enter after SALT Note Pressing the PG UP or PG DOWN key will move the cursor to the beginning or end of the brackets respectively 3 Exit menu If you ...

Страница 60: ... used by categorizing them into Ingredient1 and Ingredient2 Categorization code exists to distinguishIngredient1and2 Thiscodecan beinputtedbyusingthe CHAR CODEinputkey Ingredient1andIngredient2areprintedontoseparatefieldsinthelabelformat FieldIDofIngredient1is25 whilethatforingredient2is26 1 2 InputtingofIngredientattheweighingscale 1 InputIngredient1attheingredientinputwindow MENU1311 2 Afterhavi...

Страница 61: ...alories Cal CALO F Calories From Fat Cal TO FAT Total Fat g SA FAT Saturated Fat g TR FAT Trans Fat g CHOLES Cholesterol mg SODIUM Sodium mg CARBO Total Carbohydrates g FIBERS Dietary Fibers g SUGARS Sugars g PROTN Protein g VITA A Vitamin A CALC Calcium VITA C Vitamin C IRON Iron 2 3 2 1 New Edit Nutrition Facts Menu code 1321 MENU 3 PLU Data Table II 2 Nutrition Facts 1 New Edit You can press th...

Страница 62: ...ach page 1 Nutrition Fact No This value can be from 1 to 500 EX Nutrition fact no 1 2 Enter description EX BEEF STEW 3 Enter Serving Size Text EX Serving size 1CUP 4 Serving Per Container Text EX Serving Per Container 2 5 Calories EX Calories 230 ...

Страница 63: ...64 6 Calories from fat EX Calories From Fat 120 7 Total Fat g EX Total fat 14 g 8 Saturated fat g EX Saturated fat 7 g 9 Trans Fat g EX Trans Fat 1 g 10 Cholesterol mg EX Cholesterol 40 mg ...

Страница 64: ...65 11 Sodium mg EX Sodium 950 mg 12 Total Carbohydrate g EX Total Carbohydrate 16 g 13 Dietary Fibers g EX Dietary Fiber 2 g 14 Sugars g EX Sugars 3 g 15 Protein g ...

Страница 65: ...66 EX Protein 11 g 16 Vitamin A EX Vitamin A 20 17 Calcium EX Calcium 2 18 Vitamin C EX Vitamin C 0 19 Iron EX Iron 6 ...

Страница 66: ...Data Table II 2 Nutrition Facts 3 Delete 1 Enter nutrition fact number to delete EX Delete nutrition facts no 1 Note There is no confirmation request when deleting a Nutrition Fact No Pressing the PRINT key will cause the Nutrition Fact No entered to be deleted ...

Страница 67: ...ware Discount information must be programmed in each PLU 2 4 1 1 New Edit Discount Menu code 1131 MENU 1 PLU 3 Discount 1 New Edit You can use the PG UP and PG DOWN keys to navigate from page to page or you can use the Arrow keys to go through each page 1 Enter department number and PLU number EX Department Number 1 PLU Number 1 2 Enter discount type Refer to Discount Type table as below Discount ...

Страница 68: ... charge item 7 FREEADD FreeAddition ByWeight PLU Set discount weight By Count PCS PLU Set discount number 8 TPRICE by T Total Price by total price Set a discount amount of total price for current total price 9 TPRICE by T Total Price by Total Price Set a discount of total price for current total price 10 UPRICE BY T Unit Price by Total Price Set a discount amount of unit price for current total pr...

Страница 69: ...t PLU or By PCS PLU unit is count EX 1st Target 0 100 Kg 1st Value 1 00 2nd Target 0 500 Kg 2nd Value 2 00 No Display Type Description 1 TARGT1 First Target Weight Set weight limit for 1st stage of discount 2 VALUE1 First Value Price Set the discount amount of unit price for the first weight limit 3 TARGT2 SecondTarget Weight Set weight limit for 2nd stage of discount ...

Страница 70: ...it 4 Discount Condition 1 Set the day of week 1 Discount 0 Do not discount EX Discount on Thursday Friday and Saturday 5 Discount Condition 2 Set date and time If you set date and time to 0 it means discount all the time EX Start Date 14 07 01 End Date 14 07 31 EX Start Time 8am End Time 6 30pm ...

Страница 71: ...unt Simply enter the number that you wish to delete 1 Delete by PLU No DC Menu code 1137 MENU 1 PLU 3 Discount 3 Delete 1 Delete by PLU no DC EX Press 1 key to select Delete by PLU No DC 1 Enter the department number and PLU number to delete EX Department number 2 PLU No 1 Note There is no confirmation request when deleting a Discount of a PLU No Pressing the ...

Страница 72: ...73 PRINT key will cause the Discount of the PLU No entered to be deleted ...

Страница 73: ...when deleting a Discounts by Department No Pressing the PRINT key will cause all Discounts in the Department Number entered to be deleted 3 Delete ALL DC Menu code 1139 MENU 1 PLU 3 Discount 3 Delete 3 Delete ALL DC Press 1 key to select Delete all DC Note There is no confirmation request when deleting all Discounts Pressing the PRINT key will cause All Discounts in all Departments to be deleted ...

Страница 74: ...ons 2 5 1 1 Priority Setting Menu code 1531 MENU 5 Global 3 Discount 1 Priority This menu is used to determine which Discount will have priority Refer to the chart below Discount information is also printed on the label Discount Priority Setting No Display Type Description 0 NO DC No Discount No discount applied 1 PLU DC PLU Discount PLU discount only applied 2 GLOBAL DC Global Discount Global dis...

Страница 75: ...nt information in Menu code 1532 1533 and 1534 You can use the same procedures shown in chapter 2 4 2 Global Discount condition by weight Item Menu code 1532 MENU 5 Global Setting 3 Discount 2 Weight discount Global Discount condition by Count Item Menu code 1533 MENU 5 Global Setting 3 Discount 3 Count discount Global Discount condition by PCS Item Menu code 1534 MENU 5 Global Setting 3 Discount ...

Страница 76: ...can be programmed using Menu code 1880 chapter 2 14 8 and are assigned to Speed Key locations If you program Function keys on the CL5200J series you will decrease the total number of Speed Keys available 1 Speed Key Set No Select speed key set no You can use this number when you program menu 1211 See the chapter 2 2 1 1 EX Speed key set No 2 2 Speed Key Programming The Speed keys are numbered left...

Страница 77: ...78 ...

Страница 78: ...Table 1 Store This menu shows how to program Store Data information 2 7 1 1 New Edit Store Menu code 1411 MENU 4 Store Data Table 1 Store 1 New Edit Store 1 Enter store number EX 1 2 Press PRINT key and enter appropriate text in NAME EX NAME CAS STORE 3 Press PRINT key then user may enter other store information such as TELEPHONE NUMBER or any text information EX TEL 2019339002 TEXT NJ CAS office ...

Страница 79: ...e 1413 MENU 4 Store Data Table 1 Store 3 Delete Store This menu is to delete the STORE user wish to Press 3 in STORE menu to get into DELETE STORE menu 1 Store delete EX Store 1 Note There is no confirmation request when deleting a Store No Pressing the PRINT key will cause the Store No entered to be deleted ...

Страница 80: ...counts Receivable It is used in the Clerk Mode when issuing a receipt for a Credit Transaction EX Pre paid Customer Monthly payment etc 2 7 2 1 New Edit Customer Menu code 1421 MENU 4 Store Data Table 2 Customer 1 New Edit 1 Enter Customer number and press PRINT key EX Customer No 1 2 Enter other informations in such as Name Address1 and Address2 EX NAME TOM EX ADDRESS 1 99 Murry hill ...

Страница 81: ...82 EX ADDRESS 2 East ford 3 Press PRINT key then user may enter the Address 3 TEL Number and customer s CREDIT LIMIT AMOUNT EX ADDNESS3 NJ 07073 EX TEL 2019339002 EX CREADIT LIMIT AMOUNT 200 00 ...

Страница 82: ...essage Menu code 1430 MENU 4 Store Data Table 3 Scroll Message This Menu is used to program the Scrolling Message function The Scrolling Message can be used for advertisements sales promotions sales messages etc 2 7 3 1 Configuration Menu Code 1431 MENU 4 Store Data Table 3 Scroll Message 1 Configuration The configuration function allows you to program the wait time and the actual scrolling speed ...

Страница 83: ...l be in the Scrolling Message You may input up to 9 messages and use two different scrolling effects 1 Enter Message No and Message Text Enter Message No and Message Text Ex Message No 1 Ex Message Text Scale Mart 2 Set Speed Speed means the scrolling blinking speed for the text speed is representing the moving speed of the text and when it is blinking speed it represents the speed of the blinking...

Страница 84: ...put blink counts Ex Blink Count 0 4 Set scrolling message effect Effect 0 No use Effect 1 Scroll message left to right Effect 2 Scroll message right to left Effect 3 Scroll message blink Ex Effect 2 5 Select use or unuse for scrolling Message Y USE N NO USE Ex 1 Yes 6 Set date of scroll message Date Setting Ex 1 Yes ...

Страница 85: ...nd Date 00 00 00 Note If you enter 00 00 00 for a Start and End Date This means that the message will be shown starting today and will be shown every day until December 31 2099 Enter Time Ex Start Time 00 00 00 End Time 00 00 00 Note Start time should be lower than the End time If 00 00 00 is entered for both times then the message will be displayed for the entire day ...

Страница 86: ...Menu Code 1441 MENU 4 Store Data Table 4 Currency 1 New Edit 1 Numbering Currency You can save up to 4 different currencies by numbering 1 4 EX Currency No 1 2 Rate Decimal Point Enter the Rate Decimal Point default 4 EX Rate Decimal Point 3 3 Currency Rate Enter comparative rate of currency to default currency set EX Default currency 1 00 Comparative currency rate to default Currency 12 800 4 Pri...

Страница 87: ... Decimal point digit 2 7 Price Output Format Enter the number of format EX Price Output Format 2 Printing Output formats of currency symbol No Printing Format Description 0 100 00 0 12 1 100 00 0 12 2 100 00 0 12 3 100 00 c 0 12c 4 100 00 c 12c Greek When total amount is less than 1 only Last currency symbol shows up 5 100 00 0 12 6 100 00 0 12 7 100 00c 0 12c ...

Страница 88: ...e the Currency No entered to be deleted 2 7 5 Job Batch Schedule Menu code 1450 MENU 4 Store Data Table 5 Job Batch Schedule This function is used to print the label in large number for the pieced products or to sell several pieced products that have been packaged into a set 2 7 5 1 New Edit Job Batch Schedule Menu code 1451 MENU 4 Store Data Table 5 Job Batch Schedule 1 New Edit Schedule 1 Job Ba...

Страница 89: ...al number of label printing to print You can enter 1 99 2 7 5 2 Delete Job Batch Schedule Menu code 1453 MENU 4 Store Data Table 5 Job Batch Schedule 3 Delete Schedule 1 Job Batch Schedule number to delete EX Delete Job Batch Schedule no 2 Note There is no confirmation request when deleting a Job Batch Schedule No Pressing the ...

Страница 90: ...New Edit Conv Table This is Mapping Table between each scanned bar code and each PLU number 1 Setting up scan code No Maximum number of Conversion Table Index is 1999 2 Setting up mapping Code Enter the number ranged between 1 and 13 3 Setting up department No Enter the Department number of the PLU to be mapped 4 Setting up PLU No Enter the PLU number to be mapped EX Index Thevaluetobecomparedwith...

Страница 91: ...to be deleted 2 7 6 3 Scanner Config Menu code 1464 MENU 4 Store Data Table 6 Scanner 4 Scanner Config 1 The way to set up Scan Form Enter defined 13 digit number or letter that scanner can recognize Assigned representative characters are written below X character It must be the number of same digit length as Mapping Code that you entered above has W character It represents weight date Any other s...

Страница 92: ...igits bar code is calls PLU by comparing with Mapping Code At this time you must enter 13 digits as Mapping Code at menu1461 It is possible to enter codes by using barcode scanner 2 7 7 Label Format Key Table Menu code 1470 MENU 4 Store Data Table 7 Label Format Key Table There is a function to change label format and Barcode by using function key This menu is used to set this function You can use...

Страница 93: ...94 3 PLU Barcode No Enter the barcode number to be assigned that function key ...

Страница 94: ... PLU s or if the Label Format will be programmed in the PLU data structure Note Label Formats 1 30 are Fixed Label Formats and can not be modified Formats 51 99 are Free Formats that may be created using the CL Works PC Program and downloaded to the CL5200J series You can press the SAVE key at anytime to save the current data and if you want to exit without saving press the ESC key 1 Global Label ...

Страница 95: ... IS6040 00010 60x40 4 Set total label number Set label format of total label for Add Up sales EX Total label No 29 TC6040 00029 60x40 5 Set printing direction of total label EX Reverse Total Label Y 6 Set printing direction of PLU and Misc item EX Reverse Item Label Y 7 Input Label 2 EX Label2 11 ...

Страница 96: ...lobal Barcode Setting provides all in one barcode setting by selecting nine different barcode options so that user does not need to save data for individual PLUs one by one All related barcode data are selected and saved from PLU barcode data table user may already register You can press the SAVE key at anytime to save the current data and if you want to exit without saving press the ESC key 1 Set...

Страница 97: ...mber for by count PLU Misc item EX PLU Count barcode No 2 4 Set barcode number for by PCS PLU EX PLU PCS barcode No 2 5 Set barcode number for fixed PLU EX PLU fixed barcode No 2 6 Set barcode number for Misc weight item EX Misc weight barcode No 2 ...

Страница 98: ... Add Up Total EX Add Up TTL barcode No 2 10 Set barcode number for floating Total EX Floating TTL barcode No 2 11 Set barcode2 number EX PLU Weight barcode No 2 Note Barcode 2 will be printed only if it is a label with barcode 2 field If you do not wish to use barcode2 you simply enter 0 It operates in the same manner as the Barcode2 No of the PLU input items ...

Страница 99: ... Menu code 1541 MENU 5 Global Setting 4 Tax 1 Set Global Tax 1 Setting up Global Tax It sets up the applied tax when product sales 0 Do not Use all Tax 1 PLU tax only 2 Global Tax only 2 8 3 2 Global Tax Number Menu code 1542 MENU 5 Global Setting 4 Tax 2 Global Tax No 1 Set up Select Tax No It sets up the kind of global tax when product sales 0 Do not use tax 1 9 Select registered tax Selection a...

Страница 100: ...101 1 9 Select registered tax Selection among tax at registered menu 1230 9 options ...

Страница 101: ...Serial Number Format Set the format of serial number to print label or ticket 5 ADDUP Select add up total label whether is printed or not 6 TICKET Set printing item for ticket 2 9 1 Print label item Menu code 1710 MENU 7 Print 1 Print Label Item If you set any of the items to N they will not be printed on any labels regardless of the label format You can use the PG UP and PG DOWN keys to navigate ...

Страница 102: ... Weight 13 PCS Pieces 14 SYMBOL Unit Symbol 15 S DATE Sell By Date 16 S TIME Sell By Time 17 P DATE Packed On Date 18 P TIME Packed On Time 19 PR DATE Produced Date 20 C DATE Cook By Date 21 BONUS Bonus Point 22 ORIGIN Origin 23 MSG Ingredient 24 SMSG Sales Message 25 NET WT Refer Net Weight 26 GRS WT Refer Gross Weight 27 PR TARE Percent Tare 28 PR LIMT Percent Tare Limit 29 SAVED Saved Price 30 ...

Страница 103: ...unit price total price weight or quantity information is printed on the label There are 4 sub menus available Markdown Sub menu No Sub menu Description 1 TOTAL Total Price Markdown Select Yes to display both of original total price and the discountedtotal priceif any Otherwise select No 2 UPRICE Unit Price Markdown Select Yes to display both of original unit price and the discountedunit priceif an...

Страница 104: ...ket Size If it is Label mode Width 60 Height 40 and Gap length 2 size is set If it is Ticket mode Width 60 Feed 20 and End Margin 30 size is set If you use Continuous Label Paper in Label mode Gap length value is applied to End Margin The values in are default 3 SEN CAL Enter the Gap 128 and Peel 128 values for printing sensor calibration The values in are default If you press TEST key Gap and Pee...

Страница 105: ...e from 0 to 400 You can change 2 9 3 1 Print Mode Menu code 1731 MENU 7 Print 3 Printer Hardware 1 Print Mode Select 0 for Label Mode 1 for Ticket Mode or 2 for Continuous Label Mode Press PRINT to save 2 9 3 2 Label Size Ticket Size Menu code 1732 MENU 7 Print 3 Printer Hardware 2 Label Size Enter values for Width Height Gap Length Feed and End Margin If you press TEST key height and gap length o...

Страница 106: ...t is Continuous Label Mode CONT LABEL SIZE is displayed and TEST key is not operated And End Margin instead of Gap Length shows up 2 9 3 3 Sensor Calibration Menu code 1733 MENU 7 Print 3 Printer Hardware 3 Sensor Calibration Enter appropriate values for Gap Peel Out of Paper If you press TEST key Gap and Peel values are adjusted automatically If it is Ticket mode Gap value is not saved ...

Страница 107: ... off Active rewind motor Label paper and Active Head up sensor If there is no gap on a label set Label Paper to 0 if there a gap set it to 1 When Ticket Mode is in Print Mode Peel off Rewind Motor and Label Paper do not work 2 9 3 5 Print Intensity Menu code 1735 MENU 7 Print 3 Printer Hardware 5 Print Intensity Enter any value from 0 to 20 ...

Страница 108: ...ngth value 1pixel 0 125mm Ex 280 will print 10mm higher 2 9 3 7 Label Preprint Menu code 1737 MENU 7 Print 3 Printer Hardware 7 Label Preprint Enter Y Yes or N No to select Preprint mode and any value of the preprint length from 0 mm to 10 mm Press TEST to test preprinting 2 9 3 8 Adjust Reverse Feed Length Menu code 1738 MENU 7 Print 3 Printer Hardware 8 Adjust Reverse Feed Length Enter any value...

Страница 109: ... Serial Number Format SERIAL NUMBER FORMAT programming is for numbering of label ticket issued printed on label ticket User may identify daily total counts of label ticket used up Meaning I Item Code N PLU Number P Price U Unit Price W Weight Q Quantity D Department G group A Ticket Counter Ticket Mode B ScaleTransaction Counter F PLU Prefix Character ...

Страница 110: ...Code For Future 2 9 5 Add Up Total Menu code 1750 MENU 7 Print 5 Add up Total This section shows how to set printing environments of total label and item label when you use ADD UP sales Press 5 to get into ADD UP TOTAL menu in PRINT main menu Press 0 for No or 1 for Yes in EX Print Total Label Yes EX Print Item Label No ...

Страница 111: ... label is printedwhenever youpress theADDkey It is applied to Label mode 2 9 6 Ticket Menu code 1760 MENU 7 Print 6 Ticket This section shows how to select item s Contents printed on ticket Press 6 to go to TICKET setting 2 9 6 1 Select Ticket Item Menu code 1761 MENU 7 Print 6 Ticket 1 Select Ticket Item Press 1 to go to SELECT TICKET ITEM menu 2 9 6 2 Select List Item Menu code 1762 ...

Страница 112: ...icateticket All ticket sections with exclusion of the product list areoutputtedoncemore Printingduplication of ticket D LIST Print List D ticket Same ticket including the product list is issued twice Print Duplicate Ticket must be set at Y forittobe usable PrintingList of itemson duplicatedticket Note N Printingamount of onlytotal price for duplicateticket List Item STORE Print Store Name Printing...

Страница 113: ... HEAD MS Ticket Head Message Printingmessageforticket head TAIL MS TicketTail Message Printingmessagefortickettail You have to download label format for Ticket Head Form No and Ticket Tail Form No from PC ...

Страница 114: ... Size Setting Display Ticket Font Setting Description PLU PLU Name Adjust size of product numbername TRANS TransactionData Adjust size of price of unit price weight unit product TOTAL Total Value Adjust thesizeof total price SERIAL Ticket Serial No Adjust the size of ticket issuance number It can designate from 0 to 3 Size of Subtotal Tax information Payment and Print Label cannot be adjusted ...

Страница 115: ...g table Sale Modes No Sale Modes Description 1 Ticket Floating SelectingTicket andFloatingClerk Mode 2 Label SelectingLabel Mode 3 Prepack SelectingPrepack Mode 4 Label Floating SelectingLabel andFloatingClerk Mode 5 Manager SelectingManagerMode 6 Repack SelectingRepack Mode Inthismode report is not updated 7 Self Label SelectingSelf ServiceMode Inthis mode youcanuse speedkey andsomekeys If youwan...

Страница 116: ...oating Floating Clerk Regist Label OFF 5 Manager Manager OFF 6 Repack Repack OFF 7 Self Label Label OFF Usually user has to set each option you wish to for clerk operation print or prepack mode However user may select simply one stop sales mode for 7 different modes Clerk Operation Print and Prepack mode User may also set options for Clerk Operation mode in MENU 1820 and Print Prepack mode in MENU...

Страница 117: ...ode Standard Clerk EX Operation mode Registration Clerk Modes No Clerk Modes Description 1 No Clerk Sales clerk do not log in and makes sales using PRINT key 2 Standard Clerk Sales clerk can make sales when he she logs in 3 Floating Clerk Plural sales clerks can make sales using own clerk ID Operation Modes No Operation Modes Description 1 Regist Normal sales mode 2 Repack Normal sales mode but no...

Страница 118: ...ed only in GROCERY department If user would like to use PLUs registered in other department than current department he she should change scale s department setting Store No represents Store Name or branch number on label ticket printed 1 Select DEPARTMENT No and STORE ID EX DEPARTMENT No 2 Grocery EX STORE No 1 Branch 1 2 10 4 Date Time Menu code 1840 MENU 8 Scale Config 4 Date Time This section i...

Страница 119: ...120 EX TIME 10 30 00 EX Month Format 0 DEC 1 12 1 2 Set YEAR FORMAT TIME FORMAT and separator for DATE EX Year Format 0 2001 1 01 1 EX Time Format 0 3 1 ...

Страница 120: ...E CONFIGURATION main menu 2 10 5 User Security Configuration Menu code 1850 MENU 8 Scale Config 5 User Security Configuration This section is to create edit change delete clerk s security information and configure security level 2 10 5 1 New Edit User Menu code 1851 MENU 8 Scale Config 5 User Security Con 1 New Edit Enter appropriate user data for clerk number clerk name nick name clerk password c...

Страница 121: ...122 EX CLERK NAME CHRISTOPER EX NICKNAME CHRIS EX CLERK PASSWORD 0117 EX CLERK LEVEL 3 EX USE FOR TRAINING N ...

Страница 122: ...word is 6 digit If there is no level 3 clerk you can use default value Clerk No 1 password 1 Level 3 Therefore default password is 011 You have to set a level 3 clerk If there is no level 3 clerk you can use default password 011 and if any you cannot use it Clerk level This value can be from 0 to 3 This level is related to menu 1855 Config permission If clerk 2 is set to level 2 this clerk can use...

Страница 123: ... Config Permission Menu code 1855 MENU 8 SCALECONFIG 5 User SecurityCon 5 ConfigPermission Permission level is related to clerk level and if the clerk level is lower than permission level this clerk cannot access that function Refer to clerk level on chapter 2 14 5 1 If permission level is 0 all clerks can access this function EX If you set permission level to 2 for price change key and clerk 1 is...

Страница 124: ... type Change Key 7 PLU Set a Permission level for Selecting PLU item 8 Weight Set a Permission level for In weight key 9 DC Set a Permission level for discount 10 Clerk Set a permission level for password in floating mode 11 Void Set a permission level to void item 12 Add up Set a permission level for add up sales 13 Return Set a permission level to return item 14 Ovride Set a permission level to ...

Страница 125: ...etting 28 Oper Set a permission level to change operation mode 29 Param Set a permission level to change user parameter 30 Comm Set a permission level for communication setting 31 Save Set a permission level for Save Key 32 Reopen Set a permission level for reopen sale You can use the PG UP and PG DOWN keys to navigate from page to page or you can use the Arrow keys to go through each page 2 10 5 ...

Страница 126: ... the scale by itself in the 8 fields such as DISPLAY A D KEYBOARD CHESS PRINTER PRINTER SENSOR MEMORY INFORMATION FIRMWARE VERSION and COMMUNICATION Press 6 to get into TEST menu 2 10 6 1 Display Test Menu code 1861 MENU 8 SCALE CONFIG 6 Test 1 Display To test the display press 1 on Test menu screen It automatically tests it You can exit from testing by pressing X ESC key 2 10 6 2 A D Test Menu co...

Страница 127: ...rid point Press any key to test key pad To exit keyboard test press ESC two times 2 10 6 4 Chess Printer Test Menu code 1864 MENU 8 SCALE CONFIG 6 Test 4 Chess Print Press TEST key to test printing a label 2 10 6 5 Printer Sensor Test Menu code 1865 MENU 8 SCALE CONFIG 6 Test 5 Printer Sensor To test printer sensor press 5 on Test menu screen The scale shows the conditions of current printer ...

Страница 128: ...129 Printer Sensor Test Items ...

Страница 129: ...1 Peel off To test that peel off sensor is properly work 2 Head up To test that TPH is opened or not 3 Gap To show real time Gap sensor s value 4 Peel To show real time peel off sensor s value 5 Temp To show TPH s temperature value ...

Страница 130: ...ion You can check firmware version of the scale 2 10 6 7 Communication Menu code 1868 MENU 8 SCALE CONFIG 6 Test 8 Communication You can test communication 2 10 7 Scale Parameter Menu code 1870 MENU 8 SCALE CONFIG 7 Scale Parameter You can set scale s environment as below Scale Parameter ...

Страница 131: ...73 UPRICE Y N Save unit price change TYPE Y N Save type Change in PLU SAVE MD Y N Save mode is active when you turn on the scale CLRPLU Y N PLU is cleared after printing even though there is an item on the platter MICS CT Y N If you enter count it is considered that misc Count condition when there is no Misc Key MISC WT Y N If there is an item on the platter it is considered that misc weight condi...

Страница 132: ...n define function keys to Speed keys It is recommended that you define function key to higher number Speed key because you can not use that PLU key 1 Enter key code Pole type 72 Speed Keys Standard type 54 Speed Keys If you press Speed key the displays shows the key code of that speed key EX1 Standard Type EX1 Press last speed key 2 Enter function key EX1 Use 12 Function key Display Reset Refer to...

Страница 133: ...REFERENCE Reference PLU Key 10 IN WEIGHT IN Weight Key 11 LABEL TICKET Toggle between the Label and Ticket 12 DISPLAY RESET Display refresh 13 MISC WEIGHT Misc Weight Key 14 MISC COUNT Misc Count Key 15 MISC PCS Misc PCS Key 16 EDIT SELL Sell By Date Change Key 17 EDIT ORIGIN Origin Change Key 18 EDIT ITEM PLU Change Key 19 EDIT DATETIME Change Date Time 20 EDIT D C Set discount for current PLU 21...

Страница 134: ... NO Edit Ticket Serial Number Master scale input range 1 99999 50 PRINTDATE Print Date On Off 51 82 CLERK V1 V32 Clerk key 83 90 LABEL1 8 Label Change Key 91 EDIT TAX Tax Change Key 92 EDIT TRACE Traceability Change Key 93 124 CLERK V33 64 Clerk key 125 SCAN CLERK Select the scan clerk 126 BARCODE Input barcode number Key 127 EDIT INGREDIENT Edit ingredient Key 128 LARGE MSG CALL Large Message Cal...

Страница 135: ...ea 171 GLOBAL_TAX Apply Global TAX on current PLU temporary 172 GLOBAL_LABEL Apply Global Label and Barcode toggle 173 MULTI PRINT Print multiple label 181 FEED Label feed key 182 PREPACK Prepack key 183 NETWEIGHT Prepack key 184 ZERO Zero Setting 185 TARE Tare Setting 186 EDIT KEY Edit Speed Key Config 187 SHIFT SHIFT Key 188 CLEAR CLEAR Key 189 PRINT PRINT Key 0 or 9999 PLU Key ...

Страница 136: ...ent upon how you use Z1 Remember that you can generate as many X reports as you would like because X mode does NOT clear any sales data 2 11 2 Report Menu Menu code 1600 MENU 6 Report No Display Submenus Description 1 X1 REP X1 Report Print and displaysales dataof period1 2 Z1 REP Z1 Report Print display andclearsales dataof period 1 3 CLEAR ClearAll Clear all reports of period1 4 PEND TR Non send...

Страница 137: ...sales report 4 Group Print and display group sales report 5 Department Print and display department sales report 6 Hourly Print and display hourly sales report 7 Clerk Print and display clerk sales report 2 11 4 X1 Scale Sales Report Menu code 1611 MENU 6 Report 1 X1 Report 1 Scale If you press 1 key on X1 Report menu screen scale sales report is shown on the display To print this report press TES...

Страница 138: ...139 Sample Label Scale Report Sample Ticket Scale Report ...

Страница 139: ...140 2 11 5 X1 PLU Report Menu code 1612 MENU 6 Report 1 X1 Report 2 PLU Report Press 2 key on X1 Report menu screen EX department 1 Enter PLU range to check EX PLU 1 10 ...

Страница 140: ...141 PLU sales report is shown on the display by pressing PRINT key To print report press TEST key To exit this menu press the ESC key Note PLU with no sales is not printed ...

Страница 141: ...142 Sample Label PLU Report Sample Ticket PLU Report ...

Страница 142: ...ort 1 X1 Report 3 MISC PLU Press 3 key on X1 Report menu screen Enter the number to check 0 Miscellaneous by Weight 1 Miscellaneous by count 2 Miscellaneous by pcs Ex Misc by weight Misc by count Misc by pcs Sales report is shown on the display by pressing PRINT key ...

Страница 143: ...144 To print report press TEST key To exit this menu press the ESC key Note Misc PLU with no sales is not printed Sample Label Miscellaneous Report Sample Ticket Miscellaneous Report ...

Страница 144: ...Enter group range to check Ex Group 0 Group 23 You can see group sales data by pressing PRINT key To print report press the TEST key To exit this menu press ESC key Note Misc If the setting of MENU 1872 ALL REP is No the group with no sales is not printed But if Yes all group sales data within the range is printed ...

Страница 145: ...146 Sample Label GROUP Report Sample Ticket GROUP Report ...

Страница 146: ... Enter department range to check EX dept 1 dept 10 You can see department sales data by pressing PRINT key To print report press the TEST key To exit this menu press ESC key Note If the setting of MENU 1872 ALL REP is No the department with no sales is not printed But if Yes all department sales data within the range is printed ...

Страница 147: ...148 Sample Label Department Report Sample Ticket Department Report ...

Страница 148: ...enu screen Enter time to check EX AM 9 hour PM 2 hour You can see hourly sales data by pressing PRINT key To print report press TEST key To exit this menu press ESC key Note If the setting of MENU 1872 ALL REP is No the hour with no sales is not printed But if Yes all hour sales data within the range is printed ...

Страница 149: ...150 Sample Label hourly Report Sample Ticket hourly Report ...

Страница 150: ... screen Enter clerk range to check EX clerk 0 clerk 32 You can see clerk sales data by pressing PRINT key To print report press TEST key To exit this menu press ESC key Note If the setting of MENU 1872 ALL REP is No the clerk with no sales is not printed But if Yes all clerk sales data within the range is printed ...

Страница 151: ...152 Sample Label Clerk Report Sample Ticket Clerk Report ...

Страница 152: ... key The scale shows following screen When printing is done Z1 data is cleared and exit this menu Sales data is same with X1 report Note1 Ifthesettingof Parameter 598 Print whenZ Reportclear is No youcannot print ZReport Note2 Ifthesettingof Parameter 595 Individualclear Z report is Yes youcanclearScale PLU Misc PLU Group Department Hourly Clerk dataisclearedseparately But if you usethis function ...

Страница 153: ... 2 11 12 Clear All Report Menu code 1650 MENU 6 Report 5 Clear All If you select menu code 1650 you will see following screen To clear all report press 1 key If you do not want to clear press 0 or ESC key ...

Страница 154: ...a deviation from zero as long as there are no PLUs or MISC PLUs called up The weight can sometimes drift from zero due to debris on the platter leaving objects on the platter for excessive periods of time or other environmental factors To correct this remove everything from the platter and press the ZERO key when the stable indicator is on Below is a possible zero drifted state that should be corr...

Страница 155: ...first and then call up that PLU There are two ways to enter a tare weight and both ways will only work if there is no PLU or MISC PLU called up 3 3 1 Manual Tare Entry 1 Enter a tare weight manually by pressing the numeric keys EX 150 g Press TARE key 3 3 2 Weighed Tare Entry Place the empty container on the platter making sure that the weight is stable EX 0 15 kg Press TARE key ...

Страница 156: ...How to Clear Tare Remove the item from the platter Press TARE key again 3 3 4 Preset Tare Call up a PLU including tare weight of container EX PLU 3 s tare 150 g Clear PLU 3 then tare is also automatically cleared ...

Страница 157: ...f container using numeric keys EX 150 g Enter the weight of container using numeric keys EX 200 g Press TARE key after removing item and container from the platter Note Parameter 605 Accumulation Tare and parameter 606 Subtraction Tare must be set ...

Страница 158: ...ing a PLU number PLU will be displayed depending on the setting time It takes time to call up a PLU depending on the setting of parameter 586 Indirect PLU Call Time 3 4 2 Using Speed Key To call up PLU number 79 and you programmed Speed key 5 to be PLU number 79 then you need to press the following key Speed key 5 Note You have to set Speed key in program mode Menu 1160 on chapter 2 6 Press a spee...

Страница 159: ...rarily change the pricing of priced PLUs If you set program menu 1873 UPRICE changed priced is saved after printing a label 3 5 1 By Weight PLU PLU 1 MEAT PLU Type By weight Unit Price 1 99 Press OVERRIDE key Enter new unit price Press PRINT key to print label ...

Страница 160: ...161 3 5 2 By Count PLU PLU 2 APPLE PLU Type By count Unit Price 1 00 Enter QUANTITY and press OVERRIDE key Enter new unit price Press PRINT key to print label ...

Страница 161: ... 5 3 By PCS PLU PLU 3 Eggs PLU Type By PCS Pieces 3 Unit Price 30 00 Press OVERRIDE key and enter new unit price Press FOR key and enter QUANTITY Press FOR key and enter PIECES Press PRINT key to print label ...

Страница 162: ...163 Note If you set program menu 1873 UPRICE changed priced is saved after printing a label Discount function is not available when you use OVERRIDE key ...

Страница 163: ... Weight 1 0kg Press Speed key to call up a PLU User may call up a PLU by pressing speed key or numeric key Please refer to chapter 3 4 for details Place the item s on the platter Press PRINT key to print a label and complete current transaction This transaction s is saved in the sales record Remove the item s from the platter ...

Страница 164: ...LE PLU No 31 PLU Name MANGO PLU type By Count Unit Price 1 99 Sales 20 pieces Press numeric key s to call up a PLU User may call up a PLU by pressing speed key or numeric key Please refer to chapter 3 4 for details Enter the number of pieces EX 20 pieces Press PRINT key to print a label and complete current transaction This transaction s is saved in the sales record Total Price Piece s X Unit pric...

Страница 165: ...166 ...

Страница 166: ...meric key s to call up a PLU Enter QUANTITY the number of Pieces EX 20 pieces Press PRINT key to print a label and complete current transaction This transaction s is saved in the sales record Total Price QUANTITY X Unit price PIECES Note In SAVE Prepack mode the PLU is not automatically cleared when you remove the item from the platter ...

Страница 167: ... Target of Discount Discount amount from unit price 0 50 for weight 0 500 2nd Target of Discount Discount amount from unit price 1 00 for weight 1 000 Call up a PLU Place an item on the platter In this case discount is not available because the weight of this item 0 489 kg is lower than 1st target 0 500 kg Place an item on the platter In this case discount is possible because the weight of item 0 ...

Страница 168: ... Unit Price Discount By Weight PLU EXAMPLE PLU 29 ORANGE By Weight PLU Unit price 20 00 1st Target of Discount 10 off from unit price for sales weight 0 500 kg 2nd Target of Discount 20 off from unit price for sales weight 1 000 kg Call up a PLU User may call up a PLU by pressing speed key or numeric key Please refer to chapter 3 4 for details Place an item on the platter In this case discount is ...

Страница 169: ...et 0 500 kg therefore you can have 10 discount Total price is 9 47 Place items on the platter In this case the weight of items 1 076kg is greater than 2nd target 1 000kg therefore you can have 20 discount Total price is 17 22 Press the PRINT key Markdown STRIKE THROUGH is printed on label as figure ...

Страница 170: ...amount from unit price 0 50 for sales 10 pieces Call up a PLU Enter quantity In this case 5 is greater than 1st Target 5 unit price 0 20 is discounted Enter quantity In this case 11 is greater than 2nd Target 10 unit price 0 50 is discounted Press the PRINT key Markdown STRIKE THROUGH printed on label as figure Note You can set four markdown information in menu 1720 of program mode See chapter 2 1...

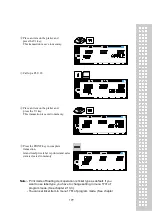
Страница 171: ... 2 PLU 32 SIRLOIN PLU Type By Weight Unit Price 20 00 PLU 35 T bone steak PLU Type By PCS Pieces 3 Unit Price 6 00 Call up a PLU and place item on the platter Press ADD key PLU is cleared automatically You will see the display as below Remove item from the platter Call up a PLU Press ADD key PLU is cleared automatically You will see the display as below ...

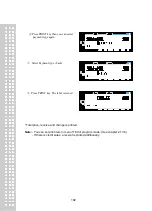
Страница 172: ...PRINT key To repeat the ADD UP process press the ESC key Note You can press the VOID key to undo the transaction See chapter 3 10 If you set I LABEL to Y in menu 1750 of program mode label will be printed whenever you press the ADD key See chapter 2 13 3 Even though you turn off the scale before printing a grand total label add up data is not cleared ...

Страница 173: ...pressing V key All clerks can use V key Up to 50 transactions are available in Clerk mode Sales data is saved in memory If you press PRINT key to complete transaction grand total price is printed and sales data is cleared from memory If you want to see total price before completing transaction press the ST TTL key To print press the PRINT key Even though you turn off the scale before printing sale...

Страница 174: ... can print ticket again by pressing X key It depends on the setting of parameter 599 Print last ticket 3 9 1 Standard Clerk Operation Assumption You have to set S MODE to 2 Standard Clerk in menu 1820 of program mode See chapter 2 14 3 EXAMPLE 2 Clerk No 2 Clerk Name Christine Clerk Key V1 PLU 1 Apple Unit Price 10 00 Weight 1 2 kg PLU 2 Orange Unit Price 20 00 Weight 1 2 kg Call up a PLU Place an...

Страница 175: ... for grand total price by pressing PRINT key When you turn on the scale this function is not active so you have to press ADD key 3 9 2 Floating Clerk Operations Assumption You have to set Select Clerk Sale mode to 3 Floating Clerk in menu 1820 of program mode See chapter 2 14 3 EXAMPLE Clerk No 2 Clerk Name Christine Clerk Key V1 PLU 1 Apple Unit Price 10 00 Weight 1 2 kg PLU 2 Orange Unit Price 2...

Страница 176: ...is saved to memory Press the PRINT key to complete transaction Grand total price label is printed and sales data is cleared in memory Note Print mode of floating clerk operation is ticket type as default If you want to use label type you have to change setting in menu 1731 of program mode See chapter 2 13 3 You can set ticket item in menu 1761 of program mode See chapter ...

Страница 177: ...178 2 13 6 ...

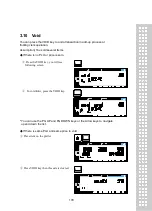
Страница 178: ...everal items If there is no PLU or price is zero Press the VOID key you will see following screen To void Kiwi press the VOID key You can use the PG UP and PG DOWN keys or the Arrow keys to navigate up and down the list If there is same PLU and same price to void Place item on the platter Press VOID key then this sale is cleared ...

Страница 179: ...180 If price is not same void list screen is shown on the display automatically ...

Страница 180: ... use PAY key in the add up process or floating clerk operation EX Total price 15 00 If customer give coupon 6 00 and cash 9 00 to clerk Press PAY key when there is subtotal price Press Page down key and select payment type Coupon Enter 6 00 ...

Страница 181: ... type again Select Payment type Cash Press PRINT key The label is issued Total price receive and change is printed Note You can set print item in menu 1760 of program mode See chapter 2 13 6 If there is credit sales a receipt is printed additionally ...

Страница 182: ...by the specified amount You need to call up the PLU that you wish to return by either pressing its corresponding speed key or typing its number When the price is zero 0 By weight PLU You need to enter the total price and weight that was printed on the return PLU s label 1 By count PLU You need to enter the total price and quantity that was printed on the return PLU s label When the price is higher...

Страница 183: ...de 2 on the display Summation ON will appear for about 3 seconds 3 call up PLU and then place a item 4 each label will be automatically prints and will make a total 5 repeat 3 4 6 when you press ST TTL key the total will be displayed 7 to print the Sub Total press PRINT key 8 repeat 3 7 9 to print Grand Total Label press ST TTL this case at there should be no sub total remains then press ST TTL ke...

Страница 184: ...tter Note If the scale is in Prepack mode then it will always auto print if the Total price is greater than 0 00 and 1 The weight deviates by an amount greater than or equal to the Parameter 862 setting Min weight for sale and the weight stabilizes at a weight greater than zero 2 The weight deviates by an amount greater than or equal to the Parameter 861 setting Auto threshold and the weight stabi...

Страница 185: ...186 than zero ...

Страница 186: ... Weight PLU Note If you want to use X key for by weight PLU you must set Parameter 582 Use X key by WT EXAMPLE Speed key 1 Onion preset key Unit price 1 50 Sales Weight 1 0kg Call up a PLU You can call up a PLU by pressing speed key or numeric key Please refer to chapter 3 4 for details Place the item s on the platter Press the X key and input 5 ...

Страница 187: ... after printing is done See chapter 2 14 21 If parameter 551 Use double print auto is set you will have two same labels in auto mode If you set 2nd label in PLU programming 2nd label is issued automatically 3 14 2 Non Weighed PLU You can use X key for by Count By PCS PLU without any setting The way of using X key is same as by weight PLU except weighing item ...

Страница 188: ...ell By Date Time Call up a PLU Press EDIT SELL key to enter both of effective date and time Press PRINT key to complete saving Note To use EDIT SELL key you have to set this key in menu 1880 of program mode See chapter 2 14 8 ...

Страница 189: ...190 3 16 How to Change Origin Call up a PLU Press ORIGIN key to retrieve one of origin data saved Note To use ORIGIN key you have to set this key in menu 1880 of program mode See chapter 2 14 8 ...

Страница 190: ...See chapter 2 14 7 Press WT CT key to change PLU type from By weight to By count PLU or vice versa If you change by Weight PLU to by count PLU quantity is set 1 and unit price is same If you change by count PLU to by weight PLU unit price is same If there is discount information on PLU you can not change PLU type ...

Страница 191: ... in PLU you can use this function 3 18 1 Fixed Price Key Call up a PLU 1 and press Fixed Price key Press Override Key Type fixed price 2 00 than press PRINT key Note To use Fixed Price Key you have to set this key in menu 1880 of program mode See chapter 2 14 8 ...

Страница 192: ...ll up a PLU 1 APPLE Press Discount key and enter amount to discount Ex 20 Press PRINT key Place item on the platter and press PRINT key Note To use DISCOUNT key you have to set this key in menu 1880 of program mode See chapter 2 14 8 ...

Страница 193: ...Operates only in the ticket mode Does not operated in PREPACK and AUTO modes When purchasing a product it automatically purchases another product additionally When the Linked PLU type is weight purchasing is made in accordance with weight When the Linked PLU type is count it sells 1 unit To use this function you have to set Linked department and Linked PLU when you create PLU 3 20 Sales Operation ...

Страница 194: ...l format and user label format FixedLabelFormat UserLabelFormat No 1 50 51 99 Quantity 30 20 Method BuiltinCL5200J DownloadfromPC Features Youcannoteditformat Using the PC program you can program format numbers 51to99 Inticketmode itisavailabletouseHead Tailformat Fixed Label Format ...

Страница 195: ...196 1 1 Label Format Sample 1 2 3 4 5 6 7 8 ...

Страница 196: ...197 9 10 11 12 13 14 ...

Страница 197: ...198 15 16 17 18 19 20 ...

Страница 198: ...199 21 22 23 24 ...

Страница 199: ...200 25 26 27 28 29 30 32 ...

Страница 200: ...201 ...

Страница 201: ...202 1 2 Label Format s field Sample 1 Label sample 1 2 Label sample 2 ...

Страница 202: ...203 2 ASCII Code Table Microsoft Window Codepage 1252 Note To enter A first you have to read 40 in a row and 01 in a column and type 41 ...

Страница 203: ...204 3 Window Character Set Information ...

Страница 204: ...ADConversionError InquireofA Scenter ChkMEMErr CHAR Memorycheckingdisableduponscalebooting InquireofA Scenter InitADErr CHAR ADmodulecheckingdisableduponscalebooting InquireofA Scenter NetworkErr CHAR Networkcheckingdisableduponscalebooting InquireofA Scenter KeyError CHAR Keyofkeypadbeingpushed orproblemwithkeypad uponscalebooting InquireofA Scenter CAL Unst CHAR WeightnotstabilizeduponSpanCalibr...

Страница 205: ...fterdeleteD C MessageappearingwhenthereexistDiscountdatainPLUtobedeletedupondeletion ofPLUfromMenu1 147 ChkDiscPLU CHAR DeletePLUperdepartment whenthereexist Discount datainPLUupondeletionof wholePLU ChkPLUtare CHAR IfPLUT areareavailable checkPLUtarewhenT areisset ChkPLUtype CHAR CheckPLUtype MessageappearingwhenweightproductisregisteredinMenu1451 Jobbatch Only countproductsallowedforuse ChkWTtar...

Страница 206: ...tforremoval of thecurrentlycalledPLUif PLUiscalled whencurrent Deptis changedby DEPT key DoublePRT CHAR Doubleprint Automode Showsautomaticissuanceof2sheets DiscountPLU CHAR ChangeinPLUtypeisnotallowedwhenDiscountinformationexistsinPLUfortypeto bechanged DataFull CHAR WhenDataT ableisfilledupwithMemory ERR REOPEN 1 3 CHAR Messageappearingwhenissuedticketcannotbereopened 1 Whentickettobeopeneddoesn...

Страница 207: ...RENCE 9 ispushedaftercallingPLU NotSupport CHAR MessageappearingundertheconditionsofnotallowingsalesinFloatingmode ADD MessageofoperationdisabledwhenAddisoperatedinClerkmode NoTare CHAR WhenT areclearingwasattemptedwithoutsetT are Nouptare CHAR T arehigherthanthesetT arecannotbesetuponcontinuoususeofT are Nodowntare CHAR T arelowerthanthesetT arecannotbesetuponcontinuoususeofT are NoXkey CHAR Mult...

Страница 208: ...emovweight CHAR Removeweightontray WhenweightisplacedontrayuponsalesofByPCS ByCountPLU Removeweight ontray Removktare CHAR WhenKeytareisset PLUwithT areinformationcannotbecalled DismantleKeytareandcallPLU REOPENOK CHAR Reopensuccess Same PLU PRT CHAR MessagedisplayedwhenthesamePLUisprintedaftercallingandprintingPLU Issuedafterre callingPLU However excludedinPrepackmode SURE CHAR Messageofbeingaske...

Страница 209: ...210 WrongValue CHAR Whentheinputtedvalueexceedsinputrange 7 SEG 7 Segment LCD CHAR Character LCD ...

Страница 210: ...211 MEMO ...

Страница 211: ...212 MEMO ...

Страница 212: ...213 MEMO ...

Страница 213: ...214 MEMO ...

Страница 214: ...215 MEMO ...

Страница 215: ...216 MEMO ...

Страница 216: ...217 MEMO ...

Страница 217: ...218 MEMO ...

Страница 218: ...219 뒷표지 ...

Отзывы: