


72
3327 • P2 6/06
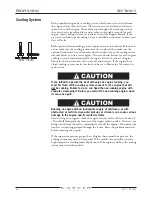
PROPULSION
SECTION 5
Starting the Engines
1. Open the cooling system seacocks for both engines.
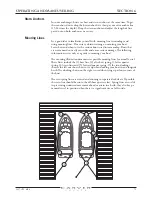
2. Move both shift/throttle levers to neutral.
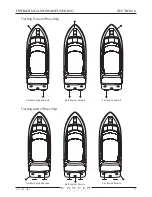
3. Select the engine you wish to start first. NEVER start both engines at the
same time.
The ignition switch is spring activated. Release the key as soon as the
engine starts. Failure to do so may damage he starter.
If the engine does not start within 10 seconds, release the key, then
try starting the engine again. Do not hold the ignition key in the START
position for more than 10 seconds.
4. Place one hand on the shift/throttle lever of the engine you are starting. With
the other hand, turn the ignition key.
The oil pressure alarm sounds for the first few seconds after the engine has
started. This is normal. The alarm is silenced as soon as the oil pressure
increases to within the normal operating range.
If the engine is cold when it starts, it may run rough. Advance its shift/
throttle lever slightly to keep it running.
5. When the engine is idling smoothly, start the other engine in the same
manner as the first.
After the Engines Have Started
1. Check the engine gauges. Make sure all readings are within the normal range.
2. Verify that water is being pumped through each engine’s exhaust outlet,
located near the transom. Refer to Section 9 - Thru-Hull Fittings for the exact
location of the exhaust outlets. If you do not see water being pumped out,
turn the affected engine(s) off. Identify and correct the cause of the problem
before restarting the engine(s).
The engine room contains moving, hot machinery. Keep your
hands, feet and body out of the engine room while one or both engines
are operating.
3. Look into the engine room and visually inspect the fuel system hoses and
exhaust hoses. If you see a leak or suspect that anything is out of order, shut
off the engines and investigate. Identify and correct the cause of any problem
before restarting the engines.
4. Let the engines warm up until the needles on the temperature gauges begin
moving up.
5. Make sure any navigation systems installed are operating properly.
6. Periodically perform a visual inspection of the engine room while underway.
Содержание 380 SPORT
Страница 1: ...HIN CDR _________________ 380 Sport Owner s Guide 2007 Version 1 ...
Страница 2: ......
Страница 4: ......
Страница 6: ......
Страница 8: ......
Страница 28: ......
Страница 40: ...28 3327 P2 6 06 DC ELECTRICAL SYSTEM SECTION 2 DC SCHEMATIC 3327 324 002 5 12 7 05 ...
Страница 54: ...42 3327 P2 6 06 AC ELECTRICAL SYSTEMS SECTION 3 AC SCHEMATIC 3327 300 015 2 9 04 ...
Страница 108: ......
Страница 122: ......
Страница 124: ...112 3327 P2 6 06 WARRANTY AND PARTS SECTION 9 Hatches ...
Страница 129: ...3327 P2 6 06 117 WARRANTY AND PARTS SECTION 9 Bill of Material ...
Страница 130: ......
Страница 131: ...3327 P2 6 06 119 WARRANTY AND PARTS SECTION 9 Carver Limited Warranty ...