Carrier 48DJ Скачать руководство пользователя страница 50

GAS VALVE ADJUSTMENT (48 Series Units Only) — The
gas valve opens and closes in response to the thermostat or
limit control. When power is supplied to valve terminal 3
(D1 on low heat), the pilot valve opens to the preset posi-
tion. When power is supplied to terminal 2 (W1 on low heat),
the main valve opens to its preset position.

The regulator factory manifold pressure setting 2.9 in. wg

and is stamped on the valve body.

Manifold pressure is the pressure at the factory-supplied

pressure tap on the manifold downstream of the gas valve.
This is not the same as the pressure at the tap on the gas
valve body. Always use the tap on the manifold to read mani-
fold pressure.

To adjust regulator:

1. Set thermostat at setting for no call for heat.
2. Turn main gas valve to OFF position.
3. Install a suitable pressure measuring device.
4. Set main gas valve to ON position.
5. Set thermostat to call for high fire (W2).
6. Remove screw cap or plastic cover covering the regula-

tor adjustment screw.

7. Turn adjustment screw clockwise to increase pressure or

counterclockwise to decrease pressure.

8. Once desired pressure is established, remove pressure-

measuring device and replace screw cap.

MAIN BURNERS ADJUSTMENT (48 Series Units Only)
— Main burners are factory set and should require no ad-
justment. However, if burner adjustment is necessary:
1. Perform Automatic Pilot Adjustment (page 49).
2. Turn gas valve to ON position. Allow unit to operate at

least 15 minutes with heat section access panel closed.

3. Open heat section access panel.
4. Loosen primary air shutter and adjust to a minimum open-

ing of

5

8

inch.

5. Retighten primary air shutter and close access panel.

To check ignition of main burners and fan switch opera-

tion, move thermostat dial above and below room tempera-
ture several times, pausing at least one minute between cycles.

Main Burner Removal (48 Series Units Only)

NOTE: For high-heat units, the side posts must be removed
before the burner assembly can be removed.
1. Shut off main gas valve.
2. Shut off power to unit.
3. Unplug PL9 (and PL10 on high-heat) and all sensor and

ignitor wires.

4. Disconnect gas connection(s) from between gas valve(s)

and field-supplied piping. See Fig. 37 and 38.

5. Remove 2 screws securing burner assembly to unit.
6. Slide burner assembly from unit.

Switch Adjustment —

All units with an economizer

have an auxiliary switch located on the economizer damper
motor. This switch is factory set to prevent the power ex-
haust from operating when the economizer damper is less
than 50% open. If other than the factory setting is desired,
follow the steps below.

Do not turn motor shaft by hand or with a wrench. Dam-
age to the gear train will result.

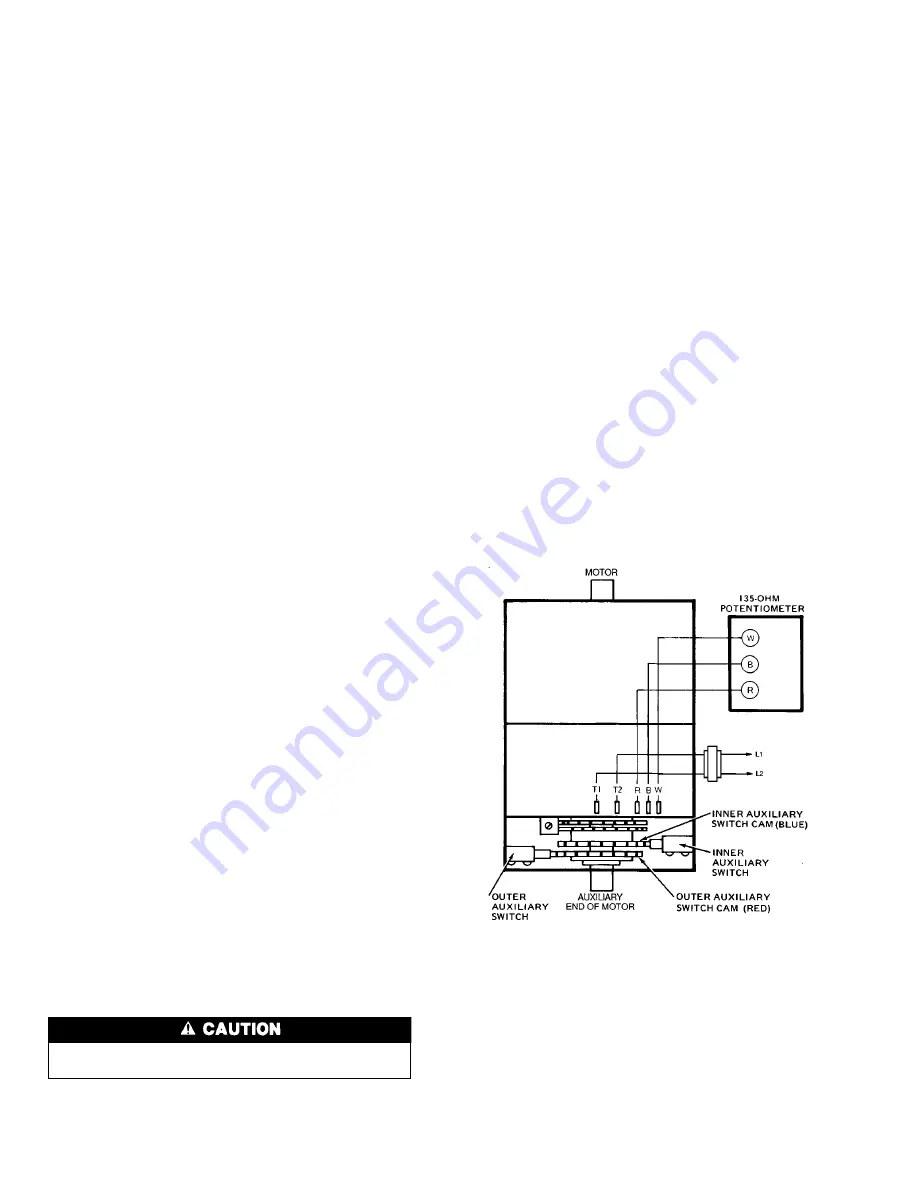
1. Remove top cover from motor to gain access to motor

terminals and cam adjustments.

2. Disconnect controller from motor. Connect RED, WHITE,

and BLUE terminals on the 135-ohm manual potentiom-
eter to corresponding RED, WHITE, and BLUE termi-
nals on the motor. Connect 24-vac power to Terminals 1
and 2. See Fig. 60.

3. Adjust the 135-ohm potentiometer so that the motor shaft

turns to the position where auxiliary equipment is to be
switched.

4. Adjust auxiliary cam by inserting a

1

8

-in. straight blade

screwdriver into slot on cam and moving TOP of screw-
driver to the right or left. See Fig. 61.

5. To close auxiliary switch RED and BLUE contacts as the

motor travels open (energizing the power exhaust mo-
tor), the switch differential can only be 10 degrees on both
switches. To adjust either cam, perform the following steps:
a. If RED and BLUE contacts are open, rotate the cam

counterclockwise until the contacts close.

b. If the RED and BLUE contacts are closed, rotate the

cam clockwise until the contacts open.

Refrigerant Feed Components —

Each refrigerant

circuit (2 per unit) has all the necessary refrigerant controls.

Thermostatic Expansion Valve (TXV) —

On size

034, each circuit has one. On size 044, each circuit has 2.
The superheat is nonadjustable. On sizes 054-074, each cir-
cuit has 2 TXVs on which superheat may be adjusted if ab-
solutely necessary.

The TXV is set to maintain 10 to 13 F superheat leaving

the evaporator coil. It controls the flow of refrigerant to the
evaporator coils.

Fig. 60 — Auxiliary Switch Stroke Adjustment

50

Содержание 48DJ

Страница 1: ...ATIC CHANGEOVER THERMOSTAT Head Pressure Control 42 SERVICE 42 53 Service Access 42 COMPRESSORS LIQUID SERVICE VALVES FILTER DRIERS AND SIGHT GLASSES EVAPORATOR FAN MOTORS PULLEYS AND BELTS POWER EXHA...

Страница 2: ...shock could cause personal injury Do not try to light any appliance Do not touch any elec trical switch do not use any phone in your building Immediately call your gas supplier from a neighbor s phone...

Страница 3: ...read with four 95 in 2413 mm and 2 8A 1 B 1 A8 long spreader bars 2 Center of gravity includes economizer 1 All panels must be in place when rigging 2 Unit is not designed for handling by forklift tru...

Страница 4: ...nal Cfm 10 500 14 000 Maximum Allowable Cfm 15 000 20 000 Maximum Allowable Rpm 900 900 Shaft Diameter at Pulley in 111 16 111 16 EVAPORATOR FAN MOTOR AND DRIVE Any motor available on any unit Motor H...

Страница 5: ...0 000 40 000 50 000 Motor Hp Rpm 1 0 1140 1 0 1140 1 0 1140 EVAPORATOR FAN Centrifugal 30 x 27 in Nominal Cfm 17 500 21 000 24 500 Maximum Allowable Cfm 25 000 30 000 30 000 Maximum Allowable Rpm 750...

Страница 6: ...n roof curb and ducts as required Ducts passing through an unconditioned space must be insulated and covered with a vapor barrier Outlet grilles must not lie directly below unit discharge The return d...

Страница 7: ...7344 24 11 8 4141 13 71 16 UNIT LEVELING TOLERANCES DIMENSIONS degrees and inches A B Deg in Deg in 1 0 2 0 50 75 From edge of unit to horizontal NOTES 1 Roof curb is shipped unassembled 2 Roof curb 1...

Страница 8: ...24 51 16 5933 19 59 16 UNIT LEVELING TOLERANCES DIMENSIONS degrees and inches A B Deg in Deg in 1 0 2 0 50 75 From edge of unit to horizontal NOTES 1 Roof curb is shipped unassembled 2 Roof curb 14 g...

Страница 9: ...ANCES DIMENSIONS degrees and inches A B Deg in Deg in 1 0 2 0 50 75 From edge of unit to horizontal NOTE To prevent the hazard of stagnant water build up in the drain pan of the indoor air section uni...

Страница 10: ...outward There is a total of 4 hoods 5 Install 18 screws 5 each side 6 top and 2 bottom around the outside of each hood Screws are in the fastener pack age taped to the basepan inside the fan section 6...

Страница 11: ...50DW DY NB LEGEND CONN Connection DIM Dimension NOTES 1 Dimensions in are in millimeters 2 Center of Gravity includes economizer Unit weight does not include economizer 3 Unit clearances Top Do not re...

Страница 12: ...es economizer Unit weight does not include economizer 3 Unit clearances Top Do not restrict condenser fans Control Box End 68 09 Sides 68 09 Economizer End 68 09 except power exhaust units 108 09 For...

Страница 13: ...units On 50 series units dimension given is measured from economizer end of unit to drain connection closest to condenser fans NOTES 1 Dimensions in are in millimeters 2 Center of Gravity includes ec...

Страница 14: ...r Unit weight does not include economizer 3 Unit clearances Top Do not restrict condenser fans Control Box End 68 09 Sides 68 09 except power exhaust units 108 09 Economizer End 68 09 except power exh...

Страница 15: ...NITS 044 074 UNITS Fig 5 Drain Location Selection Fig 6 Condensate Drain Location Fig 7 Seal Plate Location ROOF MOUNT DRAIN SLAB MOUNT DRAIN Fig 8 Condensate Drain Piping Details Fig 9 Outdoor Air Ho...

Страница 16: ...Adjustments Inside of Hood Shown O ENTHALPY SENSOR Fig 11 Enthalpy Sensor Fig 12 Enthalpy Sensor Location CONTROL CURVE CONTROL POINT Approx Deg AT 50 RH A 73 B 68 C 63 D 58 Fig 13 Psychrometric Char...

Страница 17: ...Fig 17 A 4 5 32 in hole for field power wiring and a 7 8 in hole for 24 v control wiring are provided in the bottom of the control box Field supplied couplings must be used when rout ing wiring into...

Страница 18: ...formula to determine the percent voltage imbalance Voltage Imbalance max voltage deviation from average voltage 100 x average voltage Example Supply voltage is 460 3 60 AB 452 v BC 464 v AC 455 v 452...

Страница 19: ...393 8 400 400 6 0 21 2 20 0 29 36 78 9 91 0 197 9 192 5 250 250 6 0 21 2 20 0 59 72 157 7 182 0 254 9 280 0 300 350 6 0 21 2 20 0 88 108 236 6 273 0 353 5 393 8 400 400 10 0 33 4 30 0 29 36 78 9 91 0...

Страница 20: ...6 36 46 3 93 8 110 6 0 9 6 72 93 0 133 7 150 6 0 9 6 108 139 0 191 2 200 10 0 15 2 36 46 3 99 4 125 10 0 15 2 72 93 0 133 7 150 10 0 15 2 108 139 0 191 2 200 15 0 22 0 36 46 3 106 2 125 15 0 22 0 72 9...

Страница 21: ...72 72 0 111 2 125 10 0 12 2 108 108 0 156 2 175 15 0 18 0 36 36 0 91 8 110 15 0 18 0 72 72 0 111 2 125 15 0 18 0 108 108 0 156 2 175 20 0 22 0 78 8 100 6 0 7 8 86 6 100 10 0 12 2 91 0 110 15 0 18 0 9...

Страница 22: ...72 157 7 182 0 236 1 262 5 300 300 10 0 33 4 30 0 88 108 236 6 273 0 334 2 376 3 350 400 15 0 48 4 44 0 29 36 78 9 91 0 251 1 243 9 300 300 15 0 48 4 44 0 59 72 157 7 182 0 251 1 262 5 300 300 15 0 4...

Страница 23: ...0 10 0 15 2 72 93 0 142 5 175 10 0 15 2 108 139 0 200 0 200 15 0 22 0 36 46 3 128 9 150 15 0 22 0 72 93 0 142 5 175 15 0 22 0 108 139 0 200 0 200 20 0 27 0 112 9 125 6 0 9 6 122 5 150 10 0 15 2 128 1...

Страница 24: ...7 8 36 36 0 86 1 110 6 0 7 8 72 72 0 103 7 110 6 0 7 8 108 108 0 148 7 150 10 0 12 2 36 36 0 90 5 110 10 0 12 2 72 72 0 103 7 110 10 0 12 2 108 108 0 148 7 150 15 0 18 0 36 36 0 96 3 110 15 0 18 0 72...

Страница 25: ...3 426 3 500 500 10 0 33 4 30 4 29 36 78 9 91 0 338 8 329 0 400 400 10 0 33 4 30 4 59 72 157 7 182 0 338 8 329 0 450 450 10 0 33 4 30 4 88 108 236 6 273 0 389 3 426 3 500 500 15 0 48 4 44 0 29 36 78 9...

Страница 26: ...36 46 3 150 8 200 10 0 15 2 72 93 0 150 8 200 10 0 15 2 108 139 0 207 5 225 15 0 22 0 36 46 3 157 6 200 15 0 22 0 72 93 0 157 6 200 15 0 22 0 108 139 0 207 5 225 20 0 28 0 36 46 3 163 6 200 20 0 28 0...

Страница 27: ...0 132 3 150 15 0 18 0 72 72 0 132 3 175 15 0 18 0 108 108 0 168 7 200 20 0 22 0 36 36 0 136 3 175 20 0 22 0 72 72 0 136 3 175 20 0 22 0 108 108 0 168 7 200 30 0 32 0 119 3 150 10 0 12 2 131 5 150 15...

Страница 28: ...59 72 157 7 182 0 371 7 361 9 450 450 15 0 48 4 44 0 88 108 236 6 273 0 371 7 408 8 450 450 20 0 61 6 56 0 29 36 78 9 91 0 384 9 373 9 450 450 20 0 61 6 56 0 59 72 157 7 182 0 384 9 373 9 450 450 20 0...

Страница 29: ...3 180 6 225 15 0 22 0 72 93 0 180 6 225 15 0 22 0 108 139 0 216 3 250 20 0 28 0 36 46 3 186 6 225 20 0 28 0 72 93 0 186 6 225 20 0 28 0 108 139 0 216 3 250 30 0 40 0 164 6 200 10 0 15 2 179 8 225 15...

Страница 30: ...36 36 0 131 8 150 10 0 12 2 72 72 0 131 8 150 10 0 12 2 108 108 0 162 5 175 15 0 18 0 36 36 0 137 6 175 15 0 18 0 72 72 0 137 6 175 15 0 18 0 108 108 0 162 5 175 20 0 22 0 36 36 0 141 6 175 20 0 22 0...

Страница 31: ...3 426 3 500 500 10 0 33 4 30 4 29 36 78 9 91 0 420 8 411 0 500 500 10 0 33 4 30 4 59 72 157 7 182 0 420 8 411 0 500 500 10 0 33 4 30 4 88 108 236 6 273 0 420 8 426 3 500 500 15 0 48 4 44 0 29 36 78 9...

Страница 32: ...36 46 3 188 0 250 10 0 15 2 72 93 0 188 0 250 10 0 15 2 108 139 0 207 5 250 15 0 22 0 36 46 3 194 8 250 15 0 22 0 72 93 0 194 8 250 15 0 22 0 108 139 0 207 5 250 20 0 28 0 36 46 3 200 8 250 20 0 28 0...

Страница 33: ...0 161 8 200 15 0 18 0 72 72 0 161 8 200 15 0 18 0 108 108 0 168 7 200 20 0 22 0 36 36 0 165 8 200 20 0 22 0 72 72 0 165 8 200 20 0 22 0 108 108 0 168 7 200 30 0 32 0 148 8 200 10 0 12 2 161 0 200 15...

Страница 34: ...ressurization switch field supplied normally open switch 4 Wire a field supplied switch between TB2 and the C1 connection on the evaporator fan con tactor coil IFC on unit label diagram 5 Switch to is...

Страница 35: ...TIONAL MODULATING POWER EXHAUST OPTIONAL NON MODULATING EXHAUST 054 074 UNITS BASE UNIT BASE UNIT OPTIONAL MODULATING POWER EXHAUST OPTIONAL NON MODULATING EXHAUST Fig 20 Field Wiring for Building Pre...

Страница 36: ...g 24 to ac cess panel using screws provided Hoods go over each com bustion air outlet Sub assemble flue deflector baffle inside the flue deflector hood as shown in Fig 25 and 26 Flue deflector baffle...

Страница 37: ...CATION 48 SERIES HIGH HEAT ONLY FLUE HOOD AND FLUE DEFLECTOR HOOD FLUE AND FLUE DEFLECTOR HOOD LOCATION 48 SERIES HIGH HEAT ONLY FLUE AND FLUE DEFLECTOR HOOD LOCATION SMALL INLET HOOD REMOVED SMALL IN...

Страница 38: ...Check all electrical connections in the unit control box tighten as required Refrigerant Service Valves All units have a Schrader type service port on both suction lines Be sure that caps on the port...

Страница 39: ...s for field supplied drives See Tables 9A and 9B for a complete listing of field supplied pulleys and belt connections Check the lubrication of fan and motor bearings Bearings are shipped full of grea...

Страница 40: ...d 044 units and 750 rpm for 054 074 units The maximum rpm for the power exhaust is 1300 rpm for 034 and 044 units and 925 rpm for 054 074 units Excessive fan speed may result in condensate carryover f...

Страница 41: ...ressor no 1 as first stage of cooling Com pressor no 1 is always the larger of the 2 unit compressors If cooling load cannot be satisfied with only first stage cool ing Y2 on the thermostat will close...

Страница 42: ...ng outdoor air com pressor no 2 cannot be energized If enthalpy is above set ting on enthalpy switch the economizer outdoor air dampers move to the minimum ventilation position and condenser fan numbe...

Страница 43: ...tion MAIN AND PILOT BURNERS 48 Series Units Only At the beginning of each heating season inspect for dete rioration due to corrosion or other causes Observe the pilot and main burner flames and adjust...

Страница 44: ...se block heater contactors HC1 HC1A etc plug No 20 PL20 HEATER BOX 50 Series Units Only Access to the heater box is through the door on the left side sizes 034 and 044 or right side sizes 054 074 of t...

Страница 45: ...am Clean evaporator coil with a stiff bristle brush not wire vacuum cleaner or compressed air Check and clean condensate drain annually at the start of the cooling season Replace return air filters at...

Страница 46: ...for all belts Failure to do so may result in uneven belt stretching 4 Tighten belts using the motor plate adjusting bolts 5 Adjust until proper belt tension 1 2 in deflection with one finger is obtain...

Страница 47: ...ifice is unobstructed then check for spark ignitor mal functions as follows 1 Turn off the control circuit breaker CCB to shut off con trol supply power to ignitor control pack ICP 2 Check that spark...

Страница 48: ...em 1 One Condenser Fan Running Fig 51 Charging Chart 044 Units System 1 All Condenser Fans Running Fig 52 Charging Chart 044 Units System 2 One Condenser Fan Running Fig 53 Charging Chart 044 Units Sy...

Страница 49: ...small screwdriver turn adjustment screw until flame fully engulfs sensor 6 Replace cap on pilot gas valve Turn off power to unit Return valve s to original position 7 Check for proper burner operation...

Страница 50: ...t off power to unit 3 Unplug PL9 and PL10 on high heat and all sensor and ignitor wires 4 Disconnect gas connection s from between gas valve s and field supplied piping See Fig 37 and 38 5 Remove 2 sc...

Страница 51: ...rol power Crankcase Heater Each compressor has a crankcase heater to prevent absorption of liquid refrigerant by oil in the crank case when the compressor is idle Since 115 v power for the crankcase h...

Страница 52: ...adjustments and elec trical plugs accessible through the top of the cover The econo mizer control is factory wired to the terminals on the motor All potentiometers and adjustments are a part of the co...

Страница 53: ...TED RESULT AND RESPONSE A Outdoor Air Sensor 1 Connect the enthalpy sensor terminal 1 to terminal 1 on the motor 2 Connect the positive ter minal of a DC milliam meter to terminal S of the sensor 3 Co...

Страница 54: ...problem is external to the board Reconnect plug P1 if troubleshooting is com plete and plug P3 to the board Symptom Condenser fan no 2 5 will not operate 1 Check operation of condenser fan no 1 If fa...

Страница 55: ...r and con tactor closes the board is operating properly 8 To verify compressor lockout logic a Disconnect CLO sensor wires connected to CLO2 at the control board Check wires for continuity If there is...

Страница 56: ...LEGEND CLO Compressor Lockout P Plug SC Safety Circuit Fig 65 Compressor Lockout Connections 56...

Страница 57: ...r Evaporator Fan Contactor IFCB Indoor Evaporator Fan Circuit Breaker IFM Indoor Evaporator Fan Motor IGV Inlet Guide Vanes IGVM Inlet Guide Vanes Motor LPS Low Pressure Switch LS Limit Switch LSR Lim...

Страница 58: ...Fig 66 Gas Heat Sections 48DJ NP034 044 Units 58...

Страница 59: ...Fig 67 Gas Heat Sections 48DJ NP054 074 Units 59...

Страница 60: ...Fig 68 Gas Heat Section 48DK034 044 Units 60...

Страница 61: ...Fig 69 Gas Heat Section 48DK054 074 Units 61...

Страница 62: ...Fig 70 Typical Wiring Schematic 48 50DJ 50DW Units 054 074 Shown 62...

Страница 63: ...Fig 70 Typical Wiring Schematic 48 50DJ 50DW Units 054 074 Shown cont 63...

Страница 64: ...Fig 71 Typical Wiring Schematic 48 50DK 50DY Units 054 074 Shown 64...

Страница 65: ...Fig 71 Typical Wiring Schematic 48 50DK 50DY Units 054 074 Shown cont 65...

Страница 66: ...Fig 72 Typical Control Wiring Schematic 48 50NP 50NB Units 054 074 Shown 66...

Страница 67: ...Fig 72 Typical Control Wiring Schematic 48 50NP 50NB Units 054 074 Shown cont 67...

Страница 68: ...Fig 72 Typical Control Wiring Schematic 48 50NP 50NB Units 054 074 Shown cont 68...

Страница 69: ...Fig 73 Typical Power Wiring Schematic 48 50NP 50NB Units 054 074 208 230 and 460 v Shown 69...

Страница 70: ...assette and or slides and a companion booklet Use these for self teaching or to conduct full training sessions For a free Service Training Material Catalog STM call 1 800 962 9212 Ordering instruction...

Страница 71: ......

Страница 72: ...PRESSOR NO 2 L1 L2 L3 SUPPLY FAN AMPS EXHAUST FAN AMPS ELECTRIC HEAT AMPS L1 L2 L3 TEMPERATURES OUTDOOR AIR TEMPERATURE F DB Dry Bulb RETURN AIR TEMPERATURE F DB F WB Wet Bulb COOLING SUPPLY AIR F GAS...

Отзывы: