


Carefree of Colorado Service
Manual
L
ATITUDE
070005-301r5
1
S
TANDARD
S
YSTEM
A
DJUSTMENTS
A
DJUSTING THE
A
RM
P
OSITION
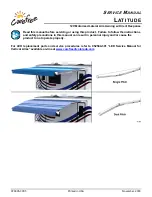
For the awning to operate and close correctly, the arms must be parallel to the roller tube. If the arm sags,
the arm position can be adjusted to bring the arm parallel.
1. Open the awning 2"-3" to access the
adjustment screws located on the side of
the arm knuckle at the wall.
2. Loosen the upper screw (counterclockwise).
3. Tighten (clockwise) the lower screw to
raise the arm elbow.
NOTE:
Make adjustments in quarter turn increments.
Tip: Lift the arm at the elbow while tightening the lower screw.
4. Repeat steps 2 and 3 until the arm is parallel with the roller tube.
5. Tighten the upper screw.
A
DJUSTING THE
P
ITCH
The awning pitch can be adjusted. It is strongly recommended that adjustments be made in small
increments to achieve the desired setting.
This procedure works best with 2 people, one person to lift the roller tube to relieve the weight and one
person to make the adjustments.
D
O
N
OT USE POWER TOOLS
,
ALWAYS USE HAND TOOLS TO MAKE ADJUSTMENTS
.
1. Open the awning.
2. At the top of the knuckle loosen the
locking screw approximately 1/4".
NOTICE
The locking screw
MUST
be
loosened before adjusting the pitch.
3. To raise the pitch: Turn the lower
adjustment screw clockwise.
4. To lower the pitch: Turn the lower adjustment screw counterclockwise.
5. Hand tighten the locking screws until snug when the desired pitch is achieved.
NOTICE
D
O
N
OT
overtighten the locking screw. Overtightening the screw can cause unnecessary
strain and wear on the knuckle.
NOTE:
After the initial installation and the awning is opened, the awning may settle. This is normal.
Check that the locking screws on the knuckle are snug.
Raise
FL013
Adjustment
Screws
Adjust Arm to be
Parallel to Roller Tube
FL009a
Locking Screw
Raise
Lower
Raise
Lower
Locking Screw
Adjustment Screw
Adjustment Screw


