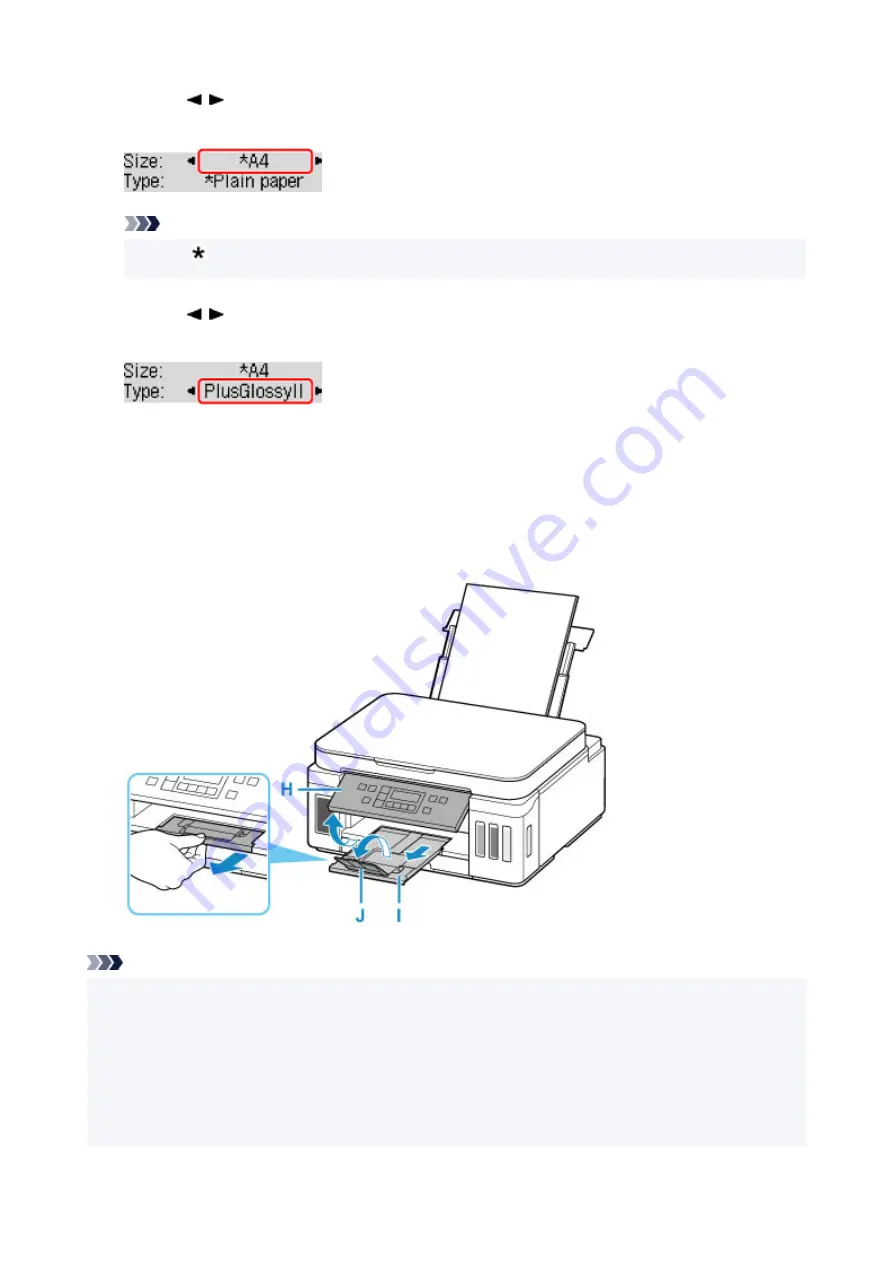
9.
Use the button to select the size of the loaded paper on the rear tray, then press the
OK
button.
Note
• The (asterisk) on the LCD indicates the current setting.
10.
Use the button to select the type of the loaded paper on the rear tray, then press the
OK
button.
Follow the instructions of any messages displayed to register the paper information.
11.
Open operation panel (H), pull out paper output tray (I), and then open output tray
extension (J).
Be sure to open the operation panel before printing. If the operation panel is close, the printer does not
start printing.
Note
• There are various types of paper, such as paper with a special surface coating for printing photos at
optimal quality and paper suitable for documents. Each media type has specific preset settings (how ink
is used and sprayed, distance from nozzles, etc.), that allow you to print to that type with optimal image
quality. The wrong paper settings may cause poor printout color quality or scratches on the printed
surface. If you notice blurring or uneven colors, increase the print quality setting and try printing again.
• To prevent incorrect printing, this printer has a function that detects whether the settings for the paper
loaded on the rear tray matches the paper settings. Before printing, make print settings in accordance
71
Содержание PIXMA G6070
Страница 1: ...G6000 series Online Manual English...
Страница 27: ...Basic Operation Printing Photos from a Computer Printing Photos from a Smartphone Tablet Copying 27...
Страница 29: ...5 Slide right paper guide D to align with both sides of paper stack 6 Close feed slot cover C gently 29...
Страница 35: ...5 Slide right paper guide D to align with both sides of paper stack 6 Close feed slot cover C gently 35...
Страница 57: ...XX represents alphanumeric characters 57...
Страница 64: ...Handling Paper Originals Ink Tanks etc Loading Paper Loading Originals Refilling Ink Tanks 64...
Страница 83: ...Loading Originals Loading Originals on Platen Loading Based on Use Supported Originals 83...
Страница 90: ...Refilling Ink Tanks Refilling Ink Tanks Checking Ink Level Ink Tips 90...
Страница 102: ...Adjusting Print Head Position Automatically For macOS Adjusting Print Head Position 102...
Страница 120: ...Safety Safety Precautions Regulatory Information WEEE EU EEA 120...
Страница 148: ...Main Components Front View Rear View Inside View Operation Panel 148...
Страница 153: ...H Print Head Holder The print head is pre installed 153...
Страница 166: ...Changing Printer Settings from Your Computer macOS Managing the Printer Power Changing the Printer Operation Mode 166...
Страница 192: ...Information about Paper Supported Media Types Paper Load Limit Unsupported Media Types Handling Paper Print Area 192...
Страница 216: ...Printing Using Canon Application Software Easy PhotoPrint Editor Guide 216...
Страница 236: ...Note To set the applications to integrate with see Settings Dialog 236...
Страница 238: ...Scanning Multiple Documents at One Time from the ADF Auto Document Feeder 238...
Страница 240: ...Scanning Tips Positioning Originals Scanning from Computer 240...
Страница 245: ...The item type may not be detected automatically In that case specify the item type in IJ Scan Utility and scan 245...
Страница 246: ...Scanning Using Smartphone Tablet Using PIXMA MAXIFY Cloud Link Printing Scanning with Wireless Direct 246...
Страница 252: ...Network Communication Problems Cannot Find Printer on Network Network Connection Problems Other Network Problems 252...
Страница 285: ...Other Network Problems Checking Network Information Restoring to Factory Defaults 285...
Страница 290: ...Problems while Printing Scanning from Smartphone Tablet Cannot Print Scan from Smartphone Tablet 290...
Страница 317: ...Scanning Problems macOS Scanning Problems 317...
Страница 318: ...Scanning Problems Scanner Does Not Work Scanner Driver Does Not Start 318...
Страница 327: ...Note See below for details on how to disable the setting from ScanGear scanner driver Scanner Tab 327...


