background image

5

FRANÇAIS

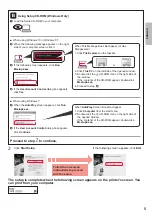
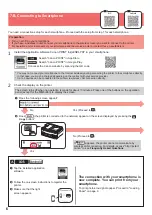
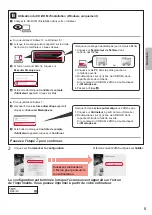
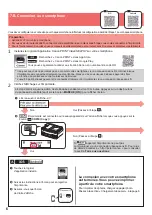
Utilisation du CD-ROM d'installation (Windows uniquement)

Chargez le CD-ROM d'installation dans votre ordinateur.


■ Si vous utilisez Windows 10 ou Windows 8.1 :

Lorsque le message suivant apparaît sur la droite 

de l'écran de l'ordinateur, cliquez dessus.

Si l'écran suivant s'affiche, cliquez sur 


Exécuter Msetup4.exe

.

Si la boîte de dialogue 

Contrôle de compte 

d'utilisateur

 apparaît, cliquez sur 

Oui

.

Lorsque ce message n'apparaît pas (ou n'est plus affiché)
1.  Cliquez sur 

Explorateur de fichiers

 dans 


la barre des tâches.

ou

2.  Cliquez sur 

Ce PC

 dans la partie gauche de 


la fenêtre ouverte.

3.  Double-cliquez sur   (icône de CD-ROM) dans 


la partie droite de la fenêtre.

Si le contenu du CD-ROM s'affiche, double-cliquez 

sur 

Msetup4.exe

.

4.  Passez à l'étape 

d

.


■ Si vous utilisez Windows 7 :

b

  Lorsque l'écran 

Lecture automatique

 apparaît, 

cliquez sur 

Exécuter Msetup4.exe

.

c

  Si la boîte de dialogue 

Contrôle de compte 

d'utilisateur

 apparaît, cliquez sur 

Continuer

.

Lorsque l'écran 

Lecture automatique

 ne s'affiche pas

1.  Cliquez sur 

Ordinateur

 à partir du menu Démarrer.

2.  Double-cliquez sur   (icône de CD-ROM) dans 


la partie droite de la fenêtre ouverte.

Si le contenu du CD-ROM s'affiche, double-cliquez 

sur 

Msetup4.exe

.

Passez à l'étape   pour continuer.
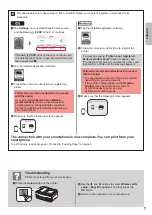
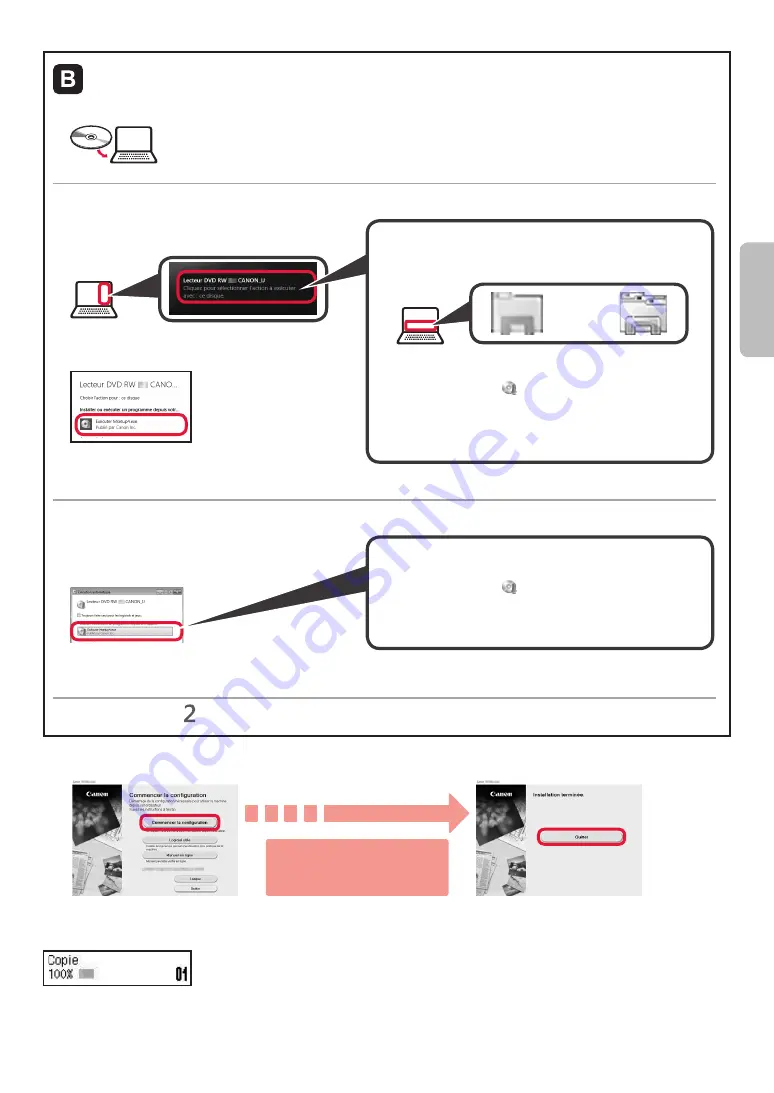
Cliquez sur 

Commencer la configuration

.

Si l'écran suivant s'affiche, cliquez sur 

Quitter

.

Suivez les instructions  

à l'écran pour poursuivre 

la configuration.

La configuration est terminée lorsque l'écran suivant apparaît sur l'écran 


de l'imprimante. Vous pouvez imprimer à partir de votre ordinateur.

Содержание PIXMA G4610 Series

Страница 1: ...D marrage Lire S curit et informations importantes addendum en premier Getting Started Read Safety and Important Information addendum first...

Страница 2: ...Connexion avec un ordinateur et un smartphone ou une tablette page 4 Manipulation de l imprimante Vid os explicatives Installing the Printer page 1 Connecting with Computer and Smartphone Tablet page...

Страница 3: ...e scanning unit cover b Remove the orange tape and the protective material and discard them a b 3 Installing the Cartridge 1 Open the cartridge locking cover 2 Take out each cartridge from the package...

Страница 4: ...ink bottle upright and remove the bottle cap 4 Insert the nozzle of the ink bottle into the inlet and stand the ink bottle upside down 5 Pour all ink into the ink tank Confirm that the ink has been fi...

Страница 5: ...d yet 2 Press the ON button 3 When the following screen appears use the and buttons to select a language and then press the OK button 4 If the following screen appears select your country or region an...

Страница 6: ...g Execute the downloaded file Proceed to step on the next page to continue 6 Preparing for Connection 1 Press the OK button Preparing the ink starts This takes about 5 to 6 minutes Proceed to the nex...

Страница 7: ...side of the window If the contents of the CD ROM appear double click Msetup4 exe 4 Proceed to step d When using Windows 7 b When the AutoPlay screen appears click Run Msetup4 exe c If the User Accoun...

Страница 8: ...ed depending on the contract with your service provider Up to 5 devices can be connected to the printer via wireless LAN connection directly 2 Check the display on the printer The screen turns off whe...

Страница 9: ...ethod recommended on the connection method selecting screen the appropriate connection method is selected automatically depending on your environment d Make sure that the following screen appears a Ta...

Страница 10: ...the printer in a sturdy box so that it is placed with its bottom facing down using sufficient protective material to ensure safe transport Do not tilt the printer Ink may leak Please handle with care...

Страница 11: ...rez l unit de num risation capot b Retirez la bande orange et le mat riau protecteur et jetez les a b 3 Installation de la cartouche 1 Ouvrez le couvercle de verrouillage de cartouche 2 Sortez chaque...

Страница 12: ...artouche d encre 3 Tenez la bouteille d encre bien droite et retirez le capuchon de la bouteille 4 Ins rez la buse de la bouteille d encre dans l arriv e et retournez la bouteille d encre 5 Versez tou...

Страница 13: ...entation 2 Appuyez sur le bouton MARCHE ON 3 Lorsque l cran suivant s affiche utilisez les boutons et pour s lectionner une langue puis appuyez sur le bouton OK 4 Si l cran suivant s affiche s lection...

Страница 14: ...ier de configuration g Ex cutez le fichier t l charg Passez avec l tape la page suivante pour continuer 6 Pr paration de la connexion 1 Appuyez sur le bouton OK La pr paration de l encre commence Cett...

Страница 15: ...a fen tre Si le contenu du CD ROM s affiche double cliquez sur Msetup4 exe 4 Passez l tape d Si vous utilisez Windows 7 b Lorsque l cran Lecture automatique appara t cliquez sur Ex cuter Msetup4 exe c...

Страница 16: ...des frais en fonction du contrat avec votre fournisseur de services Jusqu 5 p riph riques peuvent tre connect s directement l imprimante via une connexion r seau sans fil 2 V rifiez l affichage sur l...

Страница 17: ...lectionnez M thode s l auto conn recommand dans l cran de s lection de la m thode de connexion la m thode de connexion appropri e est s lectionn e automatiquement selon votre environnement d Assurez...

Страница 18: ...orientant la partie inf rieure vers le bas et en utilisant suffisamment de mat riau protecteur pour garantir un transport en toute s curit N inclinez pas l imprimante L encre risque de couler Manipule...

Страница 19: ...RMC Regulatory Model Code K10472...

Страница 20: ...ndows 10 Acc s au Manuel en ligne partir du navigateur partir du raccourci du bureau partir du navigateur Access Online Manual From browser From desktop shortcut From browser PRINTED IN XXXXXXXX IMPRI...

Отзывы: