background image

Chapter 3

   Printing with the C20    3-17

Printing with the

C20

Ignore
To ignore the mismatch, making no change, and close the printer
driver dialog box.

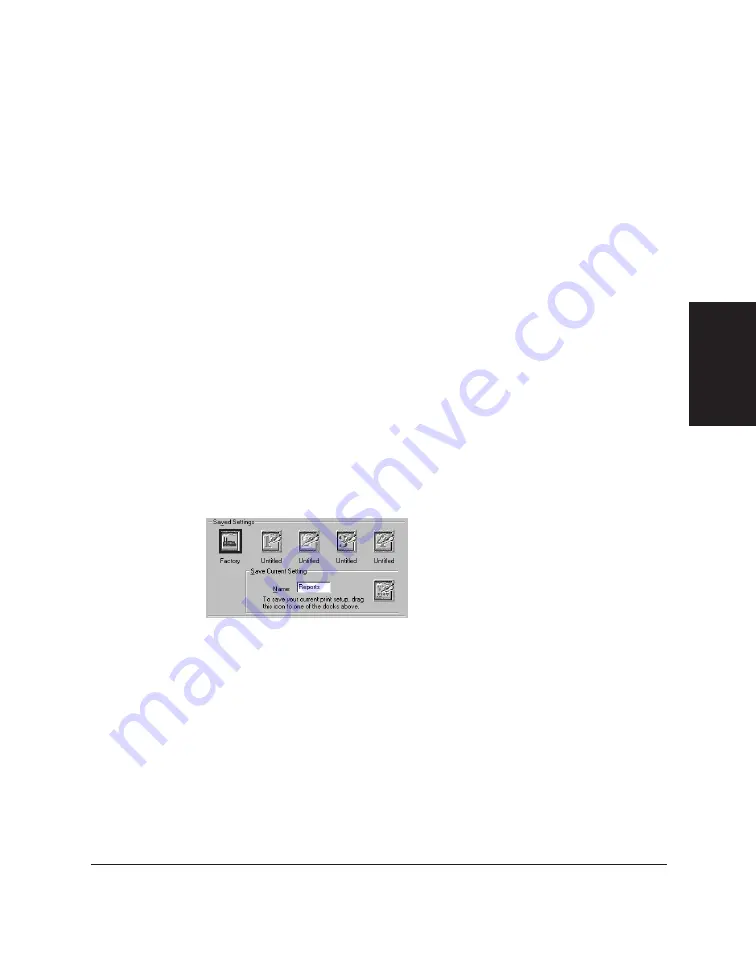
Saving Your Print Settings

You can save your printer settings for future use. For example, one group of
settings may be appropriate when printing a Word document, and another
when printing a Photoshop graphic. To more quickly set the print options
for your next document, you can select a saved setting.

In addition to the default settings provided with the software (displayed as
the Factory option), you can save up to four of your own.

To save your print settings:

1. In the printer setup or properties dialog box, set your print options as

desired on the Paper, Graphics, and Setting tabs.

2. Click the Setting tab.

3. Under Save Current Settings, in the Name box, enter the name for the

group of settings you are saving.

4. Drag the setting icon from Save Current Setting to one of the positions

(docks) under Saved Settings. You can add a new setting to the saved
settings already there, or replace one of the existing saved settings.

5. When you are prompted about saving your current settings, click OK

to save.

To use a saved print setting:

1. In the printer setup or properties dialog box, click the Setting tab.

Содержание MultiPASS C20

Страница 1: ......

Страница 2: ...MultiPASS C20 MultiPASS Desktop Manager for Windows Version 2 1 Software User s Guide...

Страница 3: ...edgments Adobe PageMaker and Adobe Photoshop are registered trademarks of Adobe Corporation Canon and BJ are registered trademarks and MultiPASS and Bubble Jet are trademarks of Canon Inc Microsoft an...

Страница 4: ...ny kind either express or implied including but not limited to the implied warranties of merchantability and fitness for a particular purpose Liability in no event will Canon be liable for any damages...

Страница 5: ...iv Preface...

Страница 6: ...2 7 Setting the Default Printer 2 11 Changing the Printer Port 2 12 Chapter 3 Printing with the C20 3 1 Printing a Document 3 2 Printing Envelopes 3 2 Changing the Printer Settings 3 5 An Alternative...

Страница 7: ...Reviewing Predefined or Creating Custom Scan Settings 6 4 Defining the Scan Options 6 6 Scanning from a Windows Application 6 7 Reviewing Predefined or Creating Custom Scan Settings 6 9 Chapter 7 Wor...

Страница 8: ...us Messages 8 22 Closing the MultiPASS Background 8 23 Preparing to Close the MultiPASS Background 8 24 Closing the MultiPASS Background Windows 3 1x 8 24 Closing the MultiPASS Background Windows 95 8...

Страница 9: ...vi Contents Appendix A Fax Phone Characters A 1 Glossary G 1 Index I 1...

Страница 10: ...ereafter referred to as the C20 and Desktop Manager respectively With your C20 the Desktop Manager software package enables you to perform a variety of tasks meeting all your printing faxing and scann...

Страница 11: ...r computer from within a Windows application or in the Desktop Manager You can define options enabling you to attach a fax cover page and to schedule the transmission time for the fax Predefined fax c...

Страница 12: ...ons include parameters that affect the sending and receiving of faxes and the assignment of speed dial numbers The option settings you define in the Desktop Manager override the corresponding option s...

Страница 13: ...ground automatically starts when you start Windows or the Desktop Manager and begins monitoring the activity through the bi directional parallel port to which the C20 is connected MultiPASSMonitor The...

Страница 14: ...bout This Guide This guide assumes you have a familiarity with and basic understanding of your Windows 3 1x or Windows 95 system This includes understanding how to start your system and navigate in yo...

Страница 15: ...nstalling the Software section Click double click Use of the word click or double click provides instructions for selecting or choosing a command or option generally with a mouse Monospaced text Used...

Страница 16: ...1 7 Introduction MultiPASS C20 User s Guide This guide offers detailed information on how to set up and operate your C20 unit The guide includes initial setup procedures fax operations daily maintenan...

Страница 17: ...1 8 Introduction Chapter 1...

Страница 18: ...chapter contains information and instructions for installing the Desktop Manager software and setting the default printer and port Installing the Software 2 2 Preparing for the Installation 2 2 Overwr...

Страница 19: ...er as described in a later chapter n The fax setup information you enter during the installation adjusts corresponding settings in your C20 Therefore any fax information you may have set manually in t...

Страница 20: ...matically switching between a telephone and fax calls automatically receiving fax calls only requiring you to manually receive fax calls or handling incoming calls with the answering machine you conne...

Страница 21: ...nt installation of the software For instructions on uninstalling the software refer to Chapter 8 C20 Setup and Other Utilities in the Desktop Manager Overwriting the C20 Options If you set up options...

Страница 22: ...p Manager in Windows 3 1x You can connect the printer driver to the appropriate printer port during installation for example LPT1 or LPT2 You can later change the connection if necessary Once you have...

Страница 23: ...You are now ready to install the Desktop Manager To install the Desktop Manager software 1 Insert the backup copy of the first Desktop Manager diskette in your diskette drive 2 In Program Manager on...

Страница 24: ...rinter driver to the appropriate printer port during installation for example LPT1 or LPT2 You can later change the connection if necessary Installing When the C20 Is Automatically Detected Follow the...

Страница 25: ...Disk dialog box follow the on screen instructions and click OK Insert the backup copy of the first printer driver diskette in your diskette drive Specify the diskette drive you are using typically A...

Страница 26: ...on presented earlier in this chapter Installing When the C20 Is Not Automatically Detected Follow these instructions to install the Desktop Manager if Windows 95 did not automatically detect your C20...

Страница 27: ...the installation is complete you are prompted to continue with the installation of the Desktop Manager To install the Desktop Manager software 1 To continue with the installation of the Desktop Manage...

Страница 28: ...s the default printer To set the default printer Windows 3 1x 1 In Program Manager double click Control Panel 2 In Control Panel double click Printers 3 In the Printers dialog box under Installed Prin...

Страница 29: ...x 1 In Program Manager double click Control Panel 2 In the Control Panel double click Printers 3 In the Printers dialog box under Installed Printers click the MultiPASS C20 printer Then click Connect...

Страница 30: ...Installing the Desktop Manager Software n The General and Details tabs provide standard Windows options for your printer driver The Paper Graphics and Setting tabs provide options for your C20 These o...

Страница 31: ...2 14 Installing the Desktop Manager Software Chapter 2...

Страница 32: ...ons for printing a document from a Windows application with your C20 and changing the default printer settings Printing a Document 3 2 Printing Envelopes 3 2 Changing the Printer Settings 3 5 An Alter...

Страница 33: ...cument can vary somewhat for different Windows application Therefore for detailed instructions refer to the user documentation for the specific application The following instructions summarize the pro...

Страница 34: ...ing results Avoid using the following types of envelopes They may cause jams or smears or may damage your printer With windows holes perforations cutouts and double flaps Made with special coated or d...

Страница 35: ...from inside the envelopes Make sure any curls are removed from the flap of each envelope 3 Insert the envelopes into the C20 Slide a stack of envelopes into the sheet feeder until it stops Align the...

Страница 36: ...ecific printer options refer to later sections in this chapter To change the print options 1 Within your Windows application with your document open click the print command 2 In the print dialog box d...

Страница 37: ...Panel In the Control Panel dialog box double click Printers In the Printers dialog box with the MultiPASS C20 printer selected click Setup Specify the appropriate changes For Windows 95 From the Wind...

Страница 38: ...is displayed under Selected Paper 2 Under Orientation click whether you want a vertical portrait or horizontal landscape orientation 3 Under Paper Size click Set In the Paper Setting dialog box under...

Страница 39: ...ur custom size can be defined based on the following dimensions width of 4 10 to 9 50 inches 104 1 to 241 3 millimetres height of 4 10 to 23 40 inches 104 1 to 594 3 millimetres You can save up to two...

Страница 40: ...fied the size drag the paper icon from Save Custom Size to Custom Size Saved Click OK to confirm you want to save the size If there are previously saved paper sizes you move the new size onto the icon...

Страница 41: ...r on the Paper tab click About Setting Graphics Options When printing a document with graphics you can set the print quality and model for the graphics 1 In the printer setup or properties dialog box...

Страница 42: ...accurately control the colours printed with your C20 With the Image Colour Matching option off the C20 controls the colour adjustment technique 5 Under Colour Model select whether you want to print i...

Страница 43: ...e Graphics tab as described in the previous section 1 In the Custom Setting dialog box under Colour Selection click the option that specifies the number of colour shades that should be used to print y...

Страница 44: ...d is best for printing business graphics G Diffusion To randomly place individual dots to achieve subtle grayscale gradations This setting is best suited for documents with finely detailed graphics or...

Страница 45: ...is available only if you set the Colour Adjustment option to None 5 To save your changes and return to the Graphics tab click OK Setting Other Print Options This section provides information about us...

Страница 46: ...anual feed If the Setup Analyser detects a mismatch you choose the most appropriate action to take to handle the situation If you turn on the Setup Analyser the paper source and paper size are checked...

Страница 47: ...the selected mismatches You can then select a mismatch individually Fix To fix the selected mismatch automatically and close the printer driver dialog box Fix and Go to Setup To fix the selected mism...

Страница 48: ...as the Factory option you can save up to four of your own To save your print settings 1 In the printer setup or properties dialog box set your print options as desired on the Paper Graphics and Settin...

Страница 49: ...tting you want to use To restore the printer options to the default settings that were installed with the software click Factory The individual settings display on their respective tabs Paper Graphics...

Страница 50: ...of the Desktop Manager For detailed information and instructions on performing Desktop Manager tasks refer to the later chapters in this guide Desktop Manager an Overview 4 2 Features of the Desktop...

Страница 51: ...Set up an address book for individuals or groups to whom you repeatedly send faxes Design your own fax cover page Define system options for the C20 Complete other tasks such as phoning an individual...

Страница 52: ...menu click Exit When you exit the Desktop Manager you close only the Desktop Manager window Any documents you have set up to PC fax or print remain active The Status Monitor which tracks the progress...

Страница 53: ...on the toolbar Standard Toolbar The standard toolbar provides you quick access to performing certain Desktop Manager tasks In circumstances where a task is not possible the toolbar button is unavaila...

Страница 54: ...in the open folder The width of the document area can be adjusted by dragging the border between the document area and folders list Process Toolbar The process toolbar is located at the bottom of the...

Страница 55: ...elected menu command The information is for display only and cannot be edited Understanding Desktop Manager Folders The Desktop Manager stores and organizes your documents in folders Only one folder c...

Страница 56: ...all incoming faxes that is all documents that were sent to you by other fax units and received by your C20 unit and then uploaded to your PC Each received fax displays with a system assigned name You...

Страница 57: ...res any documents that you want to hold for deletion Once you move a document from another folder except the Out Box folder to the Trash folder you can hold the document in the Trash folder until you...

Страница 58: ...visible list area a vertical scroll bar displays The scroll bar scrolls the entire list of system and user defined folders as a single entity In other words as you scroll the list of system defined fo...

Страница 59: ...er are listed by a combination of the date and time they were submitted for processing any future scheduling time and processing status Documents in the other system defined folders are listed in orde...

Страница 60: ...2 Creating a Fax Memo 5 10 Receiving a Fax 5 12 Using the Fax Log 5 14 Setting Up the Address Book 5 16 Features of the Address Book 5 16 Working withAddress Book Entries 5 17 Printing the Address Bo...

Страница 61: ...ers via the Desktop Manager and then download them to the C20 unit For details on changing the setup options refer to Chapter 8 C20 Setup and Other Utilities in the Desktop Manager Sending a Fax from...

Страница 62: ...click the print command 2 In the print dialog box set C20 Fax as your printer and then click OK Windows 3 1 Click Printer and set the default printer option in the Print Setup dialog box Windows 95 S...

Страница 63: ...d 4 Optionally define any of the other send fax options To attach a cover page to your fax click one by name from the Coversheet drop down list box If you do not want a fax cover page click None To ad...

Страница 64: ...Manager places the PC fax in the Out Box folder where its progress is tracked The fax job is automatically provided a unique system assigned name If you specified multiple recipients an individual fax...

Страница 65: ...ncluded in the Recipients list box appears disabled in the Address Book list box This is to prevent the same recipient from being included twice Removing a Fax Recipient You can remove a recipient inc...

Страница 66: ...l send fax options Attaching a Cover Page If desired you can attach a cover page to your fax The MultiPASS Desktop Manager contains a library of predefined fax cover pages designed with different styl...

Страница 67: ...e and size of the memo text is determined by the particular design of the cover page selected Deleting the Fax After Sending If the Delete After Sending option is selected the fax is automatically del...

Страница 68: ...er for sending The following sections provide additional information on processing your fax Sending the Fax Now When you click Send Now the fax document is placed in the Out Box folder until the fax c...

Страница 69: ...the held fax document revising the send information as needed or delete it Cancelling the Fax If you cancel the fax while in the Send Fax dialog you are returned to the application where the document...

Страница 70: ...log enter the text in the Log Note box 3 When you have finished your entries process the fax To process the fax for immediate sending click Send Now To schedule the fax for a later time that you spec...

Страница 71: ...Your Computer Is Turned On If your computer is turned on when the C20 receives a fax the Desktop Manager handles the fax by one of the following methods based on how you defined the setup options Pri...

Страница 72: ...set the C20 to save a fax in memory the fax can later be printed directly to the C20 or sent to Desktop Manager when your computer is turned on Once a fax is printed it is erased from the memory of t...

Страница 73: ...error status of a PC fax that failed While reviewing the Fax Log you can view a specific fax document or print the log To display the Fax Log 1 In the Desktop Manager on the Tools menu click Fax Log 2...

Страница 74: ...ng To print the Fax Log 1 In the Fax Log dialog box click Print 2 In the print dialog box specify the desired print options and click OK The report provides a hard copy of the Fax Log information disp...

Страница 75: ...iness and personal contacts You can use the entries in the Address Book to send a PC fax To open the Address Book On the Tools menu clickAddress Book To close the Address Book In the Address Book dial...

Страница 76: ...dress Book Working with Address Book Entries When open the Address Book displays a list of the address entries you currently have set up along with the corresponding information for each entry The Add...

Страница 77: ...x number Optionally if you want the information available for a fax cover page you can provide the contact s phone number title company and address You can also enter a comment to provide an internal...

Страница 78: ...ation or changes for the following First and last names and fax number Phone number title company name and address If you want the information available for a fax cover page Comments As an internal re...

Страница 79: ...etup Options dialog box Adding and Editing a Group Address A group address consists of addresses previously set up in the Address Book either individual addresses or other group addresses When adding...

Страница 80: ...the Address Book list box click the individual entry you want to add to the group and click Add 4 To remove an entry for the group click the entry in the group list box and click Remove 5 In the Comm...

Страница 81: ...ipient in the group Deleting an Address Book entry You delete anAddress Book entry when it is no longer needed To delete an entry click the entry Then click Delete or press the Delete key If prompted...

Страница 82: ...s separated by a tab the text file extension must be TXT You must save your text file as a comma or tab separated text file before you import it into the Desktop Manager For more information about sav...

Страница 83: ...drag the column heading text off the dialog box To assign the correct name drag the titled button to the column title 4 When the appropriate names appear at the top of each column click Import Exporti...

Страница 84: ...umns with a column title that should identify the type of information within the column The buttons above the column titles enable you to reassign the column titles where necessary 2 Assign the approp...

Страница 85: ...5 26 PC Faxing Chapter 5 4 In the Export Address Book dialog box select the file type CSV or TXT location and filename for saving the file Then click OK...

Страница 86: ...t size and style of the text displayed for each variable You can use a new fax cover page by attaching it when sending a fax with the MultiPASS Desktop Manager fax driver or by printing a hard copy an...

Страница 87: ...d components of the screen are provided in later sections of this chapter Menu Bar The menu bar contains commands that enable you to create edit and print your fax cover page Some commands can also be...

Страница 88: ...s you to visually create and edit the features of your cover page The size of the layout area corresponds to the size of a standard fax page You use the horizontal and vertical scroll bars to view dif...

Страница 89: ...om and one or more graphics that may represent your company logo or your signature The background you plan to use with the Cover Page Designer must be black and white and must be saved in a TIFF file...

Страница 90: ...e you have exported the document in a TIFF file format you can use the TIFF file as the background of your new cover page To use an alternative method for preparing the cover page background Instead o...

Страница 91: ...placed the desired variable fields into the layout area you can adjust the appearance of any field You can resize move or delete a field When you delete a field the field is removed from the layout a...

Страница 92: ...xt may be visible when the fax cover page is sent To resize the field Click the field and drag any sizing handle Changing the TextAttributes Once you have placed fields in the layout area you can chan...

Страница 93: ...t to align a column of fields on the right the right border of the first field selected is used as the anchor The other selected fields are lined up with the right border of the first field selected T...

Страница 94: ...retains the opened cover page under its original name To rename the originally opened cover page On the File menu click Rename In the Rename dialog box specify the new name and click OK Deleting a Co...

Страница 95: ...rectly from the C20 The hard copy includes the name of the cover page and the date last modified printed at the uppermost edge of the page To define the print setup 1 With the Cover Page Designer open...

Страница 96: ...w do one of the following To print the cover page click Print To enlarge or reduce the view size click Zoom In or Zoom Out To close the preview window click Close Since a cover page is not typically m...

Страница 97: ...5 38 PC Faxing Chapter 5 To print the cover page 1 With the cover page open click Print on the File menu or toolbar 2 Complete the Print dialog box and click OK...

Страница 98: ...e the C20 to scan images directly to the Desktop Manager or to a TWAIN compliant Windows application Scanning with the Desktop Manager 6 2 Reviewing Predefined or Creating Custom Scan Settings 6 4 Def...

Страница 99: ...document A scan document remains in the Scan folder until you move or delete it The scan document can be reviewed annotated printed or sent as a fax For more information on these tasks refer to Chapte...

Страница 100: ...e type you select is predefined to determine a black and white or grayscale scanned image and the resolution for the image For instructions on reviewing the predefined settings or on creating a custom...

Страница 101: ...without scanning click Cancel An indicator displays to track the progress of the scan Reviewing Predefined or Creating Custom Scan Settings Follow these instructions to review the predefined settings...

Страница 102: ...x To create custom scan settings 1 On the Scanner dialog box under Scan Mode select Custom 2 Click Advanced In the Scanner Advanced dialog box the Scan Mode box displays your selection in the Scanner...

Страница 103: ...level of contrast in your scanned image View After Scan If selected this option displays the scanned image automatically in the Desktop Manager Document Viewer In the Document Viewer you can review th...

Страница 104: ...cation supports this feature refer to your user documentation for the application The following instructions summarize the procedures for scanning an image For specific information about scanning with...

Страница 105: ...dialog box To accept the scanned image into your Windows application 1 With the scanned image displayed in the dialog box adjust your view of the image as needed To adjust the size click the size in t...

Страница 106: ...ck and white or grayscale and for a specific resolution To review predefined settings 1 On the MultiPASS Scanner dialog box under Scan Mode select Letter Graphics or Photo 2 Click Advanced 3 In the Sc...

Страница 107: ...r selection in the Scanner dialog box 3 Under Image Mode select the type of image you want to produce 4 Under Resolution select the preferred resolution for your scanned image in dots per inch dpi 5 T...

Страница 108: ...he Desktop Manager 7 2 Working with Jobs in the Out Box Folder 7 3 Creating a Folder 7 7 Moving a Document 7 7 Renaming a Document or Folder 7 8 Deleting a Document or Folder 7 9 Emptying the Trash Fo...

Страница 109: ...in this chapter Selecting Documents in the Desktop Manager To work with a document you select it in the open folder To select a document with the folder open click the document name in the list Printi...

Страница 110: ...printed is sent to the Out Box folder The job is assigned a unique name When printing is complete the copy is automatically deleted from the Out Box folder Working with Jobs in the Out Box Folder For...

Страница 111: ...ve job from PC faxing or printing Send a PC fax that has been scheduled for sending later held or has failed Print a job Delete a job that is not active The following sections provide information abou...

Страница 112: ...fax you chose to place on hold rather than send it immediately The held fax job remains in the Out Box folder until you choose to send or delete it A held job can also be printed Failed A job receives...

Страница 113: ...t for a different time When you send a PC fax from the Out Box folder the Send Fax dialog box displays the information initially entered for the PC fax You can change the information as needed For exa...

Страница 114: ...r 1 In the Desktop Manager on the File menu click New Folder 2 In the Create Folder dialog box enter the desired name of your new folder and click OK Moving a Document You can move a document from Sys...

Страница 115: ...names must be unique within the Desktop Manager Document names must be unique within a folder Whenever you attempt to rename a folder or document the system verifies whether the new name is unique In...

Страница 116: ...der with the document you want to delete and click the document Then on the Edit menu click Delete For instructions on moving a document to the Trash folder refer to the Moving a Document section in t...

Страница 117: ...disk or a diskette you can import the document into a user defined folder in the Desktop Manager To be imported and usable in the Desktop Manager the document must be in monochrome TIFF file format T...

Страница 118: ...want to export 2 Drag the document to the Export Tiff button on the toolbar Or click the document you want to export and on the File menu click Export Tiff 3 In the Export Tiff File dialog box specify...

Страница 119: ...h Documents in the Desktop Manager Chapter 7 To attach a document to an e mail message Select the document you want to attach and drag the document to the E mail button on the toolbar Or on the File m...

Страница 120: ...the modified document you have the option not to include the annotations with the document For example if you insert a whiteout on your document such as over a paragraph of text the area is no longer...

Страница 121: ...document in the Trash folder To annotate a document 1 With the document open in the Document Viewer adjust the size of your view of the document as needed 2 Create the desired annotations on your doc...

Страница 122: ...s tasks with your document Some of the commands can also be accessed by their corresponding buttons on the toolbar Toolbar The toolbar provides you quick access to performing certain Document Viewer t...

Страница 123: ...ge or scroll through the document enlarge or reduce the view of the document or change the orientation The display area contains the results of any annotations you may make Annotation Panel The annota...

Страница 124: ...u can adjust your view of the open document in a number of ways to provide a more workable display area for making annotations For example you can hide or show the different components of the Document...

Страница 125: ...oom in and out at predefined increments or specify a particular size or scale You can use the Fit to Width option which fills the width of the window with your page display or Fit to Window which adju...

Страница 126: ...ore pleasing to the eye however it is slower to generate an image For speed and reasonable image display consider the Darkest setting To lighten or darken the image On the View menu click Image Enhanc...

Страница 127: ...refer to the Annotating a Document section presented earlier in this chapter Adding a Sticky Note You can add a text note on any portion of your document When you do so you can choose the text attrib...

Страница 128: ...er over the sticky note The cursor changes to an insertion point 3 Click at the location where you want to make your changes 4 Edit the text as needed Concealing a Region You can conceal a region of y...

Страница 129: ...page drag the cursor to draw the outline of the region A dotted line displays the region On the Edit menu click White Out or Black Out Inserting a Stamp You insert a stamp to place a bitmap image on t...

Страница 130: ...To highlight a region 1 On the annotation panel click the Hilite tool 2 Select the colour of the highlighting 3 At the desired location on the displayed page drag the cursor to draw the highlight regi...

Страница 131: ...tions to your document you can turn the display of the annotations on and off for viewing To show or hide your annotations on the View menu click Annotations On the Annotations menu click the command...

Страница 132: ...draw a rectangle enclosing the annotations you want included within the region A dotted line displays to indicate the region On the Edit menu click Select in Region Graphic handles display for the an...

Страница 133: ...tation it is placed on the Document Viewer clipboard From the clipboard it can be pasted to any location on any page of your document To copy and paste an annotation 1 Select the annotation to be copi...

Страница 134: ...ct either the base page or a region of the page in your document 2 Click Copy on the Edit menu or toolbar 3 Once copied on the Edit menu click Paste to File 4 When prompted specify the drive directory...

Страница 135: ...ic file and can include or not include any annotations you may have created Typically you would save the document to use in a graphics application of your choice To determine the appropriate file type...

Страница 136: ...ent Viewer with or without any annotations you may have created Prior to printing you can specify certain print setup options To define the print setup 1 On the File menu click Print Setup 2 In the Pr...

Страница 137: ...er to use in most situations you can define default settings These settings are activated when you first open the Document Viewer To adjust the initial Document Viewer options 1 On the File menu click...

Страница 138: ...ing Up Speed Dial Assignments 8 16 Making a Phone Call from the Desktop Manager 8 18 Using the Status Monitor 8 19 Using the Minimized Status Monitor 8 20 Using the Status Monitor Window 8 21 Status M...

Страница 139: ...in using your C20 with the Desktop Manager immediately However you can change the option settings as needed Since you can make changes to most option settings either on the C20 or in the Desktop Manag...

Страница 140: ...s in the Desktop Manager For additional information refer to later sections in this chapter To change setup options in the Desktop Manager 1 On the Setup menu click the group of setup options you want...

Страница 141: ...eferences tab Date You select the format used to display the date on the C20 LCD and for printing the date on a fax Display Language You select the language to be used on the C20 device display Confir...

Страница 142: ...Windows 3 1x Print Manager or Windows 95 Print Spooler is then bypassed Telephone Attached to Unit You select this option if you have the telephone handset installed on your C20 With this option sele...

Страница 143: ...Line You specify the dialling method the C20 will use touch tone or rotary pulse You also specify any prefix used to access an outside phone line Automatic Retries You specify the number of retries th...

Страница 144: ...Use Defaults Setting Up Advanced Send Fax Options To change the following Advanced Send Fax options click Advanced on the Send Fax tab Speed You set the transmission speed used to send faxes The highe...

Страница 145: ...to lighten or darken the contrast for the fax transmission Fax Heading Position You select where you want the sent fax heading information your fax number your name and date and time to print on the f...

Страница 146: ...ternative service on and off To do so you select Use One Touch Key 06 as M Key Define the settings for the One Touch 6 button when using this alternative service When defining the M Key settings In th...

Страница 147: ...he new password Setting Up Receive Fax Options You can change the following options on the Receive Fax tab Paper Size You select the size of the paper you are using for printing a fax Reduce to Fit Pa...

Страница 148: ...umber of Rings If you cleared the Silent Receive option indicating you want the C20 to ring for incoming fax calls you specify the number of times the C20 should ring for the fax call Receive Fax Opti...

Страница 149: ...pter 8 Restoring the Default Settings After making changes to restore the default settings for the options click Use Defaults Setting Up Advanced Receive Fax Options To change the following Advanced R...

Страница 150: ...s option if you want to print documents in the Desktop Manager using a reduced amount of ink thereby saving printer ink When using this option the printed document may appear to be less bright or cont...

Страница 151: ...ly if you set the receive mode on the Receive Fax tab to answering machine mode and your fax sender may be using a fax machine that does not emit a send fax signal Select this option to have the C20 a...

Страница 152: ...al recipients to speed dial codes If the recipient has not yet been set up in the Address Book you can add the recipient while creating speed dial assignments You can also set up a group speed dial by...

Страница 153: ...columns on the list the first and last names of an address book entry may not display fully To add a recipient to the Address Book 1 Click New 2 In the New Individual Entry dialog box complete the ap...

Страница 154: ...4 In the Speed Dial list box select the first recipient and click Add Repeat this procedure until the desired recipients are included in the Members list box 5 To remove a member from the group select...

Страница 155: ...ons dialog box in the Desktop Manager You can place a call to any individual you want whether or not the individual has been set up in the Address Book At the time you are attempting to make your call...

Страница 156: ...ess Book click New Individual and complete the New Individual Entry dialog box For details on completing the New Individual Entry dialog box refer to Chapter 5 PC Faxing 4 With the phone number entere...

Страница 157: ...esponding messages To open the Status Monitor Do one of the following On the Windows desktop For Windows 3 1x In the MultiPASS C20 group double click the MultiPASS Monitor icon For Windows 95 Click St...

Страница 158: ...atus Monitor menu click Restore To open the Desktop Manager from the Status Monitor icon or button On the Status Monitor menu click Go to Manager To close the Status Monitor On the Status Monitor menu...

Страница 159: ...s status indicates the C20 is currently inactive Scanning This status indicates the C20 is scanning an image The Status Monitor window displays the number of the page currently being scanned Printing...

Страница 160: ...action When you have corrected the situation the status message automatically clears Closing the MultiPASS Background The MultiPASS Background is a utility that monitors and controls activity between...

Страница 161: ...he C20 is unable to receive more faxes until you print the faxes stored in memory To set the C20 to print received faxes In the Desktop Manager open the Setup Options dialog box In the Setup Options d...

Страница 162: ...tUp group If you have disconnected your C20 the next time you start Windows the MultiPASS Background will try to open At that time the MultiPASS Background will be unable to detect the device displayi...

Страница 163: ...StartUp window click the MultiPASS Background icon and press the Delete key Restarting the MultiPASS Background If you reconnect the C20 to the port and want to begin using the Desktop Manager again...

Страница 164: ...PASS Background to StartUp Windows 3 1x 1 On the Program Manager display the MultiPASS C20 and StartUp groups 2 While holding down the Control key drag the MultiPASS Background icon from the MultiPASS...

Страница 165: ...the wire clips and remove the cable connector from the port 6 Plug your computer back in to the electrical source Using MultiPASS Diagnostics If you have difficulties with your MultiPASS software or h...

Страница 166: ...g file choose Save As on the File menu 4 In the SaveAs dialog box specify the drive directory and filename for saving the file Then click OK 5 To exit the MultiPASS Diagnostics window on the File menu...

Страница 167: ...MultiPASS C20 Printer Then click Remove Repeat this step for MultiPASS C20 Fax To uninstall the Desktop Manager 1 Close the MultiPASS Desktop Manager and all MultiPASS related utilities such as the Co...

Страница 168: ...ultiPASS related utilities such as the Cover Page Designer 2 Close the MultiPASS Background 3 On the Window desktop click Start and then point to Programs 4 From the Programs menu point to MultiPASS C...

Страница 169: ...8 32 C20 Setup and Other Utilities in the Desktop Manager Chapter 8...

Страница 170: ...questions you may have when operating Desktop Manager with your C20 Faxes Are Not Being Sent Correctly 9 2 Faxes Are Not Being Received Correctly 9 3 Images Are Not Scanning Correctly 9 4 Documents A...

Страница 171: ...Did a document not feed correctly through the automatic document feeder Remove the document stack it and feed it into the unit again Are errors being reported when you send a fax Use the operation pan...

Страница 172: ...ck that the AC adapter is plugged securely into the unit and that your electrical source is OK Is the C20 warm to the touch The unit might have overheated and shut down Turn the unit off and let it co...

Страница 173: ...aper that meets the paper requirements for this unit Is the quality of the received fax poor Remember the sending fax machine usually determines document quality Ask the other party to check that thei...

Страница 174: ...have overheated and shut down Turn the unit off and let it cool down for several minutes but less than one hour or you might lose information registered in memory Try using it again Is the ALARM light...

Страница 175: ...ou have the Windows Printing System or other bi directional device such as a later model laser printer installed on your computer and you are attempting to use the same port on which you also have the...

Страница 176: ...cters not fit on the page Make sure paper is aligned correctly in the sheet feeder Check that margins and paper size are set correctly in your printing application Is printing not clear Check to see i...

Страница 177: ...9 8 Frequently Asked Questions Chapter 9...

Страница 178: ...Manager when sending a PC fax setting up an entry in the Address Book or making a phone call you use only the following characters Character Description 0 to 9 Dialling digits p Pause P Last Pause T T...

Страница 179: ...A 2 Fax Phone Characters Appendix A...

Страница 180: ...ols ASCII defines 128 symbols using 7 binary bits and 1 parity bit Automatic feed Method by which paper can be fed into the printer when the built in paper feeder is used B Bi directional parallel int...

Страница 181: ...ent intensities of black L Landscape orientation The horizontal orientation of your document or image across the length of the page The term landscape is derived from pictures of the landscape which a...

Страница 182: ...held scanners video capture boards digital cameras and other imaging equipment without requiring you to switch out of the application It provides compatibility between image input devices and applica...

Страница 183: ...G 4 Glossary...

Страница 184: ...esizing 7 26 revising 7 24 selecting 7 25 showing and hiding 7 24 Annotation panel in the Document Viewer 7 16 Annotations including when sending a PC fax 5 8 Attaching a document to an e mail message...

Страница 185: ...eting 7 9 exporting 7 11 importing 7 10 moving to another folder 7 7 renaming 7 8 selecting in the Desktop Manager 7 2 Document Viewer adjusting the display size 7 18 adjusting the image display 7 19...

Страница 186: ...iew 4 8 user defined described 4 8 Folders list overview for the Desktop Manager 4 5 G Graphic drawing on a document 7 23 Graphics options setting a custom model in the printer driver 3 12 setting in...

Страница 187: ...the cover page 5 8 rescheduling in the Out Box folder 7 6 sending from your computer 5 2 sending later 5 9 sending now 5 9 specifying a fax recipient 5 5 specifying fax send information 5 8 Phone cha...

Страница 188: ...older 7 5 Scheduling a PC fax for sending 7 6 Select a document in the Desktop Manager 7 2 Send Fax setup for the C20 8 5 Sending Fax status for the Status Monitor 8 22 Sent Fax folder overview 4 8 Se...

Страница 189: ...e Desktop Manager 4 5 Trash folder emptying 7 9 overview 4 8 U Uninstall Desktop Manager 8 29 User defined folder described 4 8 V Variable fields 5 32 inserting when creating a new cover page 5 31 Var...

Страница 190: ......

Отзывы: