(17/34)
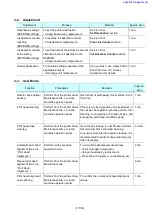
2-2. Adjustment
Adjustment
Purpose
Method
Approx. time
Destination settings
(EEPROM settings)
To set the printer destination.
- At logic board ass’y replacement
Service Tool,
Set Destination
section
1 min.
Ink absorber counter
resetting
(EEPROM settings)
To reset the ink absorber counter.
- At ink absorber replacement
Service Tool,
Clear Ink Counter
section
1 min.
Ink absorber counter
value setting
(EEPROM settings)
To set the data of the actual ink amount
absorbed in the ink absorber to the
EEPROM.
- At logic board ass’y replacement
Service Tool,
Ink Absorber Counter
section
1 min.
Grease application
To maintain sliding properties of the
applicable portions.
- At carriage unit replacement
Using a brush, etc., apply FLOIL
KG-107A. See 2-5, Grease
Application, for details.
1 min.
2-3. User Mode
Function
Procedures
Remarks
Approx.
time
Nozzle check pattern
printing
Perform from the printer driver
Maintenance tab, or via the
machine operation panel.
Set a sheet of plain paper (A4 or Letter) in the
front tray.
1 min.
Print head cleaning
Perform from the printer driver
Maintenance tab, or via the
machine operation panel.
If there is a missing portion or white streaks in
the nozzle check pattern printout, perform this
cleaning, to unclog the print head nozzles, and
to keep the print head conditions good.
1 min.
Print head deep
cleaning
Perform from the printer driver
Maintenance tab, or via the
machine operation panel.
If print head cleaning is not effective, perform
this cleaning. Since the deep cleaning
consumes more ink than regular cleaning, it is
recommended to perform deep cleaning only
when necessary.
1.5 min.
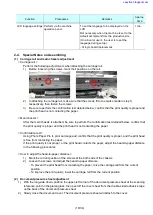
Automatic print head
alignment (See 3-4,
“Print Head
Alignment.”)
Perform via the machine
operation panel.
To correct the dot placement accuracy.
- At ink cartridge replacement
- At logic board ass’y replacement
- When the print quality is not satisfying, etc.
4 min.
Manual print head
alignment (See 3-4,
“Print Head
Alignment.”)
Perform from the printer driver
Maintenance tab.
6 min.
Print head alignment
value printing
Perform from the printer driver
Maintenance tab, or via the
machine operation panel.
To confirm the current print head alignment
values.
1 min.
easyfixs.blogspot.com


