


Setting Paper Dimensions (Custom Size)
You can specify the height and width of paper when its size cannot be selected from the
Paper Size
menu.
Such a paper size is called "custom size."
The procedure for specifying a custom size is as follows:
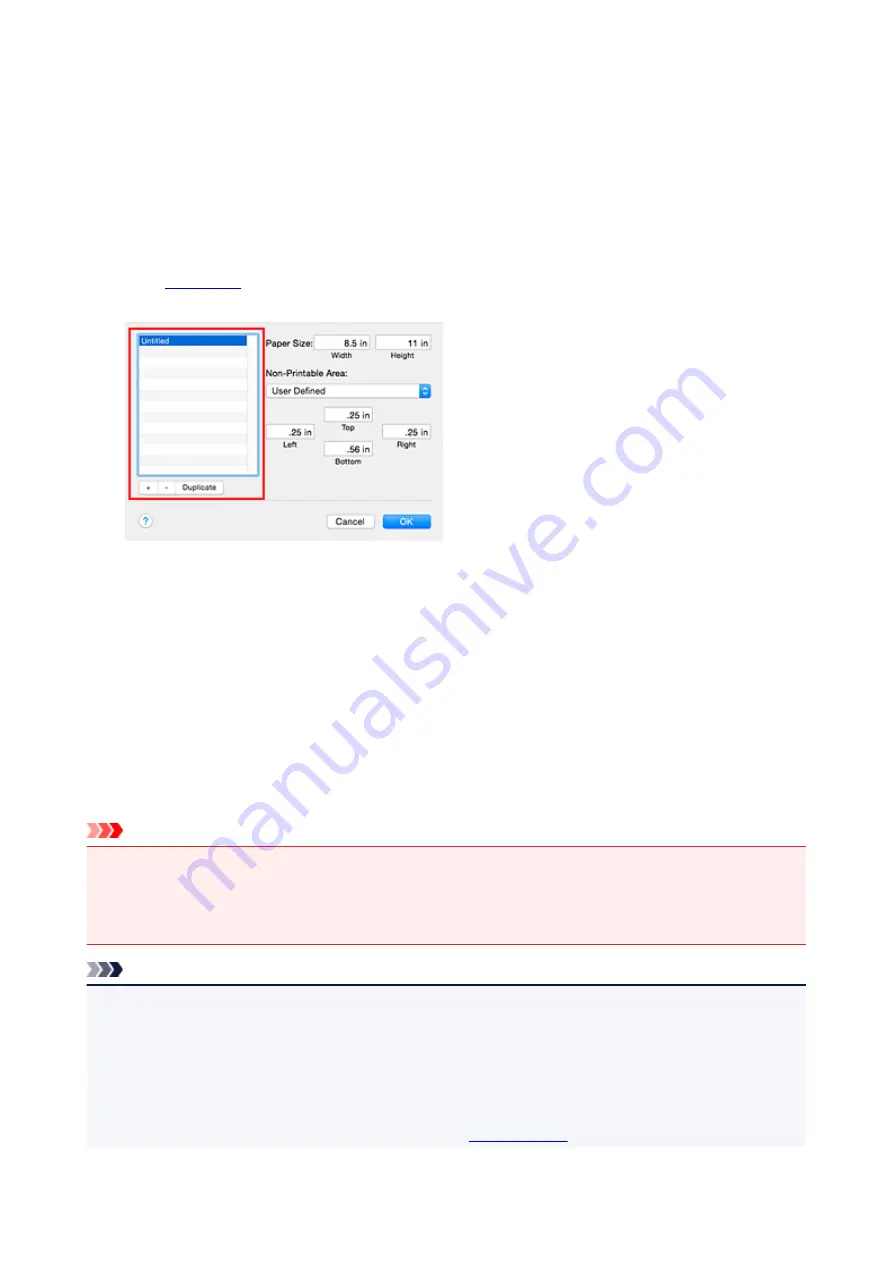
1. Creating a new custom paper size
, select
Manage Custom Sizes...
from
Paper Size
.
In the displayed dialog, click
+
.
Untitled
will be added to the list.
2. Setting details about the custom paper size
Double-click
Untitled
, enter the name of the paper size you want to register, and specify the
Width
and
Height
of the paper for
Paper Size
.
Select
User Defined
or your model for
Non-Printable Area
, and enter the margins.
3. Registering the custom paper size
Click
OK
.
The custom size is registered.
Important
• If the application software that created the document has a function for specifying height and width
values, use the application software to set the values. If the application software does not have such a
function or if the document does not print correctly, perform the above procedure from the printer driver
to set the values.
Note
• To duplicate the registered paper size, select the paper size that you want to duplicate from the
Custom Paper Sizes
list, and click
Duplicate
.
• To delete a registered paper size, select the paper size that you want to delete from the
Custom Paper
Sizes
list, and click
-
.
• If the paper settings on the print dialog differ from the cassette paper information registered on the
printer, an error may occur.
For instructions on what to do if an error occurs, see "
365
Содержание MAXIFY iB4140
Страница 1: ...iB4100 series Online Manual Printer Functions Overview Printing Troubleshooting English ...
Страница 102: ...All registered users can register and delete apps freely 102 ...
Страница 104: ...4 The senior clerk selects Advanced management from 5 For Select how to manage the senior clerk selects Set 104 ...
Страница 137: ...Loading Paper Paper Sources Loading Plain Paper Photo Paper Loading Envelopes 137 ...
Страница 140: ...140 ...
Страница 146: ...Note Before printing select the size and type of loaded paper on the print settings screen of the printer driver 146 ...
Страница 152: ...Replacing Ink Tanks Replacing Ink Tanks Checking Ink Status on the LCD 152 ...
Страница 168: ...Aligning the Print Head Position Manually Mac OS 168 ...
Страница 187: ...Safety Safety Precautions Regulatory Information WEEE EU EEA 187 ...
Страница 191: ...191 ...
Страница 202: ...Main Components and Their Use Main Components Power Supply LCD and Operation Panel 202 ...
Страница 203: ...Main Components Front View Rear View Inside View Operation Panel 203 ...
Страница 215: ...Press the OK button C Use the or button B to change the setting and then press the OK button C 215 ...
Страница 259: ...The resending setting is completed 259 ...
Страница 260: ...Network Connection Network Connection Tips 260 ...
Страница 273: ...Network Communication Mac OS Checking and Changing Network Settings Network Communication Tips 273 ...
Страница 297: ...Network Communication Tips Using Card Slot over Network Technical Terms Restrictions 297 ...
Страница 327: ...Print Area Print Area Standard Sizes Envelopes 327 ...
Страница 332: ...Administrator Settings Sharing the Printer on a Network 332 ...
Страница 339: ...Printing Printing from Computer Printing from Smartphone Tablet Paper Settings 339 ...
Страница 360: ...Related Topic Changing the Printer Operation Mode 360 ...
Страница 374: ...Adjusting Color Balance Adjusting Brightness Adjusting Intensity Adjusting Contrast 374 ...
Страница 406: ...Printing Using a Web Service Using PIXMA MAXIFY Cloud Link Printing with Google Cloud Print 406 ...
Страница 423: ...Printing from Smartphone Tablet Printing Directly from Smartphone Tablet Printing Using a Web Service 423 ...
Страница 435: ...Printing Using a Web Service Using PIXMA MAXIFY Cloud Link Printing with Google Cloud Print 435 ...
Страница 445: ...Network Communication Problems Cannot Find Printer on Network Network Connection Problems Other Network Problems 445 ...
Страница 462: ...Perform setup following the instructions on the screen 462 ...
Страница 491: ...Problems while Printing from Smartphone Tablet Cannot Print from Smartphone Tablet 491 ...
Страница 500: ...Note You can also search for details on resolving the errors indicated by the support code shown Search 500 ...
Страница 538: ...Errors and Messages An Error Occurs Message Appears 538 ...
Страница 540: ...To resolve errors that do not have support codes see An Error Occurs 540 ...
Страница 571: ...1660 Cause An ink tank is not installed What to Do Install the ink tank 571 ...
Страница 616: ...5500 Cause Ink tank has not been properly recognized What to Do Contact the service center 616 ...
Страница 617: ...5501 Cause Ink tank has not been properly recognized What to Do Contact the service center 617 ...
Страница 618: ...5B00 Cause Printer error has occurred What to Do Contact your nearest Canon service center to request a repair 618 ...
Страница 619: ...5B01 Cause Printer error has occurred What to Do Contact your nearest Canon service center to request a repair 619 ...


