background image

47

Appendix

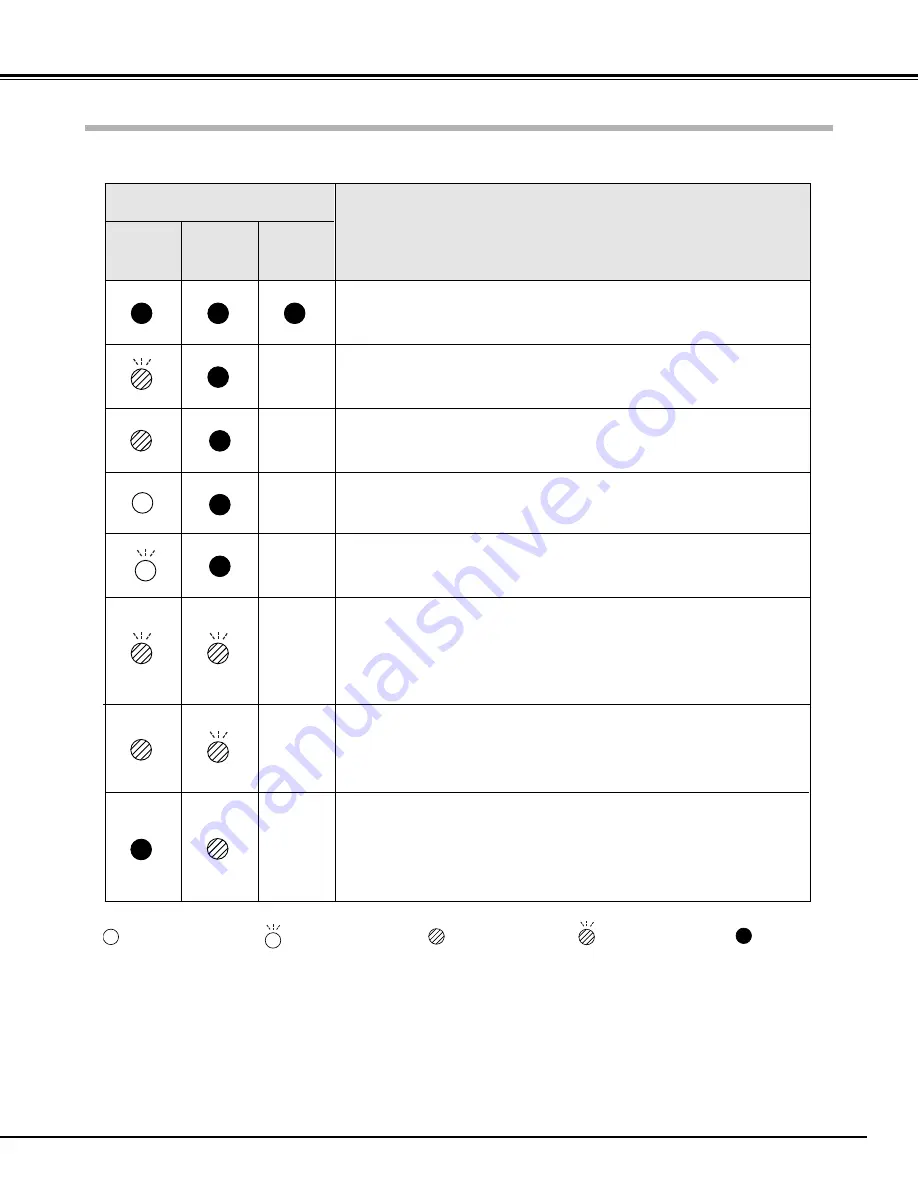
Check the indicators for projector condition.  

• • • lights green.

• • • lights red.

• • • off

• • • flashes green.

When the life of the projection lamp draws to an end, the LAMP REPLACE indicator lights yellow.  When this indicator lights
yellow, replace the projection lamp with a new one promptly.  Reset the Lamp replace counter after replacement of the lamp.  
See page 43 and 44.

The projector is OFF.  (The AC power cord is unplugged.)

The projector is preparing for stand-by or the projection lamp is being
cooled down.  The projector cannot be turned on until cooling is completed. 

The temperature inside the projector is abnormally high.  The projector can-
not be turned on.  When  the projector has cooled down enough and the
temperature returns to normal, the POWER indicator lights red and the pro-
jector can be turned on.  (The WARNING indicator keeps flashing.)  Check
and clean the Air filter.

Projector Condition

The projector is ready to be turned on with the POWER ON-OFF button.

POWER

red/green

Indicators

LAMP

REPLACE

yellow

WARNING 

red

The projector detects an abnormal condition and cannot be turned on.
Unplug the AC power cord and plug it again to turn on the projector.  If the
projector is turned off again, disconnect the AC power cord and contact the
dealer or the service center for service and checkup.  Do not leave the pro-
jector on.  It may cause electric shock or a fire hazard.

The projector is operating normally. 

The projector is in the Power management mode. 

The projector has been cooled down enough and the temperature returns
to normal.  When turning on the projector, the WARNING indicator stops
flashing.  Check and clean the air filters.

Indicators and Projector Condition

• • • flashes red.

Содержание LV-5210

Страница 1: ...E English Multimedia Projector Owner s Manual LV 7215LV 7210LV 5210 ...

Страница 2: ...r 19 Zoom Adjustment 20 Focus Adjustment 20 Keystone Adjustment 20 Picture Freeze Function 20 No Show Function 21 P Timer Function 21 Sound Adjustment 21 On Screen Menu 22 Menu Bar 23 Input Source Selection 24 Computer System Selection 25 Computer Adjustment Auto 26 Computer Adjustment Manual 27 Image Level Selection 29 Image Level Adjustment 30 Screen Size Adjustment 31 Input Source Selection Vid...

Страница 3: ...ISK OF FIRE OR ELECTRIC SHOCK DO NOT EXPOSE THIS APPLIANCE TO RAIN OR MOISTURE This projector produces intense light from the projection lens Do not stare directly into the lens as possible Eye damage could result Be especially careful that children do not stare directly into the beam Install the projector in a proper position If not it may result in a fire hazard Provide appropriate space on the ...

Страница 4: ... voltage points or short out parts that could result in a fire or electric shock Never spill liquid of any kind on the projector Do not install the projector near the ventilation duct of air conditioning equipment This projector should be operated only from the type of power source indicated on the marking label If you are not sure of the type of power supplied consult your authorized dealer or lo...

Страница 5: ...trong forces or put other things on the cabinet Install the projector properly Improper installation may reduce the lamp life and cause a fire hazard 20 20 Do not tilt the projector more than 20 degrees above and below Do not point the projector up to project an image Do not point the projector down to project an image Do not put the projector on either side to project an image Air Circulation Ope...

Страница 6: ...residential installation This equipment generates uses and can radiate radio frequency energy and if not installed and used in accordance with the instructions may cause harmful interference to radio communications However there is no guarantee that interference will not occur in a particular installation If this equipment does cause harmful interference to radio or television reception which can ...

Страница 7: ... AC This projector automatically selects the correct input voltage It is designed to work with single phase power systems having a grounded neutral conductor To reduce risk of electrical shock do not plug into any other type of power system Consult your authorized dealer or service station if you are not sure of the type of power being supplied Connect the projector with all peripheral equipment b...

Страница 8: ... you to operate both the projector and the connected computer with the remote control unit See page 14 Power Management The Power management function reduces power consumption and maintain the lamp life See page 39 Digital Visual Interface The projector is equipped with DVI 29 pin terminal for connecting DVI output from a computer or video equipment You can also enjoy digital entertainment content...

Страница 9: ...ens Cover See page 54 for attaching i Air Intake Vent q w e r t q Exhaust Vent q w e r w Top Controls and Indicators e Air Intake Vent r Terminals and Connectors CAUTION Hot air is exhausted from the exhaust vent Do not put heat sensitive objects near this side q Air Intake Vent w Air Filter e Adjustable Feet r Lamp Cover Bottom e r y u i w q q ...

Страница 10: ...omputer or video equipment connected to q or u to this jack p 17 18 r VIDEO IN Connect the composite video output from video equipment to VIDEO IN jack p18 u RGB IN 2 COMPONENT IN RGB OUT This terminal is switchable and can be used as computer input component input RGB Scart 21 Pin Video input or monitor output Set the terminal up as either Computer input or Monitor output properly before using th...

Страница 11: ...jector on or off p19 POWER indicator Flashes red until the projector gets ready to be turned on It turns red when the projector is in the stand by mode It remains green while the projector is under operation t INPUT button Selects input source p24 32 q MENU button Opens or closes the On Screen Menu p22 y POINT Up Down Left Right button Selects an item or adjusts value in the On Screen Menu These a...

Страница 12: ...ng this laser pointer for more than 1 minute release the LASER button and press it again This button is also used as a switching button to activate the Pointer function of the projector p13 4 POWER ON OFF button Turns the projector on or off p19 8 NO SHOW button Turns the picture into black image p21 1 FREEZE button Freezes the projected picture p20 2 IMAGE button Selects image levels p29 35 i SET...

Страница 13: ...sed as the Pointer function ON OFF switch instead of the Laser pointer function Press the LASER button toward the projector and see if it lights green Pointer This remote control unit emits a laser beam as the Laser pointer function from the laser light window When the LASER button is pressed the laser light goes on When the LASER button is being pressed for more than 1 minute or the LASER button ...

Страница 14: ...F switch to the RESET and then to the ON The initial code is Code 1 2 Remote Control Code While pressing the MENU button press the IMAGE button number of times corresponding to the remote control code for the projector Remote Control Code Number of Times of Pressing IMAGE Button Code 1 1 Code 2 2 Code 3 3 Code 4 4 Code 5 5 Code 6 6 Code 7 7 Code 8 8 The remote control unit can be used as a wireles...

Страница 15: ...plosion if battery is replaced by an incorrect type Dispose of used batteries according to the instructions Press the lid down ward and slide it Remove the battery compartment lid Slide the batteries into the compartment Replace the compartment lid Two AA size batteries For correct polarity and be sure battery terminals are in contact with pins in compartment 1 2 3 Point the remote control unit to...

Страница 16: ...ld be set See page 5 Positioning the Projector Adjustable Feet NOTE The brightness in a room has a great influence on picture quality It is recommended to limit ambient lighting in order to provide the best image The values shown are approximate and may vary from the actual size 100 150 190 300 190 122 95 62 40 A B 25 3 7 7m 16 1 4 9m 12 5 3 8m 8 2 2 5m Max Zoom Min Zoom A B 9 1 Screen Size W x H ...

Страница 17: ...io Cable stereo NOTE When connecting the cable the power cords of both the projector and the external equipment should be disconnected from AC outlet USB port MAC Adapter Set slide switch es according to the chart below VGA Cable HDB 15 pin DVI VGA Cable HDB 15 pin DVI Digital Cable for Single Link T M D S USB Cable MAC Adapter When connecting to Macintosh computer Audio Cables Mini Plug stereo x ...

Страница 18: ...OUT Component video output equipment such as DVD player or high definition TV source Component Video Output Y Pb Cb Pr Cr Composite Video Output Video Cable RCA x 1s Scart VGA Cable RGB Scart 21 pin Output Cables used for connection These accessories are not supplied with this projector Component VGA Cable Audio Cable RCA x 2 Audio Output R L AUDIO IN NOTE The S VIDEO IN jack has priority over the...

Страница 19: ... Then you can disconnect the AC power cord 4 After the count down the image level that was selected last and the Lamp mode status icon appear on the screen for 4 seconds and the signal from Computer or Video source appears Turning On the Projector Turning Off the Projector NOTE The projector cannot be turned on during the cooling period with the POWER indicator flashing red You can turn it on agai...

Страница 20: ...nt Up Down Left Right button Press the Point Up button to reduce the upper part of the image and press the Point Down button to reduce the lower part Press the Point Left button to reduce the left part and press the Point Right button to reduce the right part Keystone adjustment can be memorized p38 Move the Zoom Lever upward to make the image larger Move the Zoom Lever downward to make the image ...

Страница 21: ...ntrol unit to adjust volume The volume dialog box appears on the screen for a few seconds button to turn up the volume and button to turn down the volume Mute Press the MUTE button on the remote control unit to cut off sound To restore sound to its previous level press the MUTE button again or press the VOL button Press the Point Right button to turn up the volume and press the Point Left button t...

Страница 22: ...ow the item data 1 2 4 3 You can control and adjust this projector through the On Screen Menu Refer to the following pages to operate each adjustment on the On Screen Menu INPUT MENU KEY STONE SET VOL VOL Top Control Menu bar Pointer red frame Menu icon Item data Press the Point Left Right but tons to adjust value SET button Pointer red frame Press the Point Down but ton to move the pointer Item S...

Страница 23: ...t Menu Used to adjust picture image Contrast Brightness Color Tint Color temp White balance R G B Sharpness Gamma Progressive Refer to p36 37 For video source Same function as menu for computer source Input Menu Used to select input source either Video or Computer p32 PC Adjust Menu Used to adjust parameters to match with input signal format p26 28 Image Select Menu Used to select an image level a...

Страница 24: ...When the input source is analog coming from a computer through the DVI terminal select RGB Analog RGB Analog Move the pointer red arrow to Computer 2 and press the SET button Computer 2 Move the pointer to RGB and press the SET button Source Select Menu Input Menu Input Menu icon Computer 1 Video Computer 2 COMPUTER button Computer 1 Computer 2 When the input source is analog coming from a compute...

Страница 25: ...e is no signal input from the connected computer Check the connection of the computer and see if the projector is set correctly See Troubleshooting on page 45 Auto The Auto PC Adjustment func tion operates to adjust the pro jector PC System Menu The PC System Menu icon displays the system being selected The systems on this dialog box can be selected Press the MENU button and the On Screen Menu wil...

Страница 26: ...trol unit Move the red frame pointer to the Auto PC Adj icon and press the SET button PC Adjust Menu Auto PC Adj PC Adjust Menu icon To store adjustment data Adjustment parameters from Auto PC Adjustment can be memorized in this projector Once parameters are memorized the setting can be done just by selecting Mode in the PC System Menu p25 See Store on page 28 NOTE The PC Adjust Menu cannot be ope...

Страница 27: ...ton PC Adjust Menu PC Adjust Menu icon Adjusts an image as necessary to eliminate flicker from the display Press the Point Left Right button to adjust value From 0 to 31 Fine sync Adjusts the number of total dots in one horizontal period Press the Point Left Right button and adjust number to match your PC image Total dots Adjusts horizontal picture position Press the Point Left Right button to adj...

Страница 28: ...then press the SET button Move the red arrow pointer to any of Mode 1 to 5 in which you want to store and then press the SET button Resets all adjustment to their previous levels Mode free Vacant Mode shows values of Total dots Horizontal Vertical Display area H and Display area V closes this dialog box To store adjustment data To clear adjustment data To clear adjustment data previously set move ...

Страница 29: ...et image in the Image Adjust Menu p30 Custom Image Select Menu icon IMAGE button Normal picture level preset on this projector User preset image in the Image Adjust Menu p30 Standard High contrast Custom Image Level Selection Direct Operation Menu Operation Select the image level among Standard High contrast and Custom by pressing the IMAGE button on the remote control unit Picture adjustment impr...

Страница 30: ...mage Adjust Menu icon Press the Point Left button to lighten red tone and the Point Right button to deepen red tone From 0 to 63 White balance Red Press the Point Left button to lighten green tone and the Point Right button to deepen green tone From 0 to 63 White balance Green Press the Point Left button to lighten blue tone and the Point Right button to deepen blue tone From 0 to 63 White balance...

Страница 31: ...The True and Digital zoom cannot be selected when 480i 575i 480p or 575p is selected in the PC System Menu p25 This projector cannot display any resolution higher than 1280 X 1024 If your computer s screen resolution is higher than 1280 X 1024 reset the resolution to the lower before connecting to the projector The image data in other than XGA 1024 x 768 for LV 7215 LV 7210 or SVGA 800 x 600 for L...

Страница 32: ...elect and then press the SET button 3 When selecting Auto the projector automatically detects incoming video signal and adjusts itself to optimize its performance The projector selects connection in the following order 1st S Video 2nd Video The S VIDEO IN jack has priority over the VIDEO IN jack under the condition of connecting both the S VIDEO IN jack and the VIDEO IN jack Auto When video input ...

Страница 33: ... Computer 2 COMPUTER button Computer 1 Computer 2 INPUT button Computer 2 is not displayed when the RGB IN 2 COM PONETN IN RGB OUT terminal is used as Monitor out Input Source Selection Component RGB Scart 21 Pin Direct Operation Menu Operation When the input source is coming from video equipment connected to the RGB IN 2 COMPONENT IN RGB OUT terminal with a Component VGA Cable select Component Co...

Страница 34: ... PAL M PAL N The projector automatically detects incoming video signal and adjusts itself to optimize its performance If the projector cannot reproduce proper video image it is necessary to select a specific component video signal format among 480i 575i 480p 575p 720p 1035i and 1080i Auto COMPONENT VIDEO SIGNAL FORMAT Video or S Video Component The projector automatically detects incoming video sy...

Страница 35: ...mage Select Menu Normal picture level preset on this projector Standard Picture level adjusted for the picture with fine tone Cinema User preset image in the Image Adjust Menu p36 37 Custom Image Select Menu icon Select an image level among Standard Cinema Custom by pressing the IMAGE button on the remote control unit Normal picture level preset on this projector Standard Picture level adjusted fo...

Страница 36: ... the Point Right button to deepen color From 0 to 63 Press the Point Left Right button to obtain proper color From 0 to 63 Color Tint Press the Point Left button to soften the image and the Point Right button to sharpen the image From 0 to 15 Sharpness Press the Point Left button to lighten red tone and the Point Right button to deepen red tone From 0 to 63 White balance Red Press the Point Left b...

Страница 37: ...icon Provides image at a wide screen ratio of 16 9 Wide Provides image at a normal video aspect ratio of 4 3 Normal To store the adjustment data move the red frame pointer to the Store icon and press the SET button The message OK will appear Select Yes to store the adjustment data To set this manual adjustment select Custom by pressing the IMAGE button or through the Image Select Menu p35 Store ic...

Страница 38: ...con This function corrects distortion of a projected image Select either Store or Reset with the Point Left Right button and then press the SET button The keystone dialog box appears Adjust keystone with the Point Up Down Left Right button Store stores the keystone adjustment even if the AC power cord is disconnected Reset resets the keystone adjustment when the AC power cord is disconnected Setti...

Страница 39: ...tor changes to green flashing In this condition the projection lamp will be turned on if the input signal is reconnected or any button on the top control or remote control unit is pressed Shutdown When the lamp has been fully cooled down the power will be turned off Off The Power management function is canceled Power management On start When this function is On the projector is automatically turne...

Страница 40: ...mal brightness the controlled brightness according with input signal lowers brightness reduces the lamp power consumption and extends the lamp life Pointer You can emphasize a part of the projected image with this function Choose either Spotlight or Pointer with the Point Up Down button and press the SET button Then select one of three different sizes Large Middle and Small of Spotlight or a point...

Страница 41: ...cator still continues to flash When the projector is turned on again the WARNING indicator stops flashing Then check the items below Did you provide appropriate space for the projector to be ventilated Check the installing condition to see if ventilation slots are not blocked Is the projector not installed near the ventilation duct of air conditioning equipment which may be hot Install the project...

Страница 42: ...projector RECOMMENDATION We recommend avoiding dusty smoky environments when operating the projector Usage in these environments may cause poor image quality When using under dusty or smoky conditions dust may accumulate on a lens LCD panels or optical elements inside the projector This condition may degrade the quality of a projected image When the above symptoms are noticed contact your authoriz...

Страница 43: ...ause injury Allow a projector to cool for at least 45 minutes before you open the Lamp cover The inside of the projector can become very hot WARNING LAMP REPLACE KEY STONE T VOL This indicator lights yellow when the life of the projection lamp draws to an end Top Control CAUTION Screw Screw Turn off the projector and disconnect the AC plug Allow the projector to cool for at least 45 minutes Loosen...

Страница 44: ... lamp with a new one IMMEDIATELY after the projector has cooled down Follow carefully the instructions in the Lamp Replacement section of this manual Continuous use of the lamp with the LAMP REPLACE indicator lighted may increase the risk of lamp explosion A Lamp may explode as a result of vibration shock or degradation as a result of hours of use as its lifetime draws to an end Risk of explosion ...

Страница 45: ...een See page 16 Check the projection lens to see if it needs cleaning See page 42 Moving the projector from a cool temperature location to a warm temperature location may result in moisture condensation on the projection lens In such an event leave the projector OFF and wait until condensation disappears Image is Left Right reversed Check the Ceiling Rear item See Setting on page 39 Problem Try th...

Страница 46: ...sure you are not too far from the projector when using the remote control unit Maximum operating range is 16 4 5m Make sure the code of the remote control unit is conformed to the projector See page 14 40 Unlock Key lock for the remote control unit in the Setting Menu See page 40 Problem Try these solutions Wireless Mouse function does not work Make sure your computer is connected to the projector...

Страница 47: ...POWER indicator lights red and the pro jector can be turned on The WARNING indicator keeps flashing Check and clean the Air filter Projector Condition The projector is ready to be turned on with the POWER ON OFF button POWER red green Indicators LAMP REPLACE yellow WARNING red The projector detects an abnormal condition and cannot be turned on Unplug the AC power cord and plug it again to turn on ...

Страница 48: ...Input RGB Analog N A Computer 2 RGB Component Go to System 1 Computer Input Video Auto Go to System 3 Go to System 3 Computer 1 Video S Video PC Adjust 640 x 480 720 x 400 800 x 600 1024 x 768 1152 x 864 1280 x 1024 1400 x 1050 Mode 1 Mode 2 Mode 3 Mode 4 Mode 5 Image Select High 0 63 0 63 0 63 0 15 Screen Quit Quit Yes No Systems displayed in the System Menu vary depending on an input signal Mid ...

Страница 49: ...nch Italian Spanish Portuguese Dutch Swedish Chinese Korean Japanese Store Reset On Off On Off Off On Off On Off Off On Off Normal mode Code 1 Yes No Keystone Blue back Display Logo Ceiling Rear Power management On start Lamp mode Remote control Factory default Yes No Code 2 Code 3 Code 4 Code 5 Code 6 Code 7 Code 8 Quit Quit 0 63 Russian Computer 2 Terminal Monitor out High Color Temp Mid Low XLo...

Страница 50: ...768 62 04 77 07 MAC 19 1024 x 768 60 24 75 08 MAC 21 1152 x 870 68 68 75 06 1280 x 960 75 00 75 08 1280 x 1024 80 00 75 08 XGA 11 1024 x 768 XGA 12 1024 x 768 XGA 13 1024 x 768 XGA 14 1024 x 768 61 00 75 70 XGA 15 1024 x 768 35 522 86 96 Interlace 46 90 58 20 47 00 58 30 58 03 72 00 SXGA 1 1152 x 864 SXGA 2 1280 x 1024 1280 x 1024 1280 x 1024 64 20 70 40 1280 x 1024 62 50 58 60 1280 x 1024 63 90 6...

Страница 51: ... with volume 1 0 W RMS DVI I RGB IN 1 Terminal COMPUTER AUDIO IN Jack Service Port Connector Audio Output Jack Internal Audio Amp 0 to 11 9 Feet Adjustment Power Source AA UM3 or R06 Type x 2 Operating Range 16 4 5m 30 Dimensions 2 0 x 1 0 x 7 1 50mm x 27mm x 181mm Net Weight 0 34 lbs 154 g including batteries Laser Pointer Class II Laser Max Output 1mW Wave length 640 660nm Remote Control Unit 48...

Страница 52: ...3 C5 C4 Pin Configuration Analog Red Input Analog Ground R G B Analog Green Input Analog Horiz sync Analog Blue Input C1 C5 C2 C4 C3 T M D S Data2 No Connect T M D S Data2 No Connect T M D S Data2 Shield DDC Clock DDC Data Analog Vert sync 1 5 2 4 3 6 7 8 T M D S Data1 No Connect T M D S Data1 No Connect T M D S Data1 Shield 5V Power Ground for 5V Hot Plug Detect 9 13 10 12 11 14 15 16 T M D S Dat...

Страница 53: ...s give the name and Type No to the sales dealer MAC Adapter Type No LV AD02 DVI Cable Type No LV CA29 COMPONENT VGA Cable Type No LV CA32 SCART VGA Cable Type No LV CA31 Not available in the U S A This cable is used for RGB Scart 21 Pin Video output of video equipment Optional Parts Multi Card Imager Type No LV MI01 Compact Flash Card Type No LV WN03 Wired LAN Card Type No LV WN01 Wireless LAN Car...

Страница 54: ...tended period attach the lens cover Secure the string for the lens cover through a hole of the lens cover 1 2 Turn the projector upside down and secure the string for lens cover to a hole on the bottom of the projector with a screw Hole String for the lens cover Secure it to the hole with a screw ...

Страница 55: ...55 ...

Страница 56: ... 20089 Milanofiori Rozzano MI Italy CANON Schweiz A G Industriestrasse 12 8305 Dietlikon Switzerland CANON BELGIUM N V S A Bessenveldstraat 7 1831 Diegem Belgium CANON GmbH Zetschegasse 11 A 1232 Wien Austria CANON ESPANA S A C Joaquin Costa 41 28002 Madrid Spain CANON SVENSKA AB Stensätravägen 13 S 127 88 Skarholmen 2 Sweden CANON NORGE A S Hallagerbakken 110 P O Box 2 33 Holmlia 1201 Oslo 12 Nor...

Отзывы: