

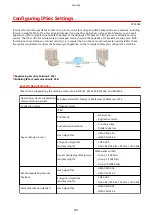


Select the type of the IP address of the machine to apply the policy from the following list.
[All IP Addresses]
Select to use IPSec for all IP packets.
[IPv4 Address]
Select to use IPSec for all IP packets that are sent to or from the IPv4 address of the
machine.
[IPv6 Address]
Select to use IPSec for all IP packets that are sent to or from an IPv6 address of the
machine.
[IPv4 Manual Settings]
Select to specify a single IPv4 address or a range of IPv4 addresses to apply IPSec.
Enter the IPv4 address (or the range) in the [Addresses to Set Manually] text box.
[IPv6 Manual Settings]
Select to specify a single IPv6 address or a range of IPv6 addresses to apply IPSec.
Enter the IPv6 address (or the range) in the [Addresses to Set Manually] text box.
[Addresses to Set Manually]
If [IPv4 Manual Settings] or [IPv6 Manual Settings] is selected for [Local Address], enter the IP address to
apply the policy.
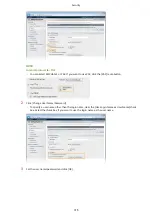
[Subnet Settings]
When manually specifying IPv4 addresses, you can express the range by using the subnet mask. Enter the
subnet mask using periods to delimit numbers (example:"255.255.255.240").
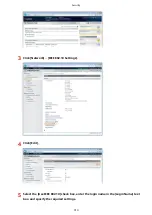
[Remote Address]
Select the type of IP address of the other devices to apply the policy from the list shown below.
[All IP Addresses]
Select to use IPSec for all IP packets.
[All IPv4 Address]
Select to use IPSec for all IP packets that are sent to or from an IPv4 address.
[All IPv6 Address]
Select to use IPSec for all IP packets that are sent to or from an IPv6 address.
[IPv4 Manual Settings]
Select to specify a single IPv4 address or a range of IPv4 addresses to apply IPSec.
Enter the IPv4 address (or the range) in the [Addresses to Set Manually] text box.
[IPv6 Manual Settings]
Select to specify a single IPv6 address or a range of IPv6 addresses to apply IPSec.
Enter the IPv6 address (or the range) in the [Addresses to Set Manually] text box.
[Addresses to Set Manually]
If [IPv4 Manual Settings] or [IPv6 Manual Settings] is selected for [Remote Address], enter the IP address to
apply the policy.
[Subnet Settings]
When manually specifying IPv4 addresses, you can express the range by using the subnet mask. Enter the
subnet mask using periods to delimit numbers (example:"255.255.255.240").
[Local Port]/[Remote Port]
If you want to create separate policies for each protocol, such as HTTP or SMTP, enter the appropriate port
number for the protocol to determine whether to use IPSec.
●
IPSec is not applied to the packets that have a specified multicast or broadcast address.
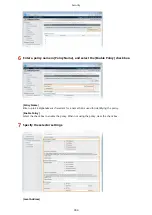
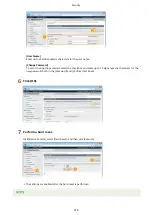
8
Specify the IKE Settings.
Security
305
Содержание LBP710Cx
Страница 1: ...LBP712Cx LBP710Cx User s Guide USRMA 0722 00 2016 04 en Copyright CANON INC 2016 ...
Страница 21: ... Saving Energy This section describes how to reduce power consumption Saving Energy P 62 Basic Operations 15 ...
Страница 51: ...Paper P 620 Basic Operations 45 ...
Страница 58: ...4 on 1 Postcard Insert the postcard with the upper end toward the machine Basic Operations 52 ...
Страница 78: ...Printing a Document 72 ...
Страница 93: ...LINKS Basic Printing Operations P 73 Printing a Document 87 ...
Страница 97: ...LINKS Basic Printing Operations P 73 Enlarging or Reducing P 82 Printing a Document 91 ...
Страница 102: ...Basic Printing Operations P 73 Printing Borders P 94 Printing Watermarks P 97 Printing a Document 96 ...
Страница 108: ...LINKS Basic Printing Operations P 73 Printing a Document 102 ...
Страница 140: ...LINKS Using the Encrypted Print P 135 Installing an SD Card P 633 Printing a Document 134 ...
Страница 154: ... It may take some time until printing starts LINKS Using Remote UI P 335 Printing a Document 148 ...
Страница 179: ...4 Click Edit 5 Specify the required settings and click OK Can Be Used Conveniently with a Mobile Device 173 ...
Страница 195: ...LINKS Connecting to a Network P 186 Network 189 ...
Страница 202: ...4 Click Edit in IPv6 Settings 5 Select the Use IPv6 check box and configure the required settings Network 196 ...
Страница 250: ...LINKS Entering Sleep Mode P 63 Network 244 ...
Страница 290: ...Printing a Document Stored in the Machine Stored Job Print P 136 Security 284 ...
Страница 296: ... Functions of the Keys Operation Panel P 24 Security 290 ...
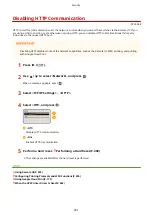
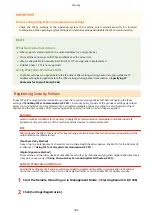
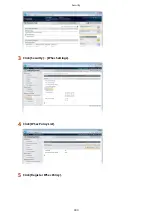
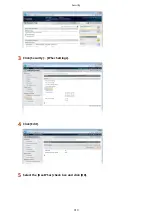
Страница 309: ...3 Click Security IPSec Settings 4 Click IPSec Policy List 5 Click Register IPSec Policy Security 303 ...
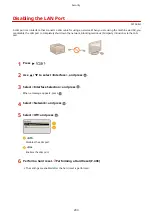
Страница 316: ...3 Click Security IPSec Settings 4 Click Edit 5 Select the Use IPSec check box and click OK Security 310 ...
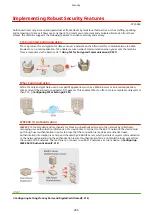
Страница 334: ...Using TLS for Encrypted Communications P 297 Configuring IPSec Settings P 301 Security 328 ...
Страница 344: ...Using Remote UI 338 ...
Страница 359: ...LINKS Remote UI Screens P 339 Using Remote UI 353 ...
Страница 383: ...Paper Source 0YSF 05E See Select Feeder Menu P 500 Setting Menu List 377 ...
Страница 516: ...Troubleshooting 510 ...
Страница 600: ...LINKS Utility Menu P 491 Job Menu P 496 Maintenance 594 ...
Страница 611: ...Third Party Software 0YSF 090 Appendix 605 ...
Страница 630: ...Appendix 624 ...
Страница 651: ...Manual Display Settings 0YSF 091 Appendix 645 ...
Страница 675: ...Scalable Fonts PCL Appendix 669 ...
Страница 676: ...Appendix 670 ...
Страница 677: ...Appendix 671 ...
Страница 678: ...OCR Code Scalable Fonts PCL Bitmapped Fonts PCL Appendix 672 ...
Страница 701: ... 16 MD4 RSA Data Security Inc MD4 Message Digest Algorithm ...
Страница 712: ... 27 including the GNU Public Licence ...
Страница 736: ... 51 SOFTWARE ...
Страница 749: ...Search Enter keyword s here 1 ...
Страница 752: ...2 ...
Страница 759: ...3 Click Manual Installation 4 Click Browse select the license file and the application file to install click Next 9 ...
Страница 762: ...12 ...
Страница 768: ...3 Click Delivered Update 4 Click Apply Firmware 5 Confirm the firmware to apply click Yes 5 ...
Страница 770: ...3 Click Delivered Update 4 Click Delete Firmware 7 ...
Страница 773: ...5 Confirm the information of the scheduled delivery click Yes The scheduled delivery is deleted 10 ...
Страница 783: ... 1 Whole contents Shows the all chapters and sections of this guide Click an item to view the contents Site Map 6 ...
Страница 789: ...Search Enter keyword s here 1 ...
Страница 810: ...Starting MEAP Applications Stopping MEAP Applications Starting Stopping MEAP Applications 10 ...
Страница 813: ...When the restart prompt message is displayed Follow the on screen instructions to restart the printer 13 ...
Страница 818: ...4 Click License Management 5 18 ...
Страница 821: ...4 Click License Management 5 21 ...
Страница 822: ...Click Disable 6 Click Yes The license file is disabled 22 ...
Страница 824: ...4 Click License Management 5 24 ...
Страница 825: ...Click Download 6 Follow the on screen instructions and specify a file storage directory The license file is saved 25 ...
Страница 827: ...4 Click License Management 5 27 ...
Страница 828: ...Click Delete 6 Click Yes The license file is deleted 28 ...
Страница 830: ...4 Click Authentication Information Settings 5 30 ...
Страница 832: ...When cancelling authentication information Click Delete 32 ...
Страница 835: ...4 The display order changes 1 Move the applets up and down by clicking Up and Down 2 Click Update 3 ...
Страница 837: ...5 ...
Страница 846: ...14 ...
Страница 847: ...Checking System Information Checking Application Information Checking License Files Checking Information 15 ...
Страница 849: ...17 ...
Страница 855: ...4 Click Yes The setting information of the application is deleted 23 ...
Страница 858: ...4 Follow the on screen instructions and specify a file storage directory The log file is saved 26 ...
Страница 860: ...4 Click Yes The log data is deleted 28 ...
Страница 889: ... 1 Whole contents Shows the all chapters and sections of this guide Click an item to view the contents Site Map 6 ...


