background image

27

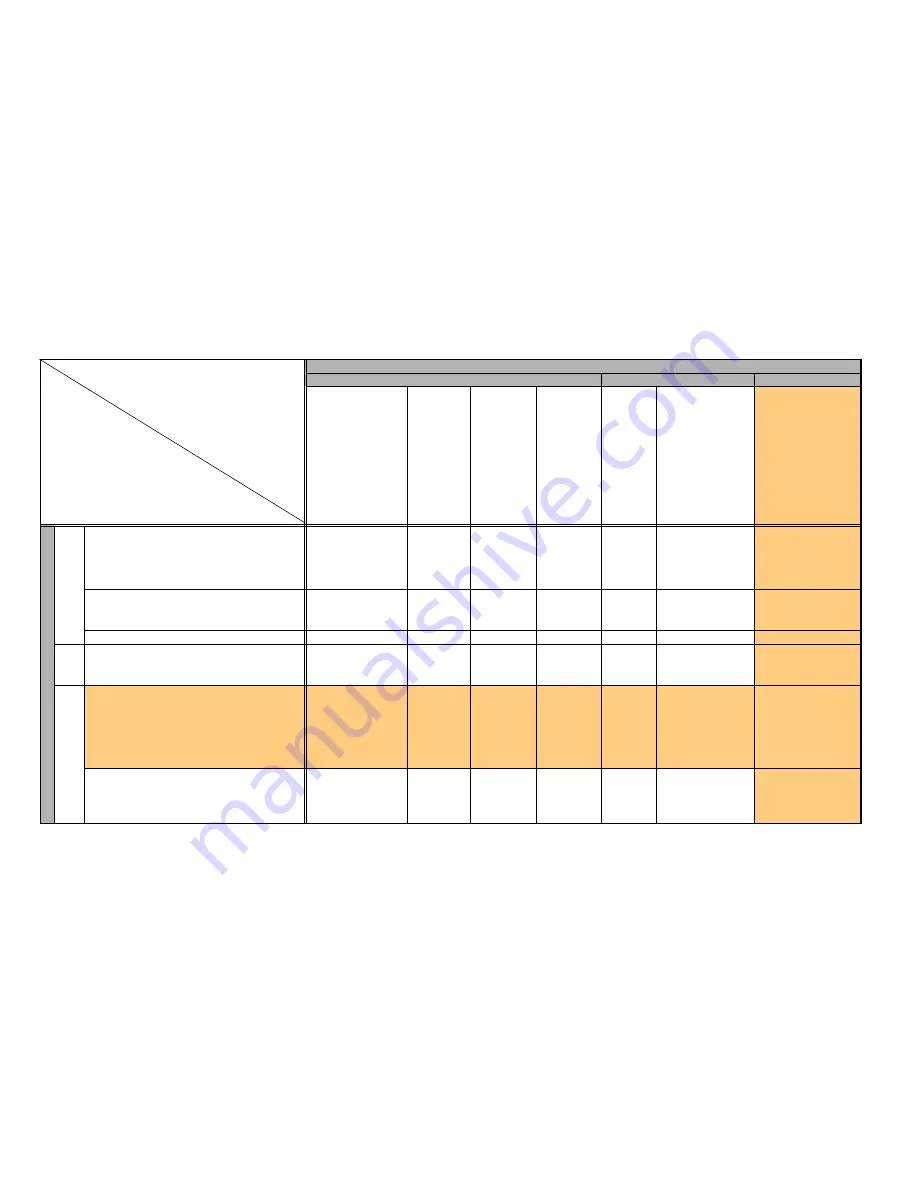
3-5 Playback Compatibility

3-5-1 Still Images

Cameras for playback (except SLR cameras)

CF card

SD memory card

SD•MMC

*

ID 400/320/300a/300/
200a/200, IXY DIGITAL

PS S20/S10

PS A70/A60/A40/A30/
A20/A10/A300/A200/
A100

PS G3/G2/G1

PS Pro90 IS

PS S50/S45/
S40/S30

PS Pro1

PS G6/G5

PS S70/S60

ID 500/450

PS S1 IS

PS A95/A85/
A80/A75/A310

ID 30

ID 600/55/50/40/
30a/L

2

/L

PS S2 IS

PS A400

ID 90/10
PS TX1
PS A570 IS/A560/A550/
A460/A450

ID 1000/900 IS/800 IS/
700/80/70/60/L

4

/L

3

/

WIRELESS

PS G7
PS S3 IS/S80

PS A710 IS/A700/A640/
A630/A620/A610/A540/
A530/A520/A510/A430/
A420/A410

C

a

meras for 

shoot

ing (

e

xcept SLR

 camer

a

s) CF

ID 500/450/400/320/300a/300/200a/200, IXY DIGITAL

PS S1 IS

PS S20/S10

PS A95/A85/A80/A75/A70/A60/A40/A30/A20/A10/
A310/A300/A200/A100

O

O

O

O

‡

‡

‡

PS G6/G5/G3/G2/G1

PS Pro90 IS

PS S70/S60/S50/S45/S40/S30

O

*1

O

O

O

*1

‡

*1

‡

*1

‡

*1

PS Pro1

O

*1*2

O

*2

O

O

*1

‡

*1*2

‡

*1

‡

*1

SD

ID 600/55/50/40/30a/30/L

2

/L

PS S2 IS

PS A400

‡

‡

‡

‡

O

O

O

SD
MMC

*

ID 90/10
PS TX1
PS A570 IS/A560/A550/A460/A450

ID 900 IS/800 IS/700/80/70/60/L

4

/L

3

/WIRELESS

PS S3 IS

PS A710 IS/A700/A620/A610/A540/A530/A520/
A510/A430/A420/A410

‡

‡

‡

‡

O

*3

O

*3

O

ID 1000

PS G7

PS S80

PS A640/A630

‡

*2

‡

*2

‡

‡

O

*2*3

O

*3

O

*1

Thumbnail is displayed for RAW image

*2

JPEG file can be played-back up to 3200 x 2400 pixels (Thumbnail displays when more than 3200 x 2400 pixels)

*3

Images recorded in the MultiMediaCard may not be played-back. 

*

MultiMediaCard

PS : PowerShot
ID : IXY DIGITAL (The model names of IXY are for Japanese market)

: Playback available

‡

:  Playback available when interchange of memory cards

Содержание Ixy Digital 90

Страница 1: ......

Страница 2: ... the reading should be between 1MΩ and 5 2MΩ When the exposed metal does not have a return path to the chassis the reading must be 4 2 Leakage Current Hot Check 1 Plug the AC cord directly into the AC outlet Do not use an isolation transformer for this check 2 Connect a 1 5KΩ 10 watt resistor paralleled by 0 15µF capacitor between each exposed metallic parts on the unit and a good earth ground suc...

Страница 3: ...product names service marks are generally either registered or unregistered marks of their respective owners Copyright All copyrights in the content of this Service Manual are owned or controlled by Canon Inc You are not permitted to copy reproduce download modify adapt or translate in any way the content of this Service Manual for any purpose other than the purpose contemplated herein without pri...

Страница 4: ...6 view Diagram 7 2 3 Nomenclature 9 3 Specifications 3 1 Product Specifications 11 3 2 System Diagram 21 3 3 Shooting Setting Features List 23 3 4 Direct Print 24 3 5 Playback Compatibility 27 3 6 List of Accessory and Its Compatibility 29 4 Accessory Specifications 4 1 Waterproof Case 33 4 2 Main Unchanged Accessories 36 ...

Страница 5: ... for getting optimum face brightness during flash photography Selected ISO speed is displayed on the LCD monitor Effective speed is displayed when pressing the shutter button halfway while Auto or High ISO Auto is selected The raised ISO speed in 1 3 stop increments is displayed when using the Auto ISO shift Auto ISO shift increases ISO speed to shutter speed without camera shake with just one pus...

Страница 6: ...ific images based on keywords or categories My Colors enables customization of the color palette for the subject during playback Transition adds fade in and fade out effects when switching between playback images Slide Show enables playback of images grouped by folder shooting date and other conditions Still Images Movies Resume Playback starts playback from last viewed image still image or frame ...

Страница 7: ...es memory card performance SDHC memory card support for high volume shooting both still images and movies UI display available in 25 languages Models for Japanese market available in 2 languages Japanese and English Compact body with even lower profile New Edge design with distinct Solid Form and two color variations for circular section modern black futuristic silver IXY DIGITAL 90 Back to basics...

Страница 8: ...ireworks Underwater Color Accent Color Swap Digital Zoom Still images Movies Approx 4 0x up to approx 12x in combination with the optical zoom Safety Zoom Still images Movies Approx 4 0x up to approx 12x in combination with the optical zoom My Colors My Colors Off Vivid Neutral Sepia Black White Positive Film Lighter Skin Tone Darker Skin Tone Vivid Blue Vivid Green Vivid Red Custom Continuous Sho...

Страница 9: ...orks Underwater Color Accent Color Swap Digital Zoom Still images Movies Approx 4 0x up to approx 12x in combination with the optical zoom Safety Zoom Still images Movies Approx 4 0x up to approx 12x in combination with the optical zoom My Colors My Colors Off Vivid Neutral Sepia Black White Positive Film Lighter Skin Tone Darker Skin Tone Vivid Blue Vivid Green Vivid Red Custom Continuous Shootin...

Страница 10: ...6 2 Exterior 2 1 Exterior Photos IXY DIGITAL 90 Black model Silver model IXY DIGITAL 10 Black model Silver model ...

Страница 11: ...7 2 2 6 view Diagram IXY DIGITAL 90 Unit mm inch Nominal Dimensions 91 6 3 61 19 6 0 77 56 8 2 24 ...

Страница 12: ...8 IXY DIGITAL 10 85 9 3 38 19 4 0 76 53 5 2 11 Unit mm inch Nominal Dimensions ...

Страница 13: ...9 2 3 Nomenclature IXY DIGITAL 90 ...

Страница 14: ...10 IXY DIGITAL 10 ...

Страница 15: ...0 Scene Excluding Fireworks and Kids Pets 2 Can not be selected in auto Optical Viewfinder IXY DIGITAL 10 only Type Real image zoom viewfinder Picture Coverage Not disclosed Eyepoint 16 mm 0 63 in Dioptric Adjustment Not available Electronic Viewfinder Not available Shooting Mode Max Wide Angle Max Telephoto Focusing Range Image Area at the Minimum Focusing Distance Image Magnification Focusing Ra...

Страница 16: ...eighted average Spot 2 1 Control to incorporate facial brightness in Face Detect AF 2 Fixed to center Manual Exposure Not available AE Lock Available Shooting standby only in movie mode Exposure Compensation Still images 2 stops in 1 3 stop increments Exposure Shift Movies 2 stops in 1 3 stop increments Shooting standby only Program Shift Not available Safety Shift Not available ISO Speed Standard...

Страница 17: ...Flash Output Compensation Not available Manual Flash Output Setting Not available FE Lock Available Red eye Reduction Available Slow Synchro Available Second curtain Synchro Not available Safety FE Not available External Not available Auxiliary Recommended Flash High Power Flash HF DC1 Mounting Method Mount to the supplied bracket using tripod socket Trigger System Detects the flash light from the...

Страница 18: ...een detected by Face Detect AF People is always selected regardless of the shooting mode Image Stabilizer Not available Camera Start up Time Release Time Lag IXY DIGITAL 90 IXY DIGITAL 10 When the flash is off Self timer Shooting Approx 10 sec approx 2 sec delay or custom Still images only Shooting start time 0 10 sec in one second increments 15 sec 20 sec 30 sec and number of shots 1 10 shots in ...

Страница 19: ...ntinuous shooting is available when the shutter button is still pressed However the shooting speeds will decrease Interval Shooting Available Movies Modes Standard Fast Frame Rate Compact Color Accent Color Swap Time Lapse Audio Specifications Audio Functions Sound Memos also available during rec review Sound Recorder Quantization Bit Rate 16 bit Sampling Rate Movies 44 100 kHz except Compact 11 0...

Страница 20: ...calculated by using the figures for 512 MB as a reference and extrapolating accordingly 1 Postcard Date Imprint mode is available 2 Memory card included with the camera Movies Recording Pixels Frame Rate Plays back at 15 fps Unit pixels Large 3072 x 2304 Medium 1 2592 x 1944 Medium 2 2048 x 1536 Medium 3 1600 x 1200 Small 640 x 480 Postcard Date Imprint 1600 x 1200 Widescreen 3072 x 1728 Unit imag...

Страница 21: ...n be calculated by using the figures for 512 MB as a reference and extrapolating accordingly Memory card included with the camera Low Level Format Standard Color Accent Color Swap Fast Frame Rate Compact Time Lapse 640 x 480 320 x 240 320 x 240 160 x 120 640 x 480 30 fps 15 fps 30 fps 15 fps 60 fps 15 fps 1 sec interval 2 sec interval 32 MB SDC 128M 29 sec 1 min 3 min SDC 512MSH 1 min 3 min Standa...

Страница 22: ... Movie By 10 images By 100 images Playback with a selected search key Jumps to the next set of nine images each time button is pressed during index playback Histogram Shooting Not available Playback Available Overexposure Warning Not available Slide Show Playback interval 3 10 sec 15 sec 30 sec Repeat Available Playlist All Images Date My Category Folder Movies Stills Custom 1 3 Only images with D...

Страница 23: ...ic Romanian Ukrainian and Japanese Models for Japanese market available in 2 languages Japanese and English My Camera Selectable Items Start up image start up sound operation sound self timer sound shutter sound Number of Choices 3 choice Off is also selectable 1 Canon s original images and sounds Cannot be customized 2 Customizable by the user 3 Customizable by the user The 2nd option features sc...

Страница 24: ...er CA DC10 DC Coupler DR 10 is required Car Battery Adapter Not available Sub battery MS lithium secondary battery MS614S Charging Time Approx 4 hours charged from main battery Duration Approx 2 weeks after removal from the fully charged main battery Battery Capacity Number of Images Shot Playback Time Approx 4 hours Power Saving Function Auto Power Down when in idle Available Shooting mode Approx...

Страница 25: ...able AVC DC300 1 1 Also available for purchase separately 2 See the user guide supplied with the printer for more information on the printer 3 This camera can also be connected to the Card Photo Printer CP 10 CP 100 CP 200 CP 300 4 See the user guide supplied with the Bubble Jet printer for more information on the printer and inter face cables 5 Not sold in some regions AC Adapter Kit ACK DC10 Can...

Страница 26: ...Cable AVC DC300 1 1 Also available for purchase separately 2 See the user guide supplied with the printer for more information on the printer 3 This camera can also be connected to the Card Photo Printer CP 10 CP 100 CP 200 CP 300 4 See the user guide supplied with the Bubble Jet printer for more information on the printer and inter face cables 5 Not sold in some regions AC Adapter Kit ACK DC10 Ca...

Страница 27: ...r of recording pixels selection still images 2 2 Compression selection still images 640 480 30 fps 15 fps 320 240 30 fps 15 fps 320 240 60 fps 160 120 15 fps AE FE Lock Exposure Shift AF Lock Focusing zone Normal Macro Infinity Flash Auto On Off LCD Monitor off LCD Monitor no infomation LCD Monitor infomation view Stitch Direction Selection Right Left AiAF Off On 9 point Face Detect Digital Zoom 3...

Страница 28: ... 4 or 8 images on a single sheet of paper 8 can only be selected when printing on credit card size paper 8 Prints by specifying the print size of the image on a sheet of paper For the paper size and the print size refer to the direct print user guide 9 Only available with cameras supporting Movie Print in single frames function 10When the print type is set to Index the Date and File Number cannot ...

Страница 29: ... Off O O O O O O O O O VIVID NR VIVID NR U 2 O O O O O O O Face brightness adjustment O O O O Red eye1 correction 3 O Red eye2 correction 4 O O Setting the Number of Copies 5 O O O O O O O O O Setting the Print Area Trimming O O O O O O O O O Selecting the Paper Size 6 O O O O O O O O O Selecting the Paper Type 7 O O O O O O O O O Setting the Layout Borderless Bordered O O O O O O O O O N up 8 O 9...

Страница 30: ...t CP 200 300 CP220 330 Canon Direct Print PictBridge Canon Direct Print SELPHY CP series Canon Direct Print PictBridge support CP730 720 710 510 CP500 400 ES1 CP600 PictBridge PIXMA series Bubble Jet Direct support PIXMA series Bubble Jet Direct PictBridge support PictBridge Bubble Jet Direct SELPHY DS series Bubble Jet Direct PictBridge support Other manufacturer s Printer PictBridge support IXY ...

Страница 31: ...AL PS S1 IS PS S20 S10 PS A95 A85 A80 A75 A70 A60 A40 A30 A20 A10 A310 A300 A200 A100 O O O O PS G6 G5 G3 G2 G1 PS Pro90 IS PS S70 S60 S50 S45 S40 S30 O 1 O O O 1 1 1 1 PS Pro1 O 1 2 O 2 O O 1 1 2 1 1 SD ID 600 55 50 40 30a 30 L2 L PS S2 IS PS A400 O O O SD MMC ID 90 10 PS TX1 PS A570 IS A560 A550 A460 A450 ID 900 IS 800 IS 700 80 70 60 L4 L3 WIRELESS PS S3 IS PS A710 IS A700 A620 A610 A540 A530 A...

Страница 32: ...5 A85 A80 A75 A70 A60 A310 A300 O 1 O 1 O O PS S1 IS O SD ID 30a 30 L2 L PS 400 1 1 O O O O O O O ID 600 55 50 40 O O O O O PS S2 IS O O O O SD MMC PS A520 A510 1 1 O 2 O 2 O O O O O PS A550 A460 A450 ID 800 IS 700 80 70 60 L3 WIRELESS PS S3 IS except 320 x 240 60 fps S80 except XGA PS A710 IS A700 A640 A630 A620 A610 A540 A530 A430 A420 A410 O 2 O O O O PS S3 IS 320 x 240 60 fps O O O PS S80 XGA ...

Страница 33: ...IS G1 Battery NB 5H NB 1L 1LH O O O O NB 2L 2LH O O O O NB 3L O O NB 4L O O NB 5L O BP 511 511A O O O O O O BP 512 514 O O O O NB4 100 NB4 200 O O O O O O O O O O NB4 300 O O O O O O O O O O Adapter Charger 100E DK110 ACK300 O ACK500 O O O ACK600 O O O O ACK900 O ACK700 O O ACK800 O O O O ACK DC10 O ACK DC20 O O ACK DC30 O CA DC20 O CA PS700 N O O O CA 560 O O O O O O CA 570 CG 560 570 O O O O O O...

Страница 34: ... LA DC58F O LA DC58G O LA DC58H O LA DC10 O LA DC20 O FA DC58A O LH DC58 O LH DC10 O LH DC20 O LH DC30 O LH DC40 O LAH DC20 O O LAH DC10 O Speedlite 220EX O O O O O O O 380EX O O O O O O 420EX O O O O O O 430EX O 550EX O O O O O O 580EX O O MR 14EX O O O O PS PS PS TX1 PS ID PS ID PS PS PS ID ID PS PS PS PS PS ID PS PS PS PS ID ID PS PS ID PS PS A570 IS A560 A550 A540 A530 A520 A510 A460 A450 A420...

Страница 35: ...O O O O O O DIF B250 O except 200 O All Weather Case Waterproof Case Waterproof Case Weight AW PS200 O 200 O AW DC10 O AW DC20 O 400 AW DC30 O 55 50 40 AW DC40 O AW DC50 O 60 WP DC100 O 300 WP DC200 O 20 10 WP DC200s O WP DC300 O WP DC400 O 200 100 WP DC500 O 300a WP DC600 O except 200 WP DC700 O 70 60 WP DC800 O WP DC900 O 80 WP DC10 O 30a 30 WP DC20 O WP DC30 O 85 75 WP DC40 O WP DC50 O 95 WP DC...

Страница 36: ...O O O O O O O O O O KC 18IL O O O O O O O O O O KC 18IF O O O O O O O O O O KW 24IP O O O O O O O E P50 E P100 O E L50 E L100 O E C25 O E C25L O E P25BW O Cable DIF 100 O O DIF 200 O O IFC 200PCU O O O O O O O O O O IFC 300PCU O O O O O O O O O O IFC 400PCU O O O O O O O O O O Power Supply CA CP100 O O O O O O CBA CP100 O O O O CA CP200 O O O O O CA ES100 O NB CP1L O O O NB CP2L O O O O O O NB ES1...

Страница 37: ...lycarbonate body etc ABS controls clear plate glass lens window acrylic diffusion plate stainless steel springs etc EPDM seal etc Controls All buttons and controls Printing operation with the Print Share button is not available Supplied Accessories Neck strap wrist strap and silicon grease Remarks Double paned glass lens window with anti reflection coating on both sides diffusion plate detachable ...

Страница 38: ... 40 C 32 104 F Dimensions excluding protrusions 128 5 x 87 3 x 61 9 mm 5 06 x 3 44 x 2 44 in Volume Approx 420 6 cm3 14 2 fl oz US 1 Weight Approx 280 g 9 88 oz Waterproof Case only 1 Approx 425 g 15 0 oz Waterproof Case 1 and cam era body 2 Number of Separately Sold Waterproof Case Weights WW DC1 Recommended for Mounting 0 weight Unit mm inch 128 5 5 06 87 3 3 44 61 9 2 44 ...

Страница 39: ...0 40 C 32 104 F Dimensions excluding protrusions 129 1 x 89 2 x 60 7 mm 5 08 x 3 51 x 2 39 in Volume Approx 425 cm3 14 4 fl oz US 1 Weight Approx 280 g 9 88 oz Waterproof Case only 1 Approx 430 g 15 2 oz Waterproof Case 1 and cam era body 2 Number of Separately Sold Waterproof Case Weights WW DC1 Recommended for Mounting 0 weight 129 1 5 08 89 2 3 51 Unit mm inch 60 7 2 39 ...

Страница 40: ...in Weight Approx 17 g 0 60 oz CB 2LV CB 2LVE Rated Input 100 240 V AC 50 60 Hz 0 1 A 100 V 0 06 A 240 V Rated Output 4 2 V DC 0 65 A Charging Time Approx 1 hr 30 min a case of NB 4L Charge Indicator Charging Orange Full charged Green Operating Temperatures 0 40 C 32 104 F Dimensions 53 0 x 86 0 x 19 5 mm 2 09 x 3 39 x 0 77 in Weight Approx 60 g 2 12 oz Approx 55 g 1 94 oz excluding power cord Rate...

Страница 41: ... trade marks of Adobe Systems Incorporated in the United States of America and or other countries All other trademarks product names service marks are generally either registered or unregistered marks of their respective owners Copyright All copyrights in the content of this Service Manual are owned or controlled by Canon Inc You are not permitted to copy reproduce download modify adapt or transla...

Страница 42: ...1 2 Troubleshooting 2 1 When an Error Code is Displayed 2 2 2 When a Problem Occurs 3 2 3 Simplified Troubleshooting 4 2 3 1 If the Power cannot be Turned On 4 2 3 2 If the Flash does not Work 4 2 3 3 If the LCD Display is Abnormal 4 3 FUSE 3 1 List of Fuses Used 5 3 2 Positions of Fuses Used 5 ...

Страница 43: ...rge control 9 Audio signal processing 1 2 FLASH UNIT 1 Flash driving and charging 2 Speaker 1 3 OPERATION ASS Y 1 Rear switches 2 Signal transfer from the MAIN P C B to the LCD UNIT 3 Lens unit control 4 Shutter power switch and battery cover opening closing detection switch PowerShot SD750 DIGITAL IXUS 75 PowerShot SD1000 DIGITAL IXUS 70 1 1 MAIN PCB ASS Y 1 3 OPERATION FPC ASS Y 1 2 FLASH UNIT 1...

Страница 44: ...When communication between CPU and peripheral IC is not completed within the specified time during recording using EVF or after completion of recording Movement of the lens barrel does not end within the specified time When the Memory Card becomes full during writing of photographed images to Memory Card writing is repeatedly performed with the JPEG compression ratio successively increased to redu...

Страница 45: ...PERATION FPC ASS Y FLASH UNIT MAIN PCB ASS Y MAIN PCB ASS Y MAIN PCB ASS Y USB Connector MAIN PCB ASS Y Memory CARD OPERATION FPC ASS Y MAIN PCB ASS Y Defect position Problem when an error code is not displayed Reference FU601 BATTERY COVER deformation POWER SW cannot be turned on POWER BUTTON cannot be turned on BATTERY CARD SLOT OPEN DETECT SW cannot be turned on The power of the camera does not...

Страница 46: ...On Procedure Check point 1 Conceivable cause Remove the front cover and the rear cover Reinsert the flexible board that connects MAIN PCB ASS Y and FLASH UNIT 2 If the flash operates properly after reinsertion the flexible board connection is defective 1 2 Procedure Check point Conceivable cause Turn the power on Enter the shooting mode with LCD display ON and check the display on the LCD When the...

Страница 47: ...0 E2 E11 LAT 1 fuse is used for this product PowerShot SD750 1000 and DIGITAL IXUS 75 70 FUSE FU601 PARTS NO VD7 3642 501 Mounted PCB MAIN PCB ASS Y NOTE for BATTERY PowerShot SD750 1000 and DIGITAL IXUS 75 70 MAIN P C B ASS Y COMPONENT SIDE CN601 L609 L606 R624 C606 R613 C619 C620 C602 C601 C621 FU601 VD7 3642 501 PowerShot SD750 1000 and DIGITAL IXUS 75 70 ...

Страница 48: ...a and or other countries All other trademarks product names service marks are generally either registered or unregistered marks of their respective owners Copyright All copyrights in the content of this Service Manual are owned or controlled by Canon Inc You are not permitted to copy reproduce download modify adapt or translate in any way the content of this Service Manual for any purpose other th...

Страница 49: ...4 2 3 Disassembly of REAR COVER UNIT SIDE COVER 6 2 4 Disassembly of CROSS KEY UNIT ANALOG KEY 8 2 5 Disassembly of FRONT COVER UNIT 10 2 6 Disassembly of LCD UNIT 12 2 7 Disassembly of TOP BASE UNIT 14 2 8 Disassembly of OPERATION FPC ASS Y 16 2 9 Disassembly of MAIN PCB 20 2 10 Separation of FLASH UNIT OPTICAL UNIT 22 2 11 Disassembly of MAIN CHASSIS UNIT 24 2 12 Disassembly of OPTICAL UNIT 26 2...

Страница 50: ...age circuit 1 2 List of Tools The following tools are used for the re assembling during service List of tools New Name of tools Part No Remarks Screwdriver Local Purchase Tweezers Local Purchase 1 3 List of Supplies The following supplies are used for the re assembling during service List of supplies New Name of supplies Part No Remarks ADHESIVE TAPE SONY T4000 CY4 6012 000 Double sided tape 0 15m...

Страница 51: ... FPC board is equipped with holes as shown Use them for removal and insertion by inserting the tweezers into them as required Fig 2 Connectors for FPC board Fig 3 Holes for removal LOCK UNLOCK The contact piece should face downwards Unlocked state Locked state Unlocked state Locked state 1 Type A 2 Type B 3 Type C 4 Type D Holes Unconnected state Connected state The contact piece should face upwar...

Страница 52: ... 6 2 2 BATTERY COVER DC COVER P 4 2 7 TOP BASE UNIT P 14 2 6 LCD UNIT P 12 BASE STRAP COVER DUST PREVENTION SHEET MICROPHONE CUSHION P 10 BATTERY FPC ASS Y BATTERY FPC CUSHION BATTERY BOX P 24 JACK COVER P 14 KEY SHEET P 16 LITHIUM ION BATTERY P 20 FLASH FPC CUSHION P 22 GEAR 2 GEAR 3 GEAR 4 GEAR 5 GEAR 6 P 27 FRONT CAP BARRIER CAP TAPE BARRIER COVER BARRIER PLATE BARRIER CLOSE SPRING BARREL DRIVE...

Страница 53: ...COVER 1 Open the BATTERY COVER 2 Detach the BATTERY COVER and DC COVER in subassembly form by turning them in the direction of the arrows 3 Detach the DC COVER from the BATTERY COVER 2 3 DC COVER BATTERY COVER 1 Slide 2 Turn them to remove ...

Страница 54: ...5 Note on Reassembling 1 Attach the BATTERY COVER and DC COVER as shown in the figure below Note on Reassembling 1 DC COVER BATTERY COVER 2 Push in 1 Insert ...

Страница 55: ... disengage two claws Aand detach the SIDE COVER 3 Disengage the claws B C D and then detach the REAR COVER UNIT CD3 5786 000 3 0mm SILVER M1 7 a CD3 7756 000 3 0mm BLACK M1 7 b CD3 7753 000 3 0mm BLACK M1 7 c CD3 7754 000 3 0mm BLACK M1 7 d SIDE COVER SIDE COVER REAR COVER UNIT Claw A 2 3 1 a 1 c 1 d 1 b Claw A Claw D Claw B Claw C Move aside ...

Страница 56: ... the SIDE COVER as shown in the figure below Note on Reassembling 1 1 1 E REAR COVER UNIT Engage the claw D 2 Prevent the section E from entering the main unit and 3 Push in the claws B and C Claw C Claw B Claw D 2 Insert claw A 1 Move aside 3 Push in REAR COVER UNIT Note on Reassembling 2 ...

Страница 57: ...of CROSS KEY UNIT ANALOG KEY 1 Disengage the dowels A 2 and B 2 and then detach the CROSS KEY UNIT 2 Disengage the CN101 and two dowels B and then detach the ANALOG KEY 2 CN101 1 ANALOG KEY CROSS KEY UNIT Dowel A Dowel B ...

Страница 58: ... the CN101 engage with the dowel A and lock the CN101 2 Engage the CROSS KEY UNIT with the lower dowels A and B first then with the upper dowels A and B Note on Reassembling 1 Note on Reassembling 2 2 2 1 2 CN101 1 ANALOG KEY Dowel A Dowel A CROSS KEY UNIT Dowel A Dowel B ...

Страница 59: ...ER UNIT 1 Disengage the claw and then detach the FRONT COVER UNIT and BASE STRAP COVER 2 Detach the DUST PREVENTION SHEET and MICROPHONE CUSHION 1 2 2 1 DUST PREVENTION SHEET BASE STRAP COVER MICROPHONE CUSHION FRONT COVER UNIT Claw ...

Страница 60: ...RONT COVER UNIT should not enter the MAIN CHASSIS UNIT Push in the claw 3 MAIN CHASSIS UNIT BASE STRAP COVER FRONT COVER UNIT side 1 With the screw holes aligned in the direction shown in the figure attach the FRONT COVER UNIT while holding the BASE STRAP COVER with a finger Attach the BASE STRAP COVER in the direction shown in the figure ...

Страница 61: ...t the CN4001 disengage the dowel and claws A and B and slightly set the LCD UNIT away from the main unit 2 Disconnect the CN502 and then detach the LCD UNIT XA1 7170 307 3 0mm SILVER M1 7 e 1 1 2 CN4001 CN4001 CN502 Claw A Claw B 1 e LCD UNIT LCD FPC LCD FPC Dowel ...

Страница 62: ...t position Claw A Claw A Claw B Dowel Dowel 3 Push in 1 Insert to CN502 CN502 2 Insert Claw B 3 Holding the screw hole section push in the LCD UNIT to engage with the dowel and the claw A 3 Holding the screw hole section LCD UNIT Insert Insert Insert Insert to CN4001 4 LCD FPC LCD FPC LCD FPC Attachment reference Attachment reference CN4001 Attach the double sided tape 0 06 4 9 mm within the marki...

Страница 63: ...R in a subassembly form Note When detaching attaching the TOP BASE UNIT be careful not to deform or damage the armatures 2 Detach the JACK COVER from the TOP BASE UNIT XA1 7170 307 3 0mm SILVER M1 7 e Note 1 TOP BASE UNIT JACK COVER 2 1 e 1 Rise 2 Slide and remove the JACK COVER Tweezers Claw 1 2 Armatures ...

Страница 64: ...n the figure below 2 Attach the TOP BASE UNIT as shown in the figure below Note on Reassembling 1 Note on Reassembling 2 Claw JACK COVER Insert 2 Push in 1 Push in TOP BASE UNIT JACK section The JACK COVER is omitted Push in the JACK section first then the TOP ...

Страница 65: ...EY SHEET is not allowed 2 Disconnect the CN1002 disengage the dowels B A and C and the hook then slightly set the OPERATION FPC ASS Y away from the main unit 3 Disconnect the CN102 and then detach the OPERATION FPC ASS Y 2 OPERATION FPC ASS Y KEY SHEET 2 1 3 3 Dowel C Dowel B Dowel A Hook Hook CN102 CN1002 Tweezers ...

Страница 66: ... Note on Reassembling 1 Make the service part OPERATION FPC ASS Y remain folded at the positions marked in the figure Note on Reassembling 1 Folded in a crest form 1 Folded in a trough form 2 1 1 1 1 1 2 ...

Страница 67: ...e on Reassembling 2 Dowel C Dowel A Dowel B Hook CN1002 LED SPEAKER CABLE CN102 3 Engage the dowel B connect to the CN1002 and attach the OPERATION FPC ASS Y 2 Insert th dowels C and A 1 Insert the SPEAKER CABLE into the CN 102 and fix the connector section to the hook ...

Страница 68: ...19 3 Attach the KEY SHEET at the positions shown in the figure below Note on Reassembling 3 Dowel A Position with respect to the dowel A and attach the KEY SHEET KEY SHEET ...

Страница 69: ... CN1001 B to B and then detach the MAIN PCB Note Be careful not to damage the Cover Open Detect switch 2 Detach the LITHIUM ION BATTERY from the MAIN PCB XA1 7170 307 3 0mm SILVER M1 7 e Note Cover Open Detect SWITCH 1 1 1 1 2 LITHIUM ION BATTERY 1 1 e CN601 B to B CN1001 B to B CN702 CN501 CN2001 CN3001 ...

Страница 70: ...RY FPC CN702 Rib Boss CN1001 1 Disengage the FLASH FPC OPTICAL UNIT FPC CCD FPC and BATTERY FPC and insert the CN1001 section into the MAIN PCB Position with respect to the boss and the rib and attach the MAIN PCB 2 Insert the CCD FPC into the CN2001 with both hands 4 Fix the screw 1 and 2 in this order 3 Using the pin for its center hole insert the OPTICAL UNIT FPC For preventing the elements on ...

Страница 71: ...e the FLASH UNIT from the OPTICAL UNIT and then detach the FLASH FPC CUSHION XA4 5140 307 f 3 0mm SILVER M1 4 SELF TAP 1 OPTICAL UNIT OPTICAL UNIT CCD FPC FLASH FPC CUSHION FLASH UNIT FLASH UNIT 2 2 Dowel A Dowel A 1 Lift 1 Slightly set the CCD FPC side of the OPTICAL UNIT away from the main unit and 2 Disengage the two dowels A 2 Disengage 2 Disengage 1 f 1 f 1 f 1 f 1 f ...

Страница 72: ...ote on Reassembling 1 Note on Reassembling 2 1 1 3 2 4 Position with respect to the two dowels B and fix screws 1 through 4 in this order 1 Engage the dowel on the light emitting side Light emitting section 2 Slightly spread the MAIN CHASSIS UNIT and 2 3 Spread 3 Engage the dowels A Dowel B Dowel B Dowel A Dowel A MAIN CHASSIS UNIT 1 ...

Страница 73: ...f the DOUBLE SIDED TAPE 0 15 3 5 10mm and then detach the BATTERY FPC ASS Y and BAT TERY FPC CUSHION Note Be careful not to damage the terminal of the BATTERY FPC ASS Y 1 MAIN CHASSIS 2 BATTERY FPC CUSHION N S 2 BATTERY BOX Terminal DOUBLE SIDED TAPE 0 15 3 5 10mm 1 N S N S N S Stands for No Stock 1 BATTERY FPC ASS Y ...

Страница 74: ...Y JACK Terminal Insert its terminal section and then its JACK section and then attach the BATTERY FPC ASS Y with double sided tape Pass the BATTERY BOX beneath the rib of MAIN CHASSIS and then attach it MAIN CHASSIS BATTERY FPC CUSHION BATTERY BOX Rib Rib SOLDER 6 Terminal Completely cover the soldering and the terminals BATTERY FPC ASS Y JACK ELECTRIC INSULATION TAPE 6 5 12 5mm DOUBLE SIDED TAPE ...

Страница 75: ...TAPE and then detach the OPTI CAL FPC s CONNECTOR section 3 Remove the DIABOND and then OPTICAL FPC s PHOTO INTERRUPTER section 2 3 2 CN3501 CN3501 CONNECTOR section CONNECTOR section PHOTO INTERRUPTER section PHOTO INTERRUPTER section 2 2 DOUBLE SIDED TAPE Dowel DIABOND 1663G Tweezers 1 N S 1 N S 1 N S 1 N S N S N S Stands for No Stock ...

Страница 76: ...RONT BARREL section 5 Detach the GEARs 6 5 2 4 and 3 Note Use your fingers or an air pin to detach attach the GEARs 5 5 5 4 5 5 GEAR 3 GEAR 2 GEAR 4 GEAR 5 GEAR 6 FRONT BARREL section Claw Spread the claws of the FRONT BARREL and detach it ...

Страница 77: ...ch the FRONT BARREL section with its claw side first Note on Reassembling 1 Note on Reassembling 2 3 GEAR 2 2 GEAR 4 1 GEAR 3 With its convex side facing downward 5 GEAR 6 With its convex side facing downward 4 GEAR 5 Claw Disengage Disengage FPC With the FPC set aside attach the FRONT BARREL section with its claw side first while taking care not to pinch the FPC ...

Страница 78: ...R section and CONNECTOR section as shown in the figure below Note on Reassembling 3 CN3501 DIABOND 1663G CONNECTOR section CONNECTOR section DOUBLE SIDED TAPE Dowel 1 Insert 2 Insert PHOTO INTERRUPTER section PHOTO INTERRUPTER section ...

Страница 79: ...R CAP TAPE and remove the FRONT CAP Note Be careful not to damage the FRONT CAP 3 Disengage four claws and then detach the BARRIER COVER BARRIER PLATE BARRIER CLOSE SPRING and BARREL DRIVE RING 1 3 2 2 Claw Claw FRONT CAP BARRIER CAP TAPE FRONT CAP BARRIER CAP TAPE BARRIER COVER BARRIER COVER BARRIER PLATE BARRIER CLOSE SPRING BARREL DRIVE RING Tweezers Tweezers etc 2 ...

Страница 80: ... BARRIER PLATE BARRIER PLATE SHAFT They should be in contact with each other here Dowel Engage the BARRIER CLOSE SPRING with the dowel of the BARREL DRIVE RING and insert the SHAFT of BARRIER PLATE into the shaft hole and attach the BARRIER PLATE Shaft hole Put the BARRIER PLATE and the BARRIER CLOSE SPRING together BARREL DRIVE RING BARREL DRIVE RING Claw Claw Insert the BARREL DRIVE RING in the ...

Страница 81: ...APE to it as shown in the figure Note on Reassembling 3 Note on Reassembling 4 FRONT CAP BARRIER CAP TAPE Claw Claw Claw Rib Rib BARRIER COVER Position with respect to the dowel and attach the FRONT CAP Push the claws of the BARRIER COVER in beneath the ribs to attach the BARRIER COVER Turn the BARRIER COVER and push it into place ...

Страница 82: ... of Screws CD3 5786 000 3 0mm SILVER M1 7 a CD3 7756 000 3 0mm BLACK M1 7 b CD3 7753 000 3 0mm BLACK M1 7 c CD3 7754 000 3 0mm BLACK M1 7 d XA1 7170 307 3 0mm SILVER M1 7 e XA4 5140 307 f 3 0mm SILVER M1 4 SELF TAP ...

Страница 83: ...a and or other countries All other trademarks product names service marks are generally either registered or unregistered marks of their respective owners Copyright All copyrights in the content of this Service Manual are owned or controlled by Canon Inc You are not permitted to copy reproduce download modify adapt or translate in any way the content of this Service Manual for any purpose other th...

Страница 84: ...eparation of CENTER COVER UNIT FRONT COVER UNIT 6 2 4 Disassembly of BATTERY COVER DC COVER 8 2 5 Separation of LCD UNIT 10 2 6 Separation of TOP BASE UNIT 12 2 7 Separation of OPERATION FPC ASS Y 14 2 8 Separation of FLASH UNIT 16 2 9 Disassembly of MAIN PCB 17 2 10 Separation of FINDER UNIT 19 2 11 Separation of OPTICAL UNIT 20 2 12 Disassembly of MAIN CHASSIS UNIT 21 2 13 Disassembly of OPTICAL...

Страница 85: ... circuit 1 2 List of Tools The following tools are used for the re assembling during service List of tools New Name of tools Part No Remarks Screwdriver Local Purchase Tweezers Local Purchase 1 3 List of Supplies The following supplies are used for the re assembling during service List of supplies New Name of supplies Part No Remarks ADHESIVE TAPE SONY T4000 CY4 6012 000 Double sided tape 0 15mm 6...

Страница 86: ... FPC board is equipped with holes as shown Use them for removal and insertion by inserting the tweezers into them as required Fig 2 Connectors for FPC board LOCK UNLOCK The contact piece should face downwards Unlocked state Locked state Unlocked state Locked state 1 Type A 2 Type B 3 Type C 4 Type D Unconnected state Connected state The contact piece should face upwards Unconnected state Connected...

Страница 87: ... UNIT FRONT COVER UNIT P 6 2 2 REAR COVER UNIT SIDE COVER P 4 2 7 OPERATION FPC ASS Y P 14 2 6 TOP BASE UNIT P 12 MICROPHONE CUSHION DUST PREVENTION SHEET P 6 BASE STRAP COVER P 4 BATTERY FPC ASS Y FPC CUSHION BATTERY BOX P 21 JACK COVER P 12 FPC CUSHION P 16 LITHIUM ION BATTERY P 17 FRONT CAP BARRIER CAP TAPE BARRIER COVER BARRIER PLATE BARRIER CLOSE SPRING BARREL DRIVE RING P 27 2 9 MAIN PCB P 1...

Страница 88: ...ER UNIT be careful not to damage the SPEAKER terminal CD3 8242 000 2 5mm SILVER M1 7 a CD3 8241 000 2 5mm BLACK M1 7 a CD3 7894 000 2 5mm SILVER M1 7 b CD3 7893 000 2 5mm BLACK M1 7 b Note Cross section of COVER claw Cross section of COVER claw SPEAKER terminal 1 b 1 b 1 a 1 a REAR COVER UNIT SIDE COVER UNIT BASE STRAP COVER 2 2 CENTER COVER REAR COVER TOP BASE UNIT REAR COVER ...

Страница 89: ...ODE LEVER Push in Push in 1 2 Push in the claw section 3 4 Press the SIDE COVER UNIT downward Pull the REAR COVER UNIT slightly outward and push in the SIDE COVER UNIT With the SIDE COVER UNIT slightly pressed downward fix it with screws Pull the REAR COVER UNIT slightly outward While slightly pressing down the section just above the claw push in the REAR COVER Insert the REAR COVER UNIT to beneat...

Страница 90: ...IT 2 Detach the DUST PREVENTION SHEET and MICROPHONE CUSHION CD3 3325 000 2 5mm SILVER M1 7 c Cross section of clow COVER claw section Tweezers Rise Remove them 1 CENTER COVER UNIT FRONT COVER UNIT MICROPHONE CUSHION DUST PREVENTION SHEET 1 2 1 c CENTER COVER CENTER COVER FRONT COVER FRONT COVER Claw section Claw section Claw section ...

Страница 91: ... BUTTON CENTER COVER UNIT FRONT COVER UNIT POWER BUTTON LED Insert Claw 2 INSULATION PCB SHEET 1 3 Section A While being careful about the POWER BUTTON and the POWER BUTTON LED position with respect to the dowel and attach the CENTER COVER UNIT Insert the fixing hole section Insert the INSULATION PCB SHEET section and cover the section A Insert the FRONT COVER UNIT to beneath the CENTER COVER UNIT...

Страница 92: ...COVER 1 Open the BATTERY COVER 2 Detach the BATTERY COVER and DC COVER in subassembly form by turning them in the direction of the arrows 3 Detach the DC COVER from the BATTERY COVER 2 3 DC COVER BATTERY COVER 1 Slide 2 Turn to remove them ...

Страница 93: ...ing 1 Attach the BATTERY COVER and the DC COVER as shown in the figure after attachment of all machine compo nents other than those that have been completed Note on Reassembling 1 Insert Push in DC COVER BATTERY COVER 2 1 ...

Страница 94: ...ew d 1 disconnect the CN4001 disengage the dowel and claw and slightly set the LCD UNIT away from the main unit 2 Disconnect the CN502 and then detach the LCD UNIT XA1 7170 257 2 5mm SILVER M1 7 d Dowel CN502 CN4001 CN4001 Claw LCD UNIT 1 d 2 2 1 1 ...

Страница 95: ... 2 Attach the LCD UNIT as shown in the figure below Note on Reassembling 1 Note on Reassembling 2 LCD FPC LCD FPC CN502 CN502 CN4001 DOUBLE SIDED TAPE 0 06 5 13mm Dowel Claw 4 3 2 1 1 Connect the CN502 2 position with respect to the dowel 3 push in the LCD unit to engage the claw and 4 connect the CN4001 and attach the LCD unit 5mm ...

Страница 96: ...and JACK COVER in a subassembly form Note When detaching attaching the TOP BASE UNIT be careful not to deform or damage the armatures 2 Disengage the claw B and then detach the JACK COVER Note 1 TOP BASE UNIT JACK COVER 2 1 2 Claw A Claw B Claw B Lift Slide and remove the JACK COVER Armatures ...

Страница 97: ...NIT as shown in the figure below Note on Reassembling 1 Note on Reassembling 2 Claw B Push in Push in JACK section JACK COVER TOP BASE UNIT The JACK COVER is omitted Claw A Push the TOP BASE UNIT against the main unit Push the JACK section against the main unit and push it in to engage with the claw A ...

Страница 98: ...NDER LED section peel off the DOUBLE SIDED TAPE disengage the two dowels A and two dowels B and disconnect the CN1002 in that order and then detach the OPERATION FPC ASS Y 1 1 OPERATION FPC ASS Y 1 1 CN1002 FINDER LED DOUBLE SIDED TAPE Dowel A Dowel B CN1002 ...

Страница 99: ...ION FPC ASS Y as shown in the figure below Note on Reassembling 1 1 OPERATION FPC ASS Y 2 2 3 4 CN1002 CN1002 FINDER LED DOUBLE SIDED TAPE Attach the Dowel B CN1002 Dowel A FINDER LED section and DOUBLE SIDED TAPE in that order 5 Dowel A Dowel B ...

Страница 100: ... UNIT as shown in the figure below XA4 5170 257 2 5mm SILVER M1 7 SELF TAP e Note on Reassembling 1 CN501 B to B CN1001 B to B 2 2 1 FLASH FPC MAIN CHASSIS FPC CUSHION 2 e Dowel FLASH UNIT Detach the FLASH UNIT with its lower side first So as not to damage the FLASH FPC insert the FLASH UNIT with its MAIN CHASSIS side first position with respect to the dowel and attach the FLASH UNIT ...

Страница 101: ...nd CN3001 and then detach the MAIN PCB Note Be careful not to damage the Cover Open Detect switch 2 Detach the LITHIUM ION BATTERY from the MAIN PCB XA1 7170 257 2 5mm SILVER M1 7 d Note Cover Open Detect SWITCH 1 MAIN PCB 1 2 LITHIUM ION BATTERY 1 1 d 1 d CN1601 B to B CN702 B to B CN3001 CN2001 ...

Страница 102: ...Y FPC OPTICAL FPC CCD FPC MAIN PCB Rib Boss Disengage Disengage Disengage Disengage the OPTICAL UNIT FPC CCD FPC and BATTERY FPC and position with respect to the boss and the rib and attach the MAIN PCB 1 Elements Elements CN3001 OPTICAL FPC Pin CCD FPC CN2001 2 3 Insert the CCD FPC into the CN2001 with both hands Using the pin for its center hole insert the OPTICAL UNIT FPC To prevent damage to t...

Страница 103: ...UNIT Note on Reassembling 1 Attach the FINDER UNIT as shown in the figure below XA4 9140 307 3 0mm SILVER M1 4 SELF TAP f Note on Reassembling 1 Dowel A Dowel A 1 f 1 FINDER UNIT Dowel A Dowel B Dowel B Push in Detach the FINDER UNIT from the dowel A side Push in the FINDER UNIT to engage with the dowels B and then with the dowel A ...

Страница 104: ...ICAL UNIT Note on Reassembling 1 Attach the OPTICAL UNIT as shown in the figure below XA4 5140 257 2 5mm SILVER M1 4 SELF TAP g Note on Reassembling 1 1 g 1 g 1 OPTICAL UNIT Dowel Dowel Position with respect to the two dowels B and fix screws 1 through 4 in this order 2 3 4 1 1 g 1 g ...

Страница 105: ...l off the DOUBLE SIDED TAPE 0 15 3 5 10mm and then detach the BATTERY FPC ASS Y and BAT TERY FPC CUSHION Note Be careful not to damage the terminal of the BATTERY FPC ASS Y N S N S Stands for No Stock N S 1 MAIN CHASSIS 2 FPC CUSHION 2 BATTERY BOX Terminal DOUBLE SIDED TAPE 0 15 3 5 10mm 1 N S 1 BATTERY FPC ASS Y ...

Страница 106: ...minals JACK DOUBLE SIDED TAPE 0 15 3 5 10mm BATTERY FPC ASS Y JACK Terminal Insert its terminal section and then its JACK section and then attach the BATTERY FPC ASS Y with double sided tape DOUBLE SIDED TAPE ADHESIVE TAPE DOUBLE SIDED TAPE 0 15 3 5 10mm Attachment reference BATTERY FPC ASS Y MAIN CHASSIS FPC CUSHION BATTERY BOX Rib Rib Dowel Dowel Put the BATTERY FPC ASS Y below the rib of the MA...

Страница 107: ...TAPE and then detach the OPTI CAL FPC s CONNECTOR section 3 Remove the DIABOND and then OPTICAL FPC s PHOTO INTERRUPTER section 2 3 2 CN3501 CN3501 CONNECTOR section CONNECTOR section PHOTO INTERRUPTER section PHOTO INTERRUPTER section 2 2 DOUBLE SIDED TAPE Dowel DIABOND 1663G Tweezers 1 N S 1 N S 1 N S 1 N S N S N S Stands for No Stock ...

Страница 108: ...RONT BARREL section 5 Detach the GEARs 6 5 2 4 and 3 Note Use your fingers or an air pin to detach attach the GEARs 5 5 5 4 5 5 GEAR 3 GEAR 2 GEAR 4 GEAR 5 GEAR 6 FRONT BARREL section Claw Spread the claws of the FRONT BARREL and detach it ...

Страница 109: ...ch the FRONT BARREL section with its claw side first Note on Reassembling 1 Note on Reassembling 2 3 GEAR 2 2 GEAR 4 1 GEAR 3 With its convex side facing downward 5 GEAR 6 With its convex side facing downward 4 GEAR 5 Claw Disengage Disengage FPC With the FPC set aside attach the FRONT BARREL section with its claw side first while taking care not to pinch the FPC ...

Страница 110: ...R section and CONNECTOR section as shown in the figure below Note on Reassembling 3 CN3501 DIABOND 1663G CONNECTOR section CONNECTOR section DOUBLE SIDED TAPE Dowel 1 Insert 2 Insert PHOTO INTERRUPTER section PHOTO INTERRUPTER section ...

Страница 111: ...R CAP TAPE and remove the FRONT CAP Note Be careful not to damage the FRONT CAP 3 Disengage four claws and then detach the BARRIER COVER BARRIER PLATE BARRIER CLOSE SPRING and BARREL DRIVE RING 1 3 2 2 Claw Claw FRONT CAP BARRIER CAP TAPE FRONT CAP BARRIER CAP TAPE BARRIER COVER BARRIER COVER BARRIER PLATE BARRIER CLOSE SPRING BARREL DRIVE RING Tweezers Tweezers etc 2 ...

Страница 112: ...ING BARRIER PLATE BARRIER PLATE SHAFT They should be in contact with each other here Dowel Engage the BARRIER CLOSE SPRING with the dowel of the BARREL DRIVE RING and insert the SHAFT of BARRIER PLATE into the shaft hole and attach the BARRIER PLATE Shaft hole Put the BARRIER PLATE and the BARRIER CLOSE SPRING together BARRIER DRIVE RING BARREL DRIVE RING Claw Claw Insert the BARREL DRIVE RING in ...

Страница 113: ...APE to it as shown in the figure Note on Reassembling 3 Note on Reassembling 4 FRONT CAP BARRIER CAP TAPE Claw Claw Rib Rib BARRIER COVER Turn the BARRIER COVER and push it into place Position with respect to the dowel and attach the FRONT CAP Push the claws of the BARRIER COVER in beneath the ribs to attach the BARRIER COVER Claw ...

Страница 114: ...5mm SILVER M1 7 d CD3 8242 000 2 5mm SILVER M1 7 a CD3 8241 000 2 5mm BLACK M1 7 a CD3 7894 000 2 5mm SILVER M1 7 b CD3 7893 000 2 5mm BLACK M1 7 b XA4 5170 257 2 5mm SILVER M1 7 SELF TAP e XA4 9140 307 3 0mm SILVER M1 4 SELF TAP f XA4 5140 257 2 5mm SILVER M1 4 SELF TAP g ...

Страница 115: ...rks or trade marks of Adobe Systems Incorporated in the United States of America and or other countries All other trademarks product names service marks are generally either registered or unregistered marks of their respective owners Copyright All copyrights in the content of this Service Manual are owned or controlled by Canon Inc You are not permitted to copy reproduce download modify adapt or t...

Страница 116: ... Preparation 5 3 5 Starting up the Adjustment Software 6 3 6 Menu Window 6 3 7 How to Use the Adjustment Software 7 4 Calibration 8 4 1 Calibration 8 5 Adjustment Procedure 12 5 1 Optical Unit Adjustment 12 5 2 CCD Adjustment 14 5 3 Shading Adjustment 17 5 4 Imaging Process Adjustment 19 5 5 Color Adjustment 22 5 6 Pixel Dot Adjustment 24 5 7 LCD Adjustment 26 5 8 Flash Adjustment 27 5 9 Checking ...

Страница 117: ...stment is not necessary only if the adjustment data has been saved and then transferred after the part is replaced Blank Adjustment is unnecessary When OPTICAL UNIT is replaced adjust certainly at the procedure as below 1 Optical Unit Adjustment 2 CCD Adjustment 3 Shading Adjustment 4 Imaging Process Adjustment 5 Color Adjustment 6 Pixel Dot Adjustment 7 Flash Adjustment Adjustment Items Replaceme...

Страница 118: ...olor Viewer 5500 K Color Bar Chart 18 Gray Chart AF Chart 1 Infinity Collimator W 10 Filter 1 C 12 Filter FL W Filter ND 4 Filter Light Shielding Cloth 500 x 500 mm or larger Tripod Reference Camera DIGITAL CAMERA SolutionDisk PARTS NO CY9 1566 100 200 2 CY9 1562 100 200 2 DY9 2002 000 CY9 1563 000 CY9 1583 000 CY9 1569 100 200 2 CY9 1556 000 CY9 1555 000 CY9 1557 000 CY9 1553 000 REMARKS Local pu...

Страница 119: ...P Connect Installation After downloading and extracting Adjustment Software double click Setup exe Canon DCP Connect Setup exe to install it 3 3 Adjustment Software Installation 1 After downloading and extracting Adjustment Software double click Setup exe to install it Adjustment Softwares are different according to the model of camera that you are going to adjust 2 When the dialog box below appea...

Страница 120: ...ox below appears click the button Software installation will then begin 4 When the dialog box below appears click the Continue button In the case that you do not add a shortcut on desktop remove clicking from the check box ...

Страница 121: ... the Power Source with the AC Adapter Kit ACK DC10 CA DC10 AC Cable DR 10 4 Set the Replay Mode on the camera 5 Connect the Camera s Digital terminal to the PC s USB Port with INTERFACE CABLE IFC 400 PCU 6 Turn on the camera while pressing the left side of the cross key and the Print Share button Note Perform the preparation in the following order otherwise the camera won t work properly INTERFACE...

Страница 122: ...preparatory steps click Start and move the cursor to Program then select Canon Digital Camera Adjustment and click Canon PowerShot SD750 1000 and DIGITAL IXUS 75 70 Adjustment 3 6 Menu Window When the Adjustment Software starts up the Menu Window below will appear ...

Страница 123: ...sure to change Model Name every time MAIN PCB ASS Y is changed Adjustment Menu Calibration For starting click the button related with calibration adjustment Whenever you use your light source for the adjustment for the first time be sure to click the Calibration Button Quitting the Adjustment Software Click the Exit button Camera Data Saving and Loading Data Transfer Save button This button saves ...

Страница 124: ...ghtness Box Color Viewer 5500 K Color Bar Chart W 10 Filter 2pcs C 12 Filter FL W Filter ND 4 Filter Light Shielding Cloth Reference Camera DIGITAL CAMERA SolutionDisk Click the Calibration button When the message on the right appears go to 4 1 2 3 1 When the message on the right appears check that the reference camera Merchandise is connected to the computer 2 Click the OK button ...

Страница 125: ... light source surface of the Brightness Box 2 Put the light Shielding Cloth so that light ex cept the Brightness Box does not come in 3 Set the Brightness Box to the value displayed on the message 4 Click the ADJUST button 1 Place the camera so that lens is set against the light source surface of the Brightness Box via the two W 10 Filters 2 Put the light Shielding Cloth so that light ex cept the ...

Страница 126: ...move the two W 10 Filters 2 Place the camera so that lens is set against the light source surface of the Brightness Box via the C 12 and FL W Filter 3 Put the light Shielding Cloth so that light ex cept the Brightness Box does not come in 4 Set the Brightness Box to the value displayed on the message 5 Click the ADJUST button 1 Attach the Color Bar Chart to the Color Viewer 2 Place the camera so t...

Страница 127: ...11 12 Check Save as the Reference and click the OK button to store the data 13 When the message on the right appears click the FINISH button This ends the Calibration Adjustment ...

Страница 128: ...e Optical Unit button 2 3 When the message on the right appears enter the value written on the Optical Unit Flex in the Focus Sink text box and then click the Update button After the update is complete proceed to step 3 1 Place the camera at the infinity collimator 2 Adjust the position of the camera finely so that the center of the Auto Focus Chart is aligned with the center of the LCD 3 Click th...

Страница 129: ...1 Set the AF Chart 1 CY9 1583 000 at 48 0cm away from the front of the cover Set the AF Chart 1 CY9 1583 000 on a plain color wall or equivalent Adjust the light so that the brightness of the chart will be about EV9 0 The ray of the light should come in at a narrow angle as seen from the chart 2 Adjust the position of the camera finely so that the center of the AF Chart 1 CY9 1583 000 is aligned w...

Страница 130: ... the right appears go to 3 3 1 Set the filter of the Brightness Box and place the camera so that lens is set against the light source surface of the Brightness Box 2 Put the light Shielding Cloth so that light except the Brightness Box does not come in 3 Set the Brightness Box to the value displayed on the message 4 Click the ADJUST button When the adjustment does not work click the Default button...

Страница 131: ...e message on the right appears set to the displayed value 2 Click the Adjust button 6 7 When the message on the right appears go to 7 1 Cover the camera with the Light Shielding Cloth so that the no light reasons the CCD 2 Click the ADJUST button CAMERA BODY Power Source Personal Computer Light Shielding Cloth ...

Страница 132: ...16 8 When the message on the right appears click the FINISH button This ends the CCD Adjustment ...

Страница 133: ...2 When the message on the right appears go to 3 3 Brightness Box Personal Computer Power Source CAMERA BODY Light Shielding Cloth 1 Do not set the filter of the Brightness Box and place the camera so that lens is set about 3mm interval from the light source surface of the Brightness Box 2 Put the light Shielding Cloth so that light ex cept the Brightness Box does not come in 3 Set the Brightness B...

Страница 134: ...18 4 When the message on the right appears click the FINISH button This ends the Shading Adjustment ...

Страница 135: ...nDisk 1 2 3 Click the Imaging Process button When the message on the right appears go to 3 1 Set the filter of the Brightness Box and place the camera so that lens is set against the light source surface of the Brightness Box 2 Put the light Shielding Cloth so that light except the Brightness Box does not come in 3 Set the Brightness Box to the value displayed on the message 4 Click the ADJUST but...

Страница 136: ...ness Box via the two W 10 Filters 2 Put the light Shielding Cloth so that light except the Brightness Box does not come in 3 Set the Brightness Box to the value displayed on the message 4 Click the ADJUST button 1 Remove the two W 10 Filters 2 Place the camera so that lens is set against the light source surface of the Brightness Box via the C 12 and FL W Filter 3 Put the light Shielding Cloth so ...

Страница 137: ... 1 Remove the C 12 and FL W Filter 2 Set the filter of the Brightness Box and place the camera so that lens is set against the light source surface of the Brightness Box 3 Put the light Shielding Cloth so that light except the Brightness Box does not come in 4 Set the Brightness Box to the value displayed on the message 5 Click the ADJUST button When the message on the right appears go to 9 ...

Страница 138: ...Chart 2 When the message on the right appears go to 3 3 1 Click the Color button 1 Attach the Color Bar Chart to the Color Viewer 2 Place the camera so that the Viewing image of the color bar chart is the full of LCD with the ND 4 Filter attached 3 Click the ADJUST button Color Viewer Personal Computer Power Source Stand CAMERA BODY ND 4 Filter Color Bar Chart ND 4 Filter DIGITAL CAMERA SolutionDi...

Страница 139: ...fies the specifications 2 If the image on the PC monitor does not satisfy the specifications change the data using UP DOWN button or change the data directly by typing the data in the text box Then click the UPDATE button If these data within specifications click the OK button Measure the yellow and red colors and if they are both within the specifications click the OK button and then proceed to s...

Страница 140: ...el Dot button 2 When the message on the right appears go to 3 3 1 Set the filter of the Brightness Box and place the camera so that lens is set against the light source surface of the Brightness Box 2 Put the light Shielding Cloth so that light except the Brightness Box does not come in 3 Set the Brightness Box to the value displayed on the message 4 Click the ADJUST button Brightness Box Personal...

Страница 141: ...message on the right appears click the FINISH button This ends the Pixel Dot Adjustment CAMERA BODY Power Source Personal Computer Light Shielding Cloth 1 Cover the camera with the Light Shielding Cloth so that the no light reasons the CCD 2 Click the ADJUST button ...

Страница 142: ... the refernce camera using Zoom Browser EX Gray jpg is in the folder of Adjustment Software downloaded 4 Finish the ZoomBrowser EX 5 Disconnect the reference camera from the PC and display the Gray jpg image in PLAY mode Reference Camera DIGITAL CAMERA SolutionDisk 1 Click the LCD button 2 1 Compare the image with that of the reference camera If it has a different color tint adjust it by repeating...

Страница 143: ...ERFACE CABLE IFC 400PCU 18 Gray Chart Tripod DIGITAL CAMERA SolutionDisk 1 Click the Flash button 2 When the message on the right appears go to 3 3 1 Set the 18 Gray Chart at 43 5cm away from the front of the cover 2 Make the room as dark as a darkroom 3 Click the ADJUST button Personal Computer Power Source 18 Gray Chart 43 5cm CAMERA BODY Tripod ...

Страница 144: ...28 4 When the message on the right appears click the FINISH button This ends the Flash Adjustment ...

Страница 145: ...29 5 9 Checking of sound recording output It is not required to adjust the recording output volume etc of sound Check the camera if the sound is recorded play backed properly ...

Страница 146: ...arks or trade marks of Adobe Systems Incorporated in the United States of America and or other countries All other trademarks product names service marks are generally either registered or unregistered marks of their respective owners Copyright All copyrights in the content of this Service Manual are owned or controlled by Canon Inc You are not permitted to copy reproduce download modify adapt or ...

Страница 147: ...50 Secondary Side 2 7 BATTERY FPC ASS Y IXY DIGITAL 90 DIGITAL IXUS 75 PowerShot SD750 Primary Side 2 8 BATTERY FPC ASS Y IXY DIGITAL 90 DIGITAL IXUS 75 PowerShot SD750 Secondary Side 2 9 MAIN PCB ASS Y IXY DIGITAL 10 DIGITAL IXUS 70 PowerShot SD1000 Primary Side 2 10 MAIN PCB ASS Y IXY DIGITAL 10 DIGITAL IXUS 70 PowerShot SD1000 Secondary Side 2 11 ST FPC ASS Y IXY DIGITAL 10 DIGITAL IXUS 70 Powe...

Страница 148: ...ontact Pins face down Metal contact Metal contact CN701 CN702 CN703 CN501 CN502 CN102 CN101 CN1002 CN1003 CN2001 CN3001 CN1005 CN1004 CN601 IC601 IC2001 IC1004 IC1005 IC2003 IC2005 IC1003 IC1001 IC1006 IC1002 IC4800 IC4502 IC4000 IC3001 SW1001 BATTERY SD CARD Cover Open Detect SW IC1007 BAT1001 MIC4500 CN4001 CN1001 LED104 AF ASEST LED SW103 POWER SW101 TELE WIDE PRINT SW105 LED105 LED103 LEFT_SW ...

Страница 149: ...ct Metal contact CN701 CN702 CN703 CN501 CN502 CN1002 CN1003 CN2001 CN3001 CN1005 CN1004 CN601 IC601 IC2001 IC1004 IC1005 IC2003 IC2005 IC1003 IC1001 IC1006 IC1002 IC4800 IC4502 IC4000 IC3001 SW1001 BATTERY SD CARD Cover Open Detect SW IC1007 BAT1001 MIC4500 CN4001 CN1001 LED104 AF ASEST LED POWER_SW SW103 TELE WIDE SW101 PRINT SW105 LEFT_SW SW102 UP_SW SW104 FUNC SET_SW SW106 DOUN_SW SW109 RIGHT_...

Страница 150: ...0 C1051 R1029 X2001 C1056 R1034 R1039 C2003 C2005 FU601 Q2001 C2006 C2009 R1042 R1043 C2012 C2013 C2014 C2015 C2016 C2017 C2018 C2019 R1054 R1055 R1056 R1057 C2020 C2021 C2023 C2025 C2026 D2002 C2027 C2028 C2029 R2007 C2030 R2008 C2031 R2009 IC2001 C2033 IC2003 C2034 C2036 C2037 C2038 R2010 R2011 R2012 R2013 R2014 R2015 R2016 R2017 R2018 R2019 RA1001 RA1004 RA1006 RA1007 RA1008 R2020 R2022 R2023 Z...

Страница 151: ...1008 SW1001 C1021 C1023 C1025 D1001 D1003 IC1004 C4500 C1045 C1046 C4502 C4503 C4504 C1049 C4505 C4506 R1023 C4507 C4508 C4509 R1026 R1028 C1053 C1054 C4510 C1055 C4511 C4512 C4513 R1031 R1032 R4500 R4501 R4502 R1047 R4503 R4504 R4505 R4506 IC4502 R1050 R1051 R1052 R1053 RA1002 RA1003 ZD4000 RA1005 RA1009 ZNR1001 CN1004 R2024 R1024 Q1012 R1015 R1022 C617 C628 R622 R618 C626 C627 R619 IC1002 CN1005...

Страница 152: ...01 Feb 2007 CANON INC 2007 2 3 ST FPC ASS Y IXY DIGITAL 90 DIGITAL IXUS 75 PowerShot SD750 Primary Side CP501 CP502 CP503 CP504 ...

Страница 153: ... CANON INC 2007 2 4 ST FPC ASS Y IXY DIGITAL 90 DIGITAL IXUS 75 PowerShot SD750 Secondary Side FU501 Q501 L501 R501 R502 R503 R504 R505 R506 T501 C501 C503 C504 C505 C506 C507 C508 D501 D502 IC502 T502 CN502 CN501 ...

Страница 154: ...01 Feb 2007 CANON INC 2007 2 5 OPERATION FPC ASS Y IXY DIGITAL 90 DIGITAL IXUS 75 PowerShot SD750 Primary Side Q102 LED103 LED104 LED105 SW101 SW103 SW105 SW107 SW108 SW111 R103 R104 R105 CN102 CN101 ...

Страница 155: ...01 Feb 2007 CANON INC 2007 2 6 OPERATION FPC ASS Y IXY DIGITAL 90 DIGITAL IXUS 75 PowerShot SD750 Secondary Side ...

Страница 156: ...01 Feb 2007 CANON INC 2007 2 7 BATTERY FPC ASS Y IXY DIGITAL 90 DIGITAL IXUS 75 PowerShot SD750 Primary Side CN702 CN701 CN703 R701 ...

Страница 157: ...01 Feb 2007 CANON INC 2007 2 8 BATTERY FPC ASS Y IXY DIGITAL 90 DIGITAL IXUS 75 PowerShot SD750 Secondary Side ...

Страница 158: ...9 C1056 R1034 R1039 C2003 C2005 FU601 Q2001 C2006 C2009 R1042 R1043 C2012 C2013 C2014 C2015 C2016 C2017 C2018 C2019 R1054 R1055 R1056 R1057 C2020 C2021 C2023 C2025 C2026 D2002 C2027 C2028 C2029 R2007 C2030 R2008 C2031 R2009 IC2001 C2033 IC2003 C2034 C2036 C2037 C2038 R2010 R2011 R2012 R2013 R2014 R2015 R2016 R2017 R2018 R2019 RA1001 RA1004 RA1006 RA1007 RA1008 R2020 R2022 R2023 ZNR1002 ZNR1003 ZNR...

Страница 159: ...Q1008 SW1001 C1021 C1023 C1025 D1001 D1003 IC1004 C4500 C1045 C1046 C4502 C4503 C4504 C1049 C4505 C4506 R1023 C4507 C4508 C4509 R1026 R1028 C1053 C1054 C4510 C1055 C4511 C4512 C4513 R1031 R1032 R4500 R4501 R4502 R1047 R4503 R4504 R4505 R4506 IC4502 R1050 R1051 R1052 R1053 RA1002 RA1003 ZD4000 RA1005 RA1009 ZNR1001 CN1004 R2024 R1024 Q1012 R1015 R1022 C617 C628 R622 R618 C626 C627 R619 IC1002 CN100...

Страница 160: ... CANON INC 2007 2 11 ST FPC ASS Y IXY DIGITAL 10 DIGITAL IXUS 70 PowerShot SD1000 Primary Side FU501 Q501 L501 R501 R502 R503 R504 R505 R506 T501 C501 C503 C504 C505 C506 C507 C508 D501 D502 IC502 T502 CN502 CN501 ...

Страница 161: ...01 Feb 2007 CANON INC 2007 2 12 ST FPC ASS Y IXY DIGITAL 10 DIGITAL IXUS 70 PowerShot SD1000 Secondary Side CP501 CP503 CP502 CP504 ...

Страница 162: ...007 2 13 OPERATION FPC ASS Y IXY DIGITAL 10 DIGITAL IXUS 70 PowerShot SD1000 Primary Side Q102 LED101 LED102 L E D 1 0 3 LED104 LED105 SW101 SW102 SW103 SW104 SW105 SW106 SW107 SW108 SW109 SW110 SW111 R101 R102 R103 R104 R105 ...

Страница 163: ...01 Feb 2007 CANON INC 2007 2 14 OPERATION FPC ASS Y IXY DIGITAL 10 DIGITAL IXUS 70 PowerShot SD1000 Secondary Side ...

Страница 164: ...01 Feb 2007 CANON INC 2007 2 15 BATTERY FPC ASS Y IXY DIGITAL 10 DIGITAL IXUS 70 PowerShot SD1000 Primary Side R701 CN701 CN702 CN703 ...

Страница 165: ...01 Feb 2007 CANON INC 2007 2 16 BATTERY FPC ASS Y IXY DIGITAL 10 DIGITAL IXUS 70 PowerShot SD1000 Secondary Side ...

Страница 166: ......

Отзывы: