background image

1

1

1

1

Checking the Copy Mode Settings (Setting Confirmation)

1-75

1-75

1-75

1-75

Ba

si

C

o

p

y

in

g

Checking the Copy Mode Settings 

Checking the Copy Mode Settings 

Checking the Copy Mode Settings 

Checking the Copy Mode Settings 

(Setting Confirmation)

(Setting Confirmation)

(Setting Confirmation)

(Setting Confirmation)

When the copy mode settings are selected in screens, for example, the Special Features screen, 
you can check those settings in a list.

1

1

1

1

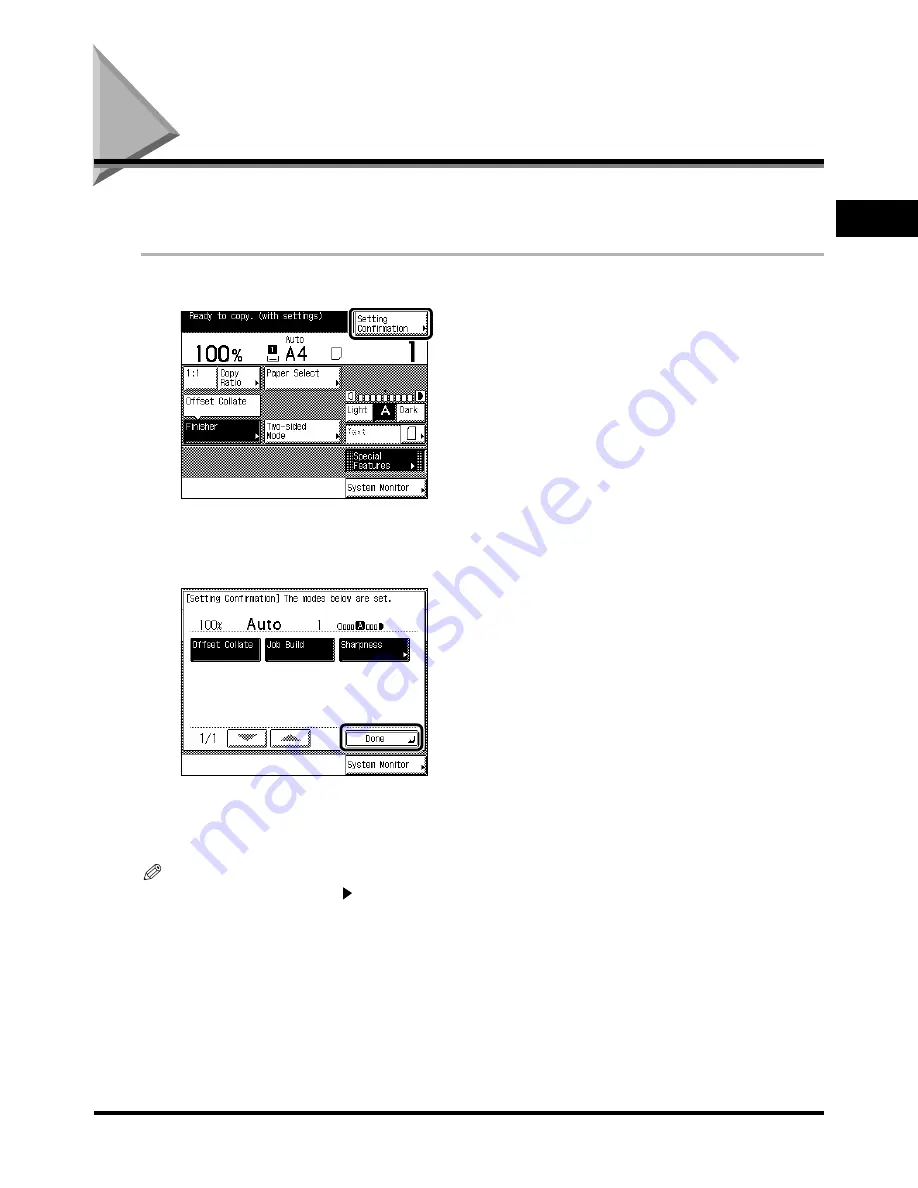
Press [Setting Confirmation] in the Basic Features screen. 

Press [Setting Confirmation] in the Basic Features screen. 

Press [Setting Confirmation] in the Basic Features screen. 

Press [Setting Confirmation] in the Basic Features screen. 

The display shows the selected copy mode settings.

2

2

2

2

Check the settings, and press [Done].

Check the settings, and press [Done].

Check the settings, and press [Done].

Check the settings, and press [Done].

When ten or more copy modes have been set, use [

t

] to bring up the next screen. To return to the 

previous screen, press [

s

].

The display returns to the Basic Features screen.

NOTE

••••

If the copy mode key has a “

” mark attached, another screen appears when you press the key.

Содержание iR3300 Series

Страница 1: ...iR3300 iR2800 iR2200 iR3300 iR2800 iR2200 iR3300 iR2800 iR2200 iR3300 iR2800 iR2200 Copying Guide Copying Guide Copying Guide Copying Guide ...

Страница 2: ... Use For Convenient Mail Box Function Use For Convenient Mail Box Function Use Mail Box Function Guide Mail Box Function Guide Mail Box Function Guide Mail Box Function Guide For Remote UI Use For Remote UI Use For Remote UI Use For Remote UI Use Remote UI Guide Remote UI Guide Remote UI Guide Remote UI Guide For Setting Up the Network Connection For Setting Up the Network Connection For Setting U...

Страница 3: ...sic Copying Basic Copying Useful Copy Functions Useful Copy Functions Useful Copy Functions Useful Copy Functions Setting Storing Specifications of the Copy Function Setting Storing Specifications of the Copy Function Setting Storing Specifications of the Copy Function Setting Storing Specifications of the Copy Function Appendix Appendix Appendix Appendix Chap 1 Chap 1 Chap 1 Chap 1 Chap 2 Chap 2 ...

Страница 4: ...y Quantity 1 16 Selecting the Copy Paper Size Paper Select Selecting the Copy Paper Size Paper Select Selecting the Copy Paper Size Paper Select Selecting the Copy Paper Size Paper Select 1 17 1 17 1 17 1 17 Automatic Paper Selection Auto Paper Selection 1 17 Specifying Paper Size Type Manual Paper Selection 1 19 Adjusting Exposure and Image Quality Adjusting Exposure and Image Quality Adjusting E...

Страница 5: ...4 Making Copies for Use as a Booklet Booklet Making Copies for Use as a Booklet Booklet Making Copies for Use as a Booklet Booklet Making Copies for Use as a Booklet Booklet 2 10 2 10 2 10 2 10 Making Copies with Sheets of Paper Interleaved Between Making Copies with Sheets of Paper Interleaved Between Making Copies with Sheets of Paper Interleaved Between Making Copies with Sheets of Paper Interl...

Страница 6: ...ecifications of the Copy Function Copy Settings List Copy Settings List Copy Settings List Copy Settings List 3 2 3 2 3 2 3 2 Setting Standard Keys Setting Standard Keys Setting Standard Keys Setting Standard Keys 3 3 3 3 3 3 3 3 Setting Automatic Collate On Off Setting Automatic Collate On Off Setting Automatic Collate On Off Setting Automatic Collate On Off 3 5 3 5 3 5 3 5 Setting Image Orientat...

Страница 7: ...ual Control panel keys Touch panel display keys OK WARNING WARNING WARNING WARNING Indicates a warning concerning operations that may lead to death or injury to persons if not performed correctly In order to use the machine safely always pay attention to these warnings CAUTION CAUTION CAUTION CAUTION Indicates a caution concerning operations that may lead to injury to persons or damage to property...

Страница 8: ...elow When multiple keys can be pressed on the touch panel display all keys are marked Select the keys which suit your needs Illustrations Used in This Manual Illustrations Used in This Manual Illustrations Used in This Manual Illustrations Used in This Manual Unless otherwise noted illustrations used in this manual are those taken when the Finisher J1 and Cassette Feeding Unit W1 are attached to t...

Страница 9: ...ure and Image Quality 1 25 Changing the Copy Exposure During Printing 1 26 Changing the Copy Ratio Copy Ratio Changing the Copy Ratio Copy Ratio Changing the Copy Ratio Copy Ratio Changing the Copy Ratio Copy Ratio 1 27 1 27 1 27 1 27 Enlarging Reducing Originals to a Standard Size Preset Zoom 1 27 Specifying the Copy Ratio by Zoom Designation 1 29 Automatically Setting the Copy Ratio Based on the...

Страница 10: ...le Set Before Copying Sample Set Checking a Sample Set Before Copying Sample Set Checking a Sample Set Before Copying Sample Set 1 72 1 72 1 72 1 72 Checking the Copy Mode Settings Setting Confirmation Checking the Copy Mode Settings Setting Confirmation Checking the Copy Mode Settings Setting Confirmation Checking the Copy Mode Settings Setting Confirmation 1 75 1 75 1 75 1 75 Changing or Cancell...

Страница 11: ...ages displayed on the touch panel display Various Kinds of Copies Various Kinds of Copies Various Kinds of Copies Various Kinds of Copies Copy Basic Features screen Copy Basic Features screen Copy Basic Features screen Copy Basic Features screen The screen on the left which appears when the machine is ready to make copies is called the Basic Features screen See p 1 17 See p 1 17 See p 1 17 See p 1...

Страница 12: ...l See p 1 23 See p 1 23 See p 1 23 See p 1 23 Press to copy originals specifying the image quality text only text and photo photo only You can also select the type of photo printed image photo when you set the Photo mode in Additional Functions beforehand See Chapter 2 See Chapter 2 See Chapter 2 See Chapter 2 Press to select the Special Features mode See the See the See the See the Reference Guid...

Страница 13: ...rs To close the Special Features screen and return to the Basic Features screen press Done Pressing after selecting a function displays a help screen containing guidance information This is useful when you want to learn more about the function See p 2 2 See p 2 2 See p 2 2 See p 2 2 Press to select or cancel the Two page Separation mode This mode enables you to copy facing pages of an opened book ...

Страница 14: ...s along the sides of copies See p 2 25 See p 2 25 See p 2 25 See p 2 25 When you select Original Frame Erase When you select Original Frame Erase When you select Original Frame Erase When you select Original Frame Erase Press to select or cancel the Frame Erase mode This mode enables you to eliminate dark border areas and lines that appear around original images or shadows from punched holes See p...

Страница 15: ...2 42 See p 2 42 See p 2 42 See p 2 42 Press to make copies feeding different size originals together in one group by setting them in the feeder See p 2 44 See p 2 44 See p 2 44 See p 2 44 Press to divide the originals into several parts and scan them then print them all together This is convenient when you cannot load all of the originals that you want to copy at one time See p 2 47 See p 2 47 See...

Страница 16: ...age inverted See p 2 58 See p 2 58 See p 2 58 See p 2 58 Press to copy an original with the image repeated in the vertical or horizontal direction See p 2 61 See p 2 61 See p 2 61 See p 2 61 Press to copy the image of the original reversed as a reflection in the mirror See p 2 63 See p 2 63 See p 2 63 See p 2 63 Press to select or cancel the Sharpness mode This mode enables you to make copies of o...

Страница 17: ... Copy Operations This section describes the flow of basic copy operations NOTE For the following items see the Reference Guide Main power and control panel power Routine maintenance 1 1 1 1 Press Press Press Press If the message You must insert a control card appears insert a control card See the Reference Guide COPY COPY MAIL BOX SYSTEM FAX ...

Страница 18: ...nal Place your original NOTE For instructions on placing the original see the Reference Guide When Auto Collate is set to On the Collate Offset Collate mode is automatically set when the original is placed in the feeder See Setting Automatic Collate On Off on p 3 5 3 3 3 3 Set the copy mode in the Basic Features screen Set the copy mode in the Basic Features screen Set the copy mode in the Basic F...

Страница 19: ...Special Features screen Set the desired copy mode in the Special Features screen Set the desired copy mode in the Special Features screen The Special Features screen is divided into two screens Press t or s to select the desired mode You can continue setting other available modes See Useful Copy Functions in Chapter 2 5 5 5 5 Enter the copy quantity Enter the copy quantity Enter the copy quantity ...

Страница 20: ...ached remove the control card See the Reference Guide If you have set the Department ID Management press See the Reference Guide IMPORTANT While copying you cannot change copy mode settings such as the copy quantity paper size and copy ratio NOTE If there is a current job the machine scans the original and waits to print it Printing starts when the current job is completed NO EF XYZ ...

Страница 21: ...played Follow the instructions in the screen and press once for each original When scanning is completed press Done l When you want to copy a different original while printing When you want to copy a different original while printing When you want to copy a different original while printing When you want to copy a different original while printing Press Done and place your originals Then press See...

Страница 22: ... be output from the machine You can also stop a copy job in the System Monitor screen See the Reference Guide l When you want to interrupt a copy job When you want to interrupt a copy job When you want to interrupt a copy job When you want to interrupt a copy job To interrupt a copy job when you need to make priority copies press For instructions on explaining how to interrupt a copy job see Inter...

Страница 23: ...f Copies Specifying the Required Number of Copies Specifying the Required Number of Copies 1 1 1 1 Press Press Press Press numeric keys to enter the desired copy quantity 1 to 999 numeric keys to enter the desired copy quantity 1 to 999 numeric keys to enter the desired copy quantity 1 to 999 numeric keys to enter the desired copy quantity 1 to 999 The copy quantity appears on the upper right side...

Страница 24: ...r to clear the entered number 2 2 2 2 Press Press Press Press numeric keys to enter the desired copy quantity 1 to 999 numeric keys to enter the desired copy quantity 1 to 999 numeric keys to enter the desired copy quantity 1 to 999 numeric keys to enter the desired copy quantity 1 to 999 The copy quantity appears on the upper right side of the Basic Features screen IMPORTANT You cannot change the...

Страница 25: ...Selection Auto Paper Selection Automatic Paper Selection Auto Paper Selection Automatic Paper Selection Auto Paper Selection Automatic Paper Selection Auto Paper Selection The machine automatically selects copy paper IMPORTANT When the machine is operating in the Automatic Paper Selection mode you cannot use the Auto Copy Ratio XY Auto Copy Ratio Rotate Collating Rotate Grouping Saddle Stitch Book...

Страница 26: ...lace your original and press Paper Select Place your original and press Paper Select Place your original and press Paper Select 2 2 2 2 Select Auto and press Done Select Auto and press Done Select Auto and press Done Select Auto and press Done The following screen is displayed 3 3 3 3 Press Press Press Press Copying starts ...

Страница 27: ...k bypass when paper is fed from the stack bypass for the current job or reserved job press Stack Bypass Setting NOTE The paper sizes are displayed in the order in which they are loaded in the paper drawers displayed on the touch panel indicates that the paper is set vertically indicates that the paper is set horizontally Paper sizes with the suffix R such as A4R indicate paper placed in the paper ...

Страница 28: ...When you select Stack Bypass Setting When you select Stack Bypass Setting Select the paper size and press Next Select the paper type and press OK NOTE When placing paper other than a standard size press Free Size When loading envelopes press Envelope To select the inch paper size press Inch size 3 3 3 3 Press Done Press Done Press Done Press Done ...

Страница 29: ...21 1 21 1 21 1 21 Basic Copying 1 1 1 1 The display returns to the Basic Features screen and the selected paper size is displayed 4 4 4 4 Press Press Press Press Copying starts NOTE To cancel all settings and return the machine to the Standard mode press ...

Страница 30: ...py Exposure Adjusting Copy Exposure Adjusting Copy Exposure Adjusting Copy Exposure You can manually adjust the exposure to the most appropriate level for the original 1 1 1 1 Place your originals and press Light or Dark Place your originals and press Light or Dark Place your originals and press Light or Dark Place your originals and press Light or Dark Move the indicator above Light and Dark to t...

Страница 31: ...rints or penciled originals can be copied clearly n Text Photo Mode Text Photo Mode Text Photo Mode Text Photo Mode This mode is best suited for making copies from originals containing both text and photos n Photo Mode Photo Mode Photo Mode Photo Mode This mode is best suited for making copies from photos printed on photographic paper or photo originals containing halftones i e printed photos IMPO...

Страница 32: ...nd select the type of original Text Text Photo or Photo Photo Photo Photo When Photo Mode in Copy Settings is set to on you can select Printed Img or Photo See Setting the Photo Mode of the Copy Function on p 3 9 2 2 2 2 Press Light or Dark to adjust the copy exposure Press Light or Dark to adjust the copy exposure Press Light or Dark to adjust the copy exposure Press Light or Dark to adjust the c...

Страница 33: ...utomatic Adjustment of Exposure and Image Quality Quality Quality Quality 1 1 1 1 Place your originals and press A Place your originals and press A Place your originals and press A Place your originals and press A The exposure is automatically adjusted to the level best suited to the quality of the original NOTE When scanning transparencies adjust exposure using Light or Dark as the automatic expo...

Страница 34: ...ng Press Light or Dark in the screen displayed during printing Press Light or Dark in the screen displayed during printing Press Light or Dark in the screen displayed during printing Move the indicator above Light and Dark to the left to make the exposure lighter or to the right to make the exposure darker The printing exposure changes and when printing is completed the display returns to the Basi...

Страница 35: ...om You can enlarge or reduce standard size originals to a standard paper size IMPORTANT Place your originals horizontally in the following cases When enlarging A4 size originals to A3 size paper When enlarging A5 size originals to A3 size paper When reducing A3 size originals to A4 size with Image Orientation Priority set to Off place A4R size paper in the paper drawer or stack bypass NOTE Placing...

Страница 36: ...Place your original and press Paper Select Place your original and press Paper Select 2 2 2 2 Select Auto and press Done Select Auto and press Done Select Auto and press Done Select Auto and press Done The display returns to the Basic Features screen NOTE The default setting is Auto 3 3 3 3 Press Copy Ratio Press Copy Ratio Press Copy Ratio Press Copy Ratio ...

Страница 37: ...display returns to the Basic Features screen and the selected copy ratio is displayed 5 5 5 5 Press Press Press Press Copying starts NOTE To return the copy ratio to 100 press 1 1 To cancel all settings and return the machine to the Standard mode press Specifying the Copy Ratio by Zoom Designation Specifying the Copy Ratio by Zoom Designation Specifying the Copy Ratio by Zoom Designation Specifyin...

Страница 38: ...et a copy ratio by pressing or and press Done Set a copy ratio by pressing or and press Done You can also use numeric keys to input the value Even if you entered the ratio with numeric keys you can change the entered values with or The display returns to the Basic Features screen and the selected copy ratio is displayed If you specify values outside the range which can be set a message telling you...

Страница 39: ...ally selects the appropriate copy ratio based on the size of the original and the selected paper The available copy ratios are from 25 to 800 when the original is placed on the platen glass and from 25 to 400 when the original is placed in the feeder IMPORTANT You cannot use the Auto mode with Automatic Paper Selection You cannot copy highly transparent originals such as transparencies in the Auto...

Страница 40: ...Select 2 2 2 2 Select the paper size and press Done Select the paper size and press Done Select the paper size and press Done Select the paper size and press Done The display returns to the Basic Features screen IMPORTANT Select a paper size other than Auto If not the copy ratio will be automatically set to the size of the paper loaded in the top paper drawer 3 3 3 3 Press Copy Ratio Press Copy Ra...

Страница 41: ...all settings and return the machine to the Standard mode press Slightly Reducing Images to Prevent the Original Slightly Reducing Images to Prevent the Original Slightly Reducing Images to Prevent the Original Slightly Reducing Images to Prevent the Original from Being Trimmed Entire Image from Being Trimmed Entire Image from Being Trimmed Entire Image from Being Trimmed Entire Image When copying ...

Страница 42: ...ss Copy Ratio 2 2 2 2 Press Entire Image and press Done Press Entire Image and press Done Press Entire Image and press Done Press Entire Image and press Done The specified mode is set and the display returns to the Basic Features screen 3 3 3 3 Press Press Press Press Copying starts NOTE To cancel the setting press Copy Ratio Entire Image in this order To cancel all settings and return the machine...

Страница 43: ... modes are available NOTE The specified sizes are converted to the copy ratio as follows Copy ratio copy size original size x 100 n Making Copies with the Same XY Copy Ratio Zoom Making Copies with the Same XY Copy Ratio Zoom Making Copies with the Same XY Copy Ratio Zoom Making Copies with the Same XY Copy Ratio Zoom Specify the same copy ratio for the vertical and horizontal directions n Making ...

Страница 44: ... Ratio Zoom Making Copies with the Same XY Copy Ratio Zoom 1 1 1 1 Place your originals and press Copy Ratio Place your originals and press Copy Ratio Place your originals and press Copy Ratio Place your originals and press Copy Ratio 2 2 2 2 Press Other Zoom Press Other Zoom Press Other Zoom Press Other Zoom 3 3 3 3 Press Zoom Program Press Zoom Program Press Zoom Program Press Zoom Program ...

Страница 45: ...an 25 a message appears telling you that the ratio will be adjusted to 25 If it is more than 800 a message appears telling you that the ratio will be adjusted to 800 NOTE When the copy ratio is larger than 400 place the original on the platen glass If you make a mistake when entering values press C and enter the correct value To specify the sizes of the horizontal direction X and the vertical dire...

Страница 46: ...y Ratios XY Zoom Making Copies with Different XY Copy Ratios XY Zoom 1 1 1 1 Place your originals and press Copy Ratio Place your originals and press Copy Ratio Place your originals and press Copy Ratio Place your originals and press Copy Ratio 2 2 2 2 Press Other Zoom Press Other Zoom Press Other Zoom Press Other Zoom 3 3 3 3 Press Zoom Program Press Zoom Program Press Zoom Program Press Zoom Pro...

Страница 47: ...cal direction Then press OK When entering values in millimetres you can use numeric keys to enter numbers and to clear your entries The display returns to the Basic Features screen and the selected copy ratio is displayed If the copy ratio is less than 25 a message appears telling you that the copy ratio will be adjusted to 25 If it is more than 800 a message appears telling you that the ratio wil...

Страница 48: ...enlarged or reduced copies with different XY copy ratios The available copy ratios are from 25 to 800 when the original is placed on the platen glass and from 25 to 400 when the original is placed in the feeder n Manually Specifying the Copy Ratio XY Zoom Manually Specifying the Copy Ratio XY Zoom Manually Specifying the Copy Ratio XY Zoom Manually Specifying the Copy Ratio XY Zoom You can manuall...

Страница 49: ...to the size of the paper set in the top paper drawer When you set the copy ratio in the Auto XY Zoom mode Auto Orientation is not performed NOTE If you specify a magnification of smaller than 25 a message appears telling you to set it to 25 If you specify a magnification of larger than 800 a message appears telling you to set it to 800 If an error occurs between the Auto XY Zoom copy ratio and the...

Страница 50: ... pressing X and Y Then press OK Enter each value for X and Y after pressing X and Y Then press OK Enter each value for X and Y after pressing X and Y Then press OK You can also use numeric keys to input the value Even if you entered the copy ratio with numeric keys you can change the entered values with or The display returns to the Basic Features screen and the selected copy ratio is displayed If...

Страница 51: ...s C and enter the correct value When you select Auto XY Zoom in the following cases X Auto and Y Auto are displayed as the copy ratios in the Basic Features screen When the original is placed in the feeder When the original whose size cannot be detected is placed on the platen glass 5 5 5 5 Press Press Press Press Copying starts NOTE To return the copy ratio to 100 press 1 1 To cancel the setting ...

Страница 52: ...h optional unit Below is a list of finishing functions and paper sizes available for each optional unit Below is a list of finishing functions and paper sizes available for each optional unit 1 If Tray A is selected as a designated tray in the Additional Functions Common Settings Tray Designation screen Offset is applied If it is not selected Rotate is applied 2 Stapling position cannot be selecte...

Страница 53: ...ecified Three sets of specified Three sets of specified Three sets of specified copies copies copies copies Copy set 2 Copy set 2 Copy set 2 Copy set 2 Copy set 3 Copy set 3 Copy set 3 Copy set 3 4 4 3 3 2 2 1 1 4 4 3 3 2 2 1 1 Grouped Grouped Grouped Grouped copies of page 1 copies of page 1 copies of page 1 copies of page 1 Originals Originals Originals Originals Three sets of specified Three se...

Страница 54: ...wo sided Copying Two sided Mode on p 1 57 4 3 2 1 1 1 1 Copy set 1 Copy set 1 Copy set 1 Copy set 1 Originals Originals Originals Originals Three sets of specified Three sets of specified Three sets of specified Three sets of specified copies copies copies copies Copy set 2 Copy set 2 Copy set 2 Copy set 2 Copy set 3 Copy set 3 Copy set 3 Copy set 3 4 3 2 1 1 1 1 Copy set 1 Copy set 1 Copy set 1 C...

Страница 55: ...Is Set When Hole Punch Is Set The machine punches holes in the copies n When Rotate Is Set When Rotate Is Set When Rotate Is Set When Rotate Is Set When originals of the same size are copied the pages are aligned and the copy sets are output into the output trays in alternating directions 4 3 4 3 2 2 1 1 Copies Copies Copies Copies Originals Originals Originals Originals 4 3 2 1 1 Copies Copies Co...

Страница 56: ...s into Sets in Page Order Collate Collating Copies into Sets in Page Order Collate 1 1 1 1 Place your originals and press Finisher Place your originals and press Finisher Place your originals and press Finisher Place your originals and press Finisher NOTE When Auto Collate is set to On the Offset Collate mode is automatically set when you place the originals in the feeder See Setting Automatic Col...

Страница 57: ... selected When Finisher J1 is attached When Finisher J1 is attached When Finisher J1 is attached When Finisher J1 is attached When Saddle Finisher G1 and Puncher When Saddle Finisher G1 and Puncher When Saddle Finisher G1 and Puncher When Saddle Finisher G1 and Puncher Unit J1 G1 are attached and Tray A exit Unit J1 G1 are attached and Tray A exit Unit J1 G1 are attached and Tray A exit Unit J1 G1...

Страница 58: ...able paper size is loaded in both horizontal and vertical directions Drawer Eligibility for APS ADS of the paper drawers loaded with available paper size is set to On 3 3 3 3 Press Press Press Press When the original is placed on the platen glass follow the instructions that appear on the screen and press once for each original When scanning is completed press Done Copying starts NOTE To cancel th...

Страница 59: ...e is automatically set when you place the originals in the feeder See Setting Automatic Collate On Off on p 3 5 2 2 2 2 Press Group and press OK Press Group and press OK Press Group and press OK Press Group and press OK When Saddle Finisher G1 and Puncher When Saddle Finisher G1 and Puncher When Saddle Finisher G1 and Puncher When Saddle Finisher G1 and Puncher Unit J1 G1 are attached and Tray A e...

Страница 60: ...le paper size is set to On When Saddle Finisher G1 and Puncher Unit J1 When Saddle Finisher G1 and Puncher Unit J1 When Saddle Finisher G1 and Puncher Unit J1 When Saddle Finisher G1 and Puncher Unit J1 G1 are attached and Tray A exit slot is not G1 are attached and Tray A exit slot is not G1 are attached and Tray A exit slot is not G1 are attached and Tray A exit slot is not selected selected sel...

Страница 61: ... To cancel all settings and return the machine to the Standard mode press Collating Pages and Stapling Staple Collating Pages and Stapling Staple Collating Pages and Stapling Staple Collating Pages and Stapling Staple 1 1 1 1 Place your originals and press Finisher Place your originals and press Finisher Place your originals and press Finisher Place your originals and press Finisher NOTE When Auto...

Страница 62: ... Unit J1 G1 are attached and Tray A exit Unit J1 G1 are attached and Tray A exit Unit J1 G1 are attached and Tray A exit slot is selected slot is selected slot is selected slot is selected When Finisher J1 is attached When Finisher J1 is attached When Finisher J1 is attached When Finisher J1 is attached When Saddle Finisher G1 and Puncher When Saddle Finisher G1 and Puncher When Saddle Finisher G1...

Страница 63: ...tached When you select Staple with the Saddle Finisher G1 attached Press Next select the type of staple Corner Double or Saddle Stitch select the staple position If Saddle Stitch is selected follow the steps below Press Next Select the paper size and press OK NOTE You can adjust the saddle stitch position See the Reference Guide 3 3 3 3 Press OK Press OK Press OK Press OK The specified mode is set...

Страница 64: ...l is placed on the platen glass follow the instructions that appear in the screen and press once for each original When scanning is completed press Done Copying starts NOTE To cancel the setting press Finisher Cancel in this order To cancel all settings and return the machine to the Standard mode press ...

Страница 65: ...eight 64 g m2 to 80 g m2 n Making Two sided Copies from One sided Originals 1 Making Two sided Copies from One sided Originals 1 Making Two sided Copies from One sided Originals 1 Making Two sided Copies from One sided Originals 1 2 Sided 2 Sided 2 Sided 2 Sided This feature enables you to make two sided copies from one sided originals n Making Two sided Copies from Two sided Originals 2 Making Tw...

Страница 66: ...dd number of originals then the back side of the last print is left blank The machine s counter does not count the blank page as a copy When combined with Different Size Originals two sided copying cannot be performed The different sized originals will be printed as one sided copies on their respective sizes When wanting to make copies on both sides of the paper with different sized originals sele...

Страница 67: ... select the type of two sided original press Done 3 3 3 3 Press OK Press OK Press OK Press OK The display returns to the Basic Features screen and 1 2 Sided is displayed above Two sided Mode 4 4 4 4 Press Press Press Press When the original is placed on the platen glass follow the instructions that appear in the screen and press once for each original When scanning is completed press Done Copying ...

Страница 68: ... sided Originals 2 2 Sided 2 2 Sided 2 2 Sided 2 2 Sided This feature enables you to copy two sided originals on the front and back sides of the paper 1 1 1 1 Place your original and press Two sided Mode Place your original and press Two sided Mode Place your original and press Two sided Mode Place your original and press Two sided Mode NOTE When Auto Collate is set to on the Collate mode or the O...

Страница 69: ... 2 2 Sided Press 2 2 Sided Press 2 2 Sided Press 2 2 Sided To select the type of two sided copy press Option select the type of two sided original press Done 3 3 3 3 Press OK Press OK Press OK Press OK The display returns to the Basic Features screen and 2 2 Sided is displayed above Two sided Mode ...

Страница 70: ...als Making One sided Copies from Two sided Originals Making One sided Copies from Two sided Originals Making One sided Copies from Two sided Originals 2 1 Sided 2 1 Sided 2 1 Sided 2 1 Sided This feature enables you to copy two sided original onto one side of the paper IMPORTANT Be sure to horizontally a A4R or A5R landscape oriented original If you set it vertically and copy the top sides of the ...

Страница 71: ... sided Mode Place your original and press Two sided Mode NOTE When Auto Collate is set to On the Collate mode or the Offset Collate mode is automatically set when you place the original in the feeder See Setting Automatic Collate On Off on p 3 5 2 2 2 2 Press 2 1 Sided Press 2 1 Sided Press 2 1 Sided Press 2 1 Sided To select the type of two sided copy press Option select the type of two sided ori...

Страница 72: ...K Press OK The display returns to the Basic Features screen and 2 1 Sided is displayed above Two sided Mode 4 4 4 4 Press Press Press Press Copying starts NOTE To cancel the setting press Two sided Mode Cancel in this order To cancel all settings and return the machine to the Standard mode press ...

Страница 73: ... copy the original in the Book 2 Sided mode from the feeder Select A4 size paper when using this feature n Left Right Two sided Left Right Two sided Left Right Two sided Left Right Two sided Makes two sided copies from facing pages n Front Back Two sided Front Back Two sided Front Back Two sided Front Back Two sided Makes two sided copies from front and back sides of a page IMPORTANT When copying ...

Страница 74: ...platen glass and press Two sided Mode Place your original on the platen glass and press Two sided Mode If you want to make copies in page order begin copying from the first page Place the original face down so that its top edge is aligned with the top left corner of the platen glass 2 2 2 2 Press Book 2 Sided and press Next Press Book 2 Sided and press Next Press Book 2 Sided and press Next Press ...

Страница 75: ... front and back sides of the left page or the front and back sides of the right page are copied onto the front and back sides of a single sheet The display returns to the Basic Features screen and Book 2 Sided is displayed above Two sided Mode 4 4 4 4 Press Press Press Press To scan the spread original place the original and press again Scanning starts 5 5 5 5 When scanning is completed press Done...

Страница 76: ... for each job 1 1 1 1 Press Done in the following screen that is displayed while printing Press Done in the following screen that is displayed while printing Press Done in the following screen that is displayed while printing Press Done in the following screen that is displayed while printing If the job displayed in the touch panel display is a function other than a copy function press to display ...

Страница 77: ...g 1 1 1 1 3 3 3 3 Press Press Press Press and start scanning originals and start scanning originals and start scanning originals and start scanning originals If the following screen is displayed press OK After the current job is completed repeat the operation ...

Страница 78: ...upt copies when the machine is ready to scan 1 1 1 1 Press Press Press Press When you want to copy after changing the Department ID while Department ID Management is enabled press and enter the Department ID and Password See the Reference Guide NOTE Even when you press the job currently being output will not be interrupted until the interrupt copy starts printing 2 2 2 2 Place your original and se...

Страница 79: ...e Once the original is scanned remove it from the machine Once the original is scanned remove it from the machine Once the original is scanned remove it from the machine When the Interrupt copy job is completed the interrupted printing operation resumes IMPORTANT If you want to continue making Interrupt copies wait until the current Interrupt copy job is completed end of printing ...

Страница 80: ...pies of your original in the Collate Staple Cover Sheet Insertion or Booklet mode Sample Set is not displayed in the Group mode NOTE The machine s counter counts the sample print as a print 1 1 1 1 Place your originals and select the desired copy settings Place your originals and select the desired copy settings Place your originals and select the desired copy settings Place your originals and sel...

Страница 81: ...ying press Cancel To change the setting press Change Settings set a new mode and press Done To change the number of copies use numeric keys To change the exposure press Light or Dark To make a two sided copy press 2 Sided Copy To select the copy paper press Paper Select See Selecting the Copy Paper Size Paper Select on p 1 17 To collate the copied papers press Finisher See Collating Copies Finishe...

Страница 82: ...1 1 1 1 Checking a Sample Set Before Copying Sample Set 1 74 1 74 1 74 1 74 ...

Страница 83: ...Confirmation in the Basic Features screen Press Setting Confirmation in the Basic Features screen Press Setting Confirmation in the Basic Features screen Press Setting Confirmation in the Basic Features screen The display shows the selected copy mode settings 2 2 2 2 Check the settings and press Done Check the settings and press Done Check the settings and press Done Check the settings and press D...

Страница 84: ...n in the Basic Features screen Press Setting Confirmation in the Basic Features screen The Setting Confirmation screen is displayed showing the selected copy mode settings 2 2 2 2 Press the key of the copy mode to be changed or cancelled Press the key of the copy mode to be changed or cancelled Press the key of the copy mode to be changed or cancelled Press the key of the copy mode to be changed o...

Страница 85: ...s To change a mode for example Sharpness Perform the same steps as when setting the mode Change the setting as you desire and press OK The display returns to the Setting Confirmation screen l To cancel a mode To cancel a mode To cancel a mode To cancel a mode Press Cancel The display returns to the Setting Confirmation screen 3 3 3 3 Press Done Press Done Press Done Press Done The display returns ...

Страница 86: ...1 1 1 1 Changing or Cancelling a Selected Copy Mode Setting Cancel 1 78 1 78 1 78 1 78 ...

Страница 87: ...r Eight Originals to Fit on a Single Copy Sheet Image Combination Reducing Two Four or Eight Originals to Fit on a Single Copy Sheet Image Combination Reducing Two Four or Eight Originals to Fit on a Single Copy Sheet Image Combination Reducing Two Four or Eight Originals to Fit on a Single Copy Sheet Image Combination 2 33 2 33 2 33 2 33 Dividing an Original into Equal Sections and Enlarging Each...

Страница 88: ...ge Separation or Image Repeat modes Place the original on the platen glass You cannot copy originals in the Two page Separation mode from the feeder NOTE When copying both sides in a book select the Two sided Separation mode See Making Two sided Copies from Facing Pages in a Book Book 2 Sided on p 1 65 1 1 1 1 Place the original on the platen glass and press Special Features Place the original on ...

Страница 89: ...2 2 2 2 Press Done Press Done Press Done Press Done The specified mode is set and the display returns to the Basic Features screen 3 3 3 3 Press Press Press Press Copying starts NOTE To cancel the setting press Special Features Two page Separation Done in this order To cancel all settings and return the machine to the Standard mode press ...

Страница 90: ...ok 2 Sided Two page Separation Booklet Transparency Interleaving Image Combination Image Separation Image Repeat or Mirror Image modes When Finisher J1 option is attached you cannot staple more than 30 sheets A4 and A4R or 15 sheets A3 of output paper including sheet insertions When Saddle Finisher G1 option is attached you cannot staple more than 50 sheets A4 and A4R or 25 sheets A3 of output pap...

Страница 91: ...rtions can also be copied on R E P O R T R E P O R T Printed back cover selected in the Cover Sheet Insertion mode Printed back cover selected in the Cover Sheet Insertion mode Printed back cover selected in the Cover Sheet Insertion mode Printed back cover selected in the Cover Sheet Insertion mode Copies Copies Copies Copies Original Original Original Original R E P O R T R E P O R T Printed she...

Страница 92: ...e is automatically set when you place the originals in the feeder See Setting Automatic Collate On Off on p 3 5 2 2 2 2 Select the Cover Sheet Insertion feature you want to use and press Next Select the Cover Sheet Insertion feature you want to use and press Next Select the Cover Sheet Insertion feature you want to use and press Next Select the Cover Sheet Insertion feature you want to use and pre...

Страница 93: ...ion press Printed and When copying onto the front cover back cover or sheet insertion press Printed and press Next press Next press Next press Next When setting Two sided Copying press Option set the side to be copied and press Done NOTE The display varies depending on the setting in step 2 The chapter page is always copied on only one side 4 4 4 4 Make the following settings depending on the mode...

Страница 94: ...t Insertion or Chapter Page When you select Sheet Insertion or Chapter Page Set all positions where the sheet is to be inserted into the copies and press Next Specify the sheet insertion positions using numeric keys IMPORTANT You cannot set the sheet insertion or chapter page position on the first page Set the position starting from the second page NOTE You can insert up to 20 insertion sheets or ...

Страница 95: ...reen IMPORTANT Select the same paper size for the front and back cover sheet insertions and chapter page When one of the paper sizes is changed to another size the other two will be changed But when only the paper drawer is changed with the same paper size the other two sizes will not be changed NOTE The display will vary depending on the mode selected 6 6 6 6 Press Press Press Press When the orig...

Страница 96: ...e Erase Different Size Originals Image Combination Image Separation Image Repeat or Mirror Image modes When you horizontally place vertical originals and scan them the images of the even number pages will be printed upside down Saddle stitching will not be performed when there is only one sheet of paper Saddle stitching cannot be set when the Saddle Finisher G1 option is not attached Folds may app...

Страница 97: ...klet NOTE When Auto Collate is set to On the Collate mode or the Offset Collate mode is automatically set when you place the original in the feeder See Setting Automatic Collate On Off on p 3 5 2 2 2 2 Select the original size and press Next Select the original size and press Next Select the original size and press Next Select the original size and press Next If two sided originals will be copied ...

Страница 98: ...e Finisher G1 option is not attached press OK Done in this order and proceed to step 5 A3 and A4R size paper can be selected To add a cover page press Add Cover NOTE Set the cover paper face down in the stack bypass l When you select Add Cover When you select Add Cover When you select Add Cover When you select Add Cover Select Yes or No to specify whether or not to copy on the cover and press Next...

Страница 99: ... whether to saddle stitch the booklet and press OK press Done press Done press Done press Done The specified mode is set and the display returns to the Basic Features screen NOTE When the number of sheets exceeds 11 stapling is not performed and the sheets are output to the tray The Booklet tray can hold up to 10 sets of copies at a time for saddle stitching When you set the Booklet mode the Shift...

Страница 100: ...sided Two page Separation Cover Sheet Insertion Booklet Image Combination Image Separation Image Repeat or Mirror Image modes You cannot make more than one set of copies at a time in the Transparency Interleaving mode Even if your machine is equipped with the Finisher you cannot use any of the Finisher modes with the Transparency Interleaving mode NOTE The machine s counter does not count blank in...

Страница 101: ...parency Interleaving press Transparency Interleaving press Transparency Interleaving press Transparency Interleaving NOTE When Auto Collate is set to On the Collate mode or the Offset Collate mode is automatically set when you place the originals in the feeder See Setting Automatic Collate On Off on p 3 5 2 2 2 2 Select the size of the transparencies and press Next Select the size of the transpare...

Страница 102: ...t 4 4 4 4 Select whether or not to copy the image onto the interleaf sheet and press OK Select whether or not to copy the image onto the interleaf sheet and press OK Select whether or not to copy the image onto the interleaf sheet and press OK Select whether or not to copy the image onto the interleaf sheet and press OK press press press press Done Done Done Done The selected mode is set and the d...

Страница 103: ...e original is placed on the platen glass follow the instructions that appear on the display and press once for each original When scanning is completed press Done Copying starts The copies are output with the copied side face down with the transparency first and followed by the interleaf sheet NOTE In the Transparency Interleaving mode the transparencies are fed from the stack bypass and the inter...

Страница 104: ...lection mode n Centre Corner Shift Centre Corner Shift Centre Corner Shift Centre Corner Shift Makes copies with the entire image shifted to the centre or a corner n No Key Entry No Key Entry No Key Entry No Key Entry Makes copies with the entire image shifted to a position specified with numeric keys Original Original Original Original Copy with original image shifted to Copy with original image ...

Страница 105: ... arrow key Then Press Center Shift Corner Shift and select the shift direction with an arrow key Then Press Center Shift Corner Shift and select the shift direction with an arrow key Then Press Center Shift Corner Shift and select the shift direction with an arrow key Then press OK and Done press OK and Done press OK and Done press OK and Done The shift direction refers not to the direction in whi...

Страница 106: ...he shift direction enter the desired value using Press No Key Entry to select the shift direction enter the desired value using numeric keys numeric keys numeric keys numeric keys If you enter a value outside the setting range a message prompting you to enter an appropriate value appears in the screen NOTE To change an entered value select the direction and enter the desired value again If you mak...

Страница 107: ...ration below Example To move the image in a diagonal direction as in the illustration below Press the upper or lower side to enter the value Next press the right or left side to enter the value and press OK press Done The diagonal direction arrow is displayed The selected mode is set and the display returns to the Basic Features screen 3 3 3 3 Press Press Press Press Copying starts NOTE To cancel ...

Страница 108: ... shifted to the left right top or bottom by a selected width then copied If copying an original image that extends to the edge of the sheet part of that image is cut off 1 1 1 1 Place your original and press Special Features Place your original and press Special Features Place your original and press Special Features Place your original and press Special Features press Margin press Margin press Ma...

Страница 109: ...the Margin and Two sided modes together and copying an original that does not have a margin then follow the instructions below 1 2 sided Set the margin for both the front and back 2 2 sided Set the margin for both the front and back 2 1 sided Set the margin for both the front and back NOTE If you want to enter values in inches then press Inch Set the inch entry function to On in the Additional Fun...

Страница 110: ...ss OK press Done When entering values in millimetres you can use numeric keys and The specified mode is set and the screen returns to the Basic Features screen If you enter a value outside the setting range a message prompting you to enter an appropriate value appears in the screen 3 3 3 3 Press Press Press Press Copying starts NOTE To cancel the setting press Special Features Margin Cancel in thi...

Страница 111: ...ame Erase Original Frame Erase Original Frame Erase Erases the dark borders and frame lines that appear around the copy when the original is smaller than the selected paper size Also it creates a blank border around the edge of the copy IMPORTANT When the machine is operating in the Original Frame Erase mode you cannot use the Entire Image Booklet Image Combination Image Separation Image Repeat or...

Страница 112: ...e Binding Frame Erase mode you cannot use the Entire Image Book 2 Sided Two page Separation Booklet Image Separation Image Repeat or Mirror Image modes Do not place originals with binding holes in the feeder as this may damage the originals Original Original Original Original Book Frame Book Frame Book Frame Book Frame Erase selected Erase selected Erase selected Erase selected Book Frame Book Fra...

Страница 113: ...lace your originals and press Special Features Place your originals and press Special Features press Frame Erase press Frame Erase press Frame Erase press Frame Erase 2 2 2 2 Press Original Frame Erase and press Next Press Original Frame Erase and press Next Press Original Frame Erase and press Next Press Original Frame Erase and press Next 3 3 3 3 Select the size of the original and press Next Se...

Страница 114: ...keys you can change the values with or The value set here is specified for all sides around the original To set independent frame erase width values for the top bottom left and right sides of the original press Adjust Each Dim When you select Adjust Each Dim select the side of the frame erase width using or and press OK press Done The specified mode is set and the display returns to the Basic Feat...

Страница 115: ...e Erase Frame Erase 1 1 1 1 Place your original and press Special Features Place your original and press Special Features Place your original and press Special Features Place your original and press Special Features press Frame Erase press Frame Erase press Frame Erase press Frame Erase 2 2 2 2 Press Book Frame Erase and press Next Press Book Frame Erase and press Next Press Book Frame Erase and p...

Страница 116: ...numeric keys you can change the values using or The values set here are specified independently for all sides around the original To set the same value for all sides around the original press Adjust All At Once When you select Adjust All At Once enter the value using or and press OK The specified mode is set and the display returns to the Basic Features screen If you enter a value outside the sett...

Страница 117: ...he platen glass and press Special Features Place your original on the platen glass and press Special Features Place your original on the platen glass and press Special Features Place your original on the platen glass and press Special Features press press press press Frame Erase Frame Erase Frame Erase Frame Erase IMPORTANT Do not place originals with binding holes in the feeder as this may damage...

Страница 118: ...h using or and press OK press Done press Done press Done press Done When entering values in millimetres you can use numeric keys and Even when you enter the values with numeric keys you can change the values using or The specified mode is set and the display returns to the Basic Features screen If you enter a value outside the setting range a message prompting you to enter an appropriate value app...

Страница 119: ...des of a selected paper size IMPORTANT When the machine is operating in the Image Combination mode you cannot use the Entire Image Two sided Two page Separation Cover Sheet Insertion Booklet Transparency Interleaving Saddle Stitch Original Frame Erase Book Frame Erase Different Size Originals Image Separation Image Repeat or Mirror Image modes Originals copied in the Image Combination mode must al...

Страница 120: ...d press Special Features Place your originals and press Special Features Place your originals and press Special Features press Image Combination press Image Combination press Image Combination press Image Combination NOTE When Auto Collate is set to On the Collate mode or the Offset Collate mode is automatically set when you place the originals in the feeder See Setting Automatic Collate On Off on...

Страница 121: ...iginal and press Next When copying a two sided original with the Image Combination mode select the size of the original and press 2 Sided Original When you pressed 2 Sided Original select the opening method and press OK NOTE To select the inch paper size press Inch size 3 3 3 3 Select the desired Image Combination feature and press Next Select the desired Image Combination feature and press Next S...

Страница 122: ...llowing order left right for 2 On 1 upper left upper right lower left lower right for 4 On 1 or 8 On 1 4 4 4 4 Select the paper size and press OK Select the paper size and press OK Select the paper size and press OK Select the paper size and press OK press Done press Done press Done press Done The specified mode is set and the display returns to the Basic Features screen IMPORTANT You cannot set A...

Страница 123: ...set the Image Combination mode the Shift mode is automatically set 5 5 5 5 Press Press Press Press When the original is placed on the platen glass follow the instructions that appear on the display and press once for each original When scanning is completed press Done Copying starts NOTE To cancel the setting press Special Features Image Combination Cancel in this order To cancel all settings and ...

Страница 124: ...TANT When the machine is operating in the Image Separation mode you cannot use the Entire Image Two sided Two page Separation Cover Sheet Insertion Booklet Transparency Interleaving Saddle Stitch Frame Erase Different Size Originals Image Combination or Image Repeat modes Originals copied in the Image Separation mode must all be the same size You cannot use the Different Size Originals mode in com...

Страница 125: ...e original on the platen glass and press Special Features Place the original on the platen glass and press Special Features Place the original on the platen glass and press Special Features Place the original on the platen glass and press Special Features press Image press Image press Image press Image Separation Separation Separation Separation 2 2 2 2 Select the type of zooming layout and press ...

Страница 126: ...ayout of the final page of the original and press Next Select the layout of the final page of the original and press Next You can reduce the output of pages without images blank output by setting the layout of the last original Press Option to select the order of the image layout and press Done If you do not specify Option the images are printed in the following order left right for 1 To 2 upper l...

Страница 127: ...nd the display returns to the Basic Features screen IMPORTANT You cannot select Automatic Paper Selection in the Image Separation mode NOTE The machine automatically selects the copy ratio depending on the selected paper size 5 5 5 5 Press Press Press Press When there are multiple originals follow the instructions that appear on the display and press once for each original When scanning is complet...

Страница 128: ... Image Repeat modes You cannot select the Shift mode when you set Automatic Paper Selection in combination with the Different Size Originals mode All originals placed together in the feeder must be the same weight paper type NOTE When combined with Different Size Originals two sided copying cannot be performed The different size originals will be printed as one sided copies on their respective siz...

Страница 129: ...e display returns to the Basic Features screen 3 3 3 3 Press Press Press Press When the original is placed on the platen glass follow the instructions that appear on the display and press once for each original When scanning is completed press Done Copying starts NOTE To cancel the setting press Special Features Different Size Originals in this order To cancel all settings and return the machine t...

Страница 130: ...next originals i e between jobs the number of copies image quality exposure and 2 sided mode When you place each original in the feeder continue to remove each original from the original output area when scanning is completed NOTE When you place different size originals in the feeder set the Different Size Originals mode When you want to copy one sided and two sided originals as two sided copies s...

Страница 131: ...sic Features screen 3 3 3 3 Press Press Press Press Scanning starts NOTE To cancel scanning press Cancel or 4 4 4 4 When scanning is completed place the next original and press When scanning is completed place the next original and press When scanning is completed place the next original and press When scanning is completed place the next original and press Change the scan settings before pressing...

Страница 132: ...d Original mode according to the type of originals Repeat this operation as necessary 5 5 5 5 After the last original is scanned press Done After the last original is scanned press Done After the last original is scanned press Done After the last original is scanned press Done NOTE To cancel the setting press Special Features Job Build in this order To cancel all settings and return the machine to...

Страница 133: ... functions NOTE The copy settings stored in memory are not erased even when you turn the power off You can store all functions modes except for the Interrupt mode Storing Copy Settings Storing Copy Settings Storing Copy Settings Storing Copy Settings 1 1 1 1 Programme the copy settings that you want to store in the Basic Features and or Special Programme the copy settings that you want to store in...

Страница 134: ...Mode Memory 2 48 2 48 2 48 2 48 2 2 2 2 2 2 2 2 Press Mode Memory Press Mode Memory Press Mode Memory Press Mode Memory 3 3 3 3 Press Store Erase Press Store Erase Press Store Erase Press Store Erase 4 4 4 4 Press Store Press Store Press Store Press Store ...

Страница 135: ... square n in the lower right corner If you select a memory key already storing copy settings the settings are displayed If there are more stored copy settings than are currently displayed then you can scroll the list using s or t l If you select a memory key not already storing copy settings If you select a memory key not already storing copy settings If you select a memory key not already storing...

Страница 136: ...mory appears for about two seconds The memory key storing the copy settings is reversed and the stored settings are displayed 6 6 6 6 Press OK and press Done Press OK and press Done Press OK and press Done Press OK and press Done The display returns to the Basic Features screen Storing a Memory Key Name Storing a Memory Key Name Storing a Memory Key Name Storing a Memory Key Name 1 1 1 1 Press Spe...

Страница 137: ... store a name and press Select the memory key M1 to M9 to which you want to store a name and press Select the memory key M1 to M9 to which you want to store a name and press Select the memory key M1 to M9 to which you want to store a name and press Next Next Next Next NOTE A mode memory key already storing copy settings shows a small black square n in the lower right corner If you select a memory ...

Страница 138: ...press Done The display returns to the Basic Features screen Recalling Copy Settings Recalling Copy Settings Recalling Copy Settings Recalling Copy Settings 1 1 1 1 Press Special Features and press Mode Memory Press Special Features and press Mode Memory Press Special Features and press Mode Memory Press Special Features and press Mode Memory 2 2 2 2 Select the memory key storing the copy settings ...

Страница 139: ... you press another memory key the copy settings stored in that key are recalled Erasing a Copy Job Erasing a Copy Job Erasing a Copy Job Erasing a Copy Job 1 1 1 1 Press Special Features and press Mode Memory Press Special Features and press Mode Memory Press Special Features and press Mode Memory Press Special Features and press Mode Memory 2 2 2 2 Press Store Erase Press Store Erase Press Store ...

Страница 140: ... erase the copy job IMPORTANT Check the copy settings before you erase them NOTE A mode memory key already storing copy settings shows a small black square n in the lower right corner If you selected a memory key already storing copy settings the settings are displayed If there are more stored copy settings than are currently displayed then you can scroll the list using s or t 5 5 5 5 Press Yes Pr...

Страница 141: ...he stored copy setting is erased NOTE The name of the memory key is not erased For details of how to change the name see Storing a Memory Key Name on p 2 50 6 6 6 6 Press Cancel and press Done Press Cancel and press Done Press Cancel and press Done Press Cancel and press Done The display returns to the Basic Features screen ...

Страница 142: ...dentical copy settings are counted as one setting NOTE Once stored the last three copy settings are held in memory even if the power is turned off 1 1 1 1 Place your originals and press Special Features Place your originals and press Special Features Place your originals and press Special Features Place your originals and press Special Features Recall Recall Recall Recall 2 2 2 2 Select either 1 B...

Страница 143: ...ess Special Features Place your originals and press Special Features Place your originals and press Special Features press press press press t 2 2 2 2 Press Nega Posi and press Done Press Nega Posi and press Done Press Nega Posi and press Done Press Nega Posi and press Done The specified mode is set and the display returns to the Basic Features screen 3 3 3 3 Press Press Press Press Copy starts NO...

Страница 144: ...ing methods are available for the Image Repeat mode n Automatic Setting Automatic Setting Automatic Setting Automatic Setting The original image is copied so that the maximum possible number of copies fit in the selected paper size IMPORTANT When the machine is operating in the Image Repeat auto setting mode you cannot use the Entire Image Book 2 Sided Two page Separation Cover Sheet Insertion Shi...

Страница 145: ...eat press Image Repeat press Image Repeat 2 2 2 2 Set the number of Image repeat times for each of the horizontal and vertical directions Set the number of Image repeat times for each of the horizontal and vertical directions Set the number of Image repeat times for each of the horizontal and vertical directions Set the number of Image repeat times for each of the horizontal and vertical direction...

Страница 146: ...times you have manually set the image to be repeated some of the designated images may overlap 3 3 3 3 Press OK and press Done Press OK and press Done Press OK and press Done Press OK and press Done The specified mode is set and the display returns to the Basic Features screen 4 4 4 4 Press Press Press Press Copying starts NOTE To cancel the setting press Special Features t Image Repeat Cancel in ...

Страница 147: ... use the Entire Image Cover Sheet Insertion Shift Booklet Margin Frame Erase Image Combination Transparency Interleaving or Image Repeat modes 1 1 1 1 Place your original and press Special Features Place your original and press Special Features Place your original and press Special Features Place your original and press Special Features press press press press t 2 2 2 2 Press Mirror Image and pres...

Страница 148: ...rror Image 2 62 2 62 2 62 2 62 2 2 2 2 3 3 3 3 Press Press Press Press Copying starts NOTE To cancel the setting press Special Features t Mirror Image in this order To cancel all settings and return the machine to the Standard mode press ...

Страница 149: ...orld s coral reefs where brilliantly colored fish and a myriad of other creatures of the tropics come together Low set Low set Low set Low set Low not set Low not set Low not set Low not set Original Original Original Original Copy Copy Copy Copy The world s coral reefs where brilliantly colored fish and a myriad of other tropical creatures come together Aptly nicknamed Tropical Forests under the ...

Страница 150: ...sharpness by pressing Low or High and press OK Adjust the sharpness by pressing Low or High and press OK Adjust the sharpness by pressing Low or High and press OK press Done press Done press Done press Done To copy text and lines clearly the setting should be towards High To copy halftone images such as photographs the setting should be towards Low The specified mode is set and the display returns...

Страница 151: ... On Off Setting Image Orientation Priority to On Off 3 6 3 6 3 6 3 6 Setting the Job Duration Display Setting the Job Duration Display Setting the Job Duration Display Setting the Job Duration Display 3 7 3 7 3 7 3 7 Setting Auto Orientation to On Off Setting Auto Orientation to On Off Setting Auto Orientation to On Off Setting Auto Orientation to On Off 3 8 3 8 3 8 3 8 Setting the Photo Mode of t...

Страница 152: ... to scroll to the screen you want and make the required settings When t or s should be pressed the indication is displayed in this manual Additional Function Additional Function Additional Function Additional Function Available settings Available settings Available settings Available settings Applicable page Applicable page Applicable page Applicable page Copy Settings Copy Settings Copy Settings ...

Страница 153: ...1 1 1 1 Call up the desired screen as follows Call up the desired screen as follows Call up the desired screen as follows Call up the desired screen as follows 2 2 2 2 Display the group of functions to be stored as Standard keys by pressing Display the group of functions to be stored as Standard keys by pressing Display the group of functions to be stored as Standard keys by pressing Display the g...

Страница 154: ... the Standard key and press OK Select the desired modes to be stored with the Standard key and press OK NOTE To cancel storing press Cancel 4 4 4 4 Press Done Press Done Press Done Press Done Repeat this procedure The display returns to the Basic Features screen Example The stored Standard keys are displayed as shown below Standard key 1 Standard key 1 Standard key 1 Standard key 1 Standard key 2 ...

Страница 155: ...ing is available only when the Feeder DADF H1 is attached NOTE When Auto Collate is set to On with the finisher option attached the Offset Collate mode is set Without any output option attached the Collate mode is set The default setting is On 1 1 1 1 Call up the desired screen as follows Call up the desired screen as follows Call up the desired screen as follows Call up the desired screen as foll...

Страница 156: ...T This setting is not available when the Finisher J1 is attached NOTE When Image Orientation Priority is set to On the first copy will take longer to process than normally The default setting is Off 1 1 1 1 Call up the desired screen as follows Call up the desired screen as follows Call up the desired screen as follows Call up the desired screen as follows 2 2 2 2 Select On or Off and press OK Sel...

Страница 157: ...inting The job duration time is not displayed for the Transparency Interleaving Cover Sheet Insertion Different Size Originals Rotate Collating and Rotate Grouping modes or when the copy waiting time is less than one minute The default setting is Off 1 1 1 1 Call up the desired screen as follows Call up the desired screen as follows Call up the desired screen as follows Call up the desired screen ...

Страница 158: ...Call up the desired screen as follows Call up the desired screen as follows Call up the desired screen as follows 2 2 2 2 Select On or Off and press OK Select On or Off and press OK Select On or Off and press OK Select On or Off and press OK NOTE Only standard size originals up to A4 for direct zoom ratio can be rotated When Automatic Paper Selection is selected any paper matching the width will b...

Страница 159: ...tion When the Photo Mode is On you can select Printed Image and Photo when making copies with the image quality setting NOTE The default setting is Off 1 1 1 1 Call up the desired screen as follows Call up the desired screen as follows Call up the desired screen as follows Call up the desired screen as follows 2 2 2 2 Select On or Off and press OK Select On or Off and press OK Select On or Off and...

Страница 160: ...antity 1 Paper selection Automatic Paper Selection Exposure Image quality A Copy Ratio 1 1 100 Copy function 1 1 sided copy Storing New Standard Settings for Copying Storing New Standard Settings for Copying Storing New Standard Settings for Copying Storing New Standard Settings for Copying To store copy settings as Standard Settings you need to specify the settings you wish to store from the Basi...

Страница 161: ...Settings NOTE The settings displayed here are the currently set copy settings Press s or t to display Copy modes that do not fit in the display area 4 4 4 4 Press Done Press Done Press Done Press Done Repeat this procedure The display returns to the Basic Features screen Initialising the Standard Settings Initialising the Standard Settings Initialising the Standard Settings Initialising the Standa...

Страница 162: ...tting and press Yes Check the setting and press Yes Check the setting and press Yes Check the setting and press Yes To cancel the initialisation press No This screen is displayed for about two seconds as the Standard Settings are initialised 4 4 4 4 Press Done Press Done Press Done Press Done Repeat this procedure The display returns to the Basic Features screen ...

Страница 163: ... Copy Settings can be returned to their default settings 1 1 1 1 Call up the desired screen as follows Call up the desired screen as follows Call up the desired screen as follows Call up the desired screen as follows 2 2 2 2 Press Yes Press Yes Press Yes Press Yes To cancel the initialisation of copy settings press No The display returns to the Copy Setting screen This screen is displayed for abou...

Страница 164: ...Restoring Settings to Default Copy Settings 3 14 3 14 3 14 3 14 2 2 2 2 ...

Страница 165: ...dix Appendix Appendix Appendix Chart of Available Combination of Functions Chart of Available Combination of Functions Chart of Available Combination of Functions Chart of Available Combination of Functions 4 2 4 2 4 2 4 2 Index Index Index Index 4 6 4 6 4 6 4 6 ...

Страница 166: ... 1 2 Sided 2 2 Sided 2 1 Sided Book 2 Sided Function intend to set Function intend to set Function intend to set Function intend to set Enlargement s s s s Zoom Designation s s s s XY Zoom s s s s Auto Zoom mode s s s s 5 5 1 Zoom Program s s s s Entire Image 1 Automatic Exposure Control s s s s Printed Image s s s s Photo s s s s Text s s s s Text Photo s s s s Automatic Paper Selection 5 s 1 5 5...

Страница 167: ...n intend to set Two page Separation 1 5 5 5 5 5 Image Combination l l l l 5 5 5 1 5 5 5 5 5 Image Separation l l l l 5 5 5 1 5 5 5 5 5 Original Frame Erase 5 Book Frame Erase 5 Binding Erase 5 5 Right Margin Left Margin Top Margin Bottom Margin Shift s 1 Front Cover 4 4 1 5 5 5 5 5 5 Sheet Insertion Printed Blank 4 4 1 5 5 5 5 5 5 Chapter Page 4 4 1 5 5 5 5 5 5 Transparency Interleaving 5 6 5 5 5 ...

Страница 168: ...ntend to set Enlargement l l l l l Zoom Designation l l l l l XY Zoom l l l l l Auto Zoom mode 5 Zoom Program l l l l l Entire Image 5 5 5 5 5 5 5 5 5 5 5 Automatic Exposure Control Printed Image Photo Text Text Photo Automatic Paper Selection 5 5 4 4 4 5 5 5 5 Automatic Paper Selection Auto Orientation 5 5 4 4 4 5 5 5 5 5 5 5 Auto Drawer Switching 5 Stack Bypass 1 1 1 1 1 1 1 5 1 1 1 1 1 Collate ...

Страница 169: ...l Frame Erase Book Frame Erase Binding Erase Right Margin Left Margin Top Margin Bottom Margin Shift Front Cover Sheet Insertion Printed Blank Chapter Page Transparency Interleaving Booklet Booklet Saddle Stitch Add Cover Printed Blank Sample Set Different Size Originals Job Build Sharpness Nega Posi Image Repeat Auto Setting Image Repeat Manual Setting Mirror Image Function intend to set Function...

Страница 170: ... A A A Auto 1 31 Auto Collate 3 5 Auto Orientation 3 8 Auto XY Zoom 1 41 B B B B Back Cover 2 5 Binding Erase 2 26 2 31 Book 2 Sided 1 57 1 65 Book Frame Erase 2 26 2 29 Booklet 2 10 C C C C Center Shift 2 19 Center Corner Shift 2 18 Chapter Page 2 6 Collate 1 45 1 48 Copy Basic Features Screen 1 3 Copy Quantity 1 16 Copy Ratio 1 27 Corner Shift 2 19 Cover Sheet Insertion 2 4 ...

Страница 171: ...e 1 33 F F F F Finisher 1 44 Frame Erase 2 25 Front Cover 2 4 Front Back Two sided 1 65 G G G G Group 1 45 1 51 H H H H Hole Punch 1 47 I I I I Image Combination 2 33 Image Orientation Priority 3 6 Image Repeat 2 58 Image Separation 2 38 Interrupt Mode 1 70 J J J J Job Build 2 44 Job Duration Display 3 7 ...

Страница 172: ... M M M Manual Paper Selection 1 19 Margin 2 22 Mirror Image 2 61 Mode Memory 2 47 N N N N Nega Posi 2 57 Non collate 1 47 O O O O Offset 1 48 Original Frame Erase 2 25 2 27 P P P P Paper Select 1 17 Photo Mode 1 23 3 9 Preset Zoom 1 27 R R R R Recall 2 56 Rotate 1 47 ...

Страница 173: ...2 5 Shift 2 18 Special Features Screen 1 2 1 5 Special Features Screen 2 2 1 8 Standard Keys 3 3 Standard Settings 3 10 Staple 1 46 1 53 T T T T Text Mode 1 23 Text Photo Mode 1 23 Transparency Interleaving 2 14 Two page Separation 2 2 Two sided Mode 1 57 X X X X XY Zoom 1 35 1 38 1 40 Z Z Z Z Zoom 1 35 1 36 Zoom Designation 1 29 Zoom Program 1 35 ...

Страница 174: ......

Отзывы: