


Chapter 11
11-23
11.5.11.2 Procedure after Replacing the Control Panel
0021-0350
imageRUNNER C1022 / imageRUNNER C1022i / Color imageRUNNER
C1030 / Color imageRUNNER C1030iF
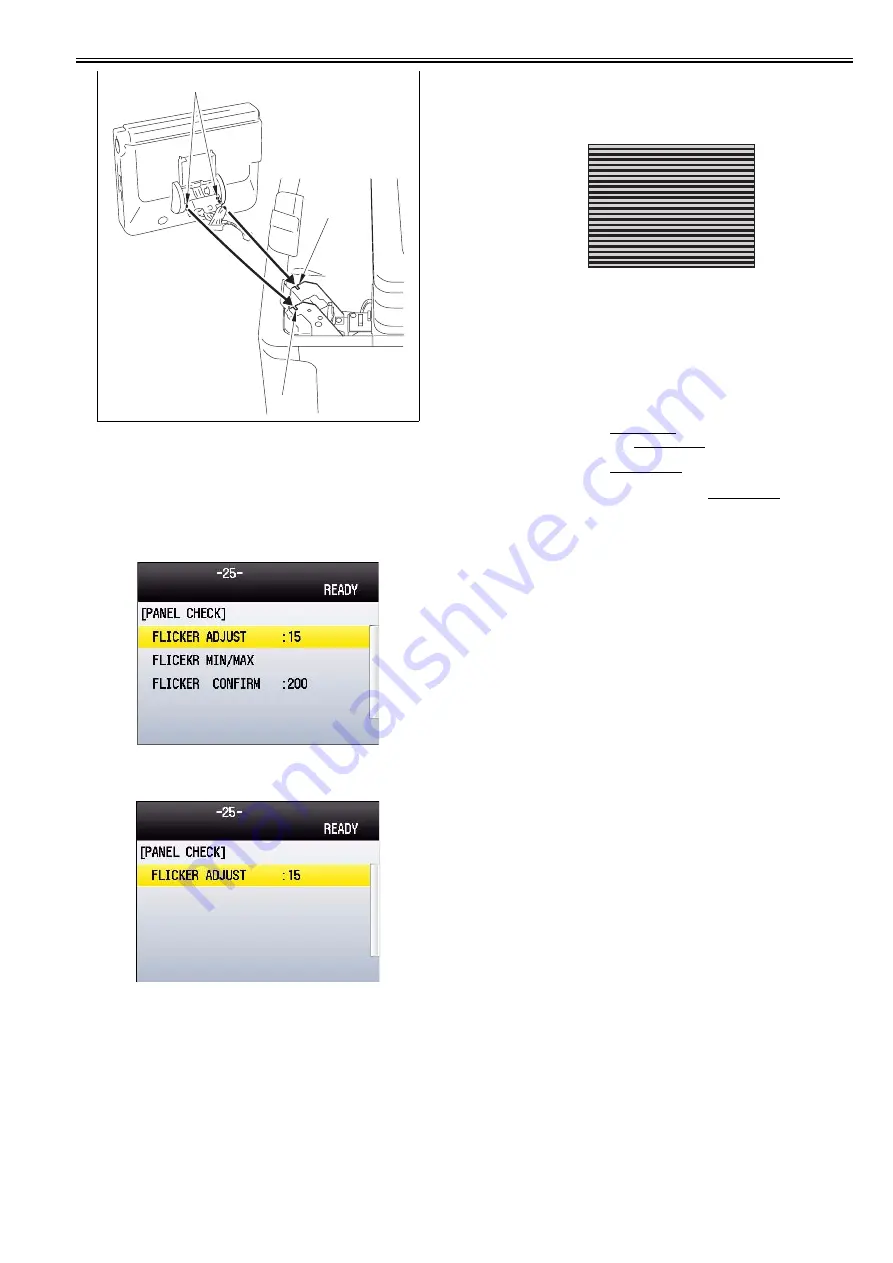
After replacing the control panel, adjust the flicker value of the control panel
using the service mode.
1) Using the service mode, make the machine display the flicker value ad-
justment screen for the control panel.
TESTMODE> PANEL> FLICKER CHECK START
F-11-56
2) Press the [OK] key.
The flicker value entry screen is displayed.
F-11-57
3) Press the [OK] key.
The flicker adjustment pattern (a pattern with horizontal stripes) is dis-
played in the LCD.
Pressing the right/left arrow keys, search for the area with the minimum
flicker.
F-11-58
4) Press the [OK] key.
5) Press the [Back] key.
The service mode operation is terminated.
11.5.12 NCU Board
11.5.12.1 Before Removing the NCU PCB
0019-5736
imageRUNNER C1022 / imageRUNNER C1022i / Color imageRUNNER
C1030 / Color imageRUNNER C1030iF
1) Remove the ETB unit.
Reference [Removing the ETB Unit]
2) Remove the rear cover unit.
Reference [Removing the Rear
Cover Unit]
3) Remove the left cover.
Reference [Removing the Left Cov-
er]
4) Remove the Electrical Components Cover.
Reference [Re-
moving the Electrical Components Cover]
11.5.12.2 Removing the NCU PCB
0019-5737
imageRUNNER C1022 / imageRUNNER C1022i / Color imageRUNNER
C1030 / Color imageRUNNER C1030iF
1) Remove the NCU PCB.
- 1 flat cable [2]
- 3 connectors [3]
- 2 screws [4]
[1]
[2]
[2]
Содержание imageRUNNERC1022
Страница 2: ......
Страница 6: ......
Страница 19: ...Chapter 1 Introduction ...
Страница 20: ......
Страница 22: ...Contents 1 2 7 Function List 1 68 1 2 7 1 Print Speed 1 68 1 2 7 2 Print Speed 1 69 1 2 7 3 Paper Type 1 70 ...
Страница 93: ...Chapter 2 Installation ...
Страница 94: ......
Страница 96: ......
Страница 111: ...Chapter 3 Basic Operation ...
Страница 112: ......
Страница 114: ......
Страница 119: ...Chapter 4 Main Controller ...
Страница 120: ......
Страница 122: ......
Страница 135: ...Chapter 5 Original Exposure System ...
Страница 136: ......
Страница 138: ......
Страница 151: ...Chapter 6 Original Feeding System ...
Страница 152: ......
Страница 154: ......
Страница 170: ......
Страница 171: ...Chapter 7 Laser Exposure ...
Страница 172: ......
Страница 174: ......
Страница 184: ......
Страница 185: ...Chapter 8 Image Formation ...
Страница 186: ......
Страница 188: ......
Страница 222: ......
Страница 223: ...Chapter 9 Pickup and Feed System ...
Страница 224: ......
Страница 259: ...Chapter 10 Fixing System ...
Страница 260: ......
Страница 262: ......
Страница 268: ...Chapter 10 10 6 ...
Страница 279: ...Chapter 11 External and Controls ...
Страница 280: ......
Страница 311: ...Chapter 12 e Maintenance imageWARE Remote ...
Страница 312: ......
Страница 314: ......
Страница 323: ...Chapter 12 12 9 F 12 27 ...
Страница 345: ...Chapter 12 12 31 A service technician performs a complete processing for the service call request that has been made ...
Страница 349: ...Chapter 13 Maintenance and Inspection ...
Страница 350: ......
Страница 352: ......
Страница 354: ......
Страница 355: ...Chapter 14 Measurement and Adjustments ...
Страница 356: ......
Страница 358: ......
Страница 361: ...Chapter 15 Correcting Faulty Images ...
Страница 362: ......
Страница 364: ......
Страница 381: ...Chapter 15 15 17 F 15 19 21 22 28 29 30 31 24 14 15 16 23 26 25 32 27 20 19 18 17 2 13 6 10 33 1 8 4 3 12 11 5 7 9 ...
Страница 385: ...Chapter 16 Error Code ...
Страница 386: ......
Страница 388: ......
Страница 399: ...Chapter 16 16 11 ...
Страница 400: ......
Страница 401: ...Chapter 17 Special Management Mode ...
Страница 402: ......
Страница 404: ......
Страница 411: ...Chapter 17 17 7 ...
Страница 412: ......
Страница 413: ...Chapter 18 Service Mode ...
Страница 414: ......
Страница 492: ......
Страница 493: ...Chapter 19 Upgrading ...
Страница 494: ......
Страница 496: ......
Страница 500: ...Chapter 19 19 4 3 Click Next F 19 4 4 Select a USB connected device and click Next F 19 5 ...
Страница 501: ...Chapter 19 19 5 5 Click Start F 19 6 6 Click Yes F 19 7 Download will be started F 19 8 ...
Страница 504: ...Chapter 19 19 8 4 Select a USB connected device and click Next F 19 12 5 Click Start F 19 13 ...
Страница 506: ...Chapter 19 19 10 ...
Страница 507: ...Chapter 20 Service Tools ...
Страница 508: ......
Страница 510: ......
Страница 514: ......
Страница 515: ...Appendix ...
Страница 516: ......
Страница 532: ......
Страница 533: ...Oct 29 2010 ...
Страница 534: ......


