background image

60

Routine Cleaning

03 

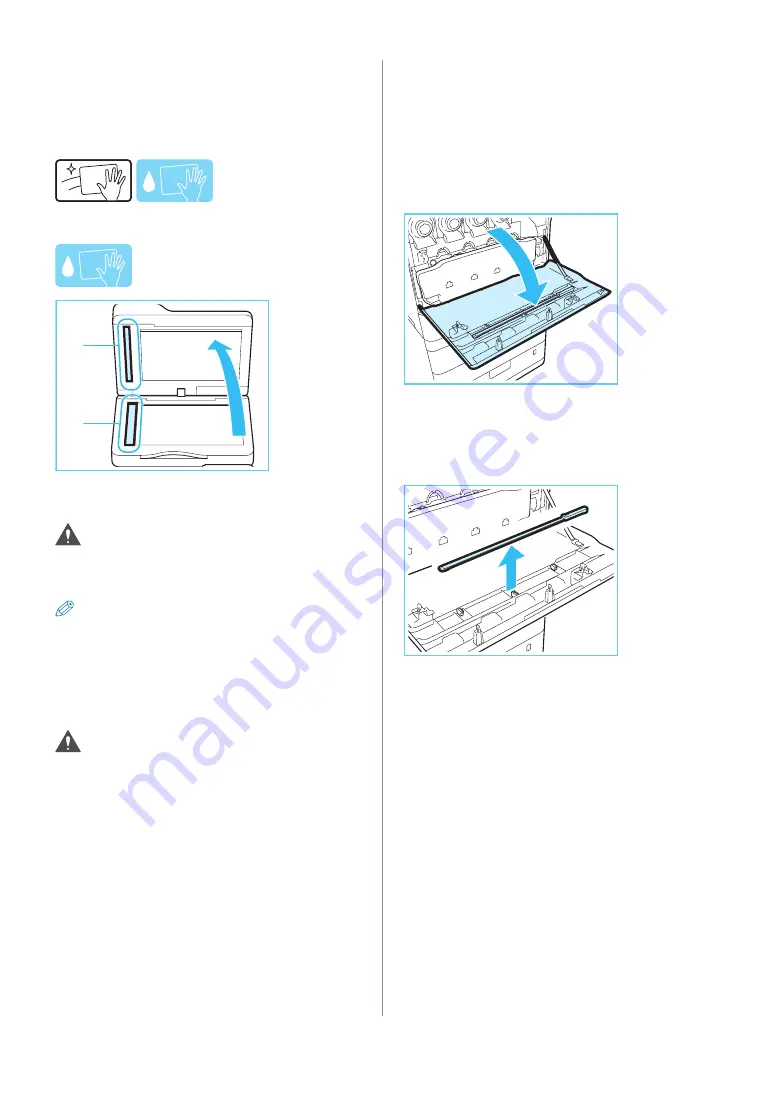
Clean the document feed scanning 

area (thin glass strip) and the white plate.

1.  Open the feeder.

2.  Clean the document feed scanning area.


3.  Clean the white plate.

2

3

1

4.  Close the feeder.

CAUTION

When closing the feeder, be careful not to get your 
fingers caught, as this may result in personal injury.

NOTE

When the glass cleaning sheet is dirty, rinse it with 
water and spread it out to let it dry.

04 

Close the feeder cover.

CAUTION

When closing the feeder cover, be careful not to get 
your fingers caught, as this may result in personal 
injury.

When White Streaks Appear on Prints 

(Cleaning the Dust Proof Glass)

When white streaks or other print defects occur, the dust 
proof glass may be dirty. Follow the procedure below to 
clean the dust proof glass.

01 

Open the front cover of the main unit.

02 

Remove the dust proof glass cleaner 

from the rear side of the front cover of the 

main unit.

Содержание imageRUNNER ADVANCE C250iF

Страница 1: ...Read this guide first Please read this guide before operating this product After you finish reading the guide store it in a safe place for future reference Starter Guide ...

Страница 2: ...o use one of the machine s operations you can quickly check it here e Manual HTML Manual Describes all the functions of the machine Also provided with a search function that is useful for finding and checking information Includes Practical Workflows which introduces flows of practical operations using functions of the machine Driver Installation Guide Provides instructions on installing the printe...

Страница 3: ...low the content to be displayed If the e Manual CD ROM Does Not Start The CD ROM auto run function may be disabled In this case you must perform the following procedure Windows XP Server 2003 1 Click Start on the taskbar click My Computer 2 Double click the e Manual icon 3 Double click Maninst exe Windows Vista 7 Server 2008 1 Click Start on the taskbar click Computer 2 Double click the e Manual i...

Страница 4: ...Sheet Storage Box 17 9 Connecting Cables 17 10 Turning the Main Power ON 18 Chapter 2 Setting and Registering the Machine Configuring the Machine Setup Guide 20 Changing Specified Settings 28 Chapter 3 Before Using This Machine Parts and Their Functions 30 External View 30 Internal View 31 Feeder 32 Control Panel Parts and Functions 32 Adjusting the Angle of the Control Panel 33 Main Power and Ene...

Страница 5: ...Finisher S1 72 Copy Card Reader F1 73 FAX Function 73 Send Function Scan Features 74 Send Function E Mail and I Fax Features 75 Network Environment Hardware Specifications 76 Network Environment Software Specifications 76 Printer Settings Software Specifications 76 Legal Notices 77 Product Name 77 FCC Federal Communications Commission Users in the U S A 77 Laser Safety 78 International ENERGY STAR...

Страница 6: ...to these warnings CAUTION Indicates a caution concerning operations that may lead to injury to persons if not performed correctly To use the machine safely always pay attention to these cautions IMPORTANT Indicates operational requirements and restrictions Be sure to read these items carefully to operate the machine correctly and avoid damage to the machine or property NOTE Indicates a clarificati...

Страница 7: ...gistered in certain jurisdictions Apple EtherTalk LocalTalk Mac Macintosh Mac OS and Safari are trademarks of Apple Inc registered in the U S and other countries Microsoft Windows Windows Vista Windows Server Internet Explorer Excel and PowerPoint are either registered trademarks or trademarks of Microsoft Corporation in the United States and or other countries Adobe PostScript and the PostScript ...

Страница 8: ...Script in the text are references to the PostScript language as defined by Adobe Systems Incorporated unless otherwise stated The name PostScript also is used as a product trademark for Adobe Systems implementation of the PostScript language interpreter Except as otherwise stated any reference to a PostScript printing device PostScript display device or similar item refers to a printing device dis...

Страница 9: ...Site 11 2 Removing the Packing Materials 12 3 Checking Items Included with the Machine 14 4 Installing the Toner Cartridge 15 5 Loading Paper into the Paper Drawer for the First Time 15 6 Storing the Envelope Feeder Attachment in a Paper Drawer 16 7 Attaching the Precaution Label 16 8 Attaching the Glass Cleaning Sheet Storage Box 17 9 Connecting Cables 17 10 Turning the Main Power ON 18 ...

Страница 10: ...y this amount is not harmful Ozone etc may be more noticeable during extended use or long production runs especially in poorly ventilated rooms It is recommended that the room be appropriately ventilated sufficient to maintain a comfortable working environment in areas of machine operation In addition do not install this machine where it exhausts directly onto a person Avoid locations that are sub...

Страница 11: ...d use of a damaged power cord can lead to an accident such as a fire or electrical shock The power cord should not be taut as this may lead to a loose connection and cause overheating which could result in a fire If excessive stress is applied to the connection part of the power cord it may damage the power cord or the wires inside the machine may disconnect This could result in a fire Avoid the f...

Страница 12: ...nect the power cord from the power outlet and then call your local authorized Canon dealer Using the machine in this state may cause a fire or electrical shock Also avoid placing objects around the power plug so that the machine can be disconnected whenever necessary Do not turn the main power switch OFF or open the front covers while the machine is in operation This may result in paper jams Do no...

Страница 13: ...o or more people by gripping the indented area on the sides of the machine and carry the machine to the installation site CAUTION Make sure to grip the handles on the sides of the machine firmly when lifting Holding the machine in an unspecified manner may result in personal injury or damage to the machine Those with back pain should check the weight of the machine before lifting Make sure that yo...

Страница 14: ...rip the handle and pull out the paper drawer until it stops 2 Remove the box containing the included items 3 Remove the packing materials attached to the paper drawer 02 Gently push the paper drawer back into the machine CAUTION When returning the paper drawer to its original position be careful not to get your fingers caught as this may result in personal injury 03 Lift the feeder tray and remove...

Страница 15: ... each part of the machine Platen Glass Control Panel Upper Part of the Front Cover of the Main Unit If you own the optional Cassette Feeding Unit AG1 Cassette Feeding Unit AH1 carefully read Attaching the Cassette Feeding Unit to the Machine and attach it to the machine ...

Страница 16: ...ncluded with the machine against this list to ensure that nothing is missing CD ROM Paper Manual x 2 Power Cord Modular Cable Service Book Holder Envelope Feeder Attachment x 4 x 1 Glass Cleaning Sheet Glass Cleaning Sheet Storage Box Double Sided Tape Paper Size Labels Precaution Labels ...

Страница 17: ...tput properly 04 Insert the new toner cartridge 1 Match the new toner cartridge with the slot on the main unit as shown in the illustration 2 Push the new toner cartridge in as far as possible NOTE Support the toner cartridge with one hand from underneath while pushing it into the machine with the other hand 05 Close the front cover of the main unit CAUTION When closing the cover be careful not to...

Страница 18: ...e Envelope Feeder Attachment in the storage area of the paper drawer 03 Gently push the paper drawer back into the machine CAUTION When returning the paper drawer to its original position be careful not to get your fingers caught as this may result in personal injury 7 Attaching the Precaution Label 01 Open the feeder 02 Select the desired language label among the supplied precaution labels peel o...

Страница 19: ...icated in the illustration 01 Attach the double sided tape onto the glass cleaning sheet storage box and remove the release liner from the double sided tape 02 Attach the box to the machine NOTE Change the location to attach the box to depending on the attached optional products 9 Connecting Cables 01 Connect a modular cable into the socket on the back left of the machine 02 Connect a LAN cable in...

Страница 20: ... cord 01 Connect the power cord into the socket on the back right of the machine and to the wall outlet 02 Turn ON the main power 2 1 The main power indicator on the control panel lights when you turn ON the main power switch Various screens appear when system software is loading NOTE For instructions on turning the main power ON and OFF and on using the Energy Saver key see Main Power and Energy ...

Страница 21: ...2 Setting and Registering the Machine Configuring the Machine Setup Guide 20 Changing Specified Settings 28 ...

Страница 22: ...ing even without entering anything Unset items can be set separately You can set them after finishing the Setup Guide If the power is turned OFF while using the Setup Guide when you turn the power back ON the Setup Guide is automatically started Perform Setup Guide settings once again Once the Setup Guide has been completed it will not start up again when turning ON the machine 01 Configuring the ...

Страница 23: ...me using numeric keys press OK Enter the day and the month using four digits including zeros The time is displayed in 24 hour notation Examples May 6 0506 7 05 a m 0705 11 18 p m 2318 If you make a mistake when entering values press Clear enter the values again starting with the month NOTE The standard time zones of the world are expressed globally in terms of the difference in hours up to 12 hour...

Страница 24: ... a fixed IP assigned to it the IP address must be set manually If you do not know the IP contact your administrator To enable DHCP When connecting to a network where each machine s IP address is automatically assigned to it by DHCP set DHCP to On NOTE By setting Auto IP to On you can have the machine automatically search the network LAN being used for usable IP addresses and assign one to the mach...

Страница 25: ...NS Dynamic Update This section describes how to specify the IPv4 settings 1 Specify the following settings in IPv4 press Next To enable DNS Dynamic Update Enter the DNS server IPv4 address in Primary DNS Server To disable DNS Dynamic Update Enter Primary DNS Server and Secondary DNS Server NOTE Secondary DNS Server The substitute DNS server that is used when the primary DNS server cannot be used I...

Страница 26: ...hen accessing an external network through a proxy server enter the user name and password registered on the server User Name Enter the user name for the proxy authentication Password Enter the password for the proxy authentication 08 Setting Country Region 1 Select the country region where the machine is located press Next NOTE This setting is necessary to specify the fax line settings This settin...

Страница 27: ...s Set enter the unit name press Next 11 Setting the Line Type You can set the phone line type to use for sending 1 Select the line type press OK 12 Specifying the System Manager Information Settings You can register the System Manager Information settings 1 Change the authentication information press Next enter information if necessary press OK IMPORTANT The default setting for both the System Man...

Страница 28: ...place the test pages properly Accurate recalibrations of the gradation density and color settings of the machine cannot be made if the test pages are not scanned correctly Two test pages are output by the machine during this adjustment This machine adjusts the toner and print speed according to the paper type To make effective adjustments select the correct paper type 1 Press Full Adjust 2 Select ...

Страница 29: ...Configuring the Machine Setup Guide 14 Closing the Setup Guide Closing the Setup Guide by pressing OK causes the machine to restart After the restart the main menu is displayed and you can use the machine ...

Страница 30: ...Settings Registration Preferences Timer Energy Settings Current Date and Time Network settings DNS server settings When setting IPv4 Network TCP IP Network Setup Procedures Protocol Settings TCP IPv4 Settings When setting IPv6 Network TCP IP Network Setup Procedures Protocol Settings TCP IPv6 Settings Proxy Settings Network TCP IP Network Setup Procedures Protocol Settings Settings Common to TCP I...

Страница 31: ...Control Panel Parts and Functions 32 Main Power and Energy Saver Key 34 How to Turn ON the Main Power 34 Energy Saver Key 35 Shutting Down the Machine 35 Backing Up Exporting Data 36 Data You Can Import Export All 36 Data You Can Import Export Individually 36 Other Data You Can Import Export Back Up 37 ...

Страница 32: ... Use this port to connect a fax line to the machine 6 Output Tray Prints are output to this tray if the optional Staple Finisher S1 is not attached 7 USB Port 1 Use the USB port to connect USB memory external hard disks and other devices to the machine 8 Right Cover of the Main Unit Open this cover when clearing a paper jam inside the main unit See e Manual Problem Solving 9 Multi Purpose Tray Use...

Страница 33: ...ing Assembly The unit that fixes toner onto paper If paper is jammed in the fixing assembly remove the fixing assembly from the machine and then carefully remove the jammed paper 6 Duplexing Unit If paper is jammed in the duplexing unit remove the paper jam See e Manual Problem Solving 7 Drum Unit The unit that applies toner to paper during printing See e Manual Maintenance 8 Envelope Feeder Attac...

Страница 34: ...Supply Tray Originals placed here are automatically fed sheet by sheet into the feeder Place originals into this tray with the surface that you want to scan face up 4 Original Output Area Originals that have been scanned from the original supply tray are output into the original output area 5 Document Feed Scanning Area Originals placed in the feeder are scanned here 6 Platen Glass Place originals...

Страница 35: ...ndicator flashes follow the instructions that appear on the touch panel display When the Error indicator maintains a steady red light contact your local authorized Canon dealer 12 Processing Data Indicator Flashes or blinks green when the machine is performing operations and maintains a steady green light when fax data is stored in memory 13 Reset key Press to restore the standard settings of the ...

Страница 36: ...t appears after the machine is turned ON from Default Screen after Startup Restoration on the Settings Registration screen See e Manual Settings Registration If this machine is connected to a powered off Macintosh computer by USB cable the computer may turn on automatically when this machine does In this case disconnect the USB cable from the machine You may also be able to solve this problem by u...

Страница 37: ...pplication is running while the machine is shutting down 01 Press the switch to the side to turn the main power OFF 2 1 IMPORTANT Do not turn the main power OFF while using the Fax I Fax function Sending or receiving I fax or fax documents cannot be done when the main power is turned OFF The machine may take some time to completely shutdown Do not unplug the power cord until the main power indicat...

Страница 38: ... Export All function IMPORTANT You cannot use the Import All function depending on the recipient s machine model For more information contact your local authorized Canon dealer Data References Settings Registration Basic Information e Manual Remote UI Paper Type Management Settings Forwarding Settings Box Settings Department ID Management Settings Main Menu Settings Web Access Settings Favorite Se...

Страница 39: ...anuals for each MEAP application User authentication information registered for the Local Device Authentication system of SSO H Single Sign On H e Manual MEAP 1 You may be able to back up data stored by MEAP applications depending on the application NOTE The passwords and PIN are backed up at the same time However some of the passwords may not be backed up depending on the type of the password If ...

Страница 40: ...38 Backing Up Exporting Data ...

Страница 41: ...he Types of Paper That Can Be Used 43 Replacement Parts 44 Replacing the Staple Cartridge Staple Finisher S1 45 Replacing the Toner Cartridge 46 Replacing the Waste Toner Container 49 Replacing the Drum Unit 51 Consumables 54 Recommended Paper 54 Toner 54 Drum Unit 55 Staple Cartridge 55 Genuine Supplies 55 ...

Страница 42: ...per such as thin paper recycled paper pre punched paper and heavy paper should be fanned particularly well before loading it Never place paper or any other items in the empty part of the drawer next to the paper stack Doing so may cause paper jams When you are printing in the Staple mode do not remove the output sheets that are waiting to be stapled Printing and stapling resume after you clear the...

Страница 43: ...ey click into place If the left guide and front guide are not aligned correctly the paper size will not correctly appear on the touch panel display It is also necessary to adjust the guides correctly to avoid causing a paper jam dirty prints or making the inside of the machine dirty NOTE When using inch paper remove the A4 Feeder Attachments attached to the paper drawer and store them in the stora...

Страница 44: ...s not completely pushed into the machine Make sure that the height of the paper stack does not exceed the loading limit mark Always check that the paper drawers are in place NOTE Each paper drawer holds up to 550 sheets of paper 21 lb bond 80 g m2 or 640 sheets of paper 17 lb bond 64 g m2 If there are instructions on the paper package about which side of the paper to load follow those instructions...

Страница 45: ...ded with the machine contain paper sizes not supported by the machine 06 If the paper has been changed register the size and type of the loaded paper Register the size and type of paper you loaded in the paper drawer in Paper Settings in Preferences Settings Registration For more information see e Manual Settings Registration Loading Envelopes If you are loading envelopes the Envelope Feeder Attac...

Страница 46: ...r Model Number WT 201 2 Drum Unit Model Number Canon GPR 51 Drum Unit Black Canon GPR 51 Drum Unit Cyan Canon GPR 51 Drum Unit Magenta Canon GPR 51 Drum Unit Yellow 3 Toner Container Model Number Canon GPR 51 Toner Black Canon GPR 51 Toner Cyan Canon GPR 51 Toner Magenta Canon GPR 51 Toner Yellow 4 Staple Cartridge Model Number Staple P1 For instructions on replacing parts 1 2 3 and 4 see the foll...

Страница 47: ...t you order staple cartridges from your local authorized Canon dealer before your stock runs out Use only staple cases intended for use with this machine 01 Open the front cover of the finisher 02 Grasp the staple case by the green tab to pull it out from the stapler unit Staple Case 03 Squeeze and lift the empty staple cartridge by its sides marked with arrows to remove it from the staple case NO...

Страница 48: ...can continue operations such as setting modes and scanning originals even if you do not replace the toner cartridge immediately WARNING Do not burn or throw used toner cartridges into open flames as this may cause the toner to ignite resulting in burns or a fire If you accidentally spill or scatter toner carefully wipe up the loose toner with a damp soft cloth and avoid inhaling any toner dust Do ...

Страница 49: ...ing Previous or Next on the touch panel display If toner runs out during a print job the remaining prints are made after you replace the toner cartridge If black toner is left you can continue copying and printing in black and white After replacing toner cartridges if printed colors are different from the colors printed before you replaced the toner cartridges perform Auto Adjust Gradation in Adju...

Страница 50: ... the illustration Doing so may cause the toner to not output properly 04 Insert the new toner cartridge 1 Match the new toner cartridge with the slot on the main unit as shown in the illustration 2 Push the new toner cartridge in as far as possible NOTE Support the new toner cartridge with your hand from underneath while pushing it into the machine with your other hand 05 Close the front cover of ...

Страница 51: ...ntainer appears on the touch panel display Follow the procedure described below to replace the waste toner container WARNING Do not burn or throw used waste toner containers into open flames Also do not store waste toner containers in places exposed to open flames as this may cause the toner to ignite resulting in burns or a fire If you accidentally spill or scatter toner carefully wipe up the loo...

Страница 52: ...a bag close and tie the bag so that the toner does not spill out and then put the bag in a box NOTE Use the bag in the box for the new waste toner container Place the removed waste toner container on a level surface If the waste toner container is tilted too far toner may spill out 03 Insert the new waste toner container into the main unit 1 Align the mark on the waste toner container and the mark...

Страница 53: ...changes causes water droplets condensation to form inside it Do not remove the orange protective cover until you insert the drum unit into the machine NOTE Complete instructions on how to replace the drum unit can be accessed by pressing Previous or Next on the touch panel display Depending on your contract a message prompting you to replace the drum unit may appear on the bottom of the touch pane...

Страница 54: ...ed area with your other hand IMPORTANT Do not tilt the removed drum unit too far Doing so may cause toner to spill out 03 Prepare to insert the new drum unit 1 Remove the new drum unit from its box 2 Hold the drum unit horizontally in both hands as shown in the illustration and tilt it to the left and right approximately 12 times 10 12 IMPORTANT Do not remove the orange protective cover until you ...

Страница 55: ...insert the drum unit into the main unit the orange protective cover remains Remove the protective cover after the drum unit is completely inserted 05 Insert the waste toner container into the main unit 1 Align the mark on the waste toner container and the mark on the slot of the main unit and insert the waste toner container 2 Close the front cover of the main unit 2 1 CAUTION When closing the fro...

Страница 56: ...er cartridge of the displayed color with a new one Toner comes in four colors black cyan magenta and yellow Check the toner color that you need to replace before ordering toner from your local authorized Canon dealer Also when replacing the toner cartridge make sure that you replace toner of the correct color Use only toner cartridges intended for use with this machine For optimum print quality us...

Страница 57: ...units intended for use with the machine For optimum print quality using Canon genuine drum unit is recommended For information on the drum unit model numbers for this machine see Replacement Parts on p 44 CAUTION For cardiac pacemaker users This drum unit emits low level magnetic flux If you use a cardiac pacemaker and feel abnormalities please move away from the drum unit and consult a physician ...

Страница 58: ...56 Consumables ...

Страница 59: ... the Dust Proof Glass 60 When an Error Message Error Code Is Displayed 62 When an Error Message Is Displayed 62 When an Error Code Is Displayed 62 Service Call Message 63 Contacting Your Local Authorized Canon Dealer 64 Setting the Limited Functions Mode from the Service Call Message Screen 64 Functions Available When the Printer Scanner Cannot Be Used Due to an Error 65 Locations of Staple Paper ...

Страница 60: ...the machine with a cloth dampened with a mild detergent mixed with water and then wipe it clean with a soft dry cloth WARNING When cleaning the machine first turn Off the main power switch and disconnect the power cord Failure to observe these steps may result in a fire or electrical shock Disconnect the power cord from the power outlet regularly and clean the area around the base of the power plu...

Страница 61: ... it out to let it dry Scanned Originals Become Dirty Manual Feeder Cleaning If originals that have been fed through the feeder have streaks or appear dirty clean the feed rollers IMPORTANT Spin the rollers while cleaning them 01 Clean the rollers of the feeder 1 Open the feeder cover 2 Clean the rollers a total of two places inside the feeder cover 1 2 02 Clean the inside of the inner cover of the...

Страница 62: ...heet is dirty rinse it with water and spread it out to let it dry 04 Close the feeder cover CAUTION When closing the feeder cover be careful not to get your fingers caught as this may result in personal injury When White Streaks Appear on Prints Cleaning the Dust Proof Glass When white streaks or other print defects occur the dust proof glass may be dirty Follow the procedure below to clean the du...

Страница 63: ...Check these marks when cleaning the dust proof glass 04 When you have finished cleaning the dust proof glass gently push the dust proof glass cleaner back onto the rear side of the front cover of the main unit Place the dust proof glass cleaner back on the rear side of the front cover of the main unit with its tip facing the left direction 05 Close the front cover of the main unit CAUTION When clo...

Страница 64: ...ssage on the Touch Panel Display Example of an Error Message on the Web Browser When an Error Code Is Displayed If a job or operation does not complete successfully the error code is displayed on the Details screen for Log on the Status Monitor Cancel screen You can check the error code in the following locations Details screen for Log on the Status Monitor Cancel screen Results row of the Device ...

Страница 65: ...on is cleared See Setting the Limited Functions Mode from the Service Call Message Screen on p 64 If a screen such as the one above is displayed and the print or scan function does not operate normally some functions may still be available When the Print or Scan function does not operate normally The selected function cannot be used Press Main Menu to return to the Main Menu When a service call me...

Страница 66: ... local authorized Canon dealer have the following information available Product name Details of the malfunction The error code displayed on the touch panel display Setting the Limited Functions Mode from the Service Call Message Screen When Limited Func Mode is displayed follow the procedures below IMPORTANT If you turn OFF the main power switch when there is a job waiting to print that job is era...

Страница 67: ...ide Available Functions When the Print function is restricted When the Scan function is restricted Quick Menu 1 The Status Monitor Cancel Screen 2 1 The registered button may not be available depending on the restricted functions 2 Print List on the Job Log screen and Register on the Consumable screen are not available Control Panel Available Functions When the Print function is restricted When th...

Страница 68: ...structions in the applicable section you can clear staple paper jams For details on these procedures see the e Manual Paper Jams e Manual Problem Solving Locations of Paper Jams Staple Jams e Manual Problem Solving Clearing Staple Jams Staple Finisher S1 Feeder Main Unit Cassette Feeding Unit AG1 AH1 Optional 2 1 Paper Drawer Staple Finisher S1 Optional ...

Страница 69: ...cations Commission Users in the U S A 77 Laser Safety 78 International ENERGY STAR Program 78 IPv6 Ready Logo 78 Information Security Standard IEEE 2600 78 Copyright 79 Disclaimers 79 Legal Limitations on the Usage of Your Product and the Use of Images 79 Users in the U S A 80 Users in Canada 81 Utilisation au Canada 82 Super G3 83 Important Safety Instructions 84 Installation 84 Power Supply 84 H...

Страница 70: ...o 128 g m2 Heavy 2 35 lb bond to 60 lb cover 129 to 163 g m2 and Envelopes Multi Purpose Tray Weight 16 lb bond to 80 lb cover 60 to 220 g m2 Type Thin 16 lb bond 60 to 63 g m2 Plain 1 17 to 20 lb bond 64 to 75 g m2 Plain 2 21 to 24 lb bond 76 to 90 g m2 Plain 3 25 to 28 lb bond 91 to 105 g m2 Recycled Color Pre Punched Bond Heavy 1 29 to 34 lb bond 106 to 128 g m2 Heavy 2 35 lb bond to 60 lb cove...

Страница 71: ... Color 7 4 seconds Black and White 5 9 seconds imageRUNNER ADVANCE C250iF Full Color 10 5 seconds Black and White 8 4 seconds Copy Speed Direct imageRUNNER ADVANCE C350iF LGL 29 sheets minute LTR 36 sheets minute STMT 26 sheets minute EXEC 36 sheets minute imageRUNNER ADVANCE C250iF LGL 21 sheets minute LTR 26 sheets minute STMT 26 sheets minute EXEC 26 sheets minute Except when paper is fed from ...

Страница 72: ...e 120 V AC 60 Hz 6 9 A Power Consumption Maximum Power Consumption 1 5 kW or less When the machine is in the Sleep mode 1 W When the main power switch is turned OFF When Quick Startup Settings for Main Power is set to On 0 5 W When Quick Startup Settings for Main Power is set to Off 0 1 W Depending on the system and conditions of use these values may differ Dimensions H x W x D 24 x 20 1 8 x 24 1 ...

Страница 73: ...ull Color at 300 x 600 dpi Scanning 1 sided scanning 36 sheets minute LTR in Black and White Full Color at 300 x 300 dpi imageRUNNER ADVANCE C250iF Copying 1 sided scanning 26 sheets minute LTR in Black and White Full Color at 300 x 600 dpi Scanning 1 sided scanning 26 sheets minute LTR in Black and White Full Color at 300 x 300 dpi Cassette Feeding Unit AG1 Item Specifications Paper Sizes LGL LTR...

Страница 74: ... bond 60 to 63 g m2 Plain 1 17 to 20 lb bond 64 to 75 g m2 Plain 2 21 to 24 lb bond 76 to 90 g m2 Plain 3 25 to 28 lb bond 91 to 105 g m2 Recycled Color Pre Punched Bond Heavy 1 29 to 34 lb bond 106 to 128 g m2 Heavy 2 35 lb bond to 60 lb cover 129 to 163 g m2 Heavy 3 61 to 80 lb cover 164 to 220 g m2 Labels Transparency and Envelopes Capacity Per Tray No finishing set Collate and Collate Offset a...

Страница 75: ...e 8 pels 2 mm x 7 7 line mm Super Fine 8 pels 2 mm x 15 4 line mm Ultra Fine 16 pels 2 mm x 15 4 line mm Transmission Speed Super G3 33 6 kbps G3 14 4 kbps Compression Method MH MR MMR JBIG Transmission Type Super G3 G3 Sending Original Sizes LGL to STMT Receiving Paper Sizes 11 x 17 to STMT Transmission Times JBIG Approximately 2 6 seconds Auto Dial Function Address Book 1 800 destinations includ...

Страница 76: ...ver 2008 R2 SP2 Windows 7 Windows 8 Windows 8 1 Windows Server 2012 Windows Server 2012 R2 Solaris 10 Mac OS X 10 6 x 10 7 x 10 8 x 10 9 x Red Hat Linux 9 Interface 1000BASE T 100BASE TX 10BASE T Color Mode Automatic Color Select Full Color Grayscale Automatic Color Select Full Color Black and White Full Color Grayscale Black and White Original Type Text Text Photo Photo Other Preview Browse Windo...

Страница 77: ...i 1 Format E mail TIFF JPEG PDF XPS OOXML PowerPoint I Fax Black and White TIFF MH MR 1 MMR 1 Original Size E mail LGL LTR STMT I Fax LGL 2 LTR STMT 2 Server Software Microsoft Exchange 2003 SP2 Microsoft Exchange 2007 SP2 Microsoft Exchange 2010 Microsoft Exchange 2013 Sendmail 8 14 4 Lotus Domino R7 0 Other Searches a destination via the LDAP Server Preview Optional PDF XPS OOXML Functions E mai...

Страница 78: ...Traditional Chinese PS 136 Scalable fonts The optional PCL International Font Set needs to be activated to use Andale and WorldType Collection or Andale Mono WT Printable Area PCL5c PCL6 Reduced to 1 8 4 2 mm from the top bottom left and right edges of the paper PostScript 3 Reduced to 1 8 4 mm from the top bottom left and right edges of the paper When printing in the Expand Print Region and Print...

Страница 79: ...n a particular installation If this equipment does cause harmful interference to radio or television reception which can be determined by turning the equipment OFF and ON the user is encouraged to try to correct the interference by one or more of the following measures Reorient or relocate the receiving antenna Increase the separation between the equipment and receiver Connect the equipment to an ...

Страница 80: ...at this machine meets the international ENERGY STAR Program for energy efficiency The International ENERGY STAR Office Equipment Program is an international program that promotes energy saving through the use of computers and other office equipment The program backs the development and dissemination of products with functions that effectively reduce energy consumption It is an open system in which...

Страница 81: ...OF ANY NATURE OR LOSSES OR EXPENSES RESULTING FROM THE USE OF THIS MATERIAL The following applies in California USA only The battery included with your product contains Perchlorate Material and may require special handling See http www dtsc ca gov hazardouswaste perchlorate for details Legal Limitations on the Usage of Your Product and the Use of Images Using your product to scan print or otherwis...

Страница 82: ...is a label that contains among other information a product identifier in the format of US AAAEQ TXXXX If requested this number must be provided to the telephone company The REN Ringer Equivalence Number is used to determine the number of devices that may be connected to a telephone line Excessive RENs on a telephone line may result in the devices not ringing in response to an incoming call In most...

Страница 83: ...r registering your name unit s telephone number time and date as described in Basic Operations or Settings Registration in the e Manual Users in Canada Preinstallation Requirements for Canon Facsimile Equipment A Location Supply a suitable table cabinet or desk for the machine See Specifications in this guide for specific dimensions and weight B Order Information 1 A single telephone line touch to...

Страница 84: ...but should contact the appropriate electric inspection authority or electrician as appropriate NOTE This equipment complies with the Canadian ICES 003 Class B limits Utilisation au Canada Conditions à Remplir Préalablement à L installation d un Télécopieur Canon A Emplacement Prévoir une table un meuble ou un bureau suffisamment solide et de taille appropriée voir Spécifications pour les indicatio...

Страница 85: ...doivent être faites par une société d entretien canadienne autorisée par le Gouvernement canadien et désignée par le fournisseur Toute réparation ou modification que pourrait faire l utilisateur de cet appareil ou tout mauvais fonctionnement donne à la compagnie de télécommunication le droit de débrancher l appareil Pour sa propre protection l utilisateur doit s assurer que les prises de terre de ...

Страница 86: ... Necklaces and other metal objects Cups vases flowerpots and other containers filled with water or liquids CAUTION Do not install the machine in unstable locations such as unsteady platforms or inclined floors or in locations subject to excessive vibrations as this may cause the machine to fall or tip over resulting in personal injury Power Supply WARNING Do not damage or modify the power cord Als...

Страница 87: ...th a high voltage area inside the machine it may result in a fire or electrical shock If these items are dropped or spilled inside the machine immediately turn OFF the main power switch and disconnect the power cord from the power outlet Then contact your local authorized Canon dealer Do not use this product for uses other than as a color digital multitasking machine CAUTION Do not place heavy obj...

Страница 88: ...d cloth with a mild detergent mixed with water Do not use alcohol benzene paint thinner or other flammable substances Check detergent for flammability prior to use If flammable substances come into contact with a high voltage area inside the machine it may result in a fire or electrical shock There are some areas inside the machine which are subject to high voltages When removing jammed paper or w...

Страница 89: ... exposed to open flames as this may cause the toner or paper to ignite resulting in burns or a fire If you accidentally spill or scatter toner carefully wipe up the loose toner with a damp soft cloth and avoid inhaling any toner dust Do not use a vacuum cleaner that is not equipped with safety measures to prevent dust explosions to clean up loose toner Doing so may cause damage to the vacuum clean...

Страница 90: ...e where there is a potential for contact with water or other liquid 2 Do not use the telephone equipment during an electrical storm as there may be a remote risk of electrical shock from lightning 3 Do not use the telephone equipment to report a gas leak in the vicinity of the leak Other Warnings WARNING For cardiac pacemaker users This product emits low level magnetic flux If you use a cardiac pa...

Страница 91: ... serial numbers have been defaced removed or altered ANY SOFTWARE THAT IS DISTRIBUTED WITH THE PRODUCT AND HAS AN ASSOCIATED END USER AGREEMENT IS LICENSED WARRANTED AND PROVIDED ACCORDING TO THE TERMS OF THAT AGREEMENT INCLUDING ANY LIMITATIONS AND DISCLAIMERS THEREIN SUCH SOFTWARE IS SOLD WITHOUT WARRANTY OF ANY KIND BY CANON PLEASE CONTACT CANON IMMEDIATELY IF YOU HAVE NOT RECEIVED A COPY OF TH...

Страница 92: ...90 Important Safety Instructions TERMS OF imageWARE REMOTE SERVICE ...

Страница 93: ... authorization by you for the Canon Seller to establish and perform during the period of provision of Service HTTPS HTTP communications using your internet and internal network bandwidth for transmissions to and from the CDS Server iv authorization by you for the Product itself or a Canon serviceperson to download or update firmware and purchased MEAP application software data for internet based a...

Страница 94: ...92 Important Safety Instructions ...

Страница 95: ......

Страница 96: ...Netherlands See http www canon europe com for details on your regional dealer CANON LATIN AMERICA INC One Canon Park Melville NY 11747 U S A CANON AUSTRALIA PTY LTD 1 Thomas Holt Drive North Ryde Sydney N S W 2113 Australia CANON CHINA CO LTD 15F Jinbao Building No 89 Jinbao Street Dongcheng District Beijing 100005 China CANON SINGAPORE PTE LTD 1 HarbourFront Avenue 04 01 Keppel Bay Tower Singapor...

Отзывы: