background image

4

b

a

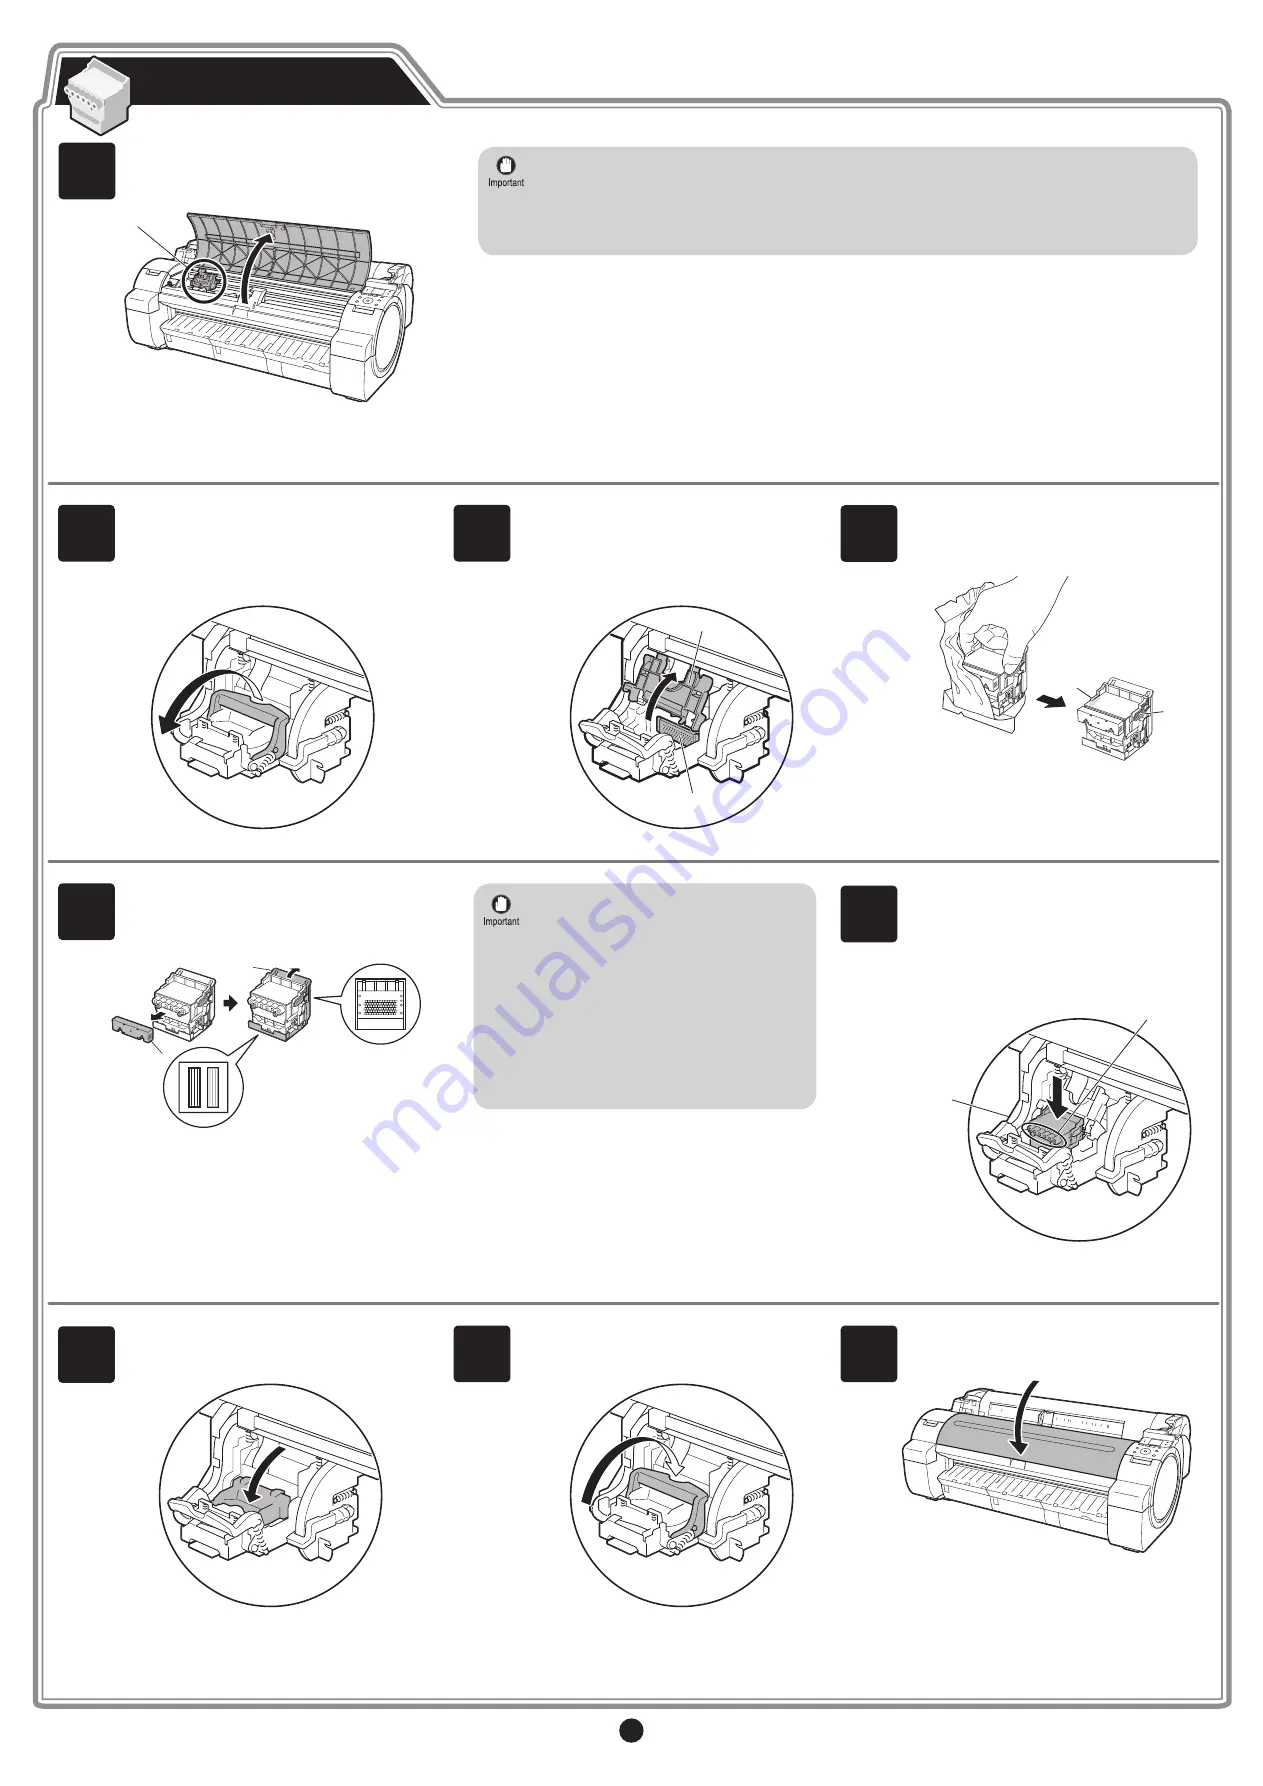
Push the printhead fixer lever all the way 

back. 

Pull the printhead fixer cover down toward 

the front to lock the printhead in place. 

Insert the printhead into the carriage (b) 

with the ink holes (a) facing away from the 

printer as shown in the figure. 

Carefully 

push the printhead firmly into the carriage 

(b), ensuring that the part covered by 

the protective part does not touch the 

carriage. 

6

7

8

Close the top cover. 

9

Remove the orange protective part (a). 

To remove orange protective part (b), 

push the grip (c) as you remove the 

part

5

• Do not reattach the protective part after 

removing it. Dispose of these materials 

according to local regulations. 

Never touch the parts covered by the 

protective part. This may damage the 

printhead and affect printing quality. 

The printhead contains ink. When 

removing the protective material, it is 

recommended that you do it over the 

bag that the printhead came in to avoid 

spilling the ink and soiling your clothes or 

the surrounding items.

Lift the printhead fixer cover (a) to open it 

fully.

At this time, make sure that no debris 

becomes adhere to the contacts (b) on the 

carriage.

Hold the printhead by the grips (a) as you 

remove it from the pouch. 

3

4

Pull the printhead fixer lever forward all 

the way to open it completely. 

2

Next, install the printhead. 

Install the Printhead

When installing the printhead, do not move the carriage (a) from the position shown in the 

figure. 

If you move the carriage (a), a warning noise sounds and the printhead cannot be installed. 

If you have moved the carriage (a), close the top cover. The carriage (a) moves to the position 

shown in the figure. 

Open Upper Cover

 is shown on the 

display screen. As instructed, open the top 

cover. 

Instructions on printhead attachment are 

shown on the display screen.

1

a

a

a

b

c

a

b

a

Содержание imagePROGRAF iPF770

Страница 1: ...of Microsoft Corporation in the U S and or other countries Mac Mac OS OS X and Bonjour are trademarks of Apple Inc registered in the U S and other countries All other trademarks or registered trademar...

Страница 2: ...g the stand lift the support rod to the position a before closing the output stacker and unlocking the 4 casters Failure to do so may lead to scratched flooring damage to the basket cloth and injury A...

Страница 3: ...t this time detach and reattach the ink tanks 2 to 3 times and ensure that the ink tanks are security attached 4 5 6 Failure to shake ink tanks may result in reduced print quality because ink ingredie...

Страница 4: ...When removing the protective material it is recommended that you do it over the bag that the printhead came in to avoid spilling the ink and soiling your clothes or the surrounding items Lift the prin...

Страница 5: ...se the remaining ink indicator and maintenance cartridge capacity indicator to drop some amount The starter ink tank is for first time installation It is recommended that you purchase replacement ink...

Страница 6: ...panel navigation function which can be accessed using the procedure in How to Display the Electronic Manuals P 14 Follow the procedure below to display the navigation on how to load roll paper 1 Press...

Страница 7: ...to For TCP IP network connections on page 8 Installation requires administrative rights such as those of Administrator Be sure to log on using an account with administrative rights before installatio...

Страница 8: ...the software If the printer is already connected to the network confirm the IP address assigned to the printer Ask your network administrator for further information 1 Use the LAN cable to connect th...

Страница 9: ...ngs outside of the procedure are also required Using DHCP P 10 Once you have selected the method for configuring IP addresses enter your preferred name for the printer in Device Name and the installat...

Страница 10: ...t When the IP Address Specifications window appears follow the instructions of When entering the printer s IP address manually in step 8 to 11 on page 9 to complete the installation of the software ME...

Страница 11: ...r 5 Select the country or region where you are using the printer and click Next 6 Select the software to install and click Next Move the mouse pointer near the name of the software to display an overv...

Страница 12: ...ayed on the screen You can also add the printer by specifying the IP address by selecting IP Select the printer 16 Click Next 17 Select the Execute media type update check box and click Next 18 Click...

Страница 13: ...ts Use the manual pocket to store the manual so you can refer to it as needed When using the stand store the 3 inch paper core attachment and other accessories in the accessory pocket MEMO The accesso...

Страница 14: ...ers or Printers or Printers and Faxes On Windows MEMO You can also view each of the manuals by clicking the links to the product manuals from other installed software How to Display the Electronic Man...

Страница 15: ...ck the CD ROM on the Desktop and then the iPF Printer Setup icon Open the PDF file that is contained in the folder that opens The Basic Guide is displayed 4 The Basic Guide is stored on the User Softw...

Страница 16: ...is loaded in the wrong position or the paper is curled Hardware error xxxxxxxx xxxx x represents a letter or number ERROR Exxx xxxx x represents a letter or number Insert the maintenance cartridge The...

Отзывы: