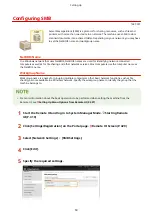


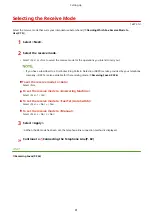


5
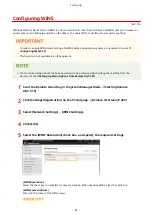
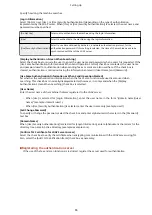
Select the [Use SNTP] check box and specify the required settings.
[Use SNTP]
Select the check box to use SNTP for synchronization. If you do not want to use SNTP, clear the check box.
[NTP Server Name]
Enter the IP address of the NTP or the SNTP server. If DNS is available on the network, you can enter a host
name (or FQDN) of alphanumeric characters instead (example: ntp.example.com).
[Polling Interval]
Specify the interval between one synchronization and the next.
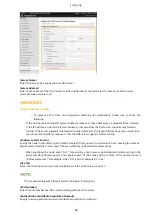
6
Click [OK].
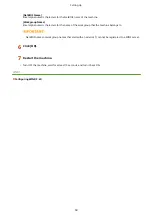
7
Restart the machine.
●
Turn OFF the machine, wait for at least 10 seconds, and turn it back ON.
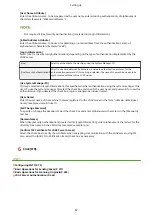
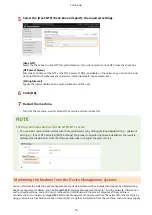
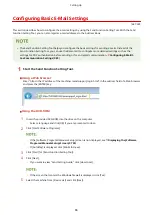
Testing communication with the NTP/SNTP server
●
You can view communication status with the registered server by clicking [Settings/Registration] [Network
Settings] [Check NTP Server] in [SNTP Settings]. If a proper connection has been established, the result is
displayed as shown below. Note that this operation does not adjust the system clock.
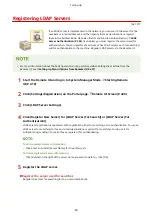
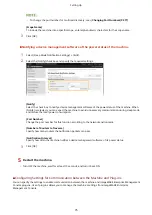
Monitoring the Machine from the Device Management Systems
You can facilitate the collection and management of various information about networked devices by implementing
device management software, such as imageWARE Enterprise Management Console
*
, into the network. Information
such as device settings, and error logs is retrieved and distributed via the server computer. If the machine is
connected to such a network, imageWARE Enterprise Management Console searches the network for the machine by
using protocols such as Service Location Protocol (SLP) to gather information from the machine, such as power supply
Setting Up
73
Содержание imageCLASS MF735Cdw
Страница 57: ...3 Follow the on screen instructions to install the drivers LINKS Printing from a Computer P 258 Setting Up 49 ...
Страница 84: ... Menu Preferences Network Device Settings Management On Setting Up 76 ...
Страница 121: ...MF735Cdw MF733Cdw MF731Cdw MF634Cdw MF632Cdw LINKS Loading Paper in the Paper Drawer P 141 Basic Operations 113 ...
Страница 164: ...Basic Operations 156 ...
Страница 175: ...LINKS Loading Paper in the Paper Drawer P 141 Loading Paper in the Multi Purpose Tray P 149 Basic Operations 167 ...
Страница 181: ...5 Select Apply LINKS Basic Operation P 128 Basic Operations 173 ...
Страница 223: ... Sending and Receiving Faxes via the Internet Using Internet Fax I Fax P 247 Faxing 215 ...
Страница 232: ...Useful Functions When Sending P 230 Checking Status and Log for Sent and Received Documents P 242 Faxing 224 ...
Страница 241: ...3 Select Start Sending The faxes are sent LINKS Basic Operations for Sending Faxes P 217 Faxing 233 ...
Страница 315: ...LINKS Basic Operations for Scanning Originals P 284 Sending I Faxes P 248 Adjusting Density P 305 Scanning 307 ...
Страница 323: ...Sending I Faxes P 248 Scanning 315 ...
Страница 326: ...LINKS Checking Status and Log for Scanned Originals P 301 Scanning 318 ...
Страница 329: ...LINKS Using ScanGear MF P 322 Scanning 321 ...
Страница 352: ...6 Click Fax Fax sending starts Linking with Mobile Devices 344 ...
Страница 358: ...Updating the Firmware 437 Initializing Settings 439 Managing the Machine 350 ...
Страница 414: ...Configuring Basic E Mail Settings P 86 Setting a Shared Folder as a Save Location P 94 Managing the Machine 406 ...
Страница 434: ...LINKS Remote UI Screen P 420 Managing the Machine 426 ...
Страница 436: ...5 Click Edit 6 Specify the required settings 7 Click OK Managing the Machine 428 ...
Страница 606: ... Is the transfer belt inside the machine dirty Cleaning the Transfer Belt ITB P 584 Maintenance 598 ...
Страница 609: ...5 Select Apply Maintenance 601 ...
Страница 623: ...Troubleshooting 615 ...
Страница 679: ...2 Gently pull out the original 3 Gently close the feeder 3 Place the original again Troubleshooting 671 ...
Страница 693: ...Third Party Software 1647 0ER For information related to third party software click the following icon s Appendix 685 ...
Страница 721: ... Import Export of the Setting Data See Setting Menu List P 442 Appendix 713 ...
Страница 727: ...Appendix 719 ...
Страница 767: ... 18 MD4 RSA Data Security Inc MD4 Message Digest Algorithm ...