Canon image Prograf iPF 685 Series Скачать руководство пользователя страница 549

Note

Enter a password if one has been set.


2


Select the print job and click 

Move Document

.

3


On the 

Move Document

 page, select the name or

number of the destination personal box in the 

Destina-

tion mail box

 list and click 

OK

.

For details, refer to the RemoteUI help file.
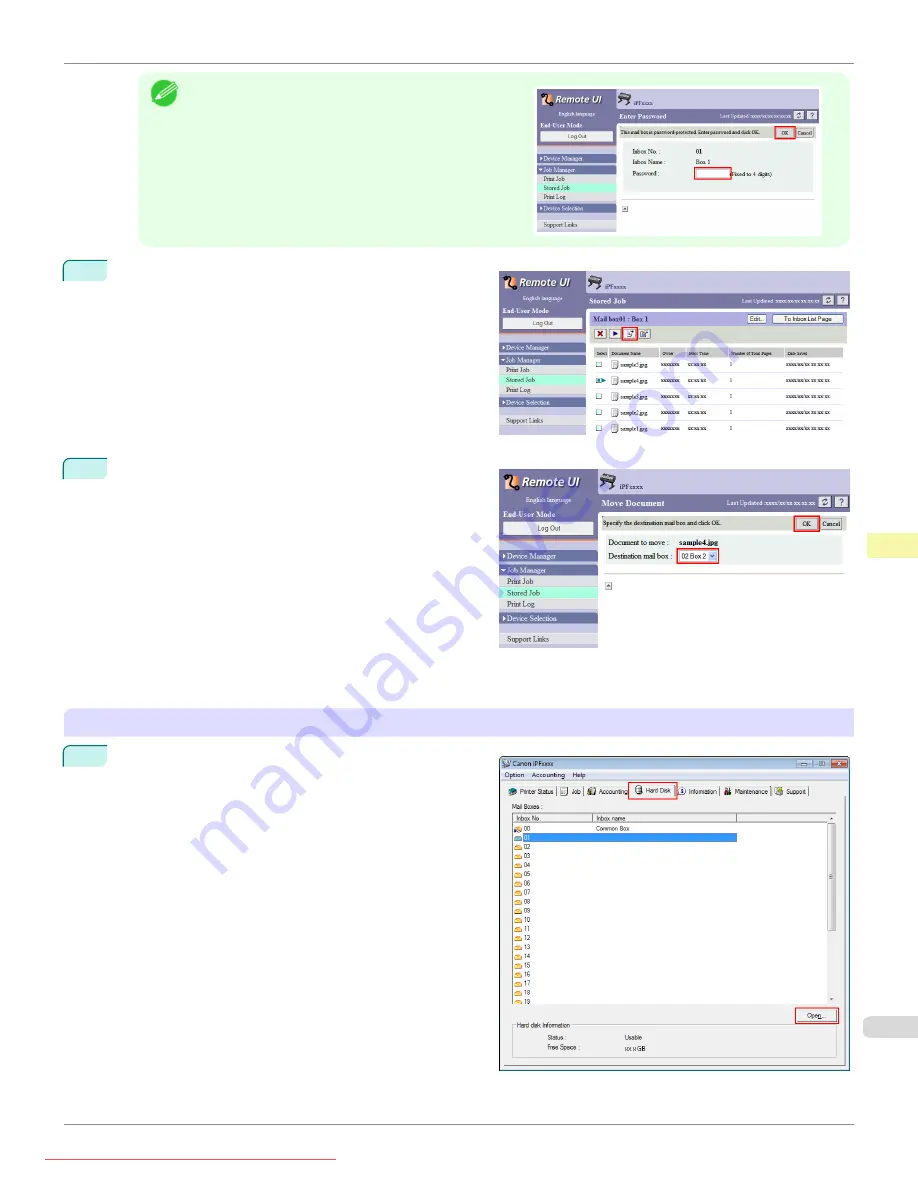
 

Using 

imagePROGRAF Status Monitor

 (Windows)

1


On the 

Hard Disk

 sheet, select a box and click 

Open

.


iPF685


Moving Saved Jobs

User's Guide


Print Job Management

Basic Print Job Operations

549


Downloaded from ManualsPrinter.com Manuals

Содержание image Prograf iPF 685 Series

Страница 1: ...y 225 Print Plug In for Office 236 and so on Mac OS Software 277 Printer Driver 278 Preview 296 Free Layout 319 Color imageRUNNER Enlargement Copy 344 and so on Handling and Use of Paper 361 Control Panel 437 Printer Parts 477 Network Setting 491 Print Job Management 511 Adjustments for Better Print Quality 573 Maintenance and Consumables 589 Troubleshooting 627 Error Message 657 Specifications 68...

Страница 2: ... Documents Windows 37 Printing Office Documents Mac OS 38 Using PosterArtist to Compose Originals 41 Printing CAD Drawings 43 Printing CAD Drawings 43 Printing Line Drawings and Text 43 Printing Line Drawings and Text Windows 44 Printing Line Drawings and Text Mac OS 45 Printing from AutoCAD 47 Specifying Colors and Printing CAD Drawings 48 Specifying Colors and Printing CAD Drawings Windows 49 HP...

Страница 3: ...tandard Paper Sizes Mac OS 107 Tiling and multiple pages per sheet 110 Printing Multiple Originals Next to Each Other 110 Printing Multiple Originals Next to Each Other Windows 111 Printing Multiple Originals Next to Each Other Mac OS 113 Printing Multiple Pages Continuously 114 Printing Multiple Pages Continuously Windows 114 Printing Multiple Pages Continuously Mac OS 116 Printing Multiple Pages...

Страница 4: ...rating System Menu 166 Main Sheet 167 Paper Information on Printer Dialog Box 170 Paper Detailed Settings Dialog Box 170 View Settings Dialog Box for the Printing Application 172 Color Adjustment Sheet Color 172 Object Adjustment Dialog box Color 174 Matching Sheet 174 Color Adjustment Sheet Monochrome 176 Object Adjustment Dialog box Monochrome 177 Page Setup Sheet 178 Output Method Dialog box 18...

Страница 5: ...ating a New Hot Folder 228 Specifying an Existing Shared Folder as a Hot Folder 231 Setting the Print Parameters 234 Printing Enlargements of Scanned Originals from a Color imageRUNNER 234 Print Plug In for Office 236 Print Plug In for Officefeatures 236 Steps to install 237 Steps to uninstall 239 When Print Plug In for Office is not displayed 240 To start from Microsoft Word 243 Print Matching Ro...

Страница 6: ...296 Preview Main Window 298 Paper Settings Panel 300 Easy Settings 302 Advanced Settings 303 Output Settings Panel 304 Color Settings Panel 306 Color Adjustment 307 Matching 309 Driver Matching Mode 311 ICC Matching Mode 312 ColorSync 313 Preferences Dialog Box 313 Zoom Dialog Box 313 Go to Page Dialog Box 314 Print with No Borders 314 Print on the Center 315 Not Print Spaces at the Top Bottom 315...

Страница 7: ... 352 Advanced Settings 353 Output Settings Panel 354 Color Settings Panel 356 Driver Matching Mode 357 ICC Matching Mode 358 Printing Enlargements of Scanned Originals from a Color imageRUNNER 358 Handling and Use of Paper Handling and Use of Paper 361 Paper 362 Types of Paper 362 Paper Sizes 362 Using Paper Other Than Genuine Paper and feed confirmed Paper 364 Printing on Paper Other Than Genuine...

Страница 8: ...uration Tool 420 Procedures for Installing 420 Starting Method 422 Media Configuration Tool Main Window 423 Editing Media Type Information for Genuine Paper and Feed Confirmed Paper 424 Adding Media Types 425 Changing Media Names 428 Deleting Media Types You Have Added 430 Switching Media Types Display Show Hide 431 Changing the Display Order of Media Types 433 Checking the update 434 Control Pane...

Страница 9: ...04 Configuring the Destination in TCP IP Networks 504 Configuring the Destination for Bonjour Network 504 Other Settings 505 Specifying Printer Related Information 505 Configuring the Communication Mode Manually 506 Email Notification When Printing is Finished or Errors Occur 507 Initializing the Network Settings 507 Device Setup Utility Windows 508 imagePROGRAF Device Setup Utility 508 Installing...

Страница 10: ...ting or Deleting Jobs on Hold 538 Printing Saved Jobs 540 Deleting Saved Jobs 544 Moving Saved Jobs 548 Advanced Print Job Operations 553 Saving Print Jobs Sent from Sources Other than the Printer Driver 553 Printing Without Saving Jobs in the Common Box 554 Setting Passwords for Personal Boxes 555 Naming Personal Boxes 558 Displaying a List of Saved Jobs 561 Printing a List of Saved Jobs 564 Disp...

Страница 11: ...pdating the Firmware 625 Troubleshooting Troubleshooting 627 Frequently Asked Questions 628 Frequently Asked Questions 628 Problems Regarding Paper 629 Clearing Jammed Roll Paper 629 Clearing a Jammed Sheet 632 Clearing Jammed Paper Paper Feed Slot 635 Roll paper cannot be inserted into the Paper Feed Slot 637 Cannot load sheets 637 Paper is not cut neatly 637 Paper is not cut 637 Depression on th...

Страница 12: ...2 printing is misaligned 651 Lines or images are missing in printed HP GL 2 jobs 651 Lines are printed too thick or thin in HP GL 2 print jobs 651 HP GL 2 jobs are printed in monochrome or color 652 Printed colors of lines are inaccurate during HP GL 2 printing 652 HP GL 2 jobs are printed 6 mm larger than specified 652 HP GL 2 jobs are printed at maximum size even if a standard size is specified ...

Страница 13: ... 670 Ink tank is empty 670 Not much ink is left 670 Check if ink tank is set and its color and direction 670 The following ink tanks cannot be recognized 670 Wrong ink tank 670 Do not pull out ink tank 670 Messages regarding printing or adjustment 671 Cannot adjust paper feed 671 Check printed document 671 Messages regarding printheads 672 Cannot adjust printhead 672 Wrong printhead 672 Printhead ...

Страница 14: ...xxxxxxxx xxxx x represents a letter or number 678 Top cover is open 679 Prepare for parts replacement 679 Parts replacement time has passed 679 Unknown file 679 Multi sensor error 679 Error in cutter position 679 Specifications Specifications 681 Printer Specifications 682 Specifications 682 Print Area 684 Appendix Appendix 685 Safety Precautions 686 Safety Precautions 686 Legal Notices 688 Manual...

Страница 15: ...57 Mac OS Software 277 Handling and Use of Paper 361 Control Panel 437 Printer Parts 477 Network Setting 491 Print Job Management 511 Adjustments for Better Print Quality 573 Maintenance and Consumables 589 Troubleshooting 627 Error Message 657 Specifications 681 Appendix 685 imagePROGRAF Basic Printing Workflow 15 Downloaded from ManualsPrinter com Manuals ...

Страница 16: ...ch as Microsoft Office applications See Printing Vertical or Horizontal Banners Large Format Printing P 97 Borderless printing Print without a margin border around posters or photos See Borderless Printing on Paper of Equivalent Size P 87 See Borderless Printing by Resizing Originals to Fit the Roll Width P 90 See Borderless Printing at Actual Size P 80 Banner printing You can print multiple pages...

Страница 17: ...inals Next to Each Other P 110 Turning the Printer On and Off Turning the Printer On and Off Turning the printer on 1 Press the Power button to turn on the printer The printer will now start up After the Display Screen shows the Canon logo Starting up Please wait is displayed 2 The Power Lamp is lit when the printer finishes starting up and the printer is now in Standby The printer will not go int...

Страница 18: ... Never disconnect the printer s power supply or unplug it during a print job This may damage the printer 1 Make sure no print jobs are in progress If the Message Lamp is flashing check the message on the Display Screen and take action as necessary See Error Messag es P 658 If the Data Lamp is flashing the printer is receiving a print job Turn off the printer only after printing is finished 2 Hold ...

Страница 19: ...s of Paper P 362 If you prefer to wait for the ink to dry after printing and simply eject the document you can deactivate automatic cutting and cut the paper manually See Specifying the Cutting Method for Rolls P 388 1 Turn the printer on See Turning the Printer On and Off P 17 2 Load the roll on the Roll Holder See Attaching the Roll Holder to Rolls P 372 iPF685 Loading and Printing on Rolls User...

Страница 20: ... to On specify the roll length after the type of paper See Specifying the Paper Length P 380 5 Complete settings in the printer driver for the type of paper and other details Specifying Paper in the Printer Driver Windows P 160 Specifying Paper in the Printer Driver Mac OS P 279 Loading and Printing on Rolls iPF685 User s Guide Basic Printing Workflow Printing procedure 20 Downloaded from ManualsP...

Страница 21: ...supported types and sizes of paper see Paper Sizes or the Paper Reference Guide See Paper Sizes P 362 See Types of Paper P 362 1 Turn the printer on See Turning the Printer On and Off P 17 2 Complete settings in the printer driver for the type of paper and other details Specifying Paper in the Printer Driver Windows P 160 Specifying Paper in the Printer Driver Mac OS P 279 iPF685 Loading and Print...

Страница 22: ...om Mac OS P 23 4 Load the sheet See Loading Sheets in the Print er P 394 The printer now starts printing the print job Loading and Printing on Sheets iPF685 User s Guide Basic Printing Workflow Printing procedure 22 Downloaded from ManualsPrinter com Manuals ...

Страница 23: ...ng borderless printing and so on are dis played in the printer driver dialog box There are two ways to access the printer driver dialog box as follows From the application See Accessing the Printer Driver Dialog Box from Applications P 164 From the operating system menu See Accessing the Printer Driver Dialog Box from the Operating System Menu P 166 Printing from Mac OS Printing from Mac OS Print ...

Страница 24: ...range of pages number of copies and so on 2 Select the printer in the Printer list 3 Click Print to start printing As shown in the following illustration you can switch to other panes in this dialog box to complete settings for various methods of printing including enlarged and re duced printing borderless printing and so on Printing from Mac OS iPF685 User s Guide Basic Printing Workflow Printing...

Страница 25: ...n during printing printer operation varies depending on the current status If you press the Stop button before printing starts Pressing the Stop button before printing starts will display a confirmation message To cancel the print job select Yes If you press the Stop button during printing Pressing the Stop button during printing will display a confirmation message To cancel the print job immediat...

Страница 26: ...Printer Status sheet click Cancel Job Note The screen may differ slightly depending on the model you are using Canceling Print Jobs from Mac OS Canceling Print Jobs from Mac OS In the printer window you can cancel jobs that are being sent to the printer Otherwise you can cancel jobs from imagePROGRAF Printmonitor if they have been received by the printer or are currently being printed Note Print j...

Страница 27: ...ready been sent to the printer click Utility to display imagePROG RAF Printmonitor 4 Select the print job to cancel and click to delete the print job Note The screen may differ slightly depending on the model you are using The job sent to the printer is canceled iPF685 Canceling Print Jobs from Mac OS User s Guide Basic Printing Workflow Canceling print jobs 27 Downloaded from ManualsPrinter com M...

Страница 28: ...ays follow these steps if you cancel print jobs from imagePROGRAF Printmonitor If you do not restart job processing the next job cannot be printed Canceling Print Jobs from Mac OS iPF685 User s Guide Basic Printing Workflow Canceling print jobs 28 Downloaded from ManualsPrinter com Manuals ...

Страница 29: ... is cleared even if you do not set Pause Print to Off and printing from the job queue resumes When paper is advanced When you execute Chg Paper Type in the Paper Menu 1 During printing on the Tab Selection screen of the Control Panel press or to select the Job tab Note If the Tab Selection screen is not displayed press the Menu button 2 Press the OK button The Job Menu is displayed 3 Press or to s...

Страница 30: ...iPF685 User s Guide 30 Downloaded from ManualsPrinter com Manuals ...

Страница 31: ...iling and multiple pages per sheet 110 Centering originals 126 Conserving roll paper 135 Checking Images Before Printing 144 Other useful settings 145 Windows Software 157 Mac OS Software 277 Handling and Use of Paper 361 Control Panel 437 Printer Parts 477 Network Setting 491 Print Job Management 511 Adjustments for Better Print Quality 573 Maintenance and Consumables 589 Troubleshooting 627 Erro...

Страница 32: ...isplayed on the printer Control Panel if the media type specified in the printer driver does not match the media type specified in the printer Although you can print under these conditions the printing results may not be suitable Genuine Canon paper or Canon feed confirmed paper For genuine Canon paper or Canon feed confirmed paper select the settings that are optimized for that type of paper For ...

Страница 33: ...are too vivid Important Depending on the Media Type setting some Print Target options may not be available Note You can check the settings values for each print target by clicking View Settings You can also fine tune these values as needed Advanced Settings For details on Advanced Settings see Giving Priority to Particular Graphic Elements and Colors for Printing P 58 For instructions on printing ...

Страница 34: ...ontrol Panel is updated when you install the Media Configuration Tool from the User Software CD ROM or if you change paper infor mation by using the Media Configuration Tool For details see Media Configuration Tool P 406 5 After confirming that DEasy Settings is selected click Photo Color in the EPrint Target list Note You can check the settings values selected in the EPrint Target list by clickin...

Страница 35: ... inches 254 0 mm 1 Choose Page Setup from the application menu to display the Page Attributes dialog box Note The configuration method varies depending on the OS and application software you are using If Page Setup is displayed in the application menu the settings are configured by opening the Page Attributes dialog box from Page Setup If it is not displayed the settings are configured in the uppe...

Страница 36: ...tion by using the Media Configuration Tool For details see Media Configuration Tool P 420 8 After confirming that DEasy Settings is selected click Photo Color in the EPrint Target list Note For information on settings optimized for printing photos and images see Printing Photos and Images P 33 You can check the settings values selected in the EPrint Target list by clicking GView set 9 Make your se...

Страница 37: ...can be viewed easily Note You can check the settings values for each print target by clicking View Settings You can also fine tune these values as needed Advanced Settings For details on Advanced Settings see Giving Priority to Particular Graphic Elements and Colors for Printing P 58 Printing Office Documents Windows Printing Office Documents Windows This topic describes how to print office docume...

Страница 38: ... specified in the application In this case click ISO A4 8 Click Manual in the LPaper Source list 9 Specify additional printing conditions For details on available printing conditions see Printer Driver Settings P 158 10 Confirm the print settings and print as desired Note For tips on confirming print settings see Confirming Print Settings P 161 Printing Office Documents Mac OS Printing Office Docu...

Страница 39: ...e settings are configured by opening the Page Attributes dialog box from Page Setup If it is not displayed the settings are configured in the upper part of the printer driver displayed when you select Print from the application software menu 2 Select the printer in the BFormat for list 3 In the CPaper Size list click the size of the original In this case click ISO A4 for Paper Tray Large Mar gins ...

Страница 40: ...selected in the EPrint Target list by clicking GView set 9 Make your selection in the FPrint Quality list 10 Access the Page Setup pane 11 Click Manual in the APaper Source list 12 Specify additional printing conditions For details on available printing conditions see Printer Driver Settings P 278 Printing Office Documents Mac OS iPF685 User s Guide Enhanced Printing Options Printing Photos and Of...

Страница 41: ...m multiple applications creating a poster layout for printing 1 Choose Print in the application menu 2 Select the printer in the dialog box and then open the printer driver dialog box See Accessing the Printer Driv er Dialog Box from Applications Windows P 164 3 Make sure the Main sheet is displayed 4 Click the Layout tab to display the Layout sheet 5 Select the APage Layout check box 6 Click in t...

Страница 42: ...rtist window as desired Without closing the PosterArtist window repeat steps 1 8 to arrange originals from multiple applications on the same page Note For details on how to edit and sort images refer to the PosterArtist Manual 10 Print from the PosterArtist menu Using PosterArtist to Compose Originals iPF685 User s Guide Enhanced Printing Options Printing Photos and Office Documents 42 Downloaded ...

Страница 43: ...ou simply choose the type of original to print Easy Settings Simply choose the printing application in the list for optimal printing results Print Target Choose presets that match the type of document to be printed Print targets for line drawings and text Print Target Description CAD Color Line Drawing Settings optimized to print intricate lines in CAD drawings clearly CAD Monochrome Line Drawing ...

Страница 44: ...ructions on printing line drawings and text refer to the following topics as appropriate for your computer and operating system Printing Line Drawings and Text Windows P 44 Printing Line Drawings and Text Mac OS P 45 Printing Line Drawings and Text Windows Printing Line Drawings and Text Windows This topic describes how to print line drawings based on the following example Document CAD drawing Pag...

Страница 45: ...his case ISO A2 A3 Roll 420 0mm 10 Specify additional printing conditions For details on available printing conditions see Printer Driver Settings P 158 11 Confirm the print settings and print as desired Note For tips on confirming print settings see Confirming Print Settings P 161 Printing Line Drawings and Text Mac OS Printing Line Drawings and Text Mac OS This topic describes how to print line ...

Страница 46: ...he upper part of the printer driver displayed when you select Print from the application software menu 2 Select the printer in the BFormat for list 3 In the CPaper Size list click the size of the original In this case click ISO A3 4 Click FOK to close the dialog box 5 Choose Print in the application menu 6 Access the Main pane 7 In the AMedia Type list select the type of paper that is loaded In th...

Страница 47: ...ou can conserve roll paper by configuring settings suitable for the document For details on how to conserve paper and print see Conserving Roll Paper by Rotating Originals 90 De grees P 136 Printing from AutoCAD Printing from AutoCAD Printer Driver Optimization Module for AutoCAD is software for printing optimally from AutoCAD with the printer driver By optimally controlling the processing resolut...

Страница 48: ... window click Install Individual Software 3 Click Install of Printer Driver Optimization Module for AutoCAD 4 Follow the instructions on the screen Specifying Colors and Printing CAD Drawings Specifying Colors and Printing CAD Drawings You can complete color settings when Color CAD is selected in Color Mode Colors can be adjusted before printing as follows when Color Compatibility is selected Note...

Страница 49: ...s on configuring Color Compatibility refer to the following topics Specifying Colors and Printing CAD Drawings Windows P 49 Specifying Colors and Printing CAD Drawings Windows Specifying Colors and Printing CAD Drawings Windows You can complete color settings when Color CAD is selected in Color Mode Note Color CAD is displayed when you select Advanced Settings on the Main sheet and set Print Prior...

Страница 50: ...n of Graphic Arts Language with Raster Operations HP GL 2 is an abbreviation of Hewlett Packard Graphics Language 2 and HP RTL is an abbreviation of Hewlett Pack ard Raster Transfer Language Emulation is good for obtaining results similar to printing on other printers When printing from applications that support HP GL 2 output specify HP GL 2 in the application s plotter output set tings HP GL 2 a...

Страница 51: ...line drawings Only Black ink is used You can adjust the color balance Monochrome Bitmap Print in a color mode for CAD using Color Ink with all non white portions printed in black No color adjustment is supported No color correction 1 Prints without performing color matching in the printer driver You can adjust the color balance 1 If No color correction is selected the Matching sheet Matching pane ...

Страница 52: ...tion Remarks Auto Color matching optimized for images graphics or text The available options and their display or der vary depending on your selected color matching mode as well as the operating system Perceptual Color matching optimized for printing typi cal photos attractively Smooth gradation is a feature This is also an easy to use mode when performing color adjustment using application softwa...

Страница 53: ...lect the printer in the dialog box and then display the printer driver dialog box See Accessing the Printer Driver Dialog Box from Applications P 164 3 Make sure the Main sheet is displayed 4 In the AMedia Type list select the type of paper that is loaded 5 Click DAdvanced Settings to switch the print mode 6 Click Color in the GColor Mode list iPF685 Fine Tuning Colors of Photos and Images Windows...

Страница 54: ...t Adjust the contrast of the darkest and lightest portions relative to each other For soft gradation decrease the contrast For hard gradation increase the contrast JSaturation Adjust the level of color saturation in a range from subdued to vivid Note Click Object Adjustment to open the Object Adjustment dialog box which allows you to select the color adjustment target from Image Graphics and Text ...

Страница 55: ...n method varies depending on the OS and application software you are using If Page Setup is displayed in the application menu the settings are configured by opening the Page Attributes dialog box from Page Setup If it is not displayed the settings are configured in the upper part of the printer driver displayed when you select Print from the application software menu 2 Select the printer in the BF...

Страница 56: ...f paper that is loaded 8 Click DAdvanced Settings to switch the print mode 9 Click Color in the HColor Mode list Fine Tuning Colors of Photos and Images Mac OS iPF685 User s Guide Enhanced Printing Options Adjusting Images 56 Downloaded from ManualsPrinter com Manuals ...

Страница 57: ...the darkest and lightest portions in tact IContrast Adjust the contrast of the darkest and lightest portions relative to each other For soft gradation decrease the contrast For hard gradation increase the contrast JSaturation Adjust the level of color saturation in a range from subdued to vivid Note Click Object Adjustment to open the Object Adjustment dialog box which allows you to select the col...

Страница 58: ...s P 37 Print Priority Choose the graphic elements that you want to emphasize for printing Print Priority 1 Description Image A setting for posters or other documents made up mainly of photos or images or for empha sizing photos or images in printed documents Line Drawing Text Choose this setting for CAD drawings made up mainly of intricate lines or wall newspapers and other notices with a large am...

Страница 59: ...D Monochrome BK ink Monochrome Bitmap No color correction Choose whether to print in color or monochrome See Adjusting the Color in the Printer Driv er P 51 Color Adjustment Cyan Magenta Yellow Gray Tone Brightness Contrast Saturation You can adjust the levels of cyan magenta and yellow as well as the brightness contrast satura tion and gray tones If you choose Monochrome or Monochrome BK ink in C...

Страница 60: ...h or Highest in Print Quality and select the Unidirectional Printing check box For instructions on specifying the print quality and color settings before printing refer to the following topics as appropriate for your computer and operating system Choosing the Document Type and Printing Conditions Windows P 60 Choosing the Document Type and Printing Conditions Mac OS P 62 Choosing the Document Type...

Страница 61: ...tructions on adjusting color see Adjusting the Color in the Printer Driver P 51 10 Select the KSharpen Text check box 11 Click the Page Setup tab to display the Page Setup sheet 12 Confirm the settings of APage Size LPaper Source and so on 13 Confirm the print settings and print as desired Note For tips on confirming print settings see Confirming Print Settings P 161 iPF685 Choosing the Document T...

Страница 62: ...Page Setup is displayed in the application menu the settings are configured by opening the Page Attributes dialog box from Page Setup If it is not displayed the settings are configured in the upper part of the printer driver displayed when you select Print from the application software menu 2 Select the printer in the BFormat for list 3 Choose the original size in the CPaper Size list 4 Click FOK ...

Страница 63: ...in the FPrint Quality list vary depending on the paper type 11 Click Monochrome in the HColor Mode list 12 To adjust the brightness and contrast click ISet Note For instructions on adjusting brightness and contrast see Adjusting the Color in the Printer Driver P 51 iPF685 Choosing the Document Type and Printing Conditions Mac OS User s Guide Enhanced Printing Options Adjusting Images 63 Downloaded...

Страница 64: ...ck MPrint to start printing Note For tips on confirming print settings see Confirming Print Settings P 281 Choosing the Document Type and Printing Conditions Mac OS iPF685 User s Guide Enhanced Printing Options Adjusting Images 64 Downloaded from ManualsPrinter com Manuals ...

Страница 65: ...he size of the paper you are using For instructions on printing with resizing to fit the paper size refer to the following topics Resizing Originals to Match the Paper Size Windows P 65 Note To print with resizing to fit the paper size on Mac OS use Scale to fit paper size in the Paper Handling panel provided by the OS For more information see the Mac OS User Manual For better printing results whe...

Страница 66: ...lect the printing application in the EPrint Target list 6 Click the Page Setup tab to display the Page Setup sheet 7 Select and click a roll paper in the LPaper Source list 8 Select the width of the loaded roll in the MRoll Paper Width list in this case ISO A2 A3 Roll 420 0mm 9 In the APage Size list click the size of the original as specified in the application In this case click ISO A4 10 Select...

Страница 67: ...as desired Resizing Originals to Fit the Roll Width Windows Resizing Originals to Fit the Roll Width Windows This topic describes how to enlarge originals before printing to match the roll width based on the following example Document Any type Page size A4 210 0 297 0 mm Letter 8 3 11 7 in Paper Roll Paper type Plain Paper Roll paper width 16 inches 406 4 mm 1 Choose Print in the application menu ...

Страница 68: ...age Setup tab to display the Page Setup sheet 7 Select and click a roll paper in the LPaper Source list 8 In the APage Size list click the size of the original as specified in the application In this case click ISO A4 or Letter 8 5 x11 Resizing Originals to Fit the Roll Width Windows iPF685 User s Guide Enhanced Printing Options Printing enlargements or reductions 68 Downloaded from ManualsPrinter...

Страница 69: ...l 11 Confirm the print settings and print as desired Note For tips on confirming print settings see Confirming Print Settings P 161 Resizing Originals to Fit the Roll Width Mac OS Resizing Originals to Fit the Roll Width Mac OS This topic describes how to enlarge originals before printing to match the roll width based on the following example Document Any Type Page size A4 210 0 297 0 mm 8 3 11 7 ...

Страница 70: ...iver displayed when you select Print from the application software menu 2 Select the printer in the BFormat for list 3 In CPaper Size click the size of the original In this case click ISO A4 4 Click FOK to close the dialog box 5 Choose Print in the application menu 6 Access the Main pane 7 In the AMedia Type list select the type of paper that is loaded In this case click Plain Paper 8 Make your se...

Страница 71: ...rinting Note For tips on confirming print settings see Confirming Print Settings P 281 Resizing Originals by Entering a Scaling Value Resizing Originals by Entering a Scaling Value You can freely adjust the size of originals by enlarging or reducing them as desired Enlarged Reduced Printing Enlarge or reduce the original in the printer driver as desired Scaling Enlarge or reduce originals by a par...

Страница 72: ...ing by entering a scaling value based on the following exam ple Document Any Type Page size A4 210 0 297 0 mm 8 3 11 7 in Paper Roll paper Paper type Plain Paper Roll paper width A2 A3 roll 420 0 mm 16 5 in Important In borderless printing you cannot resize originals by entering a scaling value 1 Choose Print in the application menu 2 Select the printer in the dialog box and then display the print...

Страница 73: ...ll not be printed If the original size after enlargement or reduction is smaller than the paper size the original is printed in the upper left corner In this case you can center originals by selecting EPrint Centered on the Layout sheet 13 Confirm the print settings and print as desired Note For tips on confirming print settings see Confirming Print Settings P 161 Resizing Originals by Entering a ...

Страница 74: ...he Page Attributes dialog box from Page Setup If it is not displayed the settings are configured in the upper part of the printer driver displayed when you select Print from the application software menu 2 Select the printer in the BFormat for list 3 In CPaper Size click the size of the original In this case click ISO A4 4 Click FOK to close the dialog box 5 Choose Print in the application menu 6 ...

Страница 75: ...120 Note You can specify enlargement that exceeds the paper size but in this case the portion off the edge of the paper will not be printed If the original size after enlargement or reduction is smaller than the paper size the original is printed in the upper left corner In this case you can center originals by selecting the JPrint Centered check box 15 Confirm the print settings and then click MP...

Страница 76: ...taking the margins necessary for printer opera tions outside of the region of the original to give the result as shown in Figure c The A4 size print as shown in Figure b can then be obtained by trimming the margins from the periphery after printing Important When printing on Oversize paper load paper larger than the page size a size that includes the margin re quired by the printer Sheets Load pap...

Страница 77: ...er Roll paper width A2 A3 roll 420 0 mm 16 5 in 1 Choose Print in the application menu 2 Select the printer in the dialog box and then display the printer driver dialog box See Accessing the Printer Driver Dialog Box from Applications P 164 3 Make sure the Main sheet is displayed 4 In the AMedia Type list select the type of paper that is loaded In this case click Plain Paper 5 Click the Page Setup...

Страница 78: ...Roll paper Paper type Plain Paper Roll paper width A2 A3 roll 420 0 mm 16 5 in 1 Choose Page Setup from the application menu to display the Page Attributes dialog box Note The configuration method varies depending on the OS and application software you are using If Page Setup is displayed in the application menu the settings are configured by opening the Page Attributes dialog box from Page Setup ...

Страница 79: ...ection in the FPrint Quality list 10 Access the Page Setup pane 11 Select and click a roll paper in the APaper Source list 12 Select the paper width of the roll loaded in the printer for BRoll Width In this case ISO A2 A3 420 0mm is selected iPF685 Printing at Full Size Mac OS User s Guide Enhanced Printing Options Printing at full size 79 Downloaded from ManualsPrinter com Manuals ...

Страница 80: ...ence Guide paper where printed image areas cannot be cut cleanly is selected When the following settings are made in the printer control panel Cutting Mode is Manual CutDustReduct is On When auto cut is configured as not performed in the printer driver Important Borderless printing is not possible if details such as crop marks and margins are included as data on the periphery of the original If th...

Страница 81: ...u require higher image quality select No from the Automatic Cutting list in the Roll Paper Options dialog box In this case the paper can be printed without borders on the left and right sides only Once printed and cut please cut the upper and lower bands with scissors Document Any type Page size 10 12 inches 254 0 304 8 mm Paper Roll Paper type Canon Heavyweight Coated Paper Roll paper width 10 in...

Страница 82: ...cut depending on frequency of use In this kind of situation change the ink drying time using the following procedure Click Advanced Settings in Media Type Select an ink drying time in the list for the Between Pages setting of Drying Time 7 Click the Page Setup tab to display the Page Setup sheet 8 In the APage Size list click the size of the original as specified in the source application In this ...

Страница 83: ... at actual size based on the following example Important When borderless printing is used the edge of the paper is cut during printing Thus ink density may be uneven at the edges If you require higher image quality select No from the Automatic Cutting list in the Paper Detailed Settings dialog box In this case the paper can be printed without borders on the left and right sides only Once printed a...

Страница 84: ...played when you select Print from the application software menu 2 Select the printer in the BFormat for list 3 In the CPaper Size list choose a paper size supported for borderless printing Here click 10 x12 Border less Note Paper sizes supported for borderless printing are indicated by Borderless 4 Click FOK to close the dialog box 5 In the application create an original that takes up the entire s...

Страница 85: ...ay damage the paper or the edge of the document that is cut depending on frequency of use In this kind of situation change the ink drying time in Between Pages in the Paper Detailed Settings dialog box 10 Access the Page Setup pane 11 Select and click a roll paper in the APaper Source list Select the paper width of the roll loaded in the printer for BRoll Width In this case 10 in 254 0mm is selec ...

Страница 86: ... to start printing Note For tips on confirming print settings see Confirming Print Settings P 281 Borderless Printing at Actual Size Mac OS iPF685 User s Guide Enhanced Printing Options Printing at full size 86 Downloaded from ManualsPrinter com Manuals ...

Страница 87: ...ecomes borderless only on the left and right 2 edge borderless because the top and bottom of the printed image are not automatically cut When paper where the borderless printing is described as two edges only in the Paper Reference Guide paper where printed image areas cannot be cut cleanly is selected When the following settings are made in the printer control panel Cutting Mode is Manual CutDust...

Страница 88: ...g by Resizing Originals to Match the Paper Size Windows Borderless Printing by Resizing Originals to Match the Paper Size Windows This topic describes how to enlarge originals before borderless printing to match the paper size based on the following example Important When borderless printing is used the edge of the paper is cut during printing Thus ink density may be uneven at the edges If you req...

Страница 89: ...weight Coat ed Paper 6 Select the print target in the EPrint Target list Important When you are using paper that takes longer for ink to adhere for borderless printing and the Cutter Unit touches printing surfaces that are not dry yet it may damage the paper or the edge of the document that is cut depending on frequency of use In this kind of situation change the ink drying time using the followin...

Страница 90: ...y the printer is added around the original With borderless printing you can print documents without the margin so that the printed image covers the entire surface of the paper Borderless printing is only available with rolls Paper you can use for borderless printing is restricted to particular types of paper and rolls of particular widths See Displaying the Paper Reference Guide P 365 Although it ...

Страница 91: ...oll paper width in borderless printing For instructions on borderless printing of photos images and other documents to match the roll paper width refer to the following topics as appropriate for your computer and operating system Borderless Printing by Resizing Originals to Fit the Roll Width Windows P 91 Borderless Printing by Resizing Originals to Fit the Roll Width Mac OS P 93 Borderless Printi...

Страница 92: ...yweight Coat ed Paper 6 Select the print target in the EPrint Target list Important When you are using paper that takes longer for ink to adhere for borderless printing and the Cutter Unit touches printing surfaces that are not dry yet it may damage the paper or the edge of the document that is cut depending on frequency of use In this kind of situation change the ink drying time using the followi...

Страница 93: ...esizing Originals to Fit the Roll Width Mac OS This topic describes how to enlarge originals before borderless printing to match the roll width based on the following example Important When borderless printing is used the edge of the paper is cut during printing Thus ink density may be uneven at the edges If you require higher image quality select No from the Automatic Cutting list in the Paper De...

Страница 94: ...d when you select Print from the application software menu 2 Select the printer in the BFormat for list 3 In CPaper Size click the size of the original In this case click ISO A4 Note All sizes are available in borderless printing if you resize originals to fit the roll width 4 Click FOK to close the dialog box 5 In the application create an original that takes up the entire space of the paper size...

Страница 95: ...aper or the edge of the document that is cut depending on frequency of use In this kind of situation change the ink drying time in Between Pages in the Paper Detailed Settings dialog box 10 Access the Page Setup pane 11 Select and click a roll paper in the APaper Source list 12 Select the paper width of the roll loaded in the printer for BRoll Width In this case 10 in 254 0mm is selec ted iPF685 B...

Страница 96: ... in DEnlarged Reduced Printing 15 Confirm the print settings and then click MPrint to start printing Note For tips on confirming print settings see Confirming Print Settings P 281 Borderless Printing by Resizing Originals to Fit the Roll Width Mac OS iPF685 User s Guide Enhanced Printing Options Borderless Printing 96 Downloaded from ManualsPrinter com Manuals ...

Страница 97: ...h the width of vertical and horizontal banners with the width of rolls use the printer driver function for automati cally enlarging reducing and printing For example if you automatically enlarge a document created with application software such as Microsoft Word you can print the full width of the roll easily For instructions on printing vertical or horizontal banners refer to the following topics...

Страница 98: ... Paper Size you then can select it repeatedly from the paper size list Custom Paper Size can be set up to 18 0 m 2 In the application create an original in the size you registered 3 Print the banner using the settings that correspond to banners Registering a Custom Paper Size This example describes how to register a paper size that is horizontally elongated and suitable for banners in either horiz...

Страница 99: ... Banner is not listed make sure this printer is selected as the printer to use In applications such as Microsoft PowerPoint that do not enable you to choose registered paper sizes use the custom paper size setting in Custom and specify 100 500 mm 3 9 19 7 in 4 Set the printing orientation to horizontal 5 Create the banner Printing the banner Follow these steps to print the banner using the corresp...

Страница 100: ...ox 9 Select and click a roll paper in the LPaper Source list 10 After you click EFit Roll Paper Width the Information dialog box is displayed 11 Select the width of the loaded roll in the Roll Paper Width list In this case click 16 in Roll 406 4mm and then click OK 12 Confirm the print settings and print as desired Note For tips on confirming print settings see Confirming Print Settings P 161 Prin...

Страница 101: ...a horizontal banner Page Size Non standard 100 500 mm 3 9 19 7 in Paper Roll Paper type Plain Paper Roll paper width 16 inches 406 4 mm The print procedure is as follows 1 In the application create an original in the format of a horizontal or vertical banner 2 In Page Setup register Custom Paper Sizes Once you register Custom Paper Sizes you then can select it repeatedly from the paper size list C...

Страница 102: ...n Height Here measurements are entered in millimeters 7 Specify the margins by entering 3 in Non Printable Area Here too measurements are entered in millimeters 8 Click OK to close the Custom Paper Sizes dialog box 9 In the FPaper Size list click the size of the original In this case click 100 500 the size you registered 10 In GOrientation click the icon of the document in landscape orientation 11...

Страница 103: ... and click a roll paper in the APaper Source list 8 Select the paper width of the roll loaded in the printer for BRoll Width In this case 16 in 406 4mm is selec ted 9 Select the DEnlarged Reduced Printing check box 10 Click FFit Roll Paper Width iPF685 Printing Vertical or Horizontal Banners Large Format Printing Mac OS User s Guide Enhanced Printing Options Printing banners or at other non standa...

Страница 104: ...er the paper size in the printer driver Call a non standard paper size registered in the printer driver with Custom Paper Size Once you register Custom Paper Size you then can select it repeatedly from the paper size list Custom Paper Size can be set up to 18 0 m Note Although you also can set Custom Size for the paper size temporarily the maximum settable size is 3 2 m Also the setting of Custom ...

Страница 105: ... 11 Enter 430 16 9 in in both Width and Height Note If you select the Fix the Ratio of the Width to Height check box after you enter a value in either Width or Height the other value will be automatically applied based on the original aspect ratio 12 Click Add to register 430 mm Square 13 Click OK to close the Paper Size Options dialog box 14 Click Manual in the LPaper Source list 15 In the APage ...

Страница 106: ...e square paper 430 430 mm 16 9 16 9 in in the printer 2 Choose Print in the application menu 3 Select the printer in the dialog box and then display the printer driver dialog box See Accessing the Printer Driver Dialog Box from Applications P 164 4 Make sure the Main sheet is displayed 5 In the AMedia Type list select the type of paper that is loaded 6 After confirming that DEasy Settings is selec...

Страница 107: ...ter driver with Custom Paper Sizes Once you register Custom Paper Sizes you then can select it repeatedly from the paper size list Custom Paper Sizes can be set up to 18 0 m This topic describes how to register a non standard paper size by the name of 430 430 and print based on the follow ing example Document Any Type Page Size A square sheet 430 430 mm 16 9 16 9 in Paper Sheets Media Type Any typ...

Страница 108: ...ick Untitled in the list at left in the Custom Paper Sizes dialog box and enter the paper name in this case 430 430 9 Click OK to close the Custom Paper Sizes dialog box 10 In the FPaper Size list click the size of the original In this case click 430 430 the size you registered 11 If you configured the settings using the Page Attributes dialog box click OK to close the dialog box and then select P...

Страница 109: ...uality list 16 Access the Page Setup pane 17 Click Manual in the APaper Source list 18 Confirm the print settings and then click MPrint to start printing Note For tips on confirming print settings see Confirming Print Settings P 281 iPF685 Printing on Non Standard Paper Sizes Mac OS User s Guide Enhanced Printing Options Printing banners or at other non standard sizes 109 Downloaded from ManualsPr...

Страница 110: ...ing Large Posters Windows 123 Printing Multiple Originals Next to Each Other Printing Multiple Originals Next to Each Other By arranging originals from word processing or spreadsheet programs or web browser screen shots next to each other on single sheets you can create highly expressive presentation materials easy to understand meeting materials and a variety of other printed documents Free Layou...

Страница 111: ...ng Multiple Originals Next to Each Other Windows Printing Multiple Originals Next to Each Other Windows This topic describes how to arrange multiple originals using the Free Layout function 1 Choose Print in the application menu 2 Select the printer in the dialog box and then display the printer driver dialog box See Accessing the Printer Driver Dialog Box from Applications P 164 3 Make sure the M...

Страница 112: ...te Without closing the imagePROGRAF Free Layout window repeat steps 1 7 to arrange originals from multi ple applications on the same page For instructions on editing and rearranging images refer to the imagePROGRAF Free Layout help topic 9 Print from the imagePROGRAF Free Layout menu Note For details on imagePROGRAF Free Layout functions see Free Layout P 202 Printing Multiple Originals Next to Ea...

Страница 113: ...agePROGRAF Free Layout window is displayed 6 Edit and rearrange the image in the Canon imagePROGRAF Free Layout window as desired Note Without closing the Canon imagePROGRAF Free Layout window repeat steps 1 to 4 to arrange originals from multiple applications on the same page For instructions on editing and rearranging images refer to the Canon imagePROGRAF Free Layout help topic iPF685 Printing ...

Страница 114: ...g system Printing Multiple Pages Continuously Windows P 114 Printing Multiple Pages Continuously Mac OS P 116 Printing Multiple Pages Continuously Windows Printing Multiple Pages Continuously Windows This topic describes how to print multiple pages as a single continuous image without margins between pages Important This feature is only available with rolls It cannot be used when printing on sheet...

Страница 115: ...Click NRoll Paper Options to display the Roll Paper Op tions dialog box 8 Select the BBanner Printing check box 9 Click OK 10 Confirm the print settings and print as desired Note For tips on confirming print settings see Confirming Print Settings P 161 iPF685 Printing Multiple Pages Continuously Windows User s Guide Enhanced Printing Options Tiling and multiple pages per sheet 115 Downloaded from ...

Страница 116: ...guration method varies depending on the OS and application software you are using If Page Setup is displayed in the application menu the settings are configured by opening the Page Attributes dialog box from Page Setup If it is not displayed the settings are configured in the upper part of the printer driver displayed when you select Print from the application software menu 2 Select the printer in...

Страница 117: ... the Page Setup pane 11 Click Roll Paper Banner in the APaper Source list 12 Confirm the print settings and then click MPrint to start printing Note For tips on confirming print settings see Confirming Print Settings P 281 iPF685 Printing Multiple Pages Continuously Mac OS User s Guide Enhanced Printing Options Tiling and multiple pages per sheet 117 Downloaded from ManualsPrinter com Manuals ...

Страница 118: ...ructions on printing multiple pages per sheet refer to the following topics as appropriate for your computer and operating system Printing Multiple Pages Per Sheet Windows P 118 Printing Multiple Pages Per Sheet Mac OS P 120 Printing Multiple Pages Per Sheet Windows Printing Multiple Pages Per Sheet Windows This topic describes how to print four pages of originals together on a single sheet based ...

Страница 119: ...ay the Page Setup sheet 8 In APage Size click the size of the original as specified in the application software In this case click ISO A3 9 Select and click a roll paper in the LPaper Source list 10 Select the width of the loaded roll in the MRoll Paper Width list in this case ISO A2 A3 Roll 420 0mm iPF685 Printing Multiple Pages Per Sheet Windows User s Guide Enhanced Printing Options Tiling and ...

Страница 120: ...educed for printing 14 Confirm the print settings and print as desired Note For tips on confirming print settings see Confirming Print Settings P 161 Printing Multiple Pages Per Sheet Mac OS Printing Multiple Pages Per Sheet Mac OS This topic describes how to print four pages of an original on a single sheet based on the following example Document Any Type Page size A3 297 0 420 0 mm 11 7 16 5 in ...

Страница 121: ...played when you select Print from the application software menu 2 Select the printer in the BFormat for list 3 In the CPaper Size list click the size of the original In this case click ISO A3 4 Click FOK to close the dialog box 5 Choose Print in the application menu 6 Access the Layout pane 7 Click 4 in the APages per Sheet list Note You can choose the layout order and specify a boundary line for ...

Страница 122: ...e FPrint Quality list 12 Access the Page Setup pane 13 Select and click a roll paper in the APaper Source list 14 Select the paper width of the roll loaded in the printer for BRoll Width In this case ISO A2 A3 420 0mm is selected Printing Multiple Pages Per Sheet Mac OS iPF685 User s Guide Enhanced Printing Options Tiling and multiple pages per sheet 122 Downloaded from ManualsPrinter com Manuals ...

Страница 123: ...arge Posters Windows P 123 Note This method of poster printing is supported in Windows Printing Large Posters Windows Printing Large Posters Windows You can enlarge an original to print it in sections on several sheets By assembling the printed sheets you can create a poster larger than the maximum supported paper size of the printer This topic describes how to enlarge an A2 original for printing ...

Страница 124: ...the Page Setup tab to display the Page Setup sheet 7 In APage Size click the size of the original as specified in the application In this case click ISO A2 8 Click Manual in the LPaper Source list Printing Large Posters Windows iPF685 User s Guide Enhanced Printing Options Tiling and multiple pages per sheet 124 Downloaded from ManualsPrinter com Manuals ...

Страница 125: ...ay the Pages to Print dialog box On the Pages to Print dialog box clear the check boxes of the portion you do not want to print Click OK to close the Pages to Print dialog box 12 Confirm the print settings and print as desired Note For tips on confirming print settings see Confirming Print Settings P 161 iPF685 Printing Large Posters Windows User s Guide Enhanced Printing Options Tiling and multip...

Страница 126: ...ginals when printing on rolls refer to the following topics as appropriate for your computer and operating system Printing Originals Centered on Rolls Windows P 126 Printing Originals Centered on Rolls Mac OS P 128 Printing Originals Centered on Rolls Windows Printing Originals Centered on Rolls Windows This topic describes how to center originals before printing on rolls based on the following ex...

Страница 127: ... In the APage Size list click the size of the original as specified in the application In this case click ISO A4 or Letter 8 5 x11 8 Select and click a roll paper in the LPaper Source list 9 Select the width of the loaded roll in the MRoll Paper Width list in this case ISO A3 A4 Roll 297 0mm iPF685 Printing Originals Centered on Rolls Windows User s Guide Enhanced Printing Options Centering origin...

Страница 128: ...per width A3 A4 roll 297 0 mm 11 7 in 1 Choose Page Setup from the application menu to display the Page Attributes dialog box Note The configuration method varies depending on the OS and application software you are using If Page Setup is displayed in the application menu the settings are configured by opening the Page Attributes dialog box from Page Setup If it is not displayed the settings are c...

Страница 129: ...the type of paper that is loaded In this case click Plain Paper 8 Make your selection in the EPrint Target list 9 Make your selection in the FPrint Quality list 10 Access the Page Setup pane 11 Select and click a roll paper in the APaper Source list iPF685 Printing Originals Centered on Rolls Mac OS User s Guide Enhanced Printing Options Centering originals 129 Downloaded from ManualsPrinter com M...

Страница 130: ... sheets when printing For instructions on centering originals when printing on sheets refer to the following topics as appropriate for your computer and operating system Printing Originals Centered on Sheets Windows P 130 Printing Originals Centered on Sheets Mac OS P 132 Printing Originals Centered on Sheets Windows Printing Originals Centered on Sheets Windows This topic describes how to reduce ...

Страница 131: ... 7 In the APage Size list click the size of the original as specified in the application In this case click ISO A4 8 Select the CEnlarged Reduced Printing check box 9 Click Match Page Size in the GPaper Size list 10 Click FScaling and enter 50 11 Click Manual in the LPaper Source list iPF685 Printing Originals Centered on Sheets Windows User s Guide Enhanced Printing Options Centering originals 13...

Страница 132: ...onfirming print settings see Confirming Print Settings P 161 Printing Originals Centered on Sheets Mac OS Printing Originals Centered on Sheets Mac OS This topic describes how to center originals for printing on sheets based on the following example Document Any Type Page size A4 Paper Sheets Paper type Plain Paper Paper size Non standard Printing Originals Centered on Sheets Mac OS iPF685 User s ...

Страница 133: ...yed when you select Print from the application software menu 2 Select the printer in the BFormat for list 3 In the CPaper Size list click the size of the original In this case click ISO A4 for Paper Tray Large Mar gins 4 Click FOK to close the dialog box 5 Choose Print in the application menu 6 Access the Main pane 7 In the AMedia Type list select the type of paper that is loaded In this case clic...

Страница 134: ...lick MPrint to start printing Note For tips on confirming print settings see Confirming Print Settings P 281 Important If you have selected Manual as the paper source follow the instructions on the printer control panel to enter the pa per size Printing Originals Centered on Sheets Mac OS iPF685 User s Guide Enhanced Printing Options Centering originals 134 Downloaded from ManualsPrinter com Manua...

Страница 135: ...ed pages For tips on conserving roll paper refer to the following topics as appropriate for your computer and operating sys tem Conserving Roll Paper by Rotating Originals 90 Degrees Windows P 135 Conserving Roll Paper by Rotating Originals 90 Degrees Mac OS P 136 Conserving Roll Paper by Rotating Originals 90 Degrees Windows Conserving Roll Paper by Rotating Originals 90 Degrees Windows This topi...

Страница 136: ...97 0mm 9 Select the KRotate Page 90 degrees Conserve Paper check box 10 Confirm the print settings and print as desired Note For tips on confirming print settings see Confirming Print Settings P 161 Conserving Roll Paper by Rotating Originals 90 Degrees Mac OS Conserving Roll Paper by Rotating Originals 90 Degrees Mac OS This topic describes how to conserve roll paper by rotating originals 90 degr...

Страница 137: ...are using If Page Setup is displayed in the application menu the settings are configured by opening the Page Attributes dialog box from Page Setup If it is not displayed the settings are configured in the upper part of the printer driver displayed when you select Print from the application software menu 2 Select the printer in the BFormat for list 3 In CPaper Size click the size of the original In...

Страница 138: ...ed in the printer for BRoll Width In this case ISO A3 A4 297 0mm is selected 11 Select the LRotate Page 90 degrees check box 12 Confirm the print settings and then click MPrint to start printing Note For tips on confirming print settings see Confirming Print Settings P 281 Conserving Roll Paper by Rotating Originals 90 Degrees Mac OS iPF685 User s Guide Enhanced Printing Options Conserving roll pa...

Страница 139: ... paper refer to the following topics as appropriate for your computer and operating sys tem Conserving Roll Paper by Printing Originals Without Top and Bottom Margins Windows P 139 Conserving Roll Paper by Printing Originals Without Top and Bottom Margins Mac OS P 141 Conserving Roll Paper by Printing Originals Without Top and Bottom Margins Windows Conserving Roll Paper by Printing Originals With...

Страница 140: ...original as specified in the application In this case click ISO A4 or Letter 8 5 x11 7 Select and click a roll paper in the LPaper Source list 8 Select the width of the loaded roll in the MRoll Paper Width list in this case ISO A3 A4 Roll 297 0mm Conserving Roll Paper by Printing Originals Without Top and Bottom Margins Windows iPF685 User s Guide Enhanced Printing Options Conserving roll paper 14...

Страница 141: ...n Paper Roll paper Paper type Plain Paper Roll paper width A3 A4 roll 297 0 mm 11 7 in 1 Choose Page Setup from the application menu to display the Page Attributes dialog box Note The configuration method varies depending on the OS and application software you are using If Page Setup is displayed in the application menu the settings are configured by opening the Page Attributes dialog box from Pag...

Страница 142: ...n Paper 8 Access the Page Setup pane 9 Select and click a roll paper in the APaper Source list 10 Select the paper width of the roll loaded in the printer for BRoll Width In this case ISO A3 A4 297 0mm is selected 11 Select the KNo Spaces at Top or Bottom check box Conserving Roll Paper by Printing Originals Without Top and Bottom Margins Mac OS iPF685 User s Guide Enhanced Printing Options Conser...

Страница 143: ...te For tips on confirming print settings see Confirming Print Settings P 281 iPF685 Conserving Roll Paper by Printing Originals Without Top and Bottom Margins Mac OS User s Guide Enhanced Printing Options Conserving roll paper 143 Downloaded from ManualsPrinter com Manuals ...

Страница 144: ...der some settings and in some environments PageComposer may be started Preview Mac OS While viewing the preview screen you can also adjust layout or size settings and your changes will be instantly applied on the preview screen For instructions on how to check the layout before printing refer to the following topics Checking the Layout in a Preview Before Printing Windows P 162 Checking the Layout...

Страница 145: ...ire special handling Watermark Watermarks are applied to all pages of your document Important Watermarks are not printed if you select poster as the type of page layout The following watermarks are provided CONFIDENTIAL COPY DRAFT FILE COPY FINAL PRELIMINARY PROOF TOP SECRET You can also create your own watermarks Specify the following options to customize your watermark Watermark string Specify t...

Страница 146: ... mm 16 5 23 4 in Paper Roll paper Paper type Plain Paper Roll paper width A2 A3 roll 420 0 mm 16 5 in 1 Choose Print in the application menu 2 Select the printer in the dialog box and then display the printer driver dialog box See Accessing the Printer Driver Dialog Box from Applications P 164 3 Make sure the Main sheet is displayed 4 In the AMedia Type list select the type of paper that is loaded...

Страница 147: ...e Layout sheet 11 Select the CWatermark check box 12 Click FILE COPY in the Watermarks list Note Click DEdit Watermark to open the Edit Watermark dialog box In the Edit Watermark dialog box you can create custom watermarks and change the position and angle of watermarks 13 Confirm the print settings and print as desired Note For tips on confirming print settings see Confirming Print Settings P 161...

Страница 148: ...the Paper Orientation Windows P 148 Making the Original Orientation Match the Paper Orientation Mac OS P 149 Making the Original Orientation Match the Paper Orientation Windows Making the Original Orientation Match the Paper Orientation Windows This topic describes how to print an original in landscape orientation after matching the paper orientation based on the following example Document An orig...

Страница 149: ...3 Roll 420 0mm 12 Confirm the print settings and print as desired Note For tips on confirming print settings see Confirming Print Settings P 161 Making the Original Orientation Match the Paper Orientation Mac OS Making the Original Orientation Match the Paper Orientation Mac OS This topic describes how to print an original in landscape orientation after matching the paper orientation based on the ...

Страница 150: ...hen you select Print from the application software menu 2 Select the printer in the BFormat for list 3 In CPaper Size click the size of the original In this case click ISO A4 4 In DOrientation click the icon of the document in landscape orientation 5 Click FOK to close the dialog box 6 Choose Print in the application menu 7 Access the Main pane 8 In the AMedia Type list select the type of paper th...

Страница 151: ...m a particular job that met your expectations or set tings for a particular page size that you will use repeatedly Favorites Registering a favorite for later use You can choose the settings you have registered from a list before printing and you can check the settings details Note You can also save the favorite settings as files Using these files is a convenient way to print under the same conditi...

Страница 152: ...ws Cutting Roll Paper After Printing Windows This topic describes how to cut roll paper automatically after printing using the auto cut function as well as how to print a cut line for manual cutting Note The auto cut function is activated on the printer by default and when the printer driver is installed Follow the steps below to reactivate the function if it is disabled or to select the setting f...

Страница 153: ...low the steps below to reactivate the function if it is disabled or to select the setting for printing a cut line instead 1 Choose Page Setup from the application menu to display the Page Attributes dialog box Note The configuration method varies depending on the OS and application software you are using If Page Setup is displayed in the application menu the settings are configured by opening the ...

Страница 154: ...he APaper Source list 8 Access the Main pane 9 In the AMedia Type list select the type of paper that is loaded Cutting Roll Paper After Printing Mac OS iPF685 User s Guide Enhanced Printing Options Other useful settings 154 Downloaded from ManualsPrinter com Manuals ...

Страница 155: ...on has been deactivated on the printer change the auto cut setting on the printer Control Panel 12 Click OK to close the Paper Detailed Settings dialog box 13 Confirm the print settings and then click MPrint to start printing Note For tips on confirming print settings see Confirming Print Settings P 281 iPF685 Cutting Roll Paper After Printing Mac OS User s Guide Enhanced Printing Options Other us...

Страница 156: ...iPF685 User s Guide 156 Downloaded from ManualsPrinter com Manuals ...

Страница 157: ... 512 Accounting 517 Device Setup Utility 508 Media Configuration Tool 406 Mac OS Software 277 Handling and Use of Paper 361 Control Panel 437 Printer Parts 477 Network Setting 491 Print Job Management 511 Adjustments for Better Print Quality 573 Maintenance and Consumables 589 Troubleshooting 627 Error Message 657 Specifications 681 Appendix 685 imagePROGRAF Windows Software 157 Downloaded from Ma...

Страница 158: ...ochrome 176 Object Adjustment Dialog box Monochrome 177 Page Setup Sheet 178 Output Method Dialog box 180 Paper Size Options Dialog Box 181 Layout Sheet 182 Page Options Dialog Box 184 Special Settings Dialog Box 185 Favorites Sheet 186 Utility Sheet 187 Support Sheet 188 Settings Summaries Dialog Box 189 Device Settings Sheet 189 Printer Driver Settings Printer Driver Settings For instructions on...

Страница 159: ...cify the page layout watermarks the orientation the number of copies and print processing options Page Options Dialog Box P 184 Special Settings Dialog Box P 185 Favorites Sheet P 186 Groups of print settings you select on each sheet can be saved as a favorite Favorites you have added can be edited or used at the time of printing as desired Utility Sheet P 187 You can specify settings related to m...

Страница 160: ...int in the application menu 2 Select the printer in the dialog box and then display the printer driver dialog box See Accessing the Printer Driver Dialog Box from Applications P 164 3 Make sure the Main sheet is displayed 4 In the AMedia Type list select the type of paper that is loaded Note Click the BGet Information button to display the Paper Information on Printer dialog box On the Paper Infor...

Страница 161: ...e two ways to confirm the print settings as follows Checking a preview of the settings A preview of the settings is displayed on the left side of the Main Page Setup and Layout sheets By checking illustrations and numerical values in the preview you can confirm current settings for the page size orientation paper source layout and so on Display Area Information Displayed PTop illustrations Illustr...

Страница 162: ... print previews see Checking the Layout in a Preview Before Printing P 144 Checking the Layout in a Preview Before Printing Checking the Layout in a Preview Before Printing This topic describes how to preview images of print jobs before actually printing them 1 Choose Print in the application menu 2 Select the printer in the dialog box and then display the printer driver dialog box See Accessing t...

Страница 163: ...egistering a favorite This section describes the procedure for registering printing settings that have been changed in the driver as Favor ites 1 Choose Print in the application menu 2 Select the printer in the dialog box and then display the printer driver dialog box See Accessing the Printer Driver Dialog Box from Applications P 164 3 Perform normal printing settings The favorite is registered f...

Страница 164: ...cessing the Printer Driver Dialog Box from Applications P 164 3 Click the Favorites tab to display the Favorites sheet 4 In the AFavorites choose the favorite you registered Note To import a favorite click IImport and specify the favorite file 5 Click DApply Favorite to replace the favorite settings with the current print settings 6 Confirm the print settings and print as desired Note For instruct...

Страница 165: ...ts other than these six sheets may be displayed Important If you access the printer driver dialog box from the source application changes you make to the settings will only apply temporarily to that application Because these are sizes you specify temporarily in the printer driver the sizes will not be available after you exit the application You can also access the printer driver dialog box from t...

Страница 166: ...e printer proper ties dialog box 3 Click Printing Preferences to display the Main or Printing Preferences dialog box titled with the name of this printer Note The Device Settings sheet is also an extension of the printer driver See Device Settings Sheet P 189 Accessing the Printer Driver Dialog Box from the Operating System Menu iPF685 User s Guide Windows Software Printer Driver 166 Downloaded fr...

Страница 167: ...e printer driver help file Note On the Main sheet choose Easy Settings to specify basic print settings based on the particular printing application or switch to Advanced Settings to complete more detailed settings as desired Common Items AMedia Type Select the type of paper For information on the types of paper the printer supports refer to the Paper Reference Guide See Displaying the Paper Refere...

Страница 168: ...occur by completing the Email Notice settings For details refer to the Status Monitor help file NAbout Displays version information for the printer driver SDefaults Restores all settings on the sheet to the default values Configuration using Easy Settings EPrint Target Choose presets that match the type of document to be printed Printing Photos and Images P 33 Printing Line Drawings and Text P 43 ...

Страница 169: ...Highest quality However depending on AMedia Type and EPrint Priority you may not be able to select THighest quality UEconomy Printing If you select this option you can print with less ink consumed However print quality is lower than in regular print ing Select this option to save ink such as when printing to check drawings Depending on the settings of AMedia Type and FPrint Quality you may not be ...

Страница 170: ...ings for the paper source and media type Note To display the Paper Information on Printer dialog box on the Main sheet click Get Information by Media Type See Main Sheet P 167 APaper Source Shows the paper source supported by the printer as well as information about the loaded paper To update the paper source and media type settings in the printer driver select the desired Paper Source option and ...

Страница 171: ...xt line Set this to avoid bleeding or color unevenness such as when bleeding occurs on a page or when color unevenness occurs during borderless printing Setting Item Details Printer Default The setting of the control panel of the printer is applied Off The next line is printed immediately after a line is printed 1 sec 3 sec 5 sec 7 sec 9 sec The next line is printed when the set time elapses after...

Страница 172: ...ersion of the document or image with the left and right sides inverted View Settings Dialog Box for the Printing Application View Settings Dialog Box for the Printing Application In the View Settings dialog box you can check details of the selected printing application Note To display the View Settings dialog box on the Main sheet click View Settings by Print Target See Main Sheet P 167 APrint Tar...

Страница 173: ...ent is lighter or darker than the original image that is the original photo that was scanned or the original graphic as it appears on the computer screen IContrast Adjust the contrast of the darkest and lightest portions relative to each other as desired Increasing the Contrast makes images sharper and reducing the Contrast softens images JSaturation Adjust the color intensity as desired Increasin...

Страница 174: ...age areas such as photos BGraphics Select this option to apply color adjustment to graphics such as lines and circles CText Select this option to apply color adjustment to text Matching Sheet Matching Sheet On the Matching sheet you can specify color matching to compensate for differences in the appearance of colors on various devices Important If No color correction is selected under Color Mode t...

Страница 175: ...ct the color matching method that suits the document to be printed Various Matching Method options are available depending on your selection in Matching Mode EGamma You can adjust the gradation of intermediate tones in an image 2 2 is normally selected If you want a softer impression than 2 2 select 1 8 ICC Matching Mode and Host ICM Mode The following options are available when you select ICC Mat...

Страница 176: ...rately on paper other than genuine Canon paper and feed confirmed pa per The created ICC profile needs to be saved in the following folder on the computer you are using C Windows system32 spool drivers color folder Note C may vary according to the user environment Note For details on settings items see Adjusting the Color in the Printer Driver P 51 Color Adjustment Sheet Monochrome Color Adjustmen...

Страница 177: ...t dialog box in which you can specify objects subject to color adjustment Object Adjustment Dialog box Monochrome P 177 SDefaults Click to restore all settings on the sheet to the default values Note For details on settings items see Adjusting the Color in the Printer Driver P 51 Object Adjustment Dialog box Monochrome Object Adjustment Dialog box Monochrome In the Object Adjustment dialog box you...

Страница 178: ...per Source list Choose from the following op tions when this setting is activated Borderless Printing on Paper of Equivalent Size P 87 Borderless Printing by Resizing Originals to Fit the Roll Width P 90 Borderless Printing at Actual Size P 80 DFit Paper Size Scales the document image to match the paper size EScale to fit Roll Paper Width Scales the document image to match the roll width FPrint Im...

Страница 179: ...mage based on a specified scaling value Enter a value in a range of 5 600 GPaper Size Choose the size of the paper you will print on For details on available paper sizes see Paper Sizes P 362 HOrientation Choose the printing orientation Making the Original Orientation Match the Paper Orientation P 148 KRotate Page 90 degrees Conserve Paper Activate this setting to rotate the document image by 90 d...

Страница 180: ... Output Method and Name of data to be saved settings Output Method Dialog box P 180 OSize Options Click to display the Paper Size Options dialog box which enables you to register additional paper sizes or select the size system for use Paper Size Options Dialog Box P 181 SDefaults Restores all settings on the sheet to the default values Output Method Dialog box Output Method Dialog box The Output ...

Страница 181: ...l box from the list DAcquire Mail Box Name When this is clicked the box name acquired from the printer main unit is displayed in Mail box Paper Size Options Dialog Box Paper Size Options Dialog Box In the Paper Size Options dialog box you can create and register your own Custom Paper Size The sizes you define are listed with standard paper sizes for selection later as needed Important You cannot c...

Страница 182: ...Add Enables you to register the custom paper size you have specified or overwrite an existing custom paper size GDisplay Series You can limit the number of options shown in Page Size Paper Size and Paper Size List Layout Sheet Layout Sheet The following settings are available on the Layout sheet For details on settings items refer to the printer driver help APage Layout Activate this setting to se...

Страница 183: ...ng blank areas above and below printable data in documents which enables you to conserve the paper Conserving Roll Paper by Printing Originals Without Top and Bottom Margins P 139 HCopies Enter the number of copies to print in a range of 1 999 Reverse Order Activate this option to print pages in reverse order IPage Options Click to display the Page Options dialog box which enables you to complete ...

Страница 184: ... DPrint Page Number Select where the page number is printed as desired EFormat Settings Click to display the Format Settings dialog box which enables you to complete format related settings Note If you specify the same position for multiple items the items are printed from left to right in this order date user name and page number When you print multiple pages per sheet using Page Layout Printing ...

Страница 185: ...e improved If it is set to No image distortions such as fine lines disappearing may be improved CPreview Switching When this setting is turned on PageComposer starts when printing is performed with the Open Preview When Print Job Starts check box selected in the Main sheet DApplication Color Matching Priority When this is on you can give applications priority in color management EFast Graphic Proc...

Страница 186: ...ose of the favorite selected in the AFavorites EApplication Settings Priority Activate this setting to use settings values specified in the source application in preference to favorite settings se lected in the AFavorites when clicking DApply Favorite For details on the settings items used in preference refer to the printer driver help FDelete Click to delete the selected favorite from the AFavori...

Страница 187: ...orites list LDown Click to move the selected favorite down in the AFavorites list Utility Sheet Utility Sheet The following items can be executed on the Utility sheet For details on the utilities refer to the relevant utility help AMaintenance Click to start the imagePROGRAF Status Monitor which offers the following maintenance for the printer Nozzle ink ejecting outlet check Nozzle ink ejecting o...

Страница 188: ...ort Sheet Support Sheet On the Support sheet you can view support information and the user s manual ASupport Information Click to access the Canon support webpage where you can find the latest information on the printer and consum ables check for printer driver updates and browse other information BUser Manual Click to connect to the Internet and display the printer user s manual CSettings Summari...

Страница 189: ... on the printer properties sheets are controlled by Windows applications However the Device Set tings sheet is for configuring the printer and it is an extension of the printer driver The following settings are available on the Device Settings sheet AColor Compatibility Click to display the Color Compatibility dialog box which enables you to adjust colors if you have selected Color Mode Color CAD ...

Страница 190: ... BAbout You can display version information for the printer driver Device Settings Sheet iPF685 User s Guide Windows Software Printer Driver 190 Downloaded from ManualsPrinter com Manuals ...

Страница 191: ...n software You can not only adjust layout settings but also your changes will be instantly applied on the preview screen and you can print the preview screen as it is seen Note The media type image size detailed media settings and the printer settings can cause the actual print output to differ from the Preview settings Starting Preview Starting Preview Follow the procedure below to start the Prev...

Страница 192: ...ve the settings Note Your printer is depicted in the lower left area of this screen 4 On the Print dialog box in the apllication software click the Print button 5 Preview main window is displayed Starting Preview iPF685 User s Guide Windows Software Preview 192 Downloaded from ManualsPrinter com Manuals ...

Страница 193: ...he View menu to show or hide the tool bar Menu Bar This allows you to select menus required for operations Tool Bar This allows you to select tool buttons required for major operations Preview Area You can check the settings you made in this area iPF685 Preview Main Window User s Guide Windows Software Preview 193 Downloaded from ManualsPrinter com Manuals ...

Страница 194: ...ns and perform a print job For more information about Dialog Area see Dialog Area P 195 Status Bar This shows the message Pages and Output Size Preview Main Window iPF685 User s Guide Windows Software Preview 194 Downloaded from ManualsPrinter com Manuals ...

Страница 195: ...nter For more information about Center Originals Across Roll see Print on the Center P 200 Note Available only if rolls are selected in Paper Source No Spaces at Top or Bottom You can save paper on not to feed roll paper for the empty spaces when the print data contains spaces at the top or bottom For more information about No Spaces at Top or Bottom see Not Print Spaces at the Top Bottom P 201 No...

Страница 196: ...of the standard size Note This item can be selected even if you have clicked the button in the toolbar Zoom Moving a Page Moving a Page You can move a page to display when you select Go to Page from the View menu Setting Details First Page Go to the first page Previous Page Go to the previous page Next Page Go to the next page Last Page Go to the last page Go To Page Go to the specified page Note ...

Страница 197: ...s before printing Pages are only rotated if they can fit lengthwise across the roll Use Driver Settings Follows printer driver settings when determining whether to rotate pages Selecting Rotate 90 Degrees If Possible or Placing a checkmark for Rotate Page 90 degrees Conserve Paper on the printer driver Selecting Use Driver Settings iPF685 Priority setting for rotating 90 degrees User s Guide Windo...

Страница 198: ...Layout Selection click the layout button to use Button Details Upper Button Turn at the position of Right Button Turn at the position of Left Button Turn at the position of Lower Button Turn at the position of Printing with Selecting the Layout iPF685 User s Guide Windows Software Preview 198 Downloaded from ManualsPrinter com Manuals ...

Страница 199: ...orientation on roll pa per You can select only Upper Button or Lower Button if Cut Sheet is selected Button Details The button is selected currently The button can be selected The button can not be selected 2 Click the Print button Printing on the selected layout begins iPF685 Printing with Selecting the Layout User s Guide Windows Software Preview 199 Downloaded from ManualsPrinter com Manuals ...

Страница 200: ... the printer 1 Click the Center Originals Across Roll check box on 2 Click the Print button Printing on the center begins Note Available only if rolls are selected in Paper Source Print on the Center iPF685 User s Guide Windows Software Preview 200 Downloaded from ManualsPrinter com Manuals ...

Страница 201: ...spaces when the print data contains spaces at the top or bottom 1 Click the No Spaces at Top or Bottom check box on 2 Click the Print button Printing on the settings with no spaces at top or bottom begins iPF685 Not Print Spaces at the Top Bottom User s Guide Windows Software Preview 201 Downloaded from ManualsPrinter com Manuals ...

Страница 202: ...g Box 223 Prints using Folded Duplex 224 The Features of Free Layout The Features of Free Layout The main features of Free Layout are as follows Allows you to lay out at will and print a document created with application software You can not only lay out multiple pages on one page but also lay out and print a multiple file document on one page or lay out and print a document created with multiple ...

Страница 203: ...rom the File menu 3 From the list select the printer and select the Layout sheet Note Your printer is depicted in the lower left area of this screen 4 In the Layout sheet click on the Page Layout check box and select Free Layout from the list Click the OK button to save the settings Note When you select Free Layout all other setting items will be disabled iPF685 Starting Free Layout User s Guide W...

Страница 204: ...n Window The Free Layout main window consists of the menu and tool bars layout area and status bar Note You can use the View menu to show or hide the tool and status bar Menu Bar This allows you to select menus required for operations Free Layout Main Window iPF685 User s Guide Windows Software Free Layout 204 Downloaded from ManualsPrinter com Manuals ...

Страница 205: ...ows the paper size unit of length and number of objects Detailed Settings Detailed Settings The printer driver opens when you select Detailed Settings from the File menu The printer driver is used to configure basic settings to match the type of media loaded in the printer iPF685 Detailed Settings User s Guide Windows Software Free Layout 205 Downloaded from ManualsPrinter com Manuals ...

Страница 206: ...You can change the numbers by clicking either button or button Divisions You can change the number of divisions of grid lines so that they serve as a guide to laying out objects Note You can input between 1 and 10 You can change the numbers by clicking either button or button Grid Color Select the grid line color Auto Arrange Spacing Change the object to object spacing to be applied in the operati...

Страница 207: ...r is automatically set so that the laid out ob jects are printed on one page Manual Settings You can input the length of one page to print on roll paper in numerical characters Note Available only if rolls are selected in Paper Source You can input between 203 2 and 18000 0 mm between 8 00 and 708 66 inch You can change the numbers by clicking either button or button Order Set the object layout or...

Страница 208: ... numbers by clicking either button or button Zoom Dialog Box Zoom Dialog Box This dialog box appears when you select Zoom from the View menu You can enlarge or reduce the screen display Scaling Set the magnification for enlargement or reduction of the screen display Note You can input between 25 and 400 You can change the numbers by clicking button Format Dialog Box Format Dialog Box This dialog b...

Страница 209: ...the value of the enlargement or reduction ratio of an object Fit Paper Size Prints by enlarging or reducing each object to match the paper size If you are using roll pa per objects are enlarged or reduced so that the width of each object matches the width of the roll paper Fit Photo Size Prints all of the objects at the specified photo size Note You can input between 25 and 600 You can change the ...

Страница 210: ...ect size Note When several objects are selected you cannot display Object Size Laying out a Multiple File Document on One Page Laying out a Multiple File Document on One Page You can lay out and print a multiple file document on one page 1 From the application software s File menu select the printer setup menu to open the Print dialog box Note Normally select Print from the File menu 2 Click Prope...

Страница 211: ...k box and select Free Layout from the list Note Your printer is depicted in the lower left area of this screen When you select Free Layout all other setting items will be disabled 5 Click the OK button to save the settings iPF685 Laying out a Multiple File Document on One Page User s Guide Windows Software Free Layout 211 Downloaded from ManualsPrinter com Manuals ...

Страница 212: ...ated with Multiple Application Programs on One Page Laying out a Document Created with Multiple Application Programs on One Page You can lay out and print a document created with multiple application programs on one page 1 From the application software s File menu select the printer setup menu to open the Print dialog box Note Normally select Print from the File menu Laying out a Document Created ...

Страница 213: ... is depicted in the lower left area of this screen 4 In the Layout sheet click on the Page Layout check box and select Free Layout from the list iPF685 Laying out a Document Created with Multiple Application Programs on One Page User s Guide Windows Software Free Layout 213 Downloaded from ManualsPrinter com Manuals ...

Страница 214: ...d the number of copies and click the OK button Free Layout starts laying out the document created with application software in the layout area as an ob ject 7 Leaving Free Layout running open other files with other application software and repeat the above steps Laying out a Document Created with Multiple Application Programs on One Page iPF685 User s Guide Windows Software Free Layout 214 Downloa...

Страница 215: ...objects select Select All from the Edit menu When you specify the area with dragging the mouse the object in the area is selected Changing the Object Size Changing the Object Size You can change the object size by means of mouse operation or by specifying a scaling value Note The vertical to horizontal ratio remains unchanged when the object is enlarged or reduced Resizing by means of mouse operat...

Страница 216: ...g either button or button 3 Click the OK button Moving an Object Moving an Object You can move the object position 1 Select an object 2 Place the pointer inside the selection box of the object to show the crosshair handle and drag it to move the object Alternatively you can move the Object Position by changing the values in Vertical Pos Horizontal Pos and Page Pos in the Format Dialog Box P 208 Ro...

Страница 217: ...rnatively you may select Auto Ar range Object from the Object menu Note The object layout order varies depending on the Order setting in the Page Options Dialog Box P 207 dialog box Aligning Objects Aligning Objects You can align objects systematically 1 Select multiple objects 2 Click the align button from the toolbar Alternatively you may select the align menu from the Object menu Align Top Lays...

Страница 218: ...ut the objects justifying them to the bottom Align Left Lays out the objects justifying them to the left Center Horizontally Lays out the objects justifying them to the horizon tal center Aligning Objects iPF685 User s Guide Windows Software Free Layout 218 Downloaded from ManualsPrinter com Manuals ...

Страница 219: ...er menu from the Object menu Note The order of overlapping affects the order of objects automatically laid out You can also select by clicking the right button of the mouse on an object Bring to Front Moves the object to the frontmost position Send to Back Moves the object to the backmost position iPF685 Changing the Object Overlapping Order User s Guide Windows Software Free Layout 219 Downloaded...

Страница 220: ...olbar Alternatively you may select Paste from the Edit menu Note The copied or cut object is laid out at the end of the page You can also select by clicking the right button of the mouse on an object In order to paste an object on any position that you like you can paste the object with Pointed Paste by clicking the right button of the mouse on any position that you want Pasting a Copied or Cut Ob...

Страница 221: ...uplex window consists of the menu and tool bars layout area and status bar Note The toolbar and status bar can be toggled between hidden and displayed from the View menu Menu Bar This allows you to select menus required for operations Tool Bar This allows you to select tool buttons required for major operations iPF685 Folded Duplex Window User s Guide Windows Software Free Layout 221 Downloaded fr...

Страница 222: ...Roll Paper Width Prints by automatically enlarging or reducing the entire document so that the width of the document matches the roll paper width Specify Folded Size Prints by automatically enlarging or reducing the entire document to match the size of the paper Select the actual size of the paper you want to print on in Fit Paper Size Rotate Page 90 degrees Conserve Paper Prints by rotating pages...

Страница 223: ...gin size as a number Note The values that can be entered are 0 to 50 mm Print Fold Lines Configures the color and type of fold lines Note To not print fold lines clear the Print Fold Lines checkbox Fold Line Color You can select the fold lines Fold Line Type You can select the fold lines The following settings are available for the fold line type Setting Details Solid Line You can print the solid ...

Страница 224: ...shed Size Note Rotate Page 90 degrees Conserve Paper is also available whenSpecify Folded Size is selected 5 Click OK to save the settings 6 Open the Binding Settings dialog box from the Edit menu 7 Select Bottom or Top in Binding Edge 8 Specify the Binding width in Binding 9 Configure the Fold Line Color and Fold Line Type from Print Fold Lines Note When the Only Print Center and Edges checkbox i...

Страница 225: ...addition to borderless printing and enlargement reduction process without growing through the printer driver Note The media type image size detailed media settings and the printer settings can cause the actual print output to differ from the Color imageRUNNER Enlargement Copy settings Starting Color imageRUNNER Enlargement Copy Starting Color imageRUNNER Enlargement Copy Follow the procedure below...

Страница 226: ...ageRUNNER Enlargement Copy from the start button 1 From the Windows start button select Color image RUNNER Enlargement Copy 2 The Color imageRUNNER Enlargement Copy dialog box displays Color imageRUNNER Enlargement Copy Dialog Box Color imageRUNNER Enlargement Copy Dialog Box The explanation below is on the Color imageRUNNER Enlargement Copy dialog box Color imageRUNNER Enlargement Copy Dialog Box...

Страница 227: ...active Hot Folder to inactive Add to Startup folder Register the application in the Windows startup menu Save Printed Data Automatically saves printed data About Button Click the button to display the name and the version number of the utility Operation Guide Button Click the button to display the Color imageRUNNER Enlargement Copy Setup Manual Hot Folder Hot Folder Hot folder refers to a folder u...

Страница 228: ... Color imageRUNNER Enlargement Copy dialog box see Starting Color image RUNNER Enlargement Copy P 225 2 The Easy Setup Wizard dialog box displays Click the Next button 3 Select the type of printer to use Click the Next button Creating a New Hot Folder iPF685 User s Guide Windows Software Color imageRUNNER Enlargement Copy 228 Downloaded from ManualsPrinter com Manuals ...

Страница 229: ...e displayed in the list Click the Next button 5 Select roll paper or cut sheet to print Also select the media size to print Click the Next button 6 Select the color matching method Click the Next button iPF685 Creating a New Hot Folder User s Guide Windows Software Color imageRUNNER Enlargement Copy 229 Downloaded from ManualsPrinter com Manuals ...

Страница 230: ...hot folder You cannot use the Back button after clicking the Next button here 8 Click Finish button to close the Easy Setup Wizard di alog box The hot folder you have created appears in the Hot Folder list in the Color imageRUNNER Enlargement Copy dialog box Creating a New Hot Folder iPF685 User s Guide Windows Software Color imageRUNNER Enlargement Copy 230 Downloaded from ManualsPrinter com Manu...

Страница 231: ... box and then click the Add button Note For the step to open the Color imageRUNNER Enlargement Copy dialog box see Starting Color image RUNNER Enlargement Copy P 225 3 The Easy Setup Wizard dialog box displays Click the Manual Settings button iPF685 Specifying an Existing Shared Folder as a Hot Folder User s Guide Windows Software Color imageRUNNER Enlargement Copy 231 Downloaded from ManualsPrint...

Страница 232: ...fy a fold er to set the existing shared folder 5 The location of the folders will appear Select the folder to specify a hot folder and click the OK button Specifying an Existing Shared Folder as a Hot Folder iPF685 User s Guide Windows Software Color imageRUNNER Enlargement Copy 232 Downloaded from ManualsPrinter com Manuals ...

Страница 233: ...se the Add Edit Hot Folder dialog box The hot folder you have created appears in the Hot Folder list in the Color imageRUNNER Enlargement Copy dialog box iPF685 Specifying an Existing Shared Folder as a Hot Folder User s Guide Windows Software Color imageRUNNER Enlargement Copy 233 Downloaded from ManualsPrinter com Manuals ...

Страница 234: ...s from a Color imageRUNNER Scanned originals from a Color imageRUNNER can be enlarged and printed automatically Originals you create by scanning with a Color imageRUNNER are transferred to a hot folder and printed automatically after enlargement according to printing conditions you specify for that folder This processing sequence is called the Color imageRUNNER Enlargement Copy function To use Col...

Страница 235: ...elow to scan an original on the Color imageRUNNER for enlarged printing on the printer For detailed instructions refer to the Color imageRUNNER manual 1 Load the original on the platen glass or document feeder of the Color imageRUNNER 2 Press Send to display the screen for transmission 3 Press Favorites and then press the Favorites button assigned to the hot folder 4 Press Start on the control pan...

Страница 236: ...ce is a Plug In that enables easy printing from Microsoft Office It is displayed on the toolbar ribbon so it is easily accessible It can be set by just selecting from the Wizard Large Format Printing custom size can also be set in the Wizard from Microsoft Word or Microsoft Power Point Custom size can be set automatically from Microsoft Excel The layout can be checked before printing by starting t...

Страница 237: ...r Software CD ROM into the CD ROM drive and start the installer Note If the installer screen does not display open the CD ROM icon from My Computer click iPFInst exe and open the icon 2 Click the imagePROGRAF Print Plug In button 3 Click the Nextbutton iPF685 Steps to install User s Guide Windows Software Print Plug In for Office 237 Downloaded from ManualsPrinter com Manuals ...

Страница 238: ...lick the Yes button Note The following message may be displayed in Windows 8 or a later OS If this happens install the NET Framework by following the procedure Steps to install iPF685 User s Guide Windows Software Print Plug In for Office 238 Downloaded from ManualsPrinter com Manuals ...

Страница 239: ...splay the imagePROGRAF Print Plug In for Office toolbar ribbon When Print Plug In for Office is not displayed P 240 Steps to uninstall Steps to uninstall Below are the steps to uninstall Print Plug In for Office 1 If Microsoft Office is open close it 2 Select Control Panel from the start menu 3 Open Add or Remove Programs 4 Select imagePROGRAF Print Plug In and click the Remove button Note You can...

Страница 240: ...t Plug In for Office once an Office application is running When the message appears select Cancel and close the active Office application Re install Print Plug In for Office as follows 1 Close Microsoft Office if it is open 2 Install Print Plug In for Office For information about instsalling see Steps to install P 237 Enabling Print Plug In for Office for items disabled in Office applications If a...

Страница 241: ... Close all the dialog boxes and restart the Office application For Microsoft Office 2007 1 Click the Office button and then click the application name options button 2 From the list on the left side of the application name options dialog box select Add ins iPF685 When Print Plug In for Office is not displayed User s Guide Windows Software Print Plug In for Office 241 Downloaded from ManualsPrinter...

Страница 242: ...ms dialog box select it and click the Enable button 5 Close all the dialog boxes and restart the Office application For Microsoft Office 2003 1 Click About application name in the Help menu of application When Print Plug In for Office is not displayed iPF685 User s Guide Windows Software Print Plug In for Office 242 Downloaded from ManualsPrinter com Manuals ...

Страница 243: ...elow are the steps to start Print Plug In for Office from Microsoft Word 1 Start Microsoft Word 2 If Start imagePROGRAF Print Plug In is displayed on the toolbar ribbon click it Important If the imagePROGRAF Print Plug In toolbar ribbon is not displayed refer to the following When Print Plug In for Office is not displayed P 240 3 Check that the imagePROGRAF Print Plug In toolbar ribbon is displaye...

Страница 244: ... PrintButton The print Wizard is displayed The settings Print Matching Roll Width Borderless Printing Multi Page Printing and Print Using Registered Settings can be set Paper Settings Button Large Format Wizard is displayed Settings for Portrait or Landscape Orientation can be set Printing Wizard dialog box Important If you want to change the display to another file or application while the Printi...

Страница 245: ...dify the data again Print Matching Roll Width Word Print Matching Roll Width Word Prints to the edge of the roll width You can print large exhibits and posters and also print Portrait and Landscape ori entations made in Large Format Printing Wizard 1 Start Microsoft Word 2 If Start imagePROGRAF Print Plug In is displayed click it 3 Click Print from the imagePROGRAF Print Plug In toolbar ribbon The...

Страница 246: ...lbar ribbon 4 Click Print Matching Roll Width 5 Select Roll Paper Width that is set in the printer 6 Select image size 7 Select layout 8 Select Next 9 Select Media Type 10 Select Print Range from All Pages Current Page and Pages If Pages is selected enter the number of pages Print Matching Roll Width Word iPF685 User s Guide Windows Software Print Plug In for Office 246 Downloaded from ManualsPrin...

Страница 247: ...per width or 18 0m 12 Press Print to start printing Borderless Printing Word Borderless Printing Word Prints up to the border of the media Photos and posters can be printed without worrying about margins 1 Start Microsoft Word 2 If Start imagePROGRAF Print Plug In is displayed click it 3 Click Print from the imagePROGRAF Print Plug In toolbar ribbon The Printing Wizard dialog box is displayed Impo...

Страница 248: ...se how to proceed and press OK Note To adjust the data select Return to application and press OK Exit Print Plug In for Office and return to the application 6 Select Roll Paper Width that is set in the printer 7 Select layout Borderless Printing Word iPF685 User s Guide Windows Software Print Plug In for Office 248 Downloaded from ManualsPrinter com Manuals ...

Страница 249: ...ess the Print Preview button to display the preview screen You can confirm and make changes to the lay out in the preview screen The maximum length for Borderless Printing is the lesser of 5 587 times the roll paper width or 18 0m 12 Press Print to start printing Multi Page Printing Word Multi Page Printing Word Prints multiple pages as one page You can print handouts into a single page or print m...

Страница 250: ...e Printing Wizard is open close the Printing Wizard dialog box Otherwise you may not be able to change displays or operate the toolbar ribbon 4 Click Multi Page Printing 5 Select Roll Paper Width that is set in the printer 6 Select layout from Layout Selection Multi Page Printing Word iPF685 User s Guide Windows Software Print Plug In for Office 250 Downloaded from ManualsPrinter com Manuals ...

Страница 251: ...maximum length for Multi Page Printing is the lesser of 5 587 times the roll paper width or 18 0m 11 Press Print to start printing Register the settings Word Register the settings Word If you are going to print multiple times using the same setting you can select One Touch Registration Registered settings can be recalled from Print Using Registered Settings 1 Set up to the Print screen from Print ...

Страница 252: ...nt screen will not delete the registered settings Print Using Registered Settings Word Print Using Registered Settings Word Prints using the registered settings 1 Start Microsoft Word 2 If Start imagePROGRAF Print Plug In is displayed click it 3 Click Print from the imagePROGRAF Print Plug In toolbar ribbon The Printing Wizard dialog box is displayed Print Using Registered Settings Word iPF685 Use...

Страница 253: ...ter the number of pages 8 Enter Copies Note When Print in Draft mode is selected printing is fast but the print quality is poor When Saturation is selected you can print posters etc vividly Press the Print Preview button to display the preview screen You can check and make changes to the layout in the preview screen The maximum print length when printing with the registered settings is the lesser ...

Страница 254: ...agePROGRAF Print Plug In is displayed click it 3 Click Paper Settings from the imagePROGRAF Print Plug In toolbar ribbon The Large Format Printing Wizard dialog box is displayed Note If you want to change the display to another file or application while the Large Format Printing Wizard is open close the Large Format Printing Wizard dialog box Otherwise you may not be able to change dis plays or op...

Страница 255: ...t The layout may collapse if you create a form using existing data If that is the case modify the data again To start from Microsoft PowerPoint To start from Microsoft PowerPoint Below are the steps to start Print Plug In for Office from Microsoft PowerPoint 1 Start Microsoft PowerPoint 2 If Start imagePROGRAF Print Plug In is displayed on the toolbar ribbon click it iPF685 To start from Microsoft...

Страница 256: ...r update the display PrintButton The print Wizard is displayed The settings Print Matching Roll Width Borderless Printing Multi Page Printing and Print Using Registered Settings can be set Paper Settings Button Large Format Wizard is displayed Settings for Portrait or Landscape Orientation can be set Printing Wizard dialog box Important If you want to change the display to another file or applicat...

Страница 257: ...f you open a password protected document as read only the Large Format Printing Wizard cannot be run Remove the password protection Print Matching Roll Width PowerPoint Print Matching Roll Width PowerPoint Prints to the edge of the roll width You can print large exhibits and posters and also print Portrait and Landscape ori entations made in Large Format Printing Wizard 1 Start Microsoft PowerPoin...

Страница 258: ...ng Wizard is open close the Printing Wizard dialog box Otherwise you may not be able to change displays or operate the toolbar ribbon 4 Click Print Matching Roll Width 5 Select Roll Paper Width that is set in the printer 6 Select image size 7 Select layout Print Matching Roll Width PowerPoint iPF685 User s Guide Windows Software Print Plug In for Office 258 Downloaded from ManualsPrinter com Manua...

Страница 259: ...rint Preview button to display the preview screen You can check and make changes to the layout in the preview screen When you print to the edge of the roll width the maximum length will be the lesser of 14 22 times the roll paper width or 18 0m 12 Press Print to start printing Borderless Printing PowerPoint Borderless Printing PowerPoint Prints up to the border of the media Photos and posters can ...

Страница 260: ...e displays or operate the toolbar ribbon 4 Click Borderless Printing 5 A confirmation dialog box is displayed If the data fills up the page confirm that Continue using the plug in is selected in Choose how to proceed and press OK Note To adjust the data select Return to application and press OK Exit Print Plug In for Office and return to the application Borderless Printing PowerPoint iPF685 User s...

Страница 261: ...lected you can print posters etc vividly Press the One Touch Registration button to register the settings This is useful for multiple printing using the same settings Press the Print Preview button to display the preview screen You can confirm and make changes to the lay out in the preview screen The maximum length for Borderless Printing is the lesser of 14 22 times the roll paper width or 18 0m ...

Страница 262: ... toolbar ribbon The Printing Wizard dialog box is displayed Important If you want to change the display to another file or application while the Printing Wizard is open close the Printing Wizard dialog box Otherwise you may not be able to change displays or operate the toolbar ribbon 4 Click Multi Page Printing 5 Select Roll Paper Width that is set in the printer 6 Select layout from Layout Select...

Страница 263: ... Multi Page Printing is the lesser of 14 22 times the roll paper width or 18 0m 11 Press Print to start printing Register the settings PowerPoint Register the settings PowerPoint If you are going to print multiple times using the same setting you can select One Touch Registration Registered settings can be recalled from Print Using Registered Settings 1 Set up to the Print screen from Print Matchi...

Страница 264: ...ll not delete the registered settings Print Using Registered Settings PowerPoint Print Using Registered Settings PowerPoint Prints using the registered settings 1 Start Microsoft PowerPoint 2 If Start imagePROGRAF Print Plug In is displayed click it 3 Click Print from the imagePROGRAF Print Plug In toolbar ribbon The Printing Wizard dialog box is displayed Print Using Registered Settings PowerPoin...

Страница 265: ...nter the slide number 8 Enter Copies Note When Print in Draft mode is selected printing is fast but the print quality is poor When Saturation is selected you can print posters etc vividly Press the Print Preview button to display the preview screen You can check and make changes to the layout in the preview screen The maximum print length when printing with the registered settings is the lesser of...

Страница 266: ... imagePROGRAF Print Plug In is displayed click it 3 Click Paper Settings from the imagePROGRAF Print Plug In toolbar ribbon The Large Format Printing Wizard dialog box is dis played Important If you want to change the display to another file or application while the Large Format Printing Wizard is open close the Large Format Printing Wizard dialog box Otherwise you may not be able to change dis pl...

Страница 267: ...g Roll Width of the Printing Wizard For details on Print Matching Roll Width see Print Matching Roll Width PowerPoint P 257 To start from Microsoft Excel To start from Microsoft Excel Below are the steps to start Print Plug In for Office from Microsoft Excel 1 Start Microsoft Excel 2 If Start imagePROGRAF Print Plug In is displayed on the toolbar ribbon click it iPF685 To start from Microsoft Exce...

Страница 268: ...Selected Area can be set Printing Wizard dialog box Important If you want to change the display to another file or application while the Printing Wizard is open close the Printing Wizard dialog box Otherwise you may not be able to change displays or operate the toolbar ribbon The Printing Wizard will not start if you click the Print button on the toolbar ribbon while editing a cell When more than ...

Страница 269: ...a message dialog box will appear asking if you want to continue printing If you click No you will return to the application If you want to change the setting remove the protection from the worksheet or cell Print Entire Sheet Excel Print Entire Sheet Excel For resizing the entire sheet to fit the roll width Choose this option to enlarge the currently displayed sheet before print ing 1 Start Micros...

Страница 270: ...t No you will return to the application 5 Select Roll Paper Width that is set in the printer 6 Select image size 7 Select layout 8 To configure Binding click the Binding Settings button Refer to Configuring Binding Excel P 274 for details on the procedure for configuring Binding Print Entire Sheet Excel iPF685 User s Guide Windows Software Print Plug In for Office 270 Downloaded from ManualsPrinte...

Страница 271: ...ng Important If divided into plural pages try reducing the data size or the range you select You cannot run Print or Print Preview if you select it for a worksheet with no data displayed Print Selected Area Excel Print Selected Area Excel For resizing the selected range of cells to fit the roll width Choose this option to enlarge a particular part of the sheet before printing 1 Start Microsoft Exc...

Страница 272: ...nting Wizard dialog box is displayed 4 Click Print Selected Area Important If only one cell is selected Print Selected Area cannot be selected A message will appear informing you that analysis is in progress Print Selected Area Excel iPF685 User s Guide Windows Software Print Plug In for Office 272 Downloaded from ManualsPrinter com Manuals ...

Страница 273: ...ou select No you will return to the application 5 Select Roll Paper Width that is set in the printer 6 Select image size 7 Select layout 8 To configure Binding click the Binding Settings button Refer to Configuring Binding Excel P 274 for details on the procedure for configuring Binding 9 Select Next 10 Select Media Type 11 Enter Copies iPF685 Print Selected Area Excel User s Guide Windows Softwar...

Страница 274: ...et with no data displayed Configuring Binding Excel Configuring Binding Excel You can configure Binding margins for binding printouts 1 Configure the settings up to Layout Selection in the Layout screen in Print Entire Sheet or Print Selected Area Refer to Print Entire Sheet Excel P 269 and Print Selected Area Excel P 271 for the configuration methods 2 Click the Binding Settings button Important ...

Страница 275: ...performed with the top bottom left and right margins layed out equally When this setting is off printing is performed without changing the position This function is only valid in Microsoft Excel Ensure image quality when creating page sizes When this setting is on documents are created at the maximum size This reduces the enlargement ratio during actual printing which minimizes degra dation of the...

Страница 276: ...iPF685 User s Guide 276 Downloaded from ManualsPrinter com Manuals ...

Страница 277: ...ent Copy 344 Printmonitor 515 Media Configuration Tool 420 Handling and Use of Paper 361 Control Panel 437 Printer Parts 477 Network Setting 491 Print Job Management 511 Adjustments for Better Print Quality 573 Maintenance and Consumables 589 Troubleshooting 627 Error Message 657 Specifications 681 Appendix 685 imagePROGRAF Mac OS Software 277 Downloaded from ManualsPrinter com Manuals ...

Страница 278: ...p Pane 294 Additional Settings Pane 295 Printer Driver Settings Printer Driver Settings For instructions on accessing the Mac OS printer driver refer to the following topics Accessing the Printer Driver Dialog Box from Applications P 282 For information on the Mac OS printer driver settings refer to the following topics Main Pane P 283 You can specify the media type color processing print quality ...

Страница 279: ...cally enlarge and print scanned originals from a Color imageRUNNER For details see Color imageRUNNER Enlargement Copy P 344 Specifying Paper in the Printer Driver Specifying Paper in the Printer Driver If you have replaced the paper you must complete the following settings in the printer driver 1 This sets the BFormat for and CPaper Size Note The configuration method varies depending on the OS and...

Страница 280: ...d in APaper Source select the width of the roll paper that is loaded in BRoll Width Note A variety of settings are available in the printer driver to suit different printing applications For details on available printing conditions see Printer Driver Settings P 278 Specifying Paper in the Printer Driver iPF685 User s Guide Mac OS Software Printer Driver 280 Downloaded from ManualsPrinter com Manua...

Страница 281: ...rint previews see Checking the Layout in a Preview Before Printing P 144 Checking the Layout in a Preview Before Printing Checking the Layout in a Preview Before Printing This topic describes how to check the layout before printing using the Canon imagePROGRAF Preview function 1 Choose Print in the application menu 2 Access the Main pane 3 Select the OPrint Preview check box 4 Click MPrint iPF685 ...

Страница 282: ...urrent print settings This is a standard feature of the operating system For details refer to the Mac OS documentation Accessing the Printer Driver Dialog Box from Applications Accessing the Printer Driver Dialog Box from Applications 1 In the application software select Print from the File menu to display the dialog box for printing conditions Note This dialog box includes basic printing options ...

Страница 283: ...in Pane The following settings are available on the Main pane For details on settings items refer to the printer driver help Note On the Main pane choose Easy Settings to specify basic print settings based on the print target or switch to Ad vanced Settings to complete more detailed settings as desired Common Items AMedia Type Select the paper type iPF685 Main Pane User s Guide Mac OS Software Pri...

Страница 284: ...e Layout is selected on the Page Setup panel Free Layout is disabled Checking the Layout in a Preview Before Printing P 144 Configuration using Easy Settings EPrint Target Choose presets that match the type of document to be printed Printing Photos and Images P 33 Printing Office Documents P 37 FPrint Quality Choose the level of print quality GView set Click to display the View set dialog box whic...

Страница 285: ...g on AMedia Type you may not be able to select NHighest quality KEconomy Printing When this mode is selected you can print with less ink consumed However print quality is lower than in regular printing Select this option to save ink such as when printing to check drawings Depending on the AMedia Type and FPrint Quality settings this mode may not be available Note If you set FPrint Quality to Fast ...

Страница 286: ...ent in Print Priority Paper Detailed Settings Dialog Box Paper Detailed Settings Dialog Box The Paper Detailed Settings dialog box offers the following settings For details on settings items refer to the printer driver help Note To display the Paper Detailed Settings dialog box on the Main pane click Set by Media Type See Main Pane P 283 AMedia Type The paper selected with Media Type of the Main p...

Страница 287: ...Margin for Safety You can specify the length of a margin on the leading edge of paper to ensure that paper susceptible to curling is held firmly against the Platen FNear End Margin Specify the length of the Near End Margin the leading edge margin of the roll as needed Setting Item Details Printer Default The setting of the control panel of the printer is applied 3 mm 0 12 in The document is printe...

Страница 288: ...t dialog box you can check details of the selected printing application Note To display the View set dialog box on the Main pane click View set by Print Target See Main Pane P 283 APrint Target Shows all Print Target options settings items for the printing application BName Identifies the item selected in Print Target by its name and an icon CDetails Here you can confirm detailed settings values f...

Страница 289: ...iver Matching Mode For color matching based on ICC profiles select ICC Matching Mode depending on your color matching system BMatching Method Select the color matching method that suits the document to be printed Various BMatching Method options are available depending on your selection in AMatching Mode EGamma You can adjust the gradation of intermediate tones in an image 2 2 is normally selected...

Страница 290: ...Method Various options are available depending on your selected AMatching Mode DPrinter Profile Settings Specify the printer profile as desired We recommend that you select an ICC profile created using commercially available profile creation software in order to perform color management accurately on paper other than genuine Canon paper and feed confirmed pa per The created ICC profile needs to be...

Страница 291: ...w Correct color tones by adjusting the levels of each color GGray Tone Adjust the color tone of grays as desired Choose Cool tinged with blue or Warm tinged with red HBrightness Adjust the overall image brightness as desired You can adjust the brightness if the printed document is lighter or darker than the original image that is the original photo that was scanned or the original graphic as it ap...

Страница 292: ...lick Object Adjustment on the Color Adjustment panel AImages Select this option to apply color adjustment to image areas such as photos BGraphics Select this option to apply color adjustment to graphics such as lines and circles CText Select this option to apply color adjustment to text Color Settings Pane Monochrome Color Settings Pane Monochrome On the Color Adjustment pane for monochrome printi...

Страница 293: ...nned or the original graphic as it appears on the computer screen IContrast Adjust the contrast of the darkest and lightest portions relative to each other as desired Increasing the IContrast makes images sharper and reducing the IContrast softens images JSaturation Not available KObject Adjustment Select this option to display the Object Adjustment dialog box in which you can specify objects subj...

Страница 294: ...Options displayed in the list vary depending on the selection in AMedia Type in the Main pane BRoll Width Select the paper width of the roll loaded in the printer DEnlarged Reduced Printing Select this checkbox to choose the following options Resizing Originals to Fit the Roll Width P 67 Resizing Originals by Entering a Scaling Value P 71 FFit Roll Paper Width Resizes the document image to match t...

Страница 295: ...ocument image by 90 degrees before printing Conserving Roll Paper by Rotating Originals 90 Degrees P 135 NFree Layout Select this checkbox to start imagePROGRAF Free Layout before printing This allows you to print multiple documents next to each other Important When Print Preview is selected on the Main panel Print Preview is disabled Printing Multiple Originals Next to Each Other P 110 Additional...

Страница 296: ...iew are as follows While viewing this screen you can adjust layout settings of a document created with application software You can not only adjust layout settings but also your changes will be instantly applied on the preview screen and you can print the preview screen as it is seen Note The media type image size detailed media settings and the printer settings can cause the actual print output t...

Страница 297: ...he Print dialog box Note Your printer is depicted in the lower left area of this screen 5 Preview main window is displayed iPF685 Starting Preview User s Guide Mac OS Software Preview 297 Downloaded from ManualsPrinter com Manuals ...

Страница 298: ...nd status area Note You can use the View menu to show or hide the tool bar Menu Bar This allows you to select menus required for operations Tool Bar This allows you to select tool buttons required for major operations Preview Main Window iPF685 User s Guide Mac OS Software Preview 298 Downloaded from ManualsPrinter com Manuals ...

Страница 299: ...ea Dialog Area This allows you to set the print conditions and perform a print job Drawer Area This allows you to display the thumbnails of a document iPF685 Preview Main Window User s Guide Mac OS Software Preview 299 Downloaded from ManualsPrinter com Manuals ...

Страница 300: ...s Area This shows Input Size and Output Size Paper Settings Panel Paper Settings Panel This panel appears when you select Paper Settings in the dialog area Media Type This allows you to select the media type Paper Settings Panel iPF685 User s Guide Mac OS Software Preview 300 Downloaded from ManualsPrinter com Manuals ...

Страница 301: ...al Select for manual paper feed printing Roll Paper Select to print on roll paper Roll Paper Width This selects the width of the roll media set to the printer Note Available only if rolls are selected in Paper Source Copies You can input the number of print copies in numerical characters Note The maximum value is 999 You can change the numbers by clicking either button or button Restore Defaults B...

Страница 302: ... Line Drawing Suitable for printing CAD drawings with sharp dark lines Perspective GIS Suitable for attractive printing of 3D CAD drawings perspective drawings and GIS drawings including maps Photo Color Suitable for printing photographic images captured with a digital camera Office Document Suitable for printing handouts as well as general office documents for which print clarity is key Faithful ...

Страница 303: ...s for the print quality the color mode and other items so you can select the values for these settings yourself Print Priority Select a print quality mode that is appropriate for the print job Setting Details Image This mode achieves the best results for printing photographic images and illustrations Line Drawing This mode is best for printing CAD drawings with fine lines or wall newssheet or othe...

Страница 304: ...th High than with Fast however print quality is higher Printing time is shorter and less ink is consumed with Fast than with High however print quality is lower For Highest quality the resolution is not displayed Output Settings Panel Output Settings Panel This panel appears when you select Output Settings in the dialog area Enlarged Reduced Printing Select the method for enlarged reduced printing...

Страница 305: ...Enlarged Reduced Printing Print Centered You can print on the center of the media loaded in the printer For more information about Print Centered see Print on the Center P 315 Note This is not displayed when a checkmark is placed in Borderless Printing No Spaces at Top or Bottom You can save paper on not to feed roll paper for the empty spaces when the print data contains spaces at the top or bott...

Страница 306: ...rom continuous color to grayscaled mono chrome Color CAD Prints lines in the best color possible so they are easy to see Monochrome Bitmap Prints all colors other than white in black Monochrome BK ink Select to print all lines with black ink No color correction Prints without performing color matching in the printer driver Select this when color matching is performed by the application such as Ado...

Страница 307: ...egin printing Update Printer Info Button Click the button to acquire printer information Color Adjustment Color Adjustment You can set the color adjustment Adjusting Color Normally colors should be adjusted in the software application but if you see colors in the printout that do not match colors on the screen you can perform color adjustments 1 Select Color on Color Mode in the Color Settings pan...

Страница 308: ...ative brightness between the brightest and darkest portions of the image For soft gradation decrease the contrast For hard gradation increase the contrast Saturation Adjusts the hues for vivid color or dark color Gray Tone Adjusts gray from cool black bluish tones to warm black reddish tones Note You can also click the up or down arrow or enter the number directly to increase or decrease the value...

Страница 309: ...ly to increase or decrease the value Matching Matching You can set the matching Important If No color correction is selected under Color Mode the Matching is not displayed Matching Mode You can select a matching mode to suit the print job Setting Details Driver Matching Mode P 311 Enables printing of optimal color tones using a driver specific color profile You should nor mally select this mode IC...

Страница 310: ...age 2 2 is normally selected If you want a softer im pression than 2 2 select 1 8 Note You can select only after Driver Matching Mode has been selected in Matching Mode Input Profile Select the input profile Note You can select only after ICC Matching Mode has been selected in Matching Mode Printer Profile Select the printer profile Note You can select only after ICC Matching Mode has been selecte...

Страница 311: ...use mode when performing color adjustment using application software Saturation Color matching optimized for printing posters etc vividly Colorimetric Color matching optimized for printing image data with accurate colors in input color space This is the easiest to use mode when you want to adjust the color and print However gra dation may be lost for colors of wider range than the color reproducti...

Страница 312: ...r space This is the easiest to use mode when you want to adjust the color and print However gra dation may be lost for colors of wider range than the color reproduction range of the printer Generally this is also called relative colorimetric Colorimetric No White Point Cor rection The processing method of color matching is identical to Colorimetric Use this when you want to further reproduce the t...

Страница 313: ...when you select Preferences from the imagePROGRAF Advanced Preview menu You can set the preferences for Preview Units Set the unit for paper length margins and so on Zoom Dialog Box Zoom Dialog Box This dialog box appears when you select Zoom from the View menu You can enlarge or reduce the screen display iPF685 ColorSync User s Guide Mac OS Software Preview 313 Downloaded from ManualsPrinter com ...

Страница 314: ...of the page of the documents Print with No Borders Print with No Borders You can use the borderless printing function to print without margins surrounding the image Note With some media borderless printing can be performed only between two edges To use the borderless printing function the specified media must be set to the printer 1 On the Paper Settings Panel P 300 select Roll Paper in Paper Sour...

Страница 315: ...n 2 Click the Print button Printing on the center begins Not Print Spaces at the Top Bottom Not Print Spaces at the Top Bottom You can save paper on not to feed roll paper for the empty spaces when the print data contains spaces at the top or bottom Note This is not displayed when a checkmark is placed in Borderless Printing 1 On the Paper Settings Panel P 300 select Roll Paper in Paper Source iPF...

Страница 316: ...elect Roll Paper in Paper Source 2 On the Output Settings Panel P 304 click the Rotate Page check box on 3 Select Rotate Right 90 Degrees or Rotate Left 90 De grees 4 Click the Print button Printing on rotating 90 degrees begins Display with Fitting to the Width of the Paper Display with Fitting to the Width of the Paper In the preview area you can display to the width of the paper 1 Select Fit to...

Страница 317: ...isplay all 1 Select Fit Screen from the tool bar 2 All is displayed Display with Actual Size Display with Actual Size In the preview area you can display the actual size 1 Select Actual Size from the tool bar iPF685 Display with All User s Guide Mac OS Software Preview 317 Downloaded from ManualsPrinter com Manuals ...

Страница 318: ...n Go to Page on the tool bar Setting Details Go to the first page Go to the previous page Go to the next page Go to the last page 2 The target page appears Note You can also move a page by clicking the page on the thumbnails Moving a Page iPF685 User s Guide Mac OS Software Preview 318 Downloaded from ManualsPrinter com Manuals ...

Страница 319: ...ures of Free Layout The main features of Free Layout are as follows Allows you to lay out at will and print a document created with application software You can not only lay out multiple pages on one page but also lay out and print a multiple file document on one page or lay out and print a document created with multiple application programs on one page Note The media type image size detailed medi...

Страница 320: ...nt dialog box Note Your printer is depicted in the lower left area of this screen 5 Free Layout main window is displayed Starting Free Layout iPF685 User s Guide Mac OS Software Free Layout 320 Downloaded from ManualsPrinter com Manuals ...

Страница 321: ...ialog areas Note You can use the View menu to show or hide the tool Menu Bar This allows you to select menus required for operations Tool Bar This allows you to select tool buttons required for major operations iPF685 Free Layout Main Window User s Guide Mac OS Software Free Layout 321 Downloaded from ManualsPrinter com Manuals ...

Страница 322: ...ects and edit the object size and orientation Dialog Area This allows you to set the print conditions and perform a print job Free Layout Main Window iPF685 User s Guide Mac OS Software Free Layout 322 Downloaded from ManualsPrinter com Manuals ...

Страница 323: ...lable to provide the optimum print settings for jobs The settings available on each mode are as follows Easy Settings P 324 Advanced Settings P 326 Paper Source You can select the paper source The following settings are available for paper source Setting Details Manual Select for manual paper feed printing Roll Paper Select to print on roll paper Roll Paper Width This selects the width of the roll...

Страница 324: ...target list that matches the content of the document Print Target You can easily select the best settings for the print job simply If you select each Print Target item the corresponding comment for that item is displayed below the list Setting Details Default Settings Suitable for printing normal documents that contain a mixture of text photographs and graphics Poster The best setting for posters ...

Страница 325: ... selection depends on the media type Print Quality Selecting print quality strikes a balance between the quality of the printed image and printing speed The level of the print quality and resolution settings are displayed in the following combinations Setting Details Print Quality Highest quality Highest High Standard Fast Resolution 1200dpi 600dpi 300dpi Note The availability of settings is deter...

Страница 326: ...ality you ex pect with printing photographs or other images with many filled areas For these types of jobs select Image Office Document Prints common office documents such as proposals memos for distribution etc so they are easy to read Note The number of settings available for selection depends on the media type Print Quality Selecting print quality strikes a balance between the quality of the pr...

Страница 327: ...s color printing Monochrome Disables color printing and converts image from continuous color to grayscaled mono chrome Color CAD Prints lines in the best color possible so they are easy to see Monochrome Bitmap Prints all colors other than white in black Monochrome BK ink Select to print all lines with black ink No color correction Prints without performing color matching in the printer driver Sel...

Страница 328: ...nting Update Printer Info Button Click the button to acquire printer information Color Adjustment Color Adjustment You can set the color adjustment Adjusting Color Normally colors should be adjusted in the software application but if you see colors in the printout that do not match colors on the screen you can perform color adjustments 1 Select Color on Color Mode in the Color Settings panel 2 Sel...

Страница 329: ...ive brightness between the brightest and darkest portions of the image For soft gradation decrease the contrast For hard gradation increase the contrast Saturation Adjusts the hues for vivid color or dark color Gray Tone Adjusts gray from cool black bluish tones to warm black reddish tones Note You can also click the up or down arrow or enter the number directly to increase or decrease the value A...

Страница 330: ... to increase or decrease the value Matching Matching You can set the matching Important If No color correction is selected under Color Mode the Matching is not displayed Matching Mode You can select a matching mode to suit the print job Setting Details Driver Matching Mode P 332 Enables printing of optimal color tones using a driver specific color profile You should nor mally select this mode ICC ...

Страница 331: ...e 2 2 is normally selected If you want a softer im pression than 2 2 select 1 8 Note You can select only after Driver Matching Mode has been selected in Matching Mode Input Profile Select the input profile Note You can select only after ICC Matching Mode has been selected in Matching Mode Printer Profile Select the printer profile Note You can select only after ICC Matching Mode has been selected ...

Страница 332: ...e mode when performing color adjustment using application software Saturation Color matching optimized for printing posters etc vividly Colorimetric Color matching optimized for printing image data with accurate colors in input color space This is the easiest to use mode when you want to adjust the color and print However gra dation may be lost for colors of wider range than the color reproduction...

Страница 333: ...space This is the easiest to use mode when you want to adjust the color and print However gra dation may be lost for colors of wider range than the color reproduction range of the printer Generally this is also called relative colorimetric Colorimetric No White Point Cor rection The processing method of color matching is identical to Colorimetric Use this when you want to further reproduce the tar...

Страница 334: ... box appears when you select Preferences from the imagePROGRAF Advanced Preview menu You can set the preferences for Free Layout Units Set the unit for paper length margins and so on Gridlines You can input a grid line width value in numerical characters so that they serve as a guide to laying out objects ColorSync iPF685 User s Guide Mac OS Software Free Layout 334 Downloaded from ManualsPrinter ...

Страница 335: ... frame style Setting Details Solid Line You can print the solid line as the frame style Dotted Line You can print the dotted line as the frame style Dashed Line You can print the dashed line as the frame style Auto Arrange Spacing Change the object to object spacing to be applied in the operation of laying out objects automatically Note You can input between 0 0 and 100 0 mm between 0 00 and 3 94 ...

Страница 336: ... available for order Setting Details Upper Left to Right The objects are laid out from upper left to right Upper Left to Bottom The objects are laid out from upper left to bottom Note When you have selected Roll Paper Length Auto Settings and Paper Orientation Vertical you can choose only Upper Left to Right When you have selected Roll Paper Length Auto Settings and Paper Orientation Horizontal yo...

Страница 337: ...nt or reduction of the obeject in numerical characters Note You can input between 25 and 400 You can change the numbers by clicking either button or button Object Size You can confirm the object size Note When several objects are selected you cannot display Object Size Laying out a Multiple File Document on One Page Laying out a Multiple File Document on One Page You can lay out and print a multip...

Страница 338: ...e Layout in the Page Setup panel to attach a checkmark 3 In the Print dialog box select the pages to print and the number of copies and click the Print button Free Layout starts laying out the document created with application software in the layout area as an object 4 Leaving Free Layout running open the files with other application software and repeat the above steps Selecting an Object Selectin...

Страница 339: ...sizing by specifying a scaling value 1 Select an object 2 Open the Format Dialog Box P 337 3 Use Scaling to set the magnification for enlargement or reduction You either enter numbers directly Note You can input between 25 and 400 You can change the numbers by clicking either button or button 4 Click the OK button Moving an Object Moving an Object You can move the object position 1 Select an objec...

Страница 340: ... select Rotate Laying out Objects Automatically Laying out Objects Automatically Click Auto Arrange in the tool bar This automatically lays out objects Alternatively you may select Auto Arrange Object from the Object menu Note The object layout order varies depending on the Order setting on the Page Setup Dialog Box P 335 Aligning Objects Aligning Objects You can align objects systematically 1 Sel...

Страница 341: ...er Vertically Lays out the objects justifying them to the vertical center Align Bottom Lays out the objects justifying them to the bottom Align Left Lays out the objects justifying them to the left iPF685 Aligning Objects User s Guide Mac OS Software Free Layout 341 Downloaded from ManualsPrinter com Manuals ...

Страница 342: ... Overlapping Order Changing the Object Overlapping Order You can change the object overlapping order 1 Select an object 2 Select the overlapping order menu from the Object menu Bring to Front Moves the object to the frontmost position Changing the Object Overlapping Order iPF685 User s Guide Mac OS Software Free Layout 342 Downloaded from ManualsPrinter com Manuals ...

Страница 343: ...asting a Copied or Cut Object 1 Click Copy or Cut from the toolbar Alternatively you may select Copy or Cut from the Edit menu 2 Click Paste from the toolbar Alternatively you may select Paste from the Edit menu Note The copied or cut object is laid out at the end of the page iPF685 Pasting a Copied or Cut Object User s Guide Mac OS Software Free Layout 343 Downloaded from ManualsPrinter com Manua...

Страница 344: ...lows Allows the document scanned with the Color imageRUNNER to be automatically enlarged and printed You can perform basic printer settings such as printer selection media type and output profile selection and matching methods in addition to borderless printing and enlargement reduction process without growing through the printer driver Note The media type image size detailed media settings and th...

Страница 345: ...t folder Add Button Click the button to open the Destination Selection dialog box so that you can add a hot folder Edit Button From the Hot Folder list select a hot folder and click this button to open the Add Edit Hot Folder dialog box that allows you to edit the hot folder Monitor Hot Folder Constantly If the check box is selected the Hot Folder is monitored from after the next login Hot Folder ...

Страница 346: ...utton in Enlarged Copy Settings to open the Destination Selection dialog box 3 From the printer list in Destination select the printer of destination 4 Click the OK button to open the Add Edit Hot Folder dialog box 5 In Name enter the name to display in the Hot Folder list 6 In Hot Folder enter the Hot Folder name Creating a New Hot Folder iPF685 User s Guide Mac OS Software Color imageRUNNER Enla...

Страница 347: ...ing For OS X v10 7 and later Check the File Sharing checkbox and click the Options button Check the Share files and folders using SMB checkbox to configure the sharing Note You can create up to 10 hot folders Editing a Hot Folder Setting Print Conditions Editing a Hot Folder Setting Print Conditions 1 Open the Color imageRUNNER Enlargement Copy dialog box 2 Select the Hot Folder from the Hot Folde...

Страница 348: ...tings Pan el P 350 5 Make the necessary settings in the Output Settings Pan el P 354 Editing a Hot Folder Setting Print Conditions iPF685 User s Guide Mac OS Software Color imageRUNNER Enlargement Copy 348 Downloaded from ManualsPrinter com Manuals ...

Страница 349: ...e sharing For OS X v10 7 and later Check the File Sharing checkbox and click the Options button Check the Share files and folders using SMB checkbox to configure the sharing Note If you ve made shared settings when you created a new Hot Folder you do not need to execute steps 8 to 9 Deleting a Hot Folder Deleting a Hot Folder 1 Open the Color imageRUNNER Enlargement Copy dialog box 2 Select the Ho...

Страница 350: ...og box The settings available on each panel are as follows Paper Settings Panel P 350 Output Settings Panel P 354 Color Settings Panel P 356 Paper Settings Panel Paper Settings Panel Easy Settings Advanced Settings Two modes are available to provide the optimum print settings for jobs The settings available on each mode are as follows Easy Settings P 352 Advanced Settings P 353 Media Type This all...

Страница 351: ...oll paper automatically or print a guideline for cutting The following settings are available for automatic cutting Setting Details Printer Default The value set on the printer operation panel takes priority None Each page is not cut after it is printed and printing continues without interruption Print Cut Guideline A print cut guideline is printed after each page and printing continues without in...

Страница 352: ...AD B W Line Drawing Suitable for printing CAD drawings with sharp dark lines Perspective GIS Suitable for attractive printing of 3D CAD drawings perspective drawings and GIS drawings including maps Photo Color Suitable for printing photographic images captured with a digital camera Faithful Color Reproduction Prints by faithfully reproducing the colors of the original image Custom Settings Suitabl...

Страница 353: ...t for printing CAD drawings with fine lines or wall newssheet or other docu ments that contain large amounts of text However you may not achieve the quality you ex pect with printing photographs or other images with many filled areas For these types of jobs select Image Office Document Prints common office documents such as proposals memos for distribution etc so they are easy to read Note The num...

Страница 354: ...he page width Make sure that the width of the roll paper in the printer is set correctly for Roll Paper Width in the Paper Settings panel Displayed only if rolls are selected in Paper Source Scaling Enlarges reduces the whole page by the scaling rate as specified Input the scaling value in numerical characters You can specify a range between 5 and 600 You can change the numbers by clicking either ...

Страница 355: ...ng Details Rotate Right 90 Degrees Rotates the portrait page right 90 degrees and print in landscape orientation When the rota ted page can fit in the width of roll paper the page is rotated automatically and when it can not fit in the width of roll paper the page is not rotated When Fit Roll Paper Width is selected under Enlarged Reduced Printing then the image is enlarged or reduced after rotati...

Страница 356: ... Mode select the matching mode Setting Details Driver Matching Mode P 357 Enables printing of optimal color tones using a driver specific color profile You should nor mally select this mode ICC Matching Mode P 358 Enables color matching using ICC profiles Select this if you want to print by specifying the input profile printer profile and matching method in detail This allows you to use ICC pro fi...

Страница 357: ...erforming color adjustment using application software Saturation Color matching optimized for printing posters etc vividly Colorimetric Color matching optimized for printing image data with accurate colors in input color space This is the easiest to use mode when you want to adjust the color and print However gra dation may be lost for colors of wider range than the color reproduction range of the...

Страница 358: ...er material color of the image data Generally this also is called absolute colorimetric 3 Click the Input Profile list and then select an input profile Note To match the color on the printing select the input profile for Color imageRUNNER Enlargement Copy of the Color imageRUNNER type in use 4 Click the Printer Profile list and then select a printer profile Printing Enlargements of Scanned Origina...

Страница 359: ...ng settings to the Favorites button refer to the Color imageRUNNER manual Scanning the original and print an enlargement Follow the steps below to scan an original on the Color imageRUNNER for enlarged printing on the printer For detailed instructions refer to the Color imageRUNNER manual 1 Load the original on the platen glass or document feeder of the Color imageRUNNER 2 Press Send to display th...

Страница 360: ...iPF685 User s Guide 360 Downloaded from ManualsPrinter com Manuals ...

Страница 361: ...ut Stacker 401 Media Configuration Tool Windows 406 Media Configuration Tool Mac OS 420 Control Panel 437 Printer Parts 477 Network Setting 491 Print Job Management 511 Adjustments for Better Print Quality 573 Maintenance and Consumables 589 Troubleshooting 627 Error Message 657 Specifications 681 Appendix 685 imagePROGRAF Handling and Use of Paper 361 Downloaded from ManualsPrinter com Manuals ...

Страница 362: ...er control panel etc Paper Reference Guide display method You can display the Paper Reference Guide from imagePROGRAF Support Information See Displaying the Paper Reference Guide P 365 1 Method of Updating Supported Paper Photo Paper To use newly released paper register the latest paper information on the printer with the Media Configuration Tool See Updating paper information P 368 Important To i...

Страница 363: ...ISO A2 420 0 594 0 mm 16 54 23 39 in ISO A3 329 0 483 0 mm 12 95 19 02 in ISO A3 297 0 420 0 mm 11 69 16 54 in ISO A4 210 0 297 0 mm 8 27 11 69 in ISO B2 500 0 707 0 mm 19 69 27 83 in ISO B3 353 0 500 0 mm 13 90 19 69 in ISO B4 250 0 353 0 mm 9 84 13 90 in JIS B2 515 0 728 0 mm 20 28 28 66 in JIS B3 364 0 515 0 mm 14 33 20 28 in JIS B4 257 0 364 0 mm 10 12 14 33 in 22 x34 ANSI D 558 8 863 6 mm 22 ...

Страница 364: ...or paper feed properties Refer to Paper Reference Guide for details on genuine Canon paper and feed confirmed paper See Displaying the Paper Reference Guide P 365 Load paper in the printer and then select the paper type in the control panel and printer driver and print You can print easily by selecting from existing settings provided in the printer control panel and printer driver See Printing on ...

Страница 365: ...1 in Syn Papr LowInk Synthetic Paper LowInk 1 Print using slightly less ink Try this if you are concerned about rubbing of ink after printing 2 Software RIP is required separately Selecting Special Settings Special settings are provided that allow you to select the amount of ink used in steps You can fix lackluster colors or bleeding ink by selecting special settings where the amount of ink used i...

Страница 366: ...erence Guide from the imagePROGRAF Printmonitor are as follows 1 Click the System Preferences icon in the Dock 2 Click Print Scan This is identified as Printers Scan ners or Print Fax in other versions of Mac OS X Displaying the Paper Reference Guide iPF685 User s Guide Handling and Use of Paper Paper 366 Downloaded from ManualsPrinter com Manuals ...

Страница 367: ...the list of printers and click Options Supplies 4 Click Utility 5 Click Open Printer Utility iPF685 Displaying the Paper Reference Guide User s Guide Handling and Use of Paper Paper 367 Downloaded from ManualsPrinter com Manuals ...

Страница 368: ...ile from the imagePROGRAF website The latest Media Information File can be downloaded by accessing the imagePROGRAF website from the links in the software installed on your computer Contact your Canon dealer if you are unable to download it For details on Media Information File Media Information File refer as follows Media Configuration Tool P 406 Windows Media Configuration Tool P 420 Mac OS Upda...

Страница 369: ...r See Accessing the Printer Driver Dialog Box from Applications Windows P 164 See Accessing the Printer Driver Dialog Box from the Operating System Menu Windows P 166 2 Select the Support sheet and click the Support In formation button The default browser on your computer is started and the imagePROGRAF webpage is displayed Mac OS The basic instructions for accessing the dedicated website from the...

Страница 370: ...from the list of printers and click Options Supplies 4 Click Utility 5 Click Open Printer Utility Updating paper information iPF685 User s Guide Handling and Use of Paper Paper 370 Downloaded from ManualsPrinter com Manuals ...

Страница 371: ...t Information button The default browser on your computer is started and the imagePROGRAF webpage is displayed iPF685 Updating paper information User s Guide Handling and Use of Paper Paper 371 Downloaded from ManualsPrinter com Manuals ...

Страница 372: ... to Rolls Attaching the Roll Holder to Rolls When printing on rolls attach the Roll Holder to the roll Rolls have a two or three inch paper core Use the correct attachment for the paper core The printer comes equipped with the 2 Inch Paper Core Attachment installed Using Rolls with a 2 Inch Paper Core Using Rolls with a 3 Inch Paper Core Holder Stopper Left Side Roll Holder Right Side Holder Stopp...

Страница 373: ...Reference Guide See Paper Sizes P 362 See Displaying the Paper Reference Guide P 365 To view instructions as you attach the Roll Holder press the Navigate button See How to View Instructions with Navi gate P 445 1 Lift the Holder Stopper lever a from the shaft side to unlock it Holding the Holder Stopper at the position in dicated b remove it from the Roll Holder 2 Insert the respective attachment...

Страница 374: ...Inch Paper Core Attachment R with the holes b of the Roll Holder and insert it firmly 3 With the edge of the roll paper facing forward as shown insert the Roll Holder from the right of the roll Insert it firmly until the roll touches the flange a of the Roll Hold er leaving no gap Attaching the Roll Holder to Rolls iPF685 User s Guide Handling and Use of Paper Handling rolls 374 Downloaded from Ma...

Страница 375: ...he printer is clean inside the Top Cover and around the Ejection Guide If these areas are dirty we recommend cleaning them in advance See Cleaning Inside the Top Cover P 614 1 Press the Load button 2 Press or to select Load Roll Paper and then press the OK button Note If any paper has been advanced that will not be used a message is shown requesting you to remove it Press or to select Yes and then...

Страница 376: ...er shaft on the Roll Ledge b At this time position the holder so that the R label c on the W label c on the Roll Holder flange is aligned with the R label d on the printer Loading Rolls in the Printer iPF685 User s Guide Handling and Use of Paper Handling rolls 376 Downloaded from ManualsPrinter com Manuals ...

Страница 377: ...end wearing clean cloth gloves when handling rolls to protect the printing surface If the paper is wrinkled or warped straighten it out before loading it Load paper straight so it is not fed askew 7 Once paper feeding starts you will need to do the following based on the ManageRemainRoll setting and the barcode printed on rolls See Keeping Track of the Amount of Roll Paper Left P 385 ManageRe main...

Страница 378: ...pe settings before you select On will be automatically selected at that time See Using the Same Type of Paper Regularly P 379 Important For best printing results the printer fine tunes the print head height and the feed amount for each type of paper Be sure to select the type of paper to use correctly before printing Because the printer fine tunes the feed amount for each type of paper the margins...

Страница 379: ...types of paper see the Paper Reference Guide See Types of Paper P 362 By default Plain Paper is selected If you move the Release Lever the setting automatically reverts to the previously selected paper Using the Same Type of Paper Regularly Configure this setting so that current media type settings will be automatically selected when you load the same type of paper later 1 On the Tab Selection scr...

Страница 380: ...1 On the Tab Selection screen of the Control Panel press or to se lect the Paper tab Note If the Tab Selection screen is not displayed press the Menu button 2 Press the OK button The Paper Menu is displayed 3 Press or to select Chg Paper Size and then press the OK button 4 Press or to select Roll Length and then press the OK button 5 Press or to select the length of paper loaded in the printer and...

Страница 381: ...ll is now rewound and ejected Caution If you have selected ManageRemainRoll On in the Control Panel menu a barcode is printed on the lead ing edge of the roll Do not remove the roll before the barcode is printed You will be unable to keep track of the amount of roll paper left See Keeping Track of the Amount of Roll Paper Left P 385 5 Positioning your hands as shown open the Roll Cover iPF685 Remo...

Страница 382: ... removing the Roll Holder from rolls see Removing the Roll Holder from Rolls P 383 8 Holding it at the positions indicated close the Roll Cover Note To load new roll paper in the printer at this point see Loading Rolls in the Printer P 375 Removing the Roll from the Printer iPF685 User s Guide Handling and Use of Paper Handling rolls 382 Downloaded from ManualsPrinter com Manuals ...

Страница 383: ... at the position in dicated b remove it from the Roll Holder 2 Remove the Roll Holder from the roll 3 When removing attachments push the tips a in as you remove the attachment 3 Inch Paper Core Attachment R Roll Holder side iPF685 Removing the Roll Holder from Rolls User s Guide Handling and Use of Paper Handling rolls 383 Downloaded from ManualsPrinter com Manuals ...

Страница 384: ...ess the Feed button to feed or retract the roll with the and buttons 1 Press the Feed button 2 Press the or button to advance or retract the roll Press to retract the roll manually Press to advance the roll manually Note If you hold down or for less than a second the roll will move about 1 mm 0 04 in If you hold down or for more than a second the roll will move until you release the button Release...

Страница 385: ... button Specifying the Ink Drying Time for Rolls Specifying the Ink Drying Time for Rolls When you are using paper that takes longer for ink to adhere ink may be transferred onto the paper surface during ejection soiling it In that case you may be able to improve the condition by setting the time to wait for the ink to dry after printing Note If the Cutter touches the print surface on which the in...

Страница 386: ...sired settings values in BBetween Pages and CBetween Scans in ADrying Time and then click OK See Paper Detailed Settings Dialog Box Win dows P 170 Mac OS 1 Choose Print in the application menu Specifying the Ink Drying Time for Rolls iPF685 User s Guide Handling and Use of Paper Handling rolls 386 Downloaded from ManualsPrinter com Manuals ...

Страница 387: ... next select the desired settings values in CBetween Pages and DBetween Scans in BDrying Time and then click OK See Paper Detailed Settings Dialog Box Mac OS P 286 iPF685 Specifying the Ink Drying Time for Rolls User s Guide Handling and Use of Paper Handling rolls 387 Downloaded from ManualsPrinter com Manuals ...

Страница 388: ...your specified position Choose this option if you want to cut pages by press ing Cutter Unit buttons for manual cutting after print ing when Automatic Cutting No is selected or Print Cut Guideline is selected in the printer driver Otherwise choose this option if you want to cut the roll edge after loading a roll Cut button pressed Yes No Print Cut Guideline Note Automatic and Eject are valid only ...

Страница 389: ...s the OK button 5 Press or to select Cutting Mode and then press the OK button 6 Press or to select Eject and then press the OK button 7 Starts printing When printing is finished the printer will stop without cutting 8 Holding the printed document to prevent it from dropping press the Cut button to cut the roll Manual when using media that cannot be cut with the Cutter Unit iPF685 Specifying the C...

Страница 390: ...select Cutting Mode and then press the OK button 6 Press or to select Manual and then press the OK button 7 Starts printing The printer stops advancing the paper after printing 8 Press the Feed button Roll paper is fed to the specified cut position and then automatically stopped 9 Cut the roll paper manually with scissors or the like 10 Press the OK button After the roll is rewound it stops automa...

Страница 391: ...Automatically If the leading edge of the paper is cut crooked or is not cut straight when roll paper is loaded it will not print correctly If this happens you can cut the leading edge of the paper straight when loading a paper roll by using Trim Edge First in the Control Panel menu Trim Edge First offers the following options Automatic If the leading edge of the paper is cut crooked and is not cut...

Страница 392: ...pressing the and buttons After making the adjustment you can cut the paper by pressing the Paper Cutting button and selecting Cut pa per After the paper has been cut press Finish paper set Note If you do not press Finish paper set after cutting the paper you will not be able to print again Off The edge is not cut and scraps are not removed Follow these steps to change the Trim Edge First setting 1...

Страница 393: ...Plain Paper or lightweight paper This may impair cutting and cause paper jams Borderless printing is not available when CutDustReduct is set to On To use borderless printing select CutDustRe duct Off Set CutDustReduct to On as follows 1 On the Tab Selection screen of the Control Panel press or to se lect the Paper tab Note If the Tab Selection screen is not displayed press the Menu button 2 Press ...

Страница 394: ... jam If necessary straighten the paper and reload it Load the paper straight Loading paper askew will cause an error See Paper is crooked P 665 Note Store unused paper in the original package away from high temperature humidity and direct sunlight 1 Select sheets as the paper source If a print job was received Sheets are automatically selected and the media type and size specified by the print job...

Страница 395: ...in the Paper Feed Slot with the right edge aligned with the Paper Align ment Guide a to the right of the Roll Cover Insert the paper until the leading edge makes contact and you hear a tone iPF685 Loading Sheets in the Printer User s Guide Handling and Use of Paper Handling sheets 395 Downloaded from ManualsPrinter com Manuals ...

Страница 396: ... feeding the paper Note Refer to Paper Reference Guide for details on type of paper to select See Displaying the Paper Reference Guide P 365 Printing From a Desired Starting Point Printing From a Desired Starting Point When printing inside boundaries or in other situations when you want to specify a particular position to start printing from set Width Detection to Off in the printer menu for the t...

Страница 397: ...in advance a menu for selection of the type of paper is displayed Press or to select the type of paper and then press the OK button Note If a print job was received before paper was advanced the media type and size specified by the job are shown on the Display Screen Thus this screen is not displayed Go to step 2 2 Width Detection OFF OK to continue is now shown on the Display Screen Press or to s...

Страница 398: ... the extended line of the Paper Alignment Line a to the right of the ejection guide and the leading edge aligned with the groove b at the far end of the Platen load the paper at the position from which to start printing Printing From a Desired Starting Point iPF685 User s Guide Handling and Use of Paper Handling sheets 398 Downloaded from ManualsPrinter com Manuals ...

Страница 399: ...ab Note If the Tab Selection screen is not displayed press the Menu button 2 Press the OK button The Paper Menu is displayed 3 Press or to select Eject Paper and then press the OK button 4 Press or to select Yes and then press the OK button The paper is ejected from the front of the printer iPF685 Removing Sheets User s Guide Handling and Use of Paper Handling sheets 399 Downloaded from ManualsPri...

Страница 400: ...e paper push the Release Lever back and remove the sheet 6 Pull the Release Lever forward Removing Sheets iPF685 User s Guide Handling and Use of Paper Handling sheets 400 Downloaded from ManualsPrinter com Manuals ...

Страница 401: ...ouch the floor and be soiled or damaged See Switching to Extended position A P 402 Important When storing printed documents on the Output Stacker always use it in position 1 If you do not printed documents may not be dropped into the Output Stacker and the printed surface may become soiled The Output Stacker can hold one sheet When printing multiple pages remove each sheet after it is printed The ...

Страница 402: ...n A Switch the stacker to Extended position A as follows 1 Lift the Support Rod to the position shown a and switch the stacker to Extended position A Using the Output Stacker iPF685 User s Guide Handling and Use of Paper Output Stacker 402 Downloaded from ManualsPrinter com Manuals ...

Страница 403: ...he regular position 1 Lower the Support Rod to the position shown a to re turn to the regular position If the Adjustable Stopper b is extended retract it 2 Return to the regular position Switching to Extended position B ST 27 only Switch the stacker to Extended position B as follows iPF685 Using the Output Stacker User s Guide Handling and Use of Paper Output Stacker 403 Downloaded from ManualsPri...

Страница 404: ... the procedure of switching to Extended posi tion B Once the printing has finished use the following procedure to return to the regular position 1 Push the Output Stacker Ejection Guides a closed un til it clicks into place Using the Output Stacker iPF685 User s Guide Handling and Use of Paper Output Stacker 404 Downloaded from ManualsPrinter com Manuals ...

Страница 405: ...se lever b towards you 3 While continuing to hold the Output stacker handle a slowly lower the Output Stacker 4 Return to the regular position iPF685 Using the Output Stacker User s Guide Handling and Use of Paper Output Stacker 405 Downloaded from ManualsPrinter com Manuals ...

Страница 406: ... printer driver dialog boxes and rename them in addition to other functions Important Normally the Media Configuration Tool is installed and the media information is configured when you install the printer driver from the User Software CD ROM Use this software if you want to add new media information or edit existing media information Administration of paper information using the Media Configurati...

Страница 407: ...y or territory then click the Next button 3 The License Agreement is displayed If you accept the agreement click Yes 4 The Change Installation Location screen appears Select the destination folder then click the Next button iPF685 Installation Procedures User s Guide Handling and Use of Paper Media Configuration Tool Windows 407 Downloaded from ManualsPrinter com Manuals ...

Страница 408: ...guration Tool Media Configuration Tool main window is displayed Note If you only start the Media Configuration Tool the media information on the printer control panel and in the printer driver is not updated If this screen is displayed select Add Genuine Paper in the main window and click the Update button in the Edit Media Types screen to update the media information Starting Method iPF685 User s...

Страница 409: ...nk to Support Information button You can check information such as the latest information for the product and software version upgrade informa tion Link to User Manual Button Displays the printer user s manual Editing Media Type Information for Genuine Paper and Feed Confirmed Paper Editing Media Type Information for Genuine Paper and Feed Confirmed Paper To add genuine paper and feed confirmed pa...

Страница 410: ... Changing Media Names P 413 Delete Button To delete added genuine paper and feed confirmed paper from the printer control panel and printer driver select the paper to delete and click this button For details on the procedure for deleting added media types see Deleting Media Types You Have Add ed P 415 Show Hide Button To change whether or not genuine paper or feed confirmed paper is displayed in t...

Страница 411: ... printer while adding the media types Reinstalling Media Configuration Tool after registering a media information file may delete the registered media infor mation file In this case first download and install latest Media Configuration Tool then download and register the re quired media information file 1 Open the Edit Media Types dialog box and then click the Add button Note For details on the pr...

Страница 412: ...If Master Media Information File is displayed as the Type of the Media Information File the media type display order and media type display non display settings are initialized Reconfigure these after added the master media information file 5 Click OK when the confirmation message is displayed 6 In the Edit Media Types dialog box click the Update button Adding Media Types iPF685 User s Guide Handl...

Страница 413: ...emain the data that is set to the printer click the Cancel button Do not attempt to print or turn the printer off while the program is communicating with the printer 8 Click the OK button Changing Media Names Changing Media Names 1 Open the Edit Media Types dialog box Note For details on the procedure for opening the Edit Media Types dialog box see Editing Media Type Informa tion for Genuine Paper...

Страница 414: ...n Control Panel are stated be low alphanumeric space _ For Name in Printer Driver up to 32 one Byte characters can be entered and for Name on Control Panel up to 16 one Byte characters can be entered 4 In the Edit Media Types dialog box click the Update button 5 The Confirm Update dialog box is displayed Configure Update Target and click the Execute button Communication with the printer begins Cha...

Страница 415: ...ck the OK button Deleting Media Types You Have Added Deleting Media Types You Have Added 1 Open the Edit Media Types dialog box Note For details on the procedure for opening the Edit Media Types dialog box see Editing Media Type Informa tion for Genuine Paper and Feed Confirmed Paper P 409 2 In the Media Type list select the name of the media to delete Click the Delete button Note Only paper for w...

Страница 416: ...ted When you would like to remain the data that is set to the printer click the Cancel button Do not attempt to print or turn the printer off while the program is communicating with the printer 5 Click the OK button Switching Media Types Display Show Hide Switching Media Types Display Show Hide 1 Open the Edit Media Types dialog box Switching Media Types Display Show Hide iPF685 User s Guide Handl...

Страница 417: ...me you click the Show Hide button the display mode cycles from showing both the printer driver and printer panel to hiding both the printer driver and printer panel and then to showing only the printer panel 3 In the Edit Media Types dialog box click the Update button 4 The Confirm Update dialog box is displayed Configure Update Target and click the Execute button Communication with the printer be...

Страница 418: ... the Display Order of Media Types 1 Open the Edit Media Types dialog box Note For details on the procedure for opening the Edit Media Types dialog box see Editing Media Type Informa tion for Genuine Paper and Feed Confirmed Paper P 409 2 Select the paper in the Media Type list for which to change the display order and then click the buttons to move the item or The selected item moves one line up o...

Страница 419: ...ram is communicating with the printer 5 Click the OK button Checking the update Checking the update After updating the media information using the Media Configuration Tool you can check whether the update has been applied to the printer in the control panel of the printer 1 Click the About button in the Media Configuration Tool main window to open the About dialog box 2 Check the value xx xx xxxx ...

Страница 420: ...earrange lists of the types of paper on the printer control panel and in printer driver dialog boxes and rename them in addition to other functions Important Normally the Media Configuration Tool is installed and the media information is configured when you install the printer driver from the User Software CD ROM Use this software if you want to add new media information or edit existing media inf...

Страница 421: ...re License Agreement click the Continue button 3 The next screen presents selections for the country or area where the printer is used Select a country or territory then click the Continue button 4 Click the Install button iPF685 Procedures for Installing User s Guide Handling and Use of Paper Media Configuration Tool Mac OS 421 Downloaded from ManualsPrinter com Manuals ...

Страница 422: ...s Canon Utilities iPFxxxx Media Configuration Tool The iPFxxxx in the folder above will be the printer name in use Starting Method Starting Method Follow the procedure below to start the Media Configuration Tool From the Applications menu Canon Utilities iPFxxxx Media Configuration Tool MCTxxxx app Media Configuration Tool main window is displayed Starting Method iPF685 User s Guide Handling and U...

Страница 423: ...nfiguration Tool main window see Starting Method P 422 Add Genuine Paper button When this button is clicked the Edit Media Types dialog box is displayed which allows you to add media informa tion files released by Canon to the printer control panel and printer driver You can also change names toggle between displaying and hiding and delete added media types You can also change the display order of...

Страница 424: ...f while the program is communicating with the printer The Edit Media Types dialog box is displayed Note In the following screens you cannot change the printer where media type information is to be updated Note Paper that is displayed grayed out does not appear in the printer driver or printer panel Add Button To add genuine paper or feed confirmed paper to the printer control panel and printer dri...

Страница 425: ...to change and click this button For details on the procedure for changing the display order of media types see Changing the Display Order of Media Types P 433 Important When you update the media type information perform the same update on all of the PCs that are using that printer Note It may not be possible to deleting showing hiding and changing the display order under some conditions If a displ...

Страница 426: ...layed in Media Information File in the Add Media Type dialog box Select the check box for the paper you want to add and click the OK button Note If Master Media Information File is displayed as the Type of the Media Information File the media type display order and media type display non display settings are initialized Reconfigure these after added the master media information file 5 Click OK whe...

Страница 427: ...ortant When setting a data to the printer that differs from the data to be updated the selected media information file is updated When you would like to remain the data that is set to the printer click the Cancel button Do not attempt to print or turn the printer off while the program is communicating with the printer 8 Click the OK button iPF685 Adding Media Types User s Guide Handling and Use of...

Страница 428: ...it the names in Name in Printer Driver and Name on Control Panel and click the OK button Note To restore the original names click the Restore button The characters that can be entered for Name in Printer Driver and Name on Control Panel are stated be low alphanumeric space _ For Name in Printer Driver up to 32 one Byte characters can be entered and for Name on Control Panel up to 16 one Byte chara...

Страница 429: ...rtant When setting a data to the printer that differs from the data to be updated the selected media information file is updated When you would like to remain the data that is set to the printer click the Cancel button Do not attempt to print or turn the printer off while the program is communicating with the printer 6 Click the OK button iPF685 Changing Media Names User s Guide Handling and Use o...

Страница 430: ...r Genuine Paper and Feed Confirmed Paper P 424 2 In the Media Type list select the name of the media to delete Click the Delete button Note Only paper for which Status in the Media Type is Add can be deleted 3 In the Edit Media Types dialog box click the Update button Deleting Media Types You Have Added iPF685 User s Guide Handling and Use of Paper Media Configuration Tool Mac OS 430 Downloaded fr...

Страница 431: ...print or turn the printer off while the program is communicating with the printer 5 Click the OK button Switching Media Types Display Show Hide Switching Media Types Display Show Hide 1 Open the Edit Media Types dialog box Note For details on the procedure for opening the Edit Media Types dialog box see Editing Media Type Informa tion for Genuine Paper and Feed Confirmed Paper P 424 iPF685 Switchi...

Страница 432: ...rinter driver and printer panel to hiding both the printer driver and printer panel and then to showing only the printer panel 3 In the Edit Media Types dialog box click the Update button 4 The Confirm Update dialog box is displayed Configure Update Target and click the Execute button Communication with the printer begins Note You should normally select Update the printer control panel and printer...

Страница 433: ... the Display Order of Media Types 1 Open the Edit Media Types dialog box Note For details on the procedure for opening the Edit Media Types dialog box see Editing Media Type Informa tion for Genuine Paper and Feed Confirmed Paper P 424 2 Select the paper in the Media Type list for which to change the display order and then click the buttons to move the item or The selected item moves one line up o...

Страница 434: ...t to the printer click the Cancel button Do not attempt to print or turn the printer off while the program is communicating with the printer 5 Click the OK button Checking the update Checking the update After updating the media information using the Media Configuration Tool you can check whether the update has been applied to the printer in the control panel of the printer 1 Click the About button...

Страница 435: ...fo System Info in the printer control panel If the values in Steps 2 and 3 are the same the update has been applied to the printer iPF685 Checking the update User s Guide Handling and Use of Paper Media Configuration Tool Mac OS 435 Downloaded from ManualsPrinter com Manuals ...

Страница 436: ...iPF685 User s Guide 436 Downloaded from ManualsPrinter com Manuals ...

Страница 437: ...1 Control Panel Operations and Display Screen 438 Printer Menu 448 Printer Parts 477 Network Setting 491 Print Job Management 511 Adjustments for Better Print Quality 573 Maintenance and Consumables 589 Troubleshooting 627 Error Message 657 Specifications 681 Appendix 685 imagePROGRAF Control Panel 437 Downloaded from ManualsPrinter com Manuals ...

Страница 438: ...or processing print jobs Otherwise this lamp flashes when the print job is paused or the printer is updating the firmware Off There are no active print jobs when the Data lamp is off c Message Lamp orange On A warning message is displayed Flashing An error message is displayed Off The printer is off or is operating normally d Power button green Turns the printer on and off See Turning the Printer ...

Страница 439: ...utton in menu items of each tab for which is displayed at left will move to the lower level of the menu item enabling you to execute menu commands or set menu values Also press this button if the Display Screen indicates to press the OK button i Back button Displays the screen before the current screen j Menu button Displays the Tab Selection screen See Menu Settings P 459 k Load button Press this...

Страница 440: ...ine displayed Indicates the printer status and shows menu names Bottom line displayed Here the remaining ink level is indicated See Checking Ink Tank Levels P 596 Job tab A tab indicating status and showing menus related to print jobs Pressing the OK button when this tab is highlighted will display the Job Menu menu Top line displayed The job icon is highlighted Middle line displayed Indicates the...

Страница 441: ...rinter automatically enters Sleep mode to conserve power when idle for a specific period by default five minutes that is if no print jobs are received or buttons are pressed while all covers are closed You can specify the period before the printer enters Sleep mode in the Sleep Timer menu See Menu Settings P 459 After entering Sleep mode from Standby mode the printer automatically recovers if prin...

Страница 442: ...ocessed The tab related to the error is displayed For information about the display in the case of multiple errors see Display Transitions in Error Status Control Panel Display iPF685 User s Guide Control Panel Operations and Display Screen 442 Downloaded from ManualsPrinter com Manuals ...

Страница 443: ... pressed while all covers are closed However it does not enter Sleep mode while error messages are displayed or when a roll can be manually advanced by pressing the Feed button 2 When the printer is in Sleep mode you can press any button except the Power button to recover from Sleep mode Sleep mode is also terminated if a print job is received or a command is issued from RemoteUI iPF685 Control Pa...

Страница 444: ... than the currently displayed error are dis played flashing You can move between the tabs to check the errors by pressing the and keys If multiple errors have occurred in the Job tab and Settings Adj tab the error message switches every four seconds within each tab Control Panel Display iPF685 User s Guide Control Panel Operations and Display Screen 444 Downloaded from ManualsPrinter com Manuals ...

Страница 445: ...ns on the printer con trol panel 1 Press the Navigate button 2 Press or to select the desired navigation menu 3 Press or to select View Op Guide and then press the OK button Instructions are now displayed Example Loading sheets iPF685 How to View Instructions with Navigate User s Guide Control Panel Operations and Display Screen 445 Downloaded from ManualsPrinter com Manuals ...

Страница 446: ... printer detects the action and switches to the next in struction screen In the case of actions the printer cannot detect instruction screens are switched every four seconds and the sequence of operations is shown repeatedly When all actions in the sequence are finished the instruction screen for the next step is displayed Example Ink tank replacement Checking Instructions During Printer Operation...

Страница 447: ...isplay the previous or next screens If you do not press the or button within 30 seconds continuous display is resumed Press the OK button to display the instruction screen for the next step iPF685 Checking Instructions During Printer Operations User s Guide Control Panel Operations and Display Screen 447 Downloaded from ManualsPrinter com Manuals ...

Страница 448: ...ons to manage print jobs Set Adj Menu Menu operations for printer adjustment and maintenance For a description of specific menu items available see Menu Settings P 459 For instructions on selecting menu items see Menu Operations P 449 Note By default menu settings apply to all print jobs However for settings that are also available in the printer driver the values specified in the printer driver t...

Страница 449: ...k tab is selected and the OK button is pressed Note If the Tab Selection screen is not displayed pressing OK will not display menus Menus can be selected after you resolve the problem Simply press buttons on the Control Panel to access menus on various tabs from the Tab Selection screen and set or execute Menu items The following section describes menu operations and how they are presented in this...

Страница 450: ...ss a lower one If items of the menu list are more than the lines of the screen press and to scroll the menu Items you select are highlighted The scroll bar at right indicates the current position in the overall menu Lower menus are available if is displayed at left next to the second and subsequent rows To access the lower menus select the menu and press the OK button Menu Operations iPF685 User s...

Страница 451: ...the or button to move to the next field for input 2 Press the or button to enter the value Note Hold down or to increase or decrease the value continuously 3 Repeat steps 1 and 2 to complete the settings and then press the OK button Note If a confirmation message is displayed regarding the setting you entered follow the on screen instructions If you have changed the Interface Setup menu settings a...

Страница 452: ... Level Fifth Level Load Paper Roll Paper Cut Sheet Eject Paper Chg Paper Type 1 Roll Paper The paper type is displayed here 1 Cut Sheet The paper type is displayed here 1 Chg Paper Size Sheet Size The size of paper is displayed here 2 CustomPaperSize Set the length and width Roll Length 3 Set the length Roll Width 4 Set the width ManageRemainRoll Off On Paper Details The paper type is dis played h...

Страница 453: ...nk Menu First Level Rep Ink Tank Head Cleaning A Job Menu First Level Second Level Third Level Fourth Level Fifth Level Print Job Job List Choose a print job Delete Preempt Jobs 1 Stored Job Mailbox List Enter a password if one has been set Job List Print Delete Print Job List Job Log 2 Choose from information about the latest three print jobs Document Name User Name Page Count Job Status OK CANCE...

Страница 454: ...ttings A High B Standard Draft Mainte nance Head Cleaning Head Cleaning A Head Cleaning B Nozzle Check Replace P head Repl maint cart Head Info GL2 Set tings Quality Manager Color Mode Monochrome Color CAD 1 Color CAD 2 Color CAD 3 Color CAD 4 Color CAD 5 Print Quality Fast Standard High Input Reso lution 600dpi 300dpi Print Econ omy Off On Paper Man ager Paper Source Automatic Roll Paper Cut Shee...

Страница 455: ...g Software Smooth ThickenFi neLines Off On AdjustFaint Lines Off On Ln wdth correct Black gray Color Processin gOption Warning Off On On the Fly Off On Detect img size Off Command priority Detected size GL2 Set Print Interface Setup 8 EOP Tim er 8 10 sec 30 sec 1 min 2 min 5 min 10 min 30 min 60 min TCP IP 8 IPv4 8 IPv4 Mode 8 Automatic Manual Protocol 5 8 DHCP 8 On Off BOOTP 8 On Off RARP 8 On Of...

Страница 456: ...n 1 hour 4 hours 8 hours 12 hours Buzzer Off On Contrast Adj 4 3 2 1 0 1 2 3 4 Date Time 8 Date yyyy mm d d 7 8 Time hh mm Date For mat 8 yyyy mm dd dd mm yyyy mm dd yyyy Language English 日本語 Français Italiano Deutsch Español Português Русский 中文 简体字 한국 어 Time Zone 8 0 London GMT 1 Paris Rome 2 Athens Cairo 3 Moscow 4 Eerevan Baku 5 Islamabad 6 Dacca 7 Bangkok 8 Hong Kong 9 Tokyo Seoul 10 Canberra...

Страница 457: ... 12 Paper Info Ink Info Head Info System Info Error Log Use Situa tion Tot Print Area Duty Counter 1 Available after you have used Auto Advanced in Head Posi Adj once 2 Available if Adj Priority is Automatic or Print Quality 3 Available if Adj Priority is Automatic or Print Length 4 Available only if Use Nesting is On 5 Not displayed if IPv4 Mode is Manual 6 Not displayed if Auto Detect is On 7 Fo...

Страница 458: ...e to enter the power save mode Sleep mode is recommended 12 Displayed as the menu during printing while printing is in progress 13 Not displayed in the regular menu Menu Structure iPF685 User s Guide Control Panel Printer Menu 458 Downloaded from ManualsPrinter com Manuals ...

Страница 459: ...Choose Off if you prefer not to print the barcode See Keeping Track of the Amount of Roll Paper Left P 385 Paper Details The type of paper is displayed here 1 Head Height Adjust the Printhead height See Troubleshooting Paper Abrasion and Blurry Images P 580 Skew Check Lv If you print on Japanese paper washi or other handmade paper that has an irregular width choose Loose for a higher skew detec ti...

Страница 460: ...quality at the leading edge and affect feeding accuracy The printed surface may be scratched and ink may adhere to the leading edge It may also cause the Platen to become soiled NearEnd Sht Mrgn Specify a margin at the leading edge of sheets to ensure better printing quality at the leading edge Note that if you choose 3mm it may lower the printing quality at the leading edge and affect feeding acc...

Страница 461: ...number of pages in the job Job Status Indicates the printing results Print Start Time Indicates when the print job was started Print End Time Indicates when the print job was finished Print Time Indicates the time required to print the job Print Size Indicates the paper size in the print job Media Type Indicates the type of paper in the print job Interface Indicates the interface used for the prin...

Страница 462: ... of Printhead alignment relative to the printing di rection See Automatic Adjustment to Straighten Lines and Colors P 574 Auto Advanced The printer prints and reads a test pattern for automatic ad justment of Printhead alignment relative to the printing di rection and spacing between nozzles and colors See Au tomatic Adjustment to Straighten Lines and Col ors P 574 Manual Print a test pattern for ...

Страница 463: ...dard Draft Mainte nance Head Cleaning Clean the Printhead See Cleaning the Print head P 600 Choose Head Cleaning A if printing is faint oddly colored or contains foreign substances Choose Head Cleaning B if no ink is printed at all or if printing is not improved by Head Cleaning A Nozzle Check Print a test pattern to check the nozzles Replace P head Execute when replacing the Printhead Follow the ...

Страница 464: ...cally rotated 90 degrees to conserve paper Similarly if the long side of an original in landscape orientation is longer than the roll width and the short side is shorter than the roll width the original is repositioned to fit on the paper HP RTL print jobs are not rotated Because HP RTL images are not rotated even if the paper is rotated 90 degrees im ages may be cut off or the blank paper may be ...

Страница 465: ...for the ends and junctions of lines If you choose No Setting If you choose Circle Setting Reset Palette Restore Define Palette to the default palette settings Smoothing Choose whether to print arcs as smooth curved lines or as multiple connected line segments If you choose Software Operation is determined by the application If nothing is specified by the application the result is as shown in the f...

Страница 466: ...area is used If Detected size is selected the detected minimum image area is used GL2 Set Print Print GL2 settings information Interface Setup EOP Timer Specify the timeout period before cancellation of print jobs that cannot be received by the printer TCP IP IPv4 IPv4 Mode Choose whether the printer IP address is configured auto matically or a static IP address is entered manually Protocol DHCP S...

Страница 467: ...ion of the time set in Shut Down Timer after entering Sleep mode the printer automatically turns off Buzzer Choose On for the buzzer to sound once for warnings and three times for errors Contrast Adj Adjust the Display Screen contrast level Date Time Date Set the current date Time Set the current time Available only if the Date setting is specified Date Format Specify the date format Language Spec...

Страница 468: ...roll is left in the retracted position Specify On to have rolls cut when printing begins after Sleep mode or when the power is restored Selecting Auto matic will trim the edge when the roll has been in the re tracted position for two days or more Rep P head Print Choose On to have the printer automatically execute the Advanced Adj operations after you replace the Printhead See Automatic Adjustment...

Страница 469: ...r When using the printer driver configure set tings on the printer Select On to print the job after it has been saved Save Common Box Select Off to print without saving jobs in the common box Show Job Log Selecting Off prevents display of the log in Job Menu Job Log Additionally the log is not printed if you choose Job Menu Print Job Log Note that because job logs are not collected the Status Moni...

Страница 470: ...cy of these estimates Estimates may vary depending on conditions of use Calculation of these estimates does not include ink consumed when cleaning printheads by forceful ejection of ink 2 Displayed as the menu during printing while printing is in progress 3 Not displayed in the regular menu Status Print Status Print You can print a Status Print report indicating the current status of the printer W...

Страница 471: ...ses Various information about previous jobs HDD Information Indicates the total hard disk capacity and the mail box free space Total capacity Box free space Set Adj Menu Settings and adjustment informa tion System Setup Printer system settings as well as settings regarding warnings and errors Sleep Timer Shut Down Timer Buzzer Contrast Adj Date Format Language Time Zone Length Unit Detect Mismatch...

Страница 472: ...ntenance Cartridge capacity The ink color is dis played here Ink levels The remaining ink is displayed in a five level scale System Info Indicates the total amount of RAM RAM Error Log The past five error codes HEAD LOT NUMBER DATE OF INSTALLATION The printhead lot number and date and time when the Printhead was installed HEAD INFxx PARTS STATUS Utilization status of replacement parts that require...

Страница 473: ...on The Set Adj Menu is displayed 4 Press or to select Test Print and then press the OK button 5 Press or to select Interface Print and then press the OK button Confirming Interface Print information The following information is included in the Interface Print report Canon imagePROGRAF iPFxxxx Interface Print Printer model Firm Firmware Version Boot Boot ROM Version MIT DBF MIT Database Format Vers...

Страница 474: ...ame SNMPv1 SNMPv3 TCP IPv6 Use IPv6 IPv6 settings values Use DHCPv6 Stateful Address Prefix Length Primary DNS Server Address Secondary DNS Server Address Use a stateless address Stateless Address 1 Prefix Length 1 Stateless Address 2 Prefix Length 2 Stateless Address 3 Prefix Length 3 Stateless Address 4 Prefix Length 4 Stateless Address 5 Prefix Length 5 Stateless Address 6 Prefix Length 6 Use a...

Страница 475: ...ost Name DNS Domain Name Perform dynamic updating of stateful addresses Dynamically update the stateless address Dynamically update the manual address Network Interface Physical Interface Network interface settings values Transmission Rate MAC Address Auto Detect Communication Ethernet Type Spanning Tree Use the Jumbo Frame Function iPF685 Printing Interface Setting Reports User s Guide Control Pa...

Страница 476: ...iPF685 User s Guide 476 Downloaded from ManualsPrinter com Manuals ...

Страница 477: ...ontrol Panel 437 Printer Parts Printer parts 478 Hard Disk 484 Optional accessories 488 Network Setting 491 Print Job Management 511 Adjustments for Better Print Quality 573 Maintenance and Consumables 589 Troubleshooting 627 Error Message 657 Specifications 681 Appendix 685 imagePROGRAF Printer Parts 477 Downloaded from ManualsPrinter com Manuals ...

Страница 478: ... it here c Roll Ledge When loading rolls rest the Roll Holder here before loading it in the Roll Holder Slot d Release Lever When releasing the Paper Retainer push this lever back e Control Panel Use this panel to operate the printer and check the printer status See Control Panel P 438 f Ink Tank Cover Open this cover to replace an Ink Tank See Ink Tank Cover Inside P 483 Front iPF685 User s Guide...

Страница 479: ...ments are ejected from this slot m Ejection Guide Supports output paper n Top Cover Open this cover to install the Printhead and remove any jammed paper from inside the printer as needed See Top Cover Inside P 481 o Width Guide When loading the sheets move the guide to match the paper size p Stand Optional A stand that holds the printer Equipped with casters to facilitate moving it See Stand P 489...

Страница 480: ...peed USB connections d Carrying Handles When carrying the printer have three people hold it by these handles on the back at both ends Grasp these parts on the left and right sides also when moving the printer with the stand attached e Power Supply Connector Connect the power cord to this connector Side iPF685 User s Guide Printer Parts Printer parts 480 Downloaded from ManualsPrinter com Manuals ...

Страница 481: ... platen hold paper in place e Borderless Printing Ink Grooves For catching ink outside the edges of paper during borderless printing f Linear Scale The linear scale serves a key role in detecting the Carriage position Be careful not to touch this part when clean ing inside the Top Cover or clearing paper jams g Cleaning Brush When cleaning inside the printer under the Top Cover use this brush to s...

Страница 482: ...ecure rolls on the Roll Holder with this part c Roll Loading Slots Slide the Roll Holder along these slots d Roll Holder Slot Load the Roll Holder into this holder slot Carriage Carriage Roll Cover Inside iPF685 User s Guide Printer Parts Printer parts 482 Downloaded from ManualsPrinter com Manuals ...

Страница 483: ...k Tank in place and protects it Lift and press down the lever when replacing an Ink Tank b Ink Color Label Load an Ink Tank that matches the color and name on this label c Ink Lamp Red Indicates the state of the Ink Tank as follows when the Ink Tank Cover is opened On The Ink Tank is installed correctly Off No Ink Tank is installed or the ink level detection function has been released Flashing Slo...

Страница 484: ... print jobs Save in mail box Yes No No No Do Not Save Print Jobs in the Common Box No No No Yes Save print jobs sent from sources other than the printer driver No No No Yes Operations with saved jobs Print saved jobs No Yes Yes Yes Delete saved jobs No Yes Yes Yes Job queue management Display job queue No Yes Yes Yes Delete No Yes Yes Yes Preempt Jobs No Yes Yes Yes Operations with held jobs No Ye...

Страница 485: ...monitor Using the Control Panel 1 On the Tab Selection screen of the Control Panel press or to se lect the Job tab Note If the Tab Selection screen is not displayed press the Menu button 2 Press the OK button The Job Menu is displayed 3 Press or to select HDD Information and then press the OK button Using RemoteUI To view the box list select Stored Job in Job Management On the Stored Job page the ...

Страница 486: ...l data on the hard disk choose from the following three options This operation is only available from the Control Panel Erasure Method Details High Speed Erases file management data for print job data stored on the printer s hard disk Choose this method for relatively fast erasure Because only the file management data is erased the print job data itself is not erased Note that it may be possible t...

Страница 487: ... jobs are not processed during execution of Erase HDD Data 1 On the Tab Selection screen of the Control Panel press or to se lect the Settings Adj tab Note If the Tab Selection screen is not displayed press the Menu button 2 Press the OK button The Set Adj Menu is displayed 3 Press or to select System Setup and then press the OK button 4 Press or to select Erase HDD Data and then press the OK butt...

Страница 488: ...ores Use the correct attachment for the particular paper core See Attaching the Roll Holder to Rolls P 372 Roll Holder Set RH2 33 Roll Holder for 2 and 3 inch paper cores Attachments Using the 2 Inch Paper Core Attachment Using the 3 Inch Paper Core Attachment 2 Inch Paper Core Attachment 3 Inch Paper Core Attachment L 3 Inch Paper Core Attachment R Roll Holder Set iPF685 User s Guide Printer Part...

Страница 489: ...r f Output stacker handle This handle is grasped and supports the sliding output stacker when putting the output stacker into Extended position B and returning it to the regular position For details on the extended position see Using the Output Stacker P 401 g Output stacker release lever Pull this lever towards you to release Extended position B For details on the extended position see Using the ...

Страница 490: ...iPF685 User s Guide 490 Downloaded from ManualsPrinter com Manuals ...

Страница 491: ...rk Setting Network Environment 492 Using RemoteUI 494 Initial Settings 496 Mac OS Settings 504 Other Settings 505 Device Setup Utility Windows 508 Print Job Management 511 Adjustments for Better Print Quality 573 Maintenance and Consumables 589 Troubleshooting 627 Error Message 657 Specifications 681 Appendix 685 imagePROGRAF Network Setting 491 Downloaded from ManualsPrinter com Manuals ...

Страница 492: ...ndows Vista Windows Server 2008 Windows 7 Windows 8 Windows Vista x64 Windows Server 2008 x64 Windows Server 2012 x64 Windows 7 x64 Windows 8 x64 OS X v10 6 8 or later Note When using IPv6 you must specify IPv6 on the Control Panel or in RemoteUI For instructions Configuring TCP IPv6 Network Settings P 499 or see Configuring the Printer s TCP IP Network Settings With Remo teUI P 500 The imagePROGR...

Страница 493: ... over TCP IP Note NetBIOS is not supported Example of a Mac OS network In Mac OS networks print over TCP IP using the Bonjour function iPF685 Network Environment User s Guide Network Setting Network Environment 493 Downloaded from ManualsPrinter com Manuals ...

Страница 494: ...ring the IP Address on the Printer P 496 What You Can Do With RemoteUI With RemoteUI you can access the printer via a network configure network settings and display the current status of the printer various types of information the processing status of jobs etc Starting RemoteUI Start RemoteUI by the following operations 1 Start your Web browser 2 Enter the following URL in Address or Location htt...

Страница 495: ...s are correctly configured Depending on the network environment you may not be able to start RemoteUI Confirm whether System Setup Use RemoteUI is set to On on the Control Panel of the printer Note RemoteUI also offers many other features You can display the ink levels check error messages and other status infor mation and cancel print jobs By factory default the English screen is displayed To cha...

Страница 496: ...ommands P 497 Important If you use a DHCP server for automatic assignment of the printer s IP address printing may no longer be possible after the printer is turned off and on This is because an IP address different from before has been assigned Thus when using DHCP server functions consult your network administrator and configure the settings in one of the follow ing ways Configure the setting fo...

Страница 497: ...or decrease the value continuously Make sure the IP address you enter for the printer is not the same as any computer IP address in your net work 10 Repeat steps 8 and 9 to complete the settings and then press the OK button 11 Press the Menu button If you have changed the settings a confirmation message is dis played Press or to select Yes and then press the OK button Important Be sure to complete...

Страница 498: ...ries to the ARP table for managing IP addresses and corresponding MAC addresses arp s IP address the printer s MAC address you have verified Example arp s xxx xxx xxx xxx 00 1E 8F xx xx xx Note In Mac OS when using Terminal enter the arp command in the format arp s xxx xxx xxx xxx 00 1E 8F xx xx xx For details refer to the help file for the command line 4 Execute the following command to send the ...

Страница 499: ...igure IPv6 StlessAddrs and DHCPv6 from the printer Control Panel Configuring the Printer Driver Destination Windows Configuring the Printer Driver Destination Windows This topic describes how to specify the printer driver destination if the printer s IP address is changed or if you will use the printer over a network connection instead of via USB connection The procedure described below is the con...

Страница 500: ...CP IP Networks P 504 If you switch to printing in a Bonjour network see Configuring the Destination for Bonjour Network P 504 Configuring the Printer s TCP IP Network Settings With RemoteUI Configuring the Printer s TCP IP Network Settings With RemoteUI Follow the steps below to configure the TCP IP network settings When using an IPv4 IP address 1 Start the web browser and enter the following URL ...

Страница 501: ...Name Specify the printer host name up to 63 characters 1 63 characters Use sin gle byte letters numbers and hyphens Do not use numbers or for the first character or for the last character NB 18GBipxxxxxx DNS Domain Name Specify the printer domain name up to 63 characters Use single byte letters numbers hyphens and periods Do not use numbers or for the first character or or for the last character b...

Страница 502: ...lt router address 0 Primary DNS Server Address Specify the IP address of the primary DNS server Secondary DNS Server Address Specify the IP address of the secondary DNS server Use the same host name and domain name as IPv4 Activate when using the same DNS host and domain names as for IPv4 Off DNS Host Name Specify the printer host name up to 63 characters 1 63 charac ters Use single byte letters n...

Страница 503: ...s for DNS servers and DNS domain name in Primary DNS Server Address Secondary DNS Server Address and DNS Domain Name respectively iPF685 Configuring the Printer s TCP IP Network Settings With RemoteUI User s Guide Network Setting Initial Settings 503 Downloaded from ManualsPrinter com Manuals ...

Страница 504: ...uring the Destination for Bonjour Network If you use the printer in a network that uses the Bonjour function register the printer in Print Scan This is identified as Printers Scanners or Print Fax in other versions of Mac OS in the Mac OS System Preferences Note For details on how to register a printer using Bonjour see the OS User Manual Important Bonjour and IP Print Auto do not support printing...

Страница 505: ...e Security group 5 Refer to the table of settings for device information and security as you complete these settings Security setting items are displayed when you click the Change Password button in the Security group Device Information Settings Item Details Default Setting Device Name Enter a device name 0 32 characters blank Location Enter the location where the device is installed 0 32 characte...

Страница 506: ...erts to the Ethernet Driver menu 7 Press or to select Comm Mode and then press the OK button 8 Press or to select the communication mode and then press the OK button The display reverts to the Ethernet Driver menu 9 Press or to select Ethernet Type and then press the OK button 10 Press or to select the Ethernet type and then press the OK button The display reverts to the Ethernet Driver menu 11 Pr...

Страница 507: ...ttings to the default values as follows Important Initializing the network settings will also restore the default value of the printer s IP address As a result the RemoteUI page cannot be displayed in the web browser after this procedure For instructions on reconfiguring the IP address see Configuring the IP Address on the Printer P 496 For details on RemoteUI see Using RemoteUI P 494 1 Start the ...

Страница 508: ... For details refer to the imagePROGRAF Device Setup Utility help Installing imagePROGRAF Device Setup Utility Installing imagePROGRAF Device Setup Utility Install imagePROGRAF Device Setup Utility from the User Software CD ROM provided with the printer as follows 1 Insert the User Software CD ROM in the CD ROM drive 2 On the Setup Menu window click Install Individual Software 3 Click Install in im...

Страница 509: ...ess assigned to the printer and click the Set button 7 Click OK after the Confirmation message is displayed 8 Exit imagePROGRAF Device Setup Utility Note To configure the IP address automatically choose Auto in the Setting IP Address list and select DHCP BOOTP or RARP You can also specify the subnet mask and default gateway iPF685 Configuring the IP Address Using imagePROGRAF Device Setup Utility ...

Страница 510: ...ateless Address Additionally when there is an DHCPv6 compatible server in the network environment select On in DHCPv6 Note When there is no IPv6 compatible router or DHCPv6 compatible server select On in Manual and enter the IPv6 Address and Prefix Length 7 Click Set 8 Click OK after the Confirmation message is displayed 9 Exit imagePROGRAF Device Setup Utility Configuring the IP Address Using ima...

Страница 511: ...etting 491 Print Job Management Status Monitor Windows 512 Printmonitor Mac OS 515 Accounting Windows 517 Basic Print Job Operations 531 Advanced Print Job Operations 553 Adjustments for Better Print Quality 573 Maintenance and Consumables 589 Troubleshooting 627 Error Message 657 Specifications 681 Appendix 685 imagePROGRAF Print Job Management 511 Downloaded from ManualsPrinter com Manuals ...

Страница 512: ...ter error occurs you can investigate the corrective action immediately Printer status can be checked in real time on a computer monitor Displays the ink level of every color in the printer An icon and warning message will notify you when ink levels are low The type of paper loaded in each media source is identified You can also check to see if paper has run out This way the utility enables you to ...

Страница 513: ...ng the Pause button pauses printing of the selected job To resume printing of a paused print job select the print job and click the Resume button Note Once all the print data for a print job has been sent to the printer the job can no longer be paused resumed Canceling Print Jobs Selecting a print job and clicking the Cancel Job button cancels printing of the selected job Note You cannot cancel ot...

Страница 514: ...paper specified by the driver does not match the paper currently loaded in the printer can be changed by using Detect Mismatch in the operation panel menu Refer to Menu Settings P 459 for details Job Management Using imagePROGRAF Status Monitor iPF685 User s Guide Print Job Management Status Monitor Windows 514 Downloaded from ManualsPrinter com Manuals ...

Страница 515: ...ce You can check the status of the hard disk and the documents saved on the hard disk Note If the status of the desired printer is not shown in imagePROGRAF Printmonitor select the printer again as follows 1 Make sure the printer is on and connected to the network or to a local port 2 In the Printer menu select the name of the desired printer After the printer is detected the printer status is sho...

Страница 516: ... Note You cannot cancel other users print jobs Preempting Other Jobs If you select a print job and click the button the selected job is printed ahead of the job that currently pre cedes it in the print queue Printing Held Jobs Printing of the job with a Status of Holding is paused because the paper specified by the driver does not match the paper currently loaded in the printer Use the procedure b...

Страница 517: ... who printed them and when Calculation of the Total Pages Used and the Total Cost This allows you to use the collected print job logs to calculate totals for items such as the number of pages printed the amount of paper used and the printing costs incurred Regular Data Acquisition for Print Jobs Job logs can be automatically collected periodically Exporting Print Job Data This allows you to export...

Страница 518: ...e administrator password can be set or cleared using Chg Admin Pswd Init Admin Pswd in the Admin Menu in the Set Adj Menu in the printer The administrator menu can only be displayed and configured by the administrator Accounting Manager Main Window Accounting Manager Main Window The Accounting Manager main window consists of a title bar menu bar toolbars listed job selection area job list area tot...

Страница 519: ...d see Switching Between Displaying Jobs on Printer and Regularly Acquired Jobs P 527 Job List Area This area lists the details of acquired jobs Displays a list of the jobs in the printers or periodically acquired jobs See Job List Area P 520 Note You can change the items that are displayed and the display order using the Advanced Display Settings dialog box The Advanced Display Settings dialog box...

Страница 520: ...ea The job items and details that can be displayed in the job list area are as follows No The job serial number Job Cost The cost of printing Note If the ink and paper unit costs are not set is displayed Document Name This is the name of the printed document Printing Results OK is displayed when the print process was executed and Cancel is displayed if the print process was not execu ted Media Typ...

Страница 521: ...he job Print Job Start Time Print Time The time when printing started and the time taken to print Number of Pages The number of pages printed Roll Paper Width The width of roll paper used for printing Paper Cost The cost of paper used for printing Note If the paper unit cost is not set is displayed Total Ink Cost The total value of the cost of ink used for printing Note If the ink unit cost is not...

Страница 522: ...7 4 Specify the jobs to be listed For details of how to select the job logs displayed see Switching Between Displaying Jobs on Printer and Regu larly Acquired Jobs P 527 This displays the required print job logs and lists the details Configuring Unit Costs in Accounting Manager Configuring Unit Costs in Accounting Manager Select Unit Costs in the Settings menu to open the Unit Costs dialog box Con...

Страница 523: ...nt Your settings are not applied until you click the OK button To set different unit costs for each ink color 1 Select the ink color to be costed 2 Enter the Tank Capacity and corresponding Price 3 Click the Overwrite button 4 Repeat steps 1 to 3 for all the inks 5 Click the OK button Important Your settings are not applied until you click the OK button iPF685 Setting the Unit Cost for Ink User s ...

Страница 524: ...for the area of the configured width x height 3 Click the Add button To change the unit cost of a media type that has already been configured click the Over write button 4 Click the OK button Important The settings are not applied until you click the OK button Specifying Price by Roll Paper 1 Select the media type in Media Type Setting the Unit Cost for Paper iPF685 User s Guide Print Job Manageme...

Страница 525: ...for each roll paper If the Roll Paper Width is set to the same value as the Width of the paper configured in the standard prices the cost is calculated using the price configured in the Roll Paper Width Settings dialog box The settings are not applied until you click the OK button Setting the Unit Cost for Items Other Than Ink and Paper Setting the Unit Cost for Items Other Than Ink and Paper Open...

Страница 526: ...Units and Display dialog box Use this dialog box to con figure the display settings Date Display Format Use this option to select the display format for dates YYYY indicates the year MM the month and DD the day Currency Unit Enter the currency unit Enter a text string up to 3 characters long 1000 Separator Use this option to select the symbol used as a separator in numbers The symbol is inserted e...

Страница 527: ...n Canceling Regular Print Job Log Acquisition You can use this procedure to cancel the regular acquisition of print job logs from printers 1 Select Regular Data Acquisition in the Settings menu 2 Uncheck the Acquire print job logs regularly option 3 Click the OK button to close the dialog box Switching Between Displaying Jobs on Printer and Regularly Acquired Jobs Switching Between Displaying Jobs...

Страница 528: ... Job Properties or Period Properties You can display the Job properties dialog box or Period Properties dialog box to check detailed cost information and other items The Job properties dialog box displays detailed information about the selected job The Period Properties dialog box displays detailed information within the Regularly Acquired Jobs period Displaying the Job properties Dialog Box Selec...

Страница 529: ...n copy text based information in this dialog box to the clipboard by clicking the Copy button Save Unit Cost Data Select a destination folder using Save Unit Cost Data in the File menu The unit cost data for items such as the selected ink and paper is saved as a file Load Unit Cost Data Selecting Load Unit Cost Data in the File menu loads saved unit cost data Showing the Total Amount of Ink and Pa...

Страница 530: ...der of the amount consumed The total consumption for other media types is shown as Other Showing the Total Amount of Ink and Paper Consumed iPF685 User s Guide Print Job Management Accounting Windows 530 Downloaded from ManualsPrinter com Manuals ...

Страница 531: ...ny errors occur If errors occur in the middle of printing as when paper runs out you can resume printing after clearing the error without resending the print job from a computer Streamline printing work Without using a computer you can select print jobs and print in the desired quantity You can also select multiple print jobs to print during the same period This enables unattended operation at nig...

Страница 532: ...ed mailbox Up to 100 print jobs can be saved here but they will be deleted one after another starting with the oldest job in the following situations If there are more than 100 jobs queued and saved in the shared mailbox combined If no more temporary storage space is available when jobs for which you have selected Print in Output Method in Windows or Send job to in Mac OS are received If there is ...

Страница 533: ... print jobs on the printer s hard disk Windows Free Layout P 202 Color imageRUNNER Enlargement Copy P 225 Preview P 191 Mac OS Free Layout P 319 Color imageRUNNER Enlargement Copy P 344 Preview P 191 Configuring the Printer Driver in Windows 1 Access the Page Setup sheet iPF685 Saving Print Jobs on the Printer Hard Disk User s Guide Print Job Management Basic Print Job Operations 533 Downloaded fr...

Страница 534: ...n prevent degradation of print quality that occurs when receiving a print job is interrupted and printing is aborted in the middle Note Click Acquire Mail Box Name to display personal box names in the Mail box list as acquired from the print er 4 In Name of data to be saved specify how to name saved print jobs To use the file name choose Use file name Otherwise choose Enter name and enter a name i...

Страница 535: ...e to identify saved print jobs Note If printed from Free Layout or Preview the Document title is saved under the name imagePROG RAF 2 Select the personal box number in the Mail box list 3 Click OK to close the Destination dialog box Print after reception is complete This option is available in combination with Print You can prevent degradation of print quality that occurs when receiving a print jo...

Страница 536: ...eted can be deleted from the job queue Preempting other jobs You can preempt other jobs by printing jobs that are currently being received or prepared for processing first Note For information on managing jobs being held see Managing Pending Jobs Printing or Deleting Jobs on Hold P 538 Using the Control Panel 1 On the Tab Selection screen of the Control Panel press or to se lect the Job tab Note I...

Страница 537: ... button 2 Press or to select the job to print first and then press the OK button 3 Press or to select Preempt Jobs and then press the OK button Using RemoteUI Manage jobs as needed on the Print Job page For details refer to the RemoteUI help file Using imagePROGRAF Status Monitor Windows Manage jobs as needed on the Job sheet For details refer to the imagePROGRAF Status Monitor help file iPF685 Ma...

Страница 538: ...age held jobs from the Control Panel imagePROGRAF Status Monitor or imagePROG RAF Printmonitor they will remain in the job queue In this case the printer processes the next job in the queue without pausing To print held jobs replace the loaded paper with the paper specified in the print job See Loading Rolls in the Printer P 375 See Loading Sheets in the Printer P 394 Using the Control Panel 1 On ...

Страница 539: ...Delete Press or to select Yes or No and then press the OK button Using RemoteUI Manage jobs as needed on the Print Job page For details refer to the RemoteUI help file Using imagePROGRAF Status Monitor Manage jobs as needed on the Job sheet For details see Job Management Using imagePROGRAF Status Moni tor P 513 iPF685 Managing Pending Jobs Printing or Deleting Jobs on Hold User s Guide Print Job M...

Страница 540: ...el or in RemoteUI imagePROGRAF Status Monitor and image PROGRAF Printmonitor Using the Control Panel 1 On the Tab Selection screen of the Control Panel press or to se lect the Job tab Note If the Tab Selection screen is not displayed press the Menu button 2 Press the OK button The Job Menu menu is displayed 3 Press or to select Stored Job and then press the OK button Printing Saved Jobs iPF685 Use...

Страница 541: ...elect the saved job and then press the OK button 7 Press or to select Print and then press the OK button 8 Specify the number of copies and press the OK button Using RemoteUI 1 On the Stored Job page choose the box Note Enter a password if one has been set 2 Select the print job and click Resume iPF685 Printing Saved Jobs User s Guide Print Job Management Basic Print Job Operations 541 Downloaded ...

Страница 542: ...ails refer to the RemoteUI help Using imagePROGRAF Status Monitor 1 On the Hard Disk sheet select a box and click Open Note Enter a password if one has been set Printing Saved Jobs iPF685 User s Guide Print Job Management Basic Print Job Operations 542 Downloaded from ManualsPrinter com Manuals ...

Страница 543: ...us print job If you change the value in Copies the printing time indicates the time it took to print one copy during the previous print job multiplied by the number of copies For details refer to the imagePROGRAF Status Monitor help file Using imagePROGRAF Printmonitor 1 On the Hard Disk pane click by Inbox No Name iPF685 Printing Saved Jobs User s Guide Print Job Management Basic Print Job Operat...

Страница 544: ...s refer to the imagePROGRAF Printmonitor help file Deleting Saved Jobs Deleting Saved Jobs Delete saved print jobs stored on the printer s hard disk as follows This operation is available from the Control Panel in RemoteUI imagePROGRAF Status Monitor and imagePROG RAF Printmonitor Deleting Saved Jobs iPF685 User s Guide Print Job Management Basic Print Job Operations 544 Downloaded from ManualsPri...

Страница 545: ...s the OK button Note Enter a password if one has been set and then press the OK button 5 Press or to select Job List and then press the OK button 6 Press or to select the saved job and then press the OK button 7 Press or to select Delete and then press the OK button 8 Press or to select Yes and then press the OK button Using RemoteUI 1 On the Stored Job page choose the mail box Note Enter a passwo...

Страница 546: ... help file Using imagePROGRAF Status Monitor 1 On the Hard Disk sheet select a box and click Open Note Enter a password if one has been set Deleting Saved Jobs iPF685 User s Guide Print Job Management Basic Print Job Operations 546 Downloaded from ManualsPrinter com Manuals ...

Страница 547: ...Monitor help file Using imagePROGRAF Printmonitor 1 In the Hard Disk pane click next to Inbox No Name Note Enter a password if one has been set The password is a four digit number iPF685 Deleting Saved Jobs User s Guide Print Job Management Basic Print Job Operations 547 Downloaded from ManualsPrinter com Manuals ...

Страница 548: ...he shared mailbox This operation is available in RemoteUI imagePROGRAF Status Monitor and imagePROGRAF Printmonitor Important Jobs stored in the shared mailbox may be automatically deleted under some conditions To prevent jobs from being deleted move them from the shared mailbox to personal boxes See Using the Printer Hard Disk P 531 Using RemoteUI 1 On the Stored Job page choose the box Moving Sa...

Страница 549: ...the destination personal box in the Destina tion mail box list and click OK For details refer to the RemoteUI help file Using imagePROGRAF Status Monitor Windows 1 On the Hard Disk sheet select a box and click Open iPF685 Moving Saved Jobs User s Guide Print Job Management Basic Print Job Operations 549 Downloaded from ManualsPrinter com Manuals ...

Страница 550: ... job and click Move 3 In the Move dialog box select the destination personal box and click OK For details refer to the imagePROGRAF Status Monitor help file Moving Saved Jobs iPF685 User s Guide Print Job Management Basic Print Job Operations 550 Downloaded from ManualsPrinter com Manuals ...

Страница 551: ...next to Inbox No Name Note Enter a password if one has been set The password is a four digit number 2 Select the print job and click Move iPF685 Moving Saved Jobs User s Guide Print Job Management Basic Print Job Operations 551 Downloaded from ManualsPrinter com Manuals ...

Страница 552: ...ct the destina tion personal box and click OK For details refer to the imagePROGRAF Printmonitor help file Moving Saved Jobs iPF685 User s Guide Print Job Management Basic Print Job Operations 552 Downloaded from ManualsPrinter com Manuals ...

Страница 553: ...he Output Method and Print After Recv settings in the Control Panel menu Note Contact the software or system developer for information about support for this printer function Specifying Output Method In Output Method specify how to manage jobs regarding printing and saving them Print Save print jobs automatically at the same time they are printed This is the default format Print Auto Del Save prin...

Страница 554: ...1 in Output Method 1 On the Tab Selection screen of the Control Panel press or to se lect the Settings Adj tab Note If the Tab Selection screen is not displayed press the Menu button 2 Press the OK button The Set Adj Menu is displayed 3 Press or to select System Setup and then press the OK button 4 Press or to select Print After Recv and then press the OK button 5 Press or to select On or Off and ...

Страница 555: ...em 5 Press or to select Off and then press the OK button Setting Passwords for Personal Boxes Setting Passwords for Personal Boxes For greater security you can specify a password for personal boxes After you set a password it will be required to modify the personal box settings as well as to display print delete move and modify jobs saved in the personal box This operation is available in RemoteUI...

Страница 556: ... digits in the range 0001 9999 Confirmation Number Re enter the password to confirm it For details refer to the RemoteUI help Using imagePROGRAF Status Monitor Windows 1 On the Hard Disk sheet select the personal box and click Open Setting Passwords for Personal Boxes iPF685 User s Guide Print Job Management Advanced Print Job Operations 556 Downloaded from ManualsPrinter com Manuals ...

Страница 557: ...nge 0001 9999 Re enter to confirm Re enter the password to confirm it For details refer to the imagePROGRAF Status Monitor help file Using imagePROGRAF Printmonitor Mac OS 1 On the Hard Disk pane click by Inbox No Name Select a saved job in the list and click Set iPF685 Setting Passwords for Personal Boxes User s Guide Print Job Management Advanced Print Job Operations 557 Downloaded from ManualsP...

Страница 558: ...elp file Naming Personal Boxes Naming Personal Boxes For easier identification you can assign names to personal boxes This operation is available in RemoteUI imagePROGRAF Status Monitor and imagePROGRAF Printmonitor Using RemoteUI 1 On the Stored Job page choose the personal box Note Enter a password if one has been set for the personal box Naming Personal Boxes iPF685 User s Guide Print Job Manag...

Страница 559: ...RemoteUI help file Using imagePROGRAF Status Monitor Windows 1 On the Hard Disk sheet select the personal box and click Open Note Enter a password if one has been set for the personal box iPF685 Naming Personal Boxes User s Guide Print Job Management Advanced Print Job Operations 559 Downloaded from ManualsPrinter com Manuals ...

Страница 560: ... to the imagePROGRAF Status Monitor help file Using imagePROGRAF Printmonitor Mac OS 1 In the Hard Disk pane click next to Inbox No Name Select a saved job in the list and click Set Naming Personal Boxes iPF685 User s Guide Print Job Management Advanced Print Job Operations 560 Downloaded from ManualsPrinter com Manuals ...

Страница 561: ...erations are available from the Control Panel or in RemoteUI imagePROGRAF Status Monitor and image PROGRAF Printmonitor Using the Control Panel 1 On the Tab Selection screen of the Control Panel press or to se lect the Job tab Note If the Tab Selection screen is not displayed press the Menu button 2 Press the OK button The Job Menu is displayed 3 Press or to select Stored Job and then press the OK...

Страница 562: ...r to select Job List and then press the OK button Using RemoteUI On the Stored Job page choose the box Note Enter a password if one has been set Jobs saved in the box are listed For details refer to the RemoteUI help Displaying a List of Saved Jobs iPF685 User s Guide Print Job Management Advanced Print Job Operations 562 Downloaded from ManualsPrinter com Manuals ...

Страница 563: ... password if one has been set Jobs saved in that box are displayed in the Documents dialog box For details refer to the imagePROGRAF Status Monitor help file iPF685 Displaying a List of Saved Jobs User s Guide Print Job Management Advanced Print Job Operations 563 Downloaded from ManualsPrinter com Manuals ...

Страница 564: ...st of Saved Jobs The list of print jobs stored on the printer s hard disk saved jobs can be printed by box as follows 1 On the Tab Selection screen of the Control Panel press or to se lect the Job tab Note If the Tab Selection screen is not displayed press the Menu button 2 Press the OK button The Job Menu is displayed Printing a List of Saved Jobs iPF685 User s Guide Print Job Management Advanced...

Страница 565: ... Displaying Details of Saved Jobs Details of print jobs stored on the printer s hard disk saved jobs can be displayed as follows This operation is available in RemoteUI imagePROGRAF Status Monitor and imagePROGRAF Printmonitor Using RemoteUI 1 On the Stored Job page choose the box Note Enter a password if one has been set 2 Select the print job and click Details iPF685 Displaying Details of Saved ...

Страница 566: ... file Using imagePROGRAF Status Monitor Windows 1 On the Hard Disk sheet select a box and click Open Note Enter a password if one has been set Displaying Details of Saved Jobs iPF685 User s Guide Print Job Management Advanced Print Job Operations 566 Downloaded from ManualsPrinter com Manuals ...

Страница 567: ...yed For details refer to the imagePROGRAF Status Monitor help file Using imagePROGRAF Printmonitor Mac OS 1 In the Hard Disk pane click next to Inbox No Name iPF685 Displaying Details of Saved Jobs User s Guide Print Job Management Advanced Print Job Operations 567 Downloaded from ManualsPrinter com Manuals ...

Страница 568: ...rd disk saved jobs can be renamed as follows This operation is available in RemoteUI imagePROGRAF Status Monitor and imagePROGRAF Printmonitor Using RemoteUI 1 On the Stored Job page choose the box Note Enter a password if one has been set 2 Select the print job and click Details Renaming Saved Jobs iPF685 User s Guide Print Job Management Advanced Print Job Operations 568 Downloaded from ManualsP...

Страница 569: ... click OK For details refer to the RemoteUI help file Using imagePROGRAF Status Monitor Windows 1 On the Hard Disk sheet select a box and click Open Note Enter a password if one has been set iPF685 Renaming Saved Jobs User s Guide Print Job Management Advanced Print Job Operations 569 Downloaded from ManualsPrinter com Manuals ...

Страница 570: ... new name and click OK For details refer to the imagePROGRAF Status Monitor help file Using imagePROGRAF Printmonitor Mac OS 1 In the Hard Disk pane click next to Inbox No Name Renaming Saved Jobs iPF685 User s Guide Print Job Management Advanced Print Job Operations 570 Downloaded from ManualsPrinter com Manuals ...

Страница 571: ... the print job and click Set 3 In the Settings dialog box enter the new name and click OK For details refer to the imagePROGRAF Printmonitor help file iPF685 Renaming Saved Jobs User s Guide Print Job Management Advanced Print Job Operations 571 Downloaded from ManualsPrinter com Manuals ...

Страница 572: ...iPF685 User s Guide 572 Downloaded from ManualsPrinter com Manuals ...

Страница 573: ... 437 Printer Parts 477 Network Setting 491 Print Job Management 511 Adjustments for Better Print Quality Adjusting the Printhead 574 Adjusting the feed amount 581 Maintenance and Consumables 589 Troubleshooting 627 Error Message 657 Specifications 681 Appendix 685 imagePROGRAF Adjustments for Better Print Quality 573 Downloaded from ManualsPrinter com Manuals ...

Страница 574: ...of the printhead Even slight misalignment can be corrected See Adjusting Line Misalignment P 577 Paper rubs against the printhead or image edges are blurred Executing Head Height to adjust the printhead height may improve printing results See Troubleshooting Paper Abrasion and Blurry Images P 580 Automatic Adjustment to Straighten Lines and Colors Automatic Adjustment to Straighten Lines and Color...

Страница 575: ...ded paper matches the settings 2 On the Tab Selection screen of the Control Panel press or to se lect the Settings Adj tab Note If the Tab Selection screen is not displayed press the Menu button 3 Press the OK button The Set Adj Menu is displayed 4 Press or to select Adjust Printer and then press the OK button 5 Press or to select Head Posi Adj and then press the OK button 6 Press or to select Aut...

Страница 576: ...ded paper matches the settings 2 On the Tab Selection screen of the Control Panel press or to se lect the Settings Adj tab Note If the Tab Selection screen is not displayed press the Menu button 3 Press the OK button The Set Adj Menu is displayed 4 Press or to select Adjust Printer and then press the OK button 5 Press or to select Head Posi Adj and then press the OK button 6 Press or to select Man...

Страница 577: ...tered and adjustment is complete Adjusting Line Misalignment Adjusting Line Misalignment If printed lines are misaligned execute Head Inc Adj to adjust the angle of inclination of the Printhead Executing Head Inc Adj requires you to examine a printed test pattern and enter an adjustment value Paper to Prepare Rolls An unused roll at least 10 inches wide Sheets One sheet of unused paper of at least...

Страница 578: ... Printer and then press the OK button 5 Press or to select Head Inc Adj and then press the OK button After the Carriage is moved a message is displayed requesting you to open the Top Cover 6 Open the Top Cover 7 Align the Angle Adjustment Lever with the red square and close the Top Cover Adjusting Line Misalignment iPF685 User s Guide Adjustments for Better Print Quality Adjusting the Printhead 57...

Страница 579: ...r and move the Angle Adjustment Lever to match the number or the square of the straightest set of lines If no single set of lines is perfectly straight move the Angle Ad justment Lever to a position between the numbers or between the number and the square of the two sets of lines that are least misaligned 10 Close the Top Cover The Printhead is now straight and adjustment is complete iPF685 Adjust...

Страница 580: ...ss the Menu button 2 Press the OK button The Paper Menu is displayed 3 Press or to select Paper Details and then press the OK button 4 Press or to select the type of paper and then press the OK button Note When Head Height is set to Automatic the setting value selected for the previous print job is displayed to the right of Automatic once you select the type of paper currently supplied However the...

Страница 581: ...of adjusting the amount paper is fed are set in Adj Priority Adjust Adj Priority to suit your particular printing application Print Quality Adjusts the feed amount to reduce banding across the sheet in printed documents Adj Quality settings are applied When Adj Fine Feed is executed the Adj Fine Feed settings are applied in addition to the Adj Quality settings Print Length Adjusts the feed amount ...

Страница 582: ... then press the OK button Automatic Banding Adjustment Automatic Banding Adjustment If printed images are affected by banding in different colors across the sheet execute Adj Quality for automatic ad justment of the paper feed amount There are two modes of automatic adjustment to correct banding Auto GenuinePpr and Auto OtherPaper In either mode the printer prints and reads a test pattern for auto...

Страница 583: ...ze or one sheet when using A2 Perform adjustment as follows 1 Load the paper Attaching the Roll Holder to Rolls P 372 Loading Rolls in the Printer P 375 Loading Sheets in the Printer P 394 Note Always make sure the loaded paper matches the type of paper specified Adjustment cannot be completed correctly unless the loaded paper matches the settings 2 On the Tab Selection screen of the Control Panel...

Страница 584: ... Feed See Fine Tuning the Paper Feed Amount P 585 Use Adjust Length to ensure that lines in CAD drawings are printed at exactly the right length See Adjusting Line Length P 586 Paper to Prepare When Using Rolls An unused roll at least 10 inches wide When Using Sheets Two sheets of unused paper of at least A4 Letter size Perform adjustment as follows 1 Load the paper Attaching the Roll Holder to Ro...

Страница 585: ...attern B for adjustment Determine the pattern in which banding is least noticeable 11 Press or to select the pattern number you have decided and then press the OK button The adjustment value is now registered and adjustment is complete Fine Tuning the Paper Feed Amount Fine Tuning the Paper Feed Amount If the contrast is uneven or banding in different colors appears at 50 mm 2 0 in intervals in pr...

Страница 586: ...Print and Change Settings A High or B Standard Draft Choose the mode that suits your particular printing application A High This setting is applied when Highest or High is selected in Print Quality in the printer driver B Standard Draft This setting is applied when Standard or Fast is selected in Print Quality in the printer driver Note Always check the Adj Priority values before using Adjust Leng...

Страница 587: ...justment hold down the Stop button When Stop printing is dis played press or to select Yes and then press the OK button 8 Press or to enter the amount of discrepancy and then press the OK button If the scale is shorter than the actual size use a positive setting value If it is longer use a negative value The feed amount can be adjusted in 0 02 increments Adjusting the Vacuum Strength Adjusting the...

Страница 588: ...ob is displayed to the right of Automatic once you select the type of paper currently supplied However the value is cleared when the printer is turned off or the pa per is replaced 5 Press or to select VacuumStrngth and then press the OK button 6 Press or to select the desired setting value and then press the OK button Adjusting the Vacuum Strength iPF685 User s Guide Adjustments for Better Print ...

Страница 589: ...s 477 Network Setting 491 Print Job Management 511 Adjustments for Better Print Quality 573 Maintenance and Consumables Ink Tanks 590 Printheads 599 Maintenance Cartridge 608 Cleaning the Printer 614 Other Maintenance 618 Troubleshooting 627 Error Message 657 Specifications 681 Appendix 685 imagePROGRAF Maintenance and Consumables 589 Downloaded from ManualsPrinter com Manuals ...

Страница 590: ...city Matte black PFI 207MBK Pigment ink 300 ml 10 2 fl oz Black PFI 207BK Dye ink Cyan PFI 207C Magenta PFI 207M Yellow PFI 207Y Note For instructions on Ink Tank replacement see Replacing Ink Tanks P 590 Replacing Ink Tanks Replacing Ink Tanks Compatible ink tanks For information on the compatible ink tanks for this printer see Ink Tanks P 590 Replacement ink tanks in 130 ml 4 4 fl oz and 300 ml ...

Страница 591: ...ink tanks installed for extended periods a month or more Residual ink may become clogged inside the printer and affect printing quality Confirm the message When the ink level becomes low a message is displayed on the Display Screen According to the message replace the ink tank or prepare a new ink tank See When to Replace Ink Tanks P 596 If a message requests you to replace an Ink Tank press the O...

Страница 592: ...nk and then press the OK button A message on the Display Screen requests you to open the Ink Tank Cover Remove the Ink Tank 1 Open the Ink Tank Cover and check the ink lamps Ink lamps flash when there is little ink left 2 Press the tip of the Ink Tank Lock Lever of the color for replacement horizontally and pull the Ink Tank Lock Lever up to open it Replacing Ink Tanks iPF685 User s Guide Maintena...

Страница 593: ... Note Dispose of used ink tanks according to local regulations Installing Ink Tanks 1 Before opening the pouch gently agitate the Ink Tank once or twice Agitate the ink in the Ink Tank by slowly rotating the Ink Tank up side down and right side up repeatedly Important After installing an ink tank do not remove and shake it Doing so may cause the ink to leak out If you do not agitate the Ink Tank t...

Страница 594: ...lled in the holder if the color or orienta tion is incorrect If the Ink Tank does not fit in the holder do not force it in Check the Ink Tank serial number the Ink Color Label the color of the Ink Tank and the orientation of the Ink Tank before reinstalling it Forcing the Ink Tank into the holder may damage the printer 4 Push the Ink Tank Lock Lever closed until it clicks into place Replacing Ink ...

Страница 595: ... rotating part of the Ink Tank Lock Lever come out of place If this happens open the Ink Tank Lock Lever to return it to the proper position 5 Make sure the Ink Lamp is lit in red Note If the Ink Lamp is not lit reinstall the tank 6 Close the Ink Tank Cover iPF685 Replacing Ink Tanks User s Guide Maintenance and Consumables Ink Tanks 595 Downloaded from ManualsPrinter com Manuals ...

Страница 596: ...s left and if you have deactivated ink level detection The remaining ink level is indicated as shown below If the Display Screen indicates to replace the Ink Tank replace the Ink Tank If a message is displayed indicating to check the remaining ink levels or after tasks that consume a lot of ink such as large format printing or head cleaning check the remaining levels and replace Ink Tank as needed...

Страница 597: ...t Attach the Ink Tank Cover to the printer Attach the Ink Tank Cover to the printer If too much force is applied to the Ink Tank Cover while it is open Ink Tank Cover may become detached from the printer If the Ink Tank Cover has become detached from the printer attach it using the following procedure Note Although the attachment procedure describes the Ink Tank Cover on the right side of the prin...

Страница 598: ...e it on the printer 4 Push down on the near side of the Ink Tank Cover from the top until it clicks 5 Open the Ink Tank Cover and check that it is attached to the printer Attach the Ink Tank Cover to the printer iPF685 User s Guide Maintenance and Consumables Ink Tanks 598 Downloaded from ManualsPrinter com Manuals ...

Страница 599: ...test pattern to check the nozzles Note Nozzles are periodically checked to ensure they are clear Configure the settings on the Control Panel menu in Nozzle Check See Menu Settings P 459 Paper to Prepare When Using Rolls An unused roll at least 254 0 mm 10 00 in wide When Using Sheets One sheet of unused paper of at least A4 Letter size 1 Load paper Attaching the Roll Holder to Rolls P 372 Loading ...

Страница 600: ...ing is faint cleaning the Printhead may improve results Choose one of two Printhead cleaning modes Head Cleaning A or Head Cleaning B depending on the problem to resolve Head Cleaning A Use this mode if printing is faint or contains foreign substances This method of cleaning consumes the least amount of ink It takes about three minutes to complete Head Cleaning B Use this mode if no ink is ejected...

Страница 601: ...Screen indicates Open top cover and replace the printhead If your Canon dealer has advised you to replace the Printhead Compatible printheads For information on compatible printheads see Printhead P 599 Precautions when handling the Printhead Take the following precautions when handling the Printhead Caution For safety keep the Printhead out of the reach of children If ink is accidentally ingested...

Страница 602: ...u is displayed 3 Press or to select Maintenance and then press the OK button 4 Press or to select Replace P head and then press the OK button Ink begins being drawn in When it finishes instructions are displayed on the Display Screen It takes about two minutes to complete Replace the Printhead 1 Open the Top Cover Instructions are now shown on the Display Screen regarding Print head replacement Im...

Страница 603: ...o wipe it clean Important Do not touch the Linear Scale a or Carriage Shaft b Touching these parts may damage them Never touch the metal contacts of the Carriage This may damage the printer iPF685 Replacing the Printhead User s Guide Maintenance and Consumables Printheads 603 Downloaded from ManualsPrinter com Manuals ...

Страница 604: ...rinthead Fixer Cover to open it completely 5 Remove the Printhead and press the OK button Note Dispose of the used Printhead in accordance with local regulations Replacing the Printhead iPF685 User s Guide Maintenance and Consumables Printheads 604 Downloaded from ManualsPrinter com Manuals ...

Страница 605: ...nozzles Be careful not to touch these surfaces when removing the caps The Printhead contains ink to protect the nozzles We recommend removing Protective Part b as you hold it over the Printhead package or safely out of the way to avoid spilling ink and staining your clothes or the surrounding area If ink accidentally spills wipe off the ink with a dry cloth If you need to put a Printhead somewhere...

Страница 606: ...down toward the front to lock the Printhead in place 10 Push the Printhead Fixer Lever toward the back of the printer until it clicks 11 Close the Top Cover Ink now fills the system It takes about seven minutes to com plete Important While ink is being filled definitely do not remove the Ink Tank or Maintenance Cartridge Ink may leak out Replacing the Printhead iPF685 User s Guide Maintenance and ...

Страница 607: ...e Menu Settings P 459 In this case follow the instructions on the Display Screen for Printhead adjustment If Rep P head Print is Off perform Head Posi Adj Auto Advanced yourself See Automatic Adjust ment to Straighten Lines and Colors P 574 iPF685 Replacing the Printhead User s Guide Maintenance and Consumables Printheads 607 Downloaded from ManualsPrinter com Manuals ...

Страница 608: ...the Maintenance Cartridge out of the reach of children If ink is accidentally ingested contact a physician immediately Important Do not remove the Maintenance Cartridge except to replace it Ink may leak out Do not remove an Maintenance Cartridge during initialization immediately after turning on the printer during Printhead cleaning while ink is being drawn out or during initialization immediately...

Страница 609: ...tenance Cartridge Access the menu for Maintenance Cartridge replacement 1 On the Tab Selection screen of the Control Panel press or to se lect the Settings Adj tab Note If the Tab Selection screen is not displayed press the Menu button 2 Press the OK button The Set Adj Menu is displayed 3 Press or to select Maintenance and then press the OK button 4 Press or to select Repl maint cart and then pres...

Страница 610: ...ce Cartridge 2 At this point open the Maintenance Cartridge Cover 3 Hold the used Maintenance Cartridge by the grip a with one hand and put your other hand under the Maintenance Car tridge to hold it firmly on the bottom keeping it level as you pull it out Replacing the Maintenance Cartridge iPF685 User s Guide Maintenance and Consumables Maintenance Cartridge 610 Downloaded from ManualsPrinter co...

Страница 611: ...e Maintenance Cartridge is right side up put it in the box with the packaging material attached and store it so that it stays level Important Always put the used Maintenance Cartridge back in the box and store the box on a flat surface Also seal the zipper thoroughly Otherwise ink may leak and cause stains Note Put the used Maintenance Cartridge in the plastic bag of the new cartridge and dispose ...

Страница 612: ...cking the Maintenance Cartridge capacity shown on the Display Screen To check remaining Maintenance Cartridge capacity access the Tab Selection screen on the Control Panel and press or to select the Settings Adj tab Note If the Tab Selection screen is not displayed press the Menu button If the Display Screen indicates to replace the Maintenance Cartridge replace the Maintenance Cartridge If a mess...

Страница 613: ...ead cleaning Printhead replacement and preparations to transfer the printer deplete much of the Maintenance Cartridge capacity In particular preparing to move the printer depletes a lot of the capacity Check the remaining Maintenance Cartridge capacity before this maintenance and replace the Maintenance Cartridge if necessary If a message for the Maintenance Cartridge replacement is shown on the D...

Страница 614: ...into contact with electrical components inside the printer there is a risk of fire or electrical shock Important If the Ejection Guide is dirty it may soil the edge of the paper when the paper is cut We recommend clean ing the Ejection Guide even if it does not appear dirty because it may actually be covered with paper dust 4 Plug the power cord into the outlet Cleaning Inside the Top Cover Cleani...

Страница 615: ... paper dust Printing on adhesive paper may leave adhesive on the Platen Paper Retainer or other parts To prevent paper jams we recommend cleaning inside the Top Cover after printing 1 Open the Top Cover 2 If paper dust has accumulated in the Vacuum holes a on the Platen or in the Borderless Printing Ink Grooves b use the Cleaning Brush c provided with the print er to wipe it away Note If the Clean...

Страница 616: ...tances come into contact with electrical components inside the printer there is a risk of fire or electrical shock Important Do not use a dry cloth to wipe inside the Top Cover This may create a static charge which may attract dust and affect the printing quality Do not touch the Linear Scale a or Carriage Shaft b This may stain your hands and damage the printer Cleaning Inside the Top Cover iPF68...

Страница 617: ...a damp cloth that you have wrung out completely to wipe over the Output Tray and along grooves 4 Close the Top Cover iPF685 Cleaning Inside the Top Cover User s Guide Maintenance and Consumables Cleaning the Printer 617 Downloaded from ManualsPrinter com Manuals ...

Страница 618: ...ace See Checking the Remaining Maintenance Cartridge Capacity P 612 Depending on the state of the printer part replacement may be necessary when preparing to transfer the printer that is when you execute the printer menu item to prepare for transfer Remove paper 1 Remove the paper Rolls See Removing the Roll from the Printer P 380 Sheets See Removing Sheets P 399 Access the Prep MovePrinter menu 1...

Страница 619: ... except when the message for replacing it is displayed If you remove the Maintenance Cartridge while ink is being drawn out the ink may leak out If consumables must be replaced the message Consumables must be replaced Call for service is shown on the Display Screen and preparation is not possible If this message is displayed press the OK button and contact your Canon dealer for assistance Remove t...

Страница 620: ...e Maintenance Cartridge Important Do not remove the Maintenance Cartridge except when the message for replacing it is displayed If you remove the Maintenance Cartridge while ink is being drawn out the ink may leak out 7 When the processing is complete Completed Turn Power Off is displayed Press the Power button to turn the power off Preparing to Transfer the Printer iPF685 User s Guide Maintenance...

Страница 621: ...it was attached to the printer 4 Disassemble and repackage the Stand by following the installation procedure in reverse 5 Repack the Roll Holder Holder Stopper and printer in shipping materials and then package them in a shipping box Reinstalling the Printer Reinstalling the Printer The basic workflow for reinstalling the printer is as follows For detailed instructions see the Setup Guide Assemble...

Страница 622: ...upport rod to the position shown a and unlock all four cas ters Moving the stand with the support rod lowered or the casters locked may cause injury or damage the area of installation or basket cloth Install the printer 1 Install the printer on a table or other flat surface If you will use the printer on an optional Stand assem ble the Stand before mounting the printer on it and then secure it wit...

Страница 623: ... casters of the Stand Attempting to place the printer on the Stand while the casters are not locked poses a risk of injury 2 Remove tape and packaging material attached to the printer 3 Connect the power cord to the Power Supply Connector on the right side of the printer 4 Plug the power cord into the outlet 5 Press the power button to turn the printer on Instructions are displayed on the Display ...

Страница 624: ... software Note that the driver installation procedure varies depending on the type of connection Important When the printer is connected to a network via TCP IP the printer s IP address may be changed if you reinstall the printer In this case be sure to reconfigure the printer s IP address Reinstalling the Printer iPF685 User s Guide Maintenance and Consumables Other Maintenance 624 Downloaded fro...

Страница 625: ...nu is displayed 3 Press or to select Printer Info and then press the OK button 4 Press or to select System Info and then press the OK button The firmware version is displayed Updating the Firmware To obtain the latest firmware visit the Canon website If the firmware available online is newer than the installed firm ware update the printer firmware For details on downloading and updating the firmwa...

Страница 626: ...iPF685 User s Guide 626 Downloaded from ManualsPrinter com Manuals ...

Страница 627: ...int Quality 573 Maintenance and Consumables 589 Troubleshooting Frequently Asked Questions 628 Problems Regarding Paper 629 Printing does not start 639 The printer stops during a print job 640 Problems with the printing quality 641 Cannot print over a network 648 Installation problems 649 HP GL 2 problems 651 Other problems 653 Error Message 657 Specifications 681 Appendix 685 imagePROGRAF Trouble...

Страница 628: ...printer See Specifying the Ink Drying Time for Rolls P 385 See Menu Structure P 452 How do I print without borders When printing on rolls you can perform borderless printing by configuring the printer driver when printing on cut sheets you cannot perform borderless printing See Borderless Printing on Paper of Equivalent Size P 87 See Borderless Printing by Resizing Originals to Fit the Roll Width ...

Страница 629: ... on the leading edge is left 638 The size of clear film cannot be detected 638 Roll Paper is Continuously Ejected 638 Clearing Jammed Roll Paper Clearing Jammed Roll Paper If paper from a roll becomes jammed Paper jam is shown on the Display Screen of the Control Panel Remove the jammed paper as follows 1 Positioning your hands as shown open the Roll Cover iPF685 Clearing Jammed Roll Paper User s ...

Страница 630: ...printer 3 Push the Release Lever back 4 Remove the jammed paper If paper is jammed inside the Top Cover 1 Open the Top Cover and move the Carriage to the left or right side manually away from the jam Clearing Jammed Roll Paper iPF685 User s Guide Troubleshooting Problems Regarding Paper 630 Downloaded from ManualsPrinter com Manuals ...

Страница 631: ...over Important Do not touch the Linear Scale a or Carriage Shaft b This may stain your hands and damage the printer If paper from a roll is jammed by the Paper Feed Slot Remove the jammed paper from the Paper Feed Slot After removing the paper make sure there are no other scraps of paper in the printer iPF685 Clearing Jammed Roll Paper User s Guide Troubleshooting Problems Regarding Paper 631 Down...

Страница 632: ...inter 5 Pull the Release Lever forward Clearing a Jammed Sheet Clearing a Jammed Sheet If a sheet becomes jammed Paper jam is shown on the Display Screen of the Control Panel Remove the jammed paper as follows 1 Push the Release Lever back Clearing a Jammed Sheet iPF685 User s Guide Troubleshooting Problems Regarding Paper 632 Downloaded from ManualsPrinter com Manuals ...

Страница 633: ...rtant Do not move the Carriage over jammed paper This may damage the Printhead 2 Clear any jammed paper from inside the Top Cover After removing the paper make sure there are no other scraps of paper in the printer 3 Close the Top Cover iPF685 Clearing a Jammed Sheet User s Guide Troubleshooting Problems Regarding Paper 633 Downloaded from ManualsPrinter com Manuals ...

Страница 634: ...ed Slot After removing the paper make sure there are no other scraps of paper in the printer If the paper is jammed by the Ejection Guide Remove the jammed paper from the Output Tray After removing the paper make sure there are no other scraps of paper in the printer Clearing a Jammed Sheet iPF685 User s Guide Troubleshooting Problems Regarding Paper 634 Downloaded from ManualsPrinter com Manuals ...

Страница 635: ...o remove any scraps left in the Paper Feed Slot after you clear jammed sheets or roll paper 1 Turn the printer off See Turning the Printer On and Off P 17 2 Push the Release Lever back iPF685 Clearing Jammed Paper Paper Feed Slot User s Guide Troubleshooting Problems Regarding Paper 635 Downloaded from ManualsPrinter com Manuals ...

Страница 636: ...rap out toward the Platen 5 Remove the scrap when it is pushed out onto the Platen 6 If any scraps remain inside the paper feed slot repeat steps 4 and 5 7 Holding it at the positions indicated close the Roll Cover Clearing Jammed Paper Paper Feed Slot iPF685 User s Guide Troubleshooting Problems Regarding Paper 636 Downloaded from ManualsPrinter com Manuals ...

Страница 637: ...rol Panel menu and use scissors or a cutting tool to cut the roll after printing See Specifying the Cutting Method for Rolls P 388 Cut Speed is not configured correctly in the Con trol Panel menu Change the Cut Speed setting in the Control Panel menu See Menu Structure P 452 During cutting printed documents fall out at an angle In the Control Panel menu set Cutting Mode to Eject Hold documents aft...

Страница 638: ... entire Platen See Cleaning Inside the Top Cover P 614 Roll Paper is Continuously Ejected Roll Paper is Continuously Ejected Cause Corrective Action Although sheets are se lected as the paper source a roll was ad vanced After roll ejection stops follow these steps to reload the roll 1 Push the Release Lever back 2 Open the Roll Cover 3 Using both hands rotate the Roll Holder toward the back to rew...

Страница 639: ... Scanners or Print Fax in other versions of Mac OS 2 Select the printer and then Resume Printer or Resume in the Printers menu to restart the print job The printer does not respond even if print jobs are sent The printer does not respond even if print jobs are sent Cause Corrective Action In the Control Panel menu Pause Print is On Set Pause Print to Off See Pausing Printing P 29 In the Control Pa...

Страница 640: ... edge of the roll paper was cut to straighten it The leading edge of rolls may be cut to straighten it if Trim Edge First is set to a value other than Off in the Control Panel menu See Cutting the Leading Edge of Roll Paper Automatically P 391 The Printhead nozzles are clogged Print a test pattern to check the nozzles and make sure the Printhead is in good condi tion for printing See Checking for ...

Страница 641: ... the jammed piece of paper inside the Top Cover 1 Open the Top Cover and make sure the Carriage is not over the Platen 2 Remove any scraps of paper inside the Top Cover See Clearing Jammed Roll Paper P 629 See Clearing a Jammed Sheet P 632 3 Close the Top Cover The ink was not dry when paper was cut Specify a longer drying period in the Control Panel menu in Paper Details Roll DryingTime See Menu ...

Страница 642: ... have loaded does not match the type selected on the Control Panel Be sure to select the correct type of paper in the Control Panel menu when loading paper See Loading Rolls in the Printer P 375 See Loading Sheets in the Printer P 394 The edges of the paper are dirty The edges of the paper are dirty Cause Corrective Action The Platen has become dirty after bor derless printing or printing on small...

Страница 643: ...over and clean the Platen See Cleaning Inside the Top Cover P 614 The Platen has become soiled because you have set Width Detection to Off in the Control Panel menu Set Width Detection to On in the Control Panel menu and then open the Top Cover and clean the Platen See Cleaning Inside the Top Cover P 614 Open the Top Cover and clean the Platen After this manually advance the roll onto the Platen b...

Страница 644: ...ting quality is lower See Giving Priority to Particular Graphic Elements and Colors for Printing P 58 The type of paper specified in the printer driver does not match the type loaded in the printer Load paper of the same type as you have specified in the printer driver See Loading Rolls in the Printer P 375 See Loading Sheets in the Printer P 394 Make sure the same type of paper is specified in th...

Страница 645: ... uneven 110 140 mm from the leading edge The position varies depending on the Print Quality setting In this case select Scan Wait Time Area Entire area However note that printing will now take longer See Menu Settings P 459 Image edges are blurred or white banding occurs Image edges are blurred or white banding occurs Cause Corrective Action The Platen suction is too strong In the Control Panel me...

Страница 646: ...e Cause Corrective Action In the Advanced Settings of the printer driver Mono chrome Monochrome BK ink or Monochrome Bitmap is specified in Color Mode In the Advanced Settings of the printer driver specify Color in Color Mode and try printing again The Printhead nozzles are clogged Print a test pattern to check the color ink nozzles and see if they are clogged See Checking for Nozzle Clogging P 59...

Страница 647: ...es not match the type loaded in the printer Load paper of the same type as you have specified in the printer driver See Loading Rolls in the Printer P 375 See Loading Sheets in the Printer P 394 Make sure the same type of paper is specified in the printer driver as you have loaded in the printer 1 Press the Stop button and stop printing 2 Change the type of paper in the printer driver and try prin...

Страница 648: ... the communication mode in use See Configuring the Communication Mode Manually P 506 Cannot print over a TCP IP network Cannot print over a TCP IP network Cause Corrective Action The printer s IP address is not configured cor rectly Make sure the printer s IP address is configured correctly See Configuring the IP Address Using imagePROGRAF Device Setup Utility P 508 See Configuring the IP Address ...

Страница 649: ...isplay the Delete Printer window 2 Select the printer in the list and click Delete 3 Click Yes after the Warning message is displayed 4 Make sure that the printer has been removed from the list and then click Exit Removing imagePROGRAF Status Monitor Windows Remove imagePROGRAF Status Monitor as follows Note The following procedure is for Windows 7 The method of removing printer drivers varies dep...

Страница 650: ...e Setup Utility to start the wizard 2 In the wizard window click Delete and then click Next 3 Follow the instructions on the screen to remove imagePROGRAF Device Setup Utility Removing Installed Printer Drivers iPF685 User s Guide Troubleshooting Installation problems 650 Downloaded from ManualsPrinter com Manuals ...

Страница 651: ...not supported by this printer was received Check the print job and settings The printer has received print data that includes HP RTL commands when Auto Rotate is On in the Control Panel menu In the Control Panel set Auto Rotate to Off and print again See Menu Settings P 459 The plotter origin is incorrect Set Detect img size to Command priority or Detected size in the Control Panel menu See Menu S...

Страница 652: ...are printed at maximum size even if a standard size is specified Cause Corrective Action The page size of the HP GL 2 print job as created in the source application is incorrect Set Detect img size to Command priority or Detected size in the Con trol Panel menu See Menu Settings P 459 Set Conserve Paper to On in the Control Panel menu See Menu Settings P 459 HP GL 2 printing takes a long time HP G...

Страница 653: ...Cause Corrective Action The printer is unplugged Plug the power cord into the outlet and then turn on the printer The specified voltage is not supplied Check the voltage of the outlet and breaker See Specifications P 682 The printer takes time to start up The printer takes time to start up Cause Corrective Action The printer may have shut down incorrectly last time This may happen after power outa...

Страница 654: ...ge are not cleared Messages advising to check the maintenance cartridge are not cleared Cause Corrective Action The printer has not detected the new Maintenance Cartridge that was used to replace the old one Remove the new Maintenance Cartridge you have just installed and insert it again firmly See Replacing the Maintenance Cartridge P 608 The printer consumes a lot of ink The printer consumes a l...

Страница 655: ...he printer Repeatedly removing and inserting an Ink Tank may damage the connection between the Ink Tank and the printer which may cause ink leakage from the Ink Tank and damage the printer Releasing ink level detection 1 On the Display Screen a message indicates that the ink level cannot be detected After checking the message press the button 2 Press or to select Information and then press the OK ...

Страница 656: ... A confirmation message about updating ink information is shown on the Display Screen After checking the message press the button 10 Press or to select Yes and then press the OK button Ink level detection is now released Ink Level Detection iPF685 User s Guide Troubleshooting Other problems 656 Downloaded from ManualsPrinter com Manuals ...

Страница 657: ...573 Maintenance and Consumables 589 Troubleshooting 627 Error Message Error Messages 658 Messages regarding paper 660 Messages regarding ink 669 Messages regarding printing or adjustment 671 Messages regarding printheads 672 Messages regarding the maintenance cartridge 674 Messages regarding the hard disk 675 Messages regarding HP GL 2 677 Other Messages 678 Specifications 681 Appendix 685 imagePR...

Страница 658: ...Hard disk error 675 Hardware error xxxxxxxx xxxx x represents a letter or number 678 Ink insufficient 669 Ink tank is empty 670 Insert the maintenance cartridge 674 Insufficient paper for job 663 Leading edge detection error 666 Mail box full Delete unwanted data 675 Mail box full Now printing without saving data 675 Mail box nearly full 675 Maint cart The level is low 674 Maintenance cartridge fu...

Страница 659: ...elected but sheets are loaded 664 Roll printing is selected 663 Sheet printing is selected 664 The following ink tanks cannot be recognized 670 The mail box is full 675 The paper is too small 661 The paper is too small 661 The roll is empty 664 This paper cannot be used 663 This type of paper is not compatible with HP GL 2 677 Top cover is open 679 Unknown file 679 Wrong ink tank 670 Wrong mainten...

Страница 660: ...heets of different types or sizes of paper were used When printing a test pattern for adjustment use sheets of the same size and type of paper in the required quantity Press or to select Change Paper press the OK button and replace the pa per See Loading and Printing on Sheets P 21 The printer now starts printing the test pattern Press or to select Stop Printing and then press the OK button MediaT...

Страница 661: ...inter driver to the size loaded in the printer and try printing again Replace the loaded paper with paper of a size that matches the size setting in the printer driver as follows 1 Press or to select Change Paper and then press the OK button to stop printing 2 Replace the loaded paper to match the settings in the printer driver and try printing again See Loading and Printing on Rolls P 19 See Load...

Страница 662: ... printer driver Press or to select Print and then press the OK button to resume print ing However note that this error may cause paper jams and affect the printing quality Press or to select Stop Printing and then press the OK button Follow these steps to replace the roll to match the width specified in the print er driver 1 Press or to select Change Paper and then press the OK button See Removing...

Страница 663: ... document Press or to select Change Paper and then press the OK button to stop printing Either change the printer driver Paper Source setting or the GL2 Settings Paper Source set ting in the printer menu or replace the roll with a roll that has enough paper for the print job and then try printing again See Removing the Roll from the Print er P 380 See Loading Rolls in the Printer P 375 Press or an...

Страница 664: ...rting from the page on which the error occurred If no message appears printing will continue from the next page There is remaining roll paper but be cause it could not be advanced it could not be detec ted The unused portion of the roll is heavy and this is placing a burden on the printer It may be helpful to change the printing mode which will change the paper feed timing Choose a higher level of...

Страница 665: ...e roll 1 Push the Release Lever back 2 Adjust the right edge of the roll to make it parallel to the orange Paper Alignment Line 3 Pull the Release Lever forward See Loading Rolls in the Printer P 375 If this error recurs after you reload the roll remove the Roll Holder from the printer push the roll firmly in until it touches the Roll Holder flange and reload the Roll Holder in the printer See Att...

Страница 666: ...y Screen press the OK button Printing will resume starting from the page on which the error occurred See Loading Rolls in the Printer P 375 There is a foreign object by the Output Tray obstructing the Cutter Unit 1 Lift the Top Cover and remove the foreign object 2 If Not finished printing Finish printing remaining jobs is shown on the Display Screen press the OK button Printing will resume starti...

Страница 667: ... button to continue printing The document will be printed with a border The loaded paper is a size not com patible with borderless printing Press or to select Stop Printing and then press the OK button Replace the paper with paper compatible for borderless printing as follows 1 Press or to select Change Paper and then press the OK button See Removing the Roll from the Printer P 380 See Removing th...

Страница 668: ...roll firmly until it touches the flange of the Roll Holder See Attaching the Roll Holder to Rolls P 372 Press or to select Print With Border and then press the OK button to continue printing The document will be printed with a border Press or to select Stop Printing and then press the OK button Roll paper is not securely in contact with roll holder Roll paper is not securely in contact with roll h...

Страница 669: ...button open the Ink Tank Cover and replace the Ink Tank for the color that does not have enough ink See Replacing Ink Tanks P 590 No ink left No ink left Cause Corrective Action There is no ink left There are no ink colors with displayed above the remaining ink indicator Press the OK button open the Ink Tank Cover and replace the Ink Tank for the color that is out of ink See Replacing Ink Tanks P ...

Страница 670: ...o Ink Tank of the indicated color in the printer Load the Ink Tank See Replacing Ink Tanks P 590 There is a problem with the Ink Tank Replace it with a new Ink Tank See Replacing Ink Tanks P 590 The following ink tanks cannot be recognized The following ink tanks cannot be recognized Cause Corrective Action An Ink Tank that is incompatible with the printer is loaded Load an Ink Tank that is compat...

Страница 671: ...the Printhead if the nozzles are clogged See Cleaning the Printhead P 600 4 Execute Adj Quality again See Automatic Banding Adjustment P 582 Highly transparent film is loaded that cannot be used for automatic feed amount adjustment Press the OK button to clear the error and then adjust the feed amount manually See Manual Banding Adjustment P 584 Check printed document Check printed document Cause ...

Страница 672: ... as follows and then execute Head Posi Adj again 1 Press the OK button to clear the error 2 Use Head Inc Adj to adjust the angle of inclination of the Printhead See Adjusting Line Misalignment P 577 3 Execute Head Posi Adj again See Automatic Adjustment to Straighten Lines and Colors P 574 Wrong printhead Wrong printhead Cause Corrective Action An incompatible Printhead has been installed Open the...

Страница 673: ...s to clean the Printhead 1 Stop printing by pressing or to select Stop Printing 2 Clean the Printhead See Cleaning the Printhead P 600 If the message is still displayed when printing replace the Printhead See Replacing the Printhead P 601 Press or to select Print and then press the OK button to resume printing However note that this error may affect the printing quality iPF685 Execute printhead cl...

Страница 674: ...o print but prepare a new Maintenance Cartridge to use when the message for replacement is displayed No Maintenance Cartridge capacity No Maintenance Cartridge capacity Cause Corrective Action The Maintenance Cartridge cannot absorb enough ink for Printhead cleaning or other opera tion After confirming that the printer has stopped operating replace the Maintenance Cartridge See Replacing the Maint...

Страница 675: ... Delete unneeded jobs stored in personal boxes See Deleting Saved Jobs P 544 Mail box full Now printing without saving data Mail box full Now printing without saving data Cause Corrective Action No more space is available on the printer s hard disk so jobs are now printed without saving them Print jobs can no longer be saved on the hard disk After printing this message is cleared Delete unneeded j...

Страница 676: ...eue See Managing the Job Queue Deleting or Preempting Other Jobs P 536 Delete unneeded jobs stored in personal boxes See Deleting Saved Jobs P 544 Mail box full Delete unwanted data iPF685 User s Guide Error Message Messages regarding the hard disk 676 Downloaded from ManualsPrinter com Manuals ...

Страница 677: ...mory is full xxxx is 0501 0903 or 0904 GL2 Wxxxx The memory is full xxxx is 0501 0903 or 0904 Cause Corrective Action The printer memory is full Because the entire print job could not be received the printer may not be able to print the entire original Check the printing results In the Control Panel menu setting On the Fly to On may enable printing However check the printing results because the im...

Страница 678: ...the error code and message turn off the printer and contact your Canon dealer for assistance Hardware error xxxxxxxx xxxx x represents a letter or number Hardware error xxxxxxxx xxxx x represents a letter or number Cause Corrective Action The last portion of roll paper was used during a print job The paper was not advanced because the trailing edge is taped to the roll Turn off the printer and rem...

Страница 679: ...e is required Contact your Canon dealer for assistance Unknown file Unknown file Cause Corrective Action Data sent to keep the printer up to date such as paper information is in the wrong format Check the data Turn off the printer and wait a while before restoring power and then resend the data You have uploaded firmware for a different model Check the firmware version Turn off the printer and wai...

Страница 680: ...iPF685 User s Guide 680 Downloaded from ManualsPrinter com Manuals ...

Страница 681: ... of Paper 361 Control Panel 437 Printer Parts 477 Network Setting 491 Print Job Management 511 Adjustments for Better Print Quality 573 Maintenance and Consumables 589 Troubleshooting 627 Error Message 657 Specifications Printer Specifications 682 Appendix 685 imagePROGRAF Specifications 681 Downloaded from ManualsPrinter com Manuals ...

Страница 682: ...uding Roll Holder Does not include Printhead and Ink Tank Approx 56 9 kg 125 4lb Space for installation W D H Printer only 1 397 1 367 807 mm 55 0 53 8 31 8 in Printer and Stand 1 397 1 700 1 362 mm 55 0 66 9 53 6 in Related standards International Energy Star Program Law on Promoting Green Purchasing GPN Japan Eco Mark Japan RoHS 1 The printer uses a trace amount of power even when turned off To ...

Страница 683: ...ports refer to the Paper Reference Guide See Displaying the Paper Reference Guide P 365 Paper width For information on the paper widths the printer supports see Paper Sizes P 362 Minimum paper length Rolls 203 2 mm 8 0 in Sheets 279 4 mm 11 0 in Maximum printable length 1 Rolls 18 m 19 7 yd Sheets 1 600 mm 63 0 in Thickness Rolls 0 07 0 8 mm 0 0028 0 031 in Sheets 0 07 0 8 mm 0 0028 0 031 in Roll ...

Страница 684: ...3 mm 0 91 in 3 mm 0 12 in 20 mm 0 79 in 23 mm 0 91 in 5 mm 0 20 in Rolls 0 3 mm 0 0 12 in 0 3 mm 0 0 12 in 0 3 mm 0 0 12 in 20 mm 0 79 in 5 mm 0 20 in 5 mm 0 20 in Sheets Printable Area a margin of 3 mm 0 12 in on top 23 mm 0 91 in on bottom and 3 mm 0 12 in on left and right sides is re quired Recommended Print Area A margin of 20 mm 0 79 in on top 23 mm 0 91 in on bottom and 5 mm 0 20 in on left...

Страница 685: ...nel 437 Printer Parts 477 Network Setting 491 Print Job Management 511 Adjustments for Better Print Quality 573 Maintenance and Consumables 589 Troubleshooting 627 Error Message 657 Specifications 681 Appendix Safety Precautions 686 Manuals for this printer 690 Disposal of the product 692 imagePROGRAF Appendix 685 Downloaded from ManualsPrinter com Manuals ...

Страница 686: ...t as soon as possible to prevent fire and electrical shocks Do not install the printer near sources of strong electromagnetic fields whether equipment that generates such fields or places where such fields occur This could damage the printer or cause malfunction Power Supply Warning Never handle the power cable with wet hands Doing so may cause electrical shock Insert the power cable securely and ...

Страница 687: ...njuries Pacemakers Warning This printer generates a low level magnetic field Anyone wearing a pacemaker who experiences discomfort while working around the printer should leave the area Consult a physician before continuing to work around the printer Moving the Printer Caution Moving the printer requires at least three people holding it on both sides and from behind Be careful to avoid back strain...

Страница 688: ...ction point on the printer During printing turn on the ventilation system in the room We recommend ensuring ample space for installation Legal Notices Legal Notices FCC Regulations U S A Canon Large Format Printer iPF685 This device complies with Part 15 of the FCC Rules Operation is subject to the following two conditions 1 This de vice may not cause harmful interference and 2 this device must ac...

Страница 689: ...ed trademark of Microsoft Corporation in the U S and or other countries Excel Internet Explorer and PowerPoint are registered trademarks or trademarks of Microsoft Corporation in the U S and or other countries Mac Mac OS Bonjour Safari and OS X are trademarks of Apple Inc registered in the U S and other countries Adobe RGB a trademark of Adobe Systems Incorporated is color space proposed by Adobe ...

Страница 690: ...rmation and explanations on restrictions or precautions in use Warning Indicates warning items for which operating error poses a risk of death or serious injury To ensure safe use always follow these warnings Caution Indicates caution items for which operating error poses a risk of injury To ensure safe use always follow these cautions Important Indicates important information and restrictions tha...

Страница 691: ...rinter driver help Figures and software screens Figures in this user manual may be different from the actual appearance of the printer in some cases Screens depicted in this user manual for the printer driver or other software may be different from the actual screens because of subsequent updates May we request The information in this user manual is subject to change without notice We strive to en...

Страница 692: ...er Batterien Richtlinie dass in dieser Batterie oder diesem Akkumulator ein Schwermetall Hg Quecksilber Cd Cadmium Pb Blei in einer Konzentration vorhanden ist die über einem in der Batterien Richtlinie angegebenen Grenzwert liegt Dieses Produkt muss bei einer dafür vorgesehenen Sammelstelle abgegeben werden Dies kann z B durch Rückgabe beim Kauf eines neuen ähnlichen Produkts oder durch Abgabe be...

Страница 693: ...r klein chemisch afval of afvalstortplaats of kunt u terecht op www canon europe com weee of www canon europe com battery Sólo para la Unión Europea y el Área Económica Europea Noruega Islandia y Liechtenstein Estos iconos indican que este producto no debe desecharse con los residuos domésticos de acuerdo con la Directiva sobre RAEE 2012 19 UE y la Directiva sobre Pilas y Acumuladores 2006 66 CE y...

Страница 694: ...duto por favor contacte as suas autoridades locais re sponsáveis pela matéria serviço de recolha aprovado para pilhas e baterias ou serviço de recolha de resíduos sólidos domésticos da sua municipalidade ou visite www canon europe com weee ou www canon europe com battery Gælder kun i Europæiske Union og EØS Norge Island og Liechtenstein Disse symboler betyder at produktet ikke må bortskaffes samme...

Страница 695: ...ua koskeva direktiivi SER direktiivi 2012 19 EU paris toista ja akuista annettu direktiivi 2006 66 EY sekä kansallinen lainsäädäntö kieltävät tuotteen hävittämisen talousjät teen mukana Jos yllä olevan symbolin alapuolelle on paristodirektiivin mukaisesti painettu kemiallisen aineen tunnus kyseinen paris to tai akku sisältää raskasmetalleja Hg elohopea Cd kadmium Pb lyijy enemmän kuin paristodirek...

Страница 696: ...E terméket az arra kijelölt gyűjtőhelyre kell juttatni pl hasonló termék vásárlásakor a régi becserélésére vonatkozó hivatalos program keretében vagy az elektromos és elektronikus berendezések EEE hulladékainak gyűjtésére vala mint a hulladék elemek és hulladék akkumulátorok gyűjtésére kijelölt hivatalos gyűjtőhelyre Az ilyen jellegű hulladékok nem előírásszerű kezelése az elektromos és elektronik...

Страница 697: ...ja inimeste tervist elektri ja elektroonikajäätmetes tavaliselt leiduvate potentsiaalselt ohtlike ainete tõttu Antud tootest tekkinud jäätmete nõuetekohase kõrvaldamisega aitate kasutada loodusvarasid efektiivselt Täiendava teabe saamiseks elektri ja elektroonikaseadmetest tekkinud jäätmete ning patarei ja akujäätmete tagasta mise ja ümbertöötlemise kohta võtke ühendust kohaliku omavalitsusega asj...

Страница 698: ...no službo za odpadke pre dstavnika pooblaščenega programa za obdelavo odpadkov ali na lokalno komunalo Lahko pa tudi obiščete našo splet no stran www canon europe com weee ali www canon europe com battery Само за Европейския съюз и ЕИП Норвегия Исландия и Лихтенщайн Тези символи показват че този продукт не трябва да се изхвърля заедно с битовите отпадъци съгласно Директивата за ИУЕЕО 2012 19 ЕC Ди...

Страница 699: ...za uklanjanje otpada ili pak na stranicama www canon europe com weee ili www canon europe com battery Només per a la Unió Europea i a l Espai Econòmic Europeu Noruega Islàndia i Liechtenstein Aquests símbols indican que aquest producte no s ha de llençar amb les escombraries de la llar d acord amb la RAEE 2012 19 UE la Directiva relativa a piles i acumuladors 2006 66 CE i la legislació nacional qu...

Страница 700: ...je usled potencijalno opasnih materijala koji se uglavnom vezuju za EEE Vaša saradnja na ispravnom odlaganju ovog proizvoda će doprineti efikasnom korišćenju prirodnih resursa Više informacija o tome kako možete da reciklirate ovaj proizvod potražite od lokalnih gradskih vlasti komunalne službe odobrenog plana reciklaže ili servisa za odlaganje kućnog otpada ili posetite stranicu www canon europe ...

Страница 701: ...449 Menu Structure 452 N Navigate 445 Nozzle 599 O Orientation 148 149 254 266 Output Method 180 Oversize 76 P Page Setup Pane 294 Page Setup Sheet 178 Paper Feed Slot 635 637 Personal Box 555 558 PosterArtist 41 Power 255 257 259 262 263 264 266 Preparing to Transfer the Printer 618 Print Job Log 527 Printer Driver Settings 158 278 Printer Hard Disk Operations 484 Printhead 574 599 600 601 641 67...

Страница 702: ...iPF685 User s Guide ENG CANON INC 2014 Downloaded from ManualsPrinter com Manuals ...

Отзывы: