


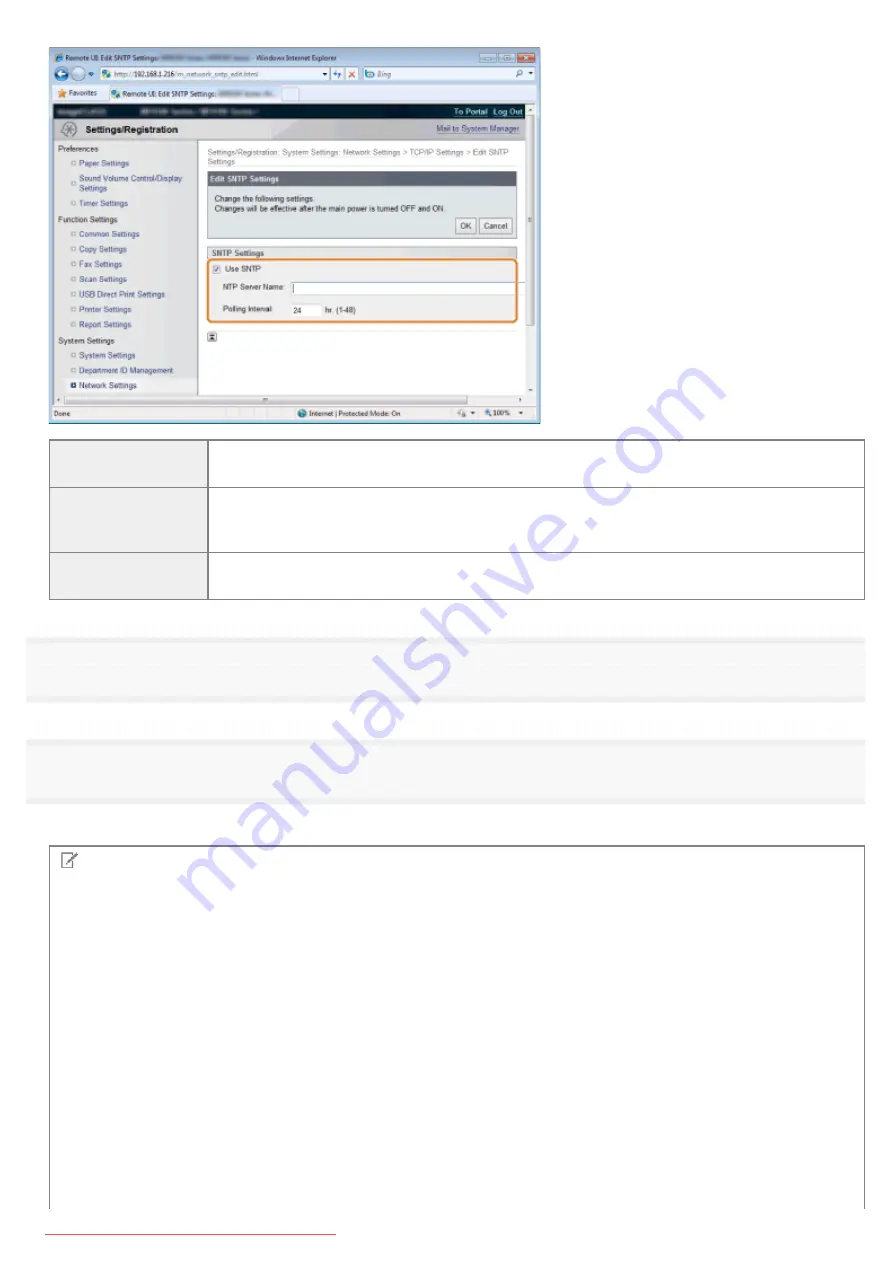
[Use SNTP]
Select the check box to use SNTP for synchronization. If you do not want to use SNTP, clear
the check box.
[NTP Server Name]
Enter the IP address of the NTP or the SNTP server. If DNS is available on the network, you
can enter a host name (or a fully qualified domain name (FQDN)) instead (example:
ntp.example.com).
[Polling Interval]
Specify the interval between one synchronization and the next. Specify an interval from 1 to 48
hours.
6
Click [OK].
7
Restart the machine.
Turn OFF the machine and wait for at least 10 seconds before turning it ON again.
NOTE
Testing communication with the NTP/SNTP server
You can test whether the machine is communicating with the registered time server via SNTP. Go to
[Settings/Registration] [Network Settings] [TCP/IP Settings] and click [Check NTP Server] in [SNTP Settings]. If a proper
connection has been established, the result is displayed as shown below. Note that this operation only tests
communication, and does not adjust the system clock.
㻢㻞㻣㻌㻛㻌㻥㻢㻠
Содержание i-SENSYS MF6140dn
Страница 1: ...㻝㻌㻛㻌㻥㻢㻠 Downloaded from ManualsPrinter com Manuals ...
Страница 49: ...The entry is complete 㻠㻥㻌㻛㻌㻥㻢㻠 Downloaded from ManualsPrinter com Manuals ...
Страница 57: ...㻡㻣㻌㻛㻌㻥㻢㻠 Downloaded from ManualsPrinter com Manuals ...
Страница 64: ...㻢㻠㻌㻛㻌㻥㻢㻠 Downloaded from ManualsPrinter com Manuals ...
Страница 106: ...6 Press Select Paper Settings to close the Select Paper screen 㻝㻜㻢㻌㻛㻌㻥㻢㻠 Downloaded from ManualsPrinter com Manuals ...
Страница 118: ...5 Press Menu to close the menu screen 㻝㻝㻤㻌㻛㻌㻥㻢㻠 Downloaded from ManualsPrinter com Manuals ...
Страница 121: ...5 Press Menu to close the menu screen 㻝㻞㻝㻌㻛㻌㻥㻢㻠 Downloaded from ManualsPrinter com Manuals ...
Страница 124: ...5 Press Menu to close the menu screen 㻝㻞㻠㻌㻛㻌㻥㻢㻠 Downloaded from ManualsPrinter com Manuals ...
Страница 129: ...6 Press Menu to close the menu screen 㻝㻞㻥㻌㻛㻌㻥㻢㻠 Downloaded from ManualsPrinter com Manuals ...
Страница 135: ...6 Press Menu to close the menu screen 㻝㻟㻡㻌㻛㻌㻥㻢㻠 Downloaded from ManualsPrinter com Manuals ...
Страница 137: ...6 Press Menu to close the menu screen 㻝㻟㻣㻌㻛㻌㻥㻢㻠 Downloaded from ManualsPrinter com Manuals ...
Страница 147: ...5 Press Menu to close the menu screen 㻝㻠㻣㻌㻛㻌㻥㻢㻠 Downloaded from ManualsPrinter com Manuals ...
Страница 149: ...Press Menu to close the Menu screen 㻝㻠㻥㻌㻛㻌㻥㻢㻠 Downloaded from ManualsPrinter com Manuals ...
Страница 151: ...5 Press Menu to close the menu screen 㻝㻡㻝㻌㻛㻌㻥㻢㻠 Downloaded from ManualsPrinter com Manuals ...
Страница 153: ...5 Press Menu to close the menu screen 㻝㻡㻟㻌㻛㻌㻥㻢㻠 Downloaded from ManualsPrinter com Manuals ...
Страница 194: ...0FR4 041 Supported Document Types Scan Area Document Type 㻝㻥㻠㻌㻛㻌㻥㻢㻠 Downloaded from ManualsPrinter com Manuals ...
Страница 197: ...0FR4 044 Supported Paper Types Printable Area Paper 㻝㻥㻣㻌㻛㻌㻥㻢㻠 Downloaded from ManualsPrinter com Manuals ...
Страница 244: ...5 Press Start 㻞㻠㻠㻌㻛㻌㻥㻢㻠 Downloaded from ManualsPrinter com Manuals ...
Страница 249: ...Select Yes using and press OK 㻞㻠㻥㻌㻛㻌㻥㻢㻠 Downloaded from ManualsPrinter com Manuals ...
Страница 277: ...6 Press Start to receive fax es 㻞㻣㻣㻌㻛㻌㻥㻢㻠 Downloaded from ManualsPrinter com Manuals ...
Страница 315: ...5 Select Apply using or and press OK The changes are saved 㻟㻝㻡㻌㻛㻌㻥㻢㻠 Downloaded from ManualsPrinter com Manuals ...
Страница 333: ...6 Press Status Monitor Cancel to close the screen 㻟㻟㻟㻌㻛㻌㻥㻢㻠 Downloaded from ManualsPrinter com Manuals ...
Страница 366: ...To print documents using AirPrint 㻟㻢㻢㻌㻛㻌㻥㻢㻠 Downloaded from ManualsPrinter com Manuals ...
Страница 372: ...9 Click Finish 10 Click Close 11 Click Apply 㻟㻣㻞㻌㻛㻌㻥㻢㻠 Downloaded from ManualsPrinter com Manuals ...
Страница 378: ...Printing begins 㻟㻣㻤㻌㻛㻌㻥㻢㻠 Downloaded from ManualsPrinter com Manuals ...
Страница 390: ...Press Menu to close the menu screen The setup is complete 㻟㻥㻜㻌㻛㻌㻥㻢㻠 Downloaded from ManualsPrinter com Manuals ...
Страница 509: ...The scanned file is sent 㻡㻜㻥㻌㻛㻌㻥㻢㻠 Downloaded from ManualsPrinter com Manuals ...
Страница 558: ...4 Click Edit in IPv6 Settings 5 Select the IPv6 check box 㻡㻡㻤㻌㻛㻌㻥㻢㻠 Downloaded from ManualsPrinter com Manuals ...
Страница 577: ...6 Click OK 7 Click Close 㻡㻣㻣㻌㻛㻌㻥㻢㻠 Downloaded from ManualsPrinter com Manuals ...
Страница 587: ...㻡㻤㻣㻌㻛㻌㻥㻢㻠 Downloaded from ManualsPrinter com Manuals ...
Страница 596: ...6 Make sure the settings and click Register 㻡㻥㻢㻌㻛㻌㻥㻢㻠 Downloaded from ManualsPrinter com Manuals ...
Страница 604: ...4 Click Edit in IPv4 Settings 5 Specify DNS settings 㻢㻜㻠㻌㻛㻌㻥㻢㻠 Downloaded from ManualsPrinter com Manuals ...
Страница 607: ...8 Click OK 㻢㻜㻣㻌㻛㻌㻥㻢㻠 Downloaded from ManualsPrinter com Manuals ...
Страница 609: ...4 Click Edit in IPv6 Settings 5 Specify DNS settings 㻢㻜㻥㻌㻛㻌㻥㻢㻠 Downloaded from ManualsPrinter com Manuals ...
Страница 614: ...4 Click Edit in WINS Configuration 5 Specify the WINS settings 㻢㻝㻠㻌㻛㻌㻥㻢㻠 Downloaded from ManualsPrinter com Manuals ...
Страница 617: ...4 Click Edit in SMB Settings 5 Set NetBIOS Name and Workgroup Name 㻢㻝㻣㻌㻛㻌㻥㻢㻠 Downloaded from ManualsPrinter com Manuals ...
Страница 628: ...㻢㻞㻤㻌㻛㻌㻥㻢㻠 Downloaded from ManualsPrinter com Manuals ...
Страница 639: ...Press Menu to close the menu screen 㻢㻟㻥㻌㻛㻌㻥㻢㻠 Downloaded from ManualsPrinter com Manuals ...
Страница 643: ...5 Press Menu to close the menu screen 㻢㻠㻟㻌㻛㻌㻥㻢㻠 Downloaded from ManualsPrinter com Manuals ...
Страница 661: ... 2 Click OK 㻢㻢㻝㻌㻛㻌㻥㻢㻠 Downloaded from ManualsPrinter com Manuals ...
Страница 664: ...4 Click Generate Key 5 Specify the keys 㻢㻢㻠㻌㻛㻌㻥㻢㻠 Downloaded from ManualsPrinter com Manuals ...
Страница 673: ...㻢㻣㻟㻌㻛㻌㻥㻢㻠 Downloaded from ManualsPrinter com Manuals ...
Страница 675: ...4 Click Register Key and Certificate 5 Click Register 㻢㻣㻡㻌㻛㻌㻥㻢㻠 Downloaded from ManualsPrinter com Manuals ...
Страница 676: ...6 Enter a key name and a password 7 Click OK 㻢㻣㻢㻌㻛㻌㻥㻢㻠 Downloaded from ManualsPrinter com Manuals ...
Страница 679: ...Click Register 㻢㻣㻥㻌㻛㻌㻥㻢㻠 Downloaded from ManualsPrinter com Manuals ...
Страница 690: ...4 Click Edit 5 Select the Use IEEE802 1X check box 㻢㻥㻜㻌㻛㻌㻥㻢㻠 Downloaded from ManualsPrinter com Manuals ...
Страница 691: ...6 Enter a login name 7 Select the Use TLS check box 㻢㻥㻝㻌㻛㻌㻥㻢㻠 Downloaded from ManualsPrinter com Manuals ...
Страница 695: ...4 Click Edit 5 Select the Use IEEE802 1X check box 㻢㻥㻡㻌㻛㻌㻥㻢㻠 Downloaded from ManualsPrinter com Manuals ...
Страница 734: ...4 Click Edit 5 Specify SNMPv3 㻣㻟㻠㻌㻛㻌㻥㻢㻠 Downloaded from ManualsPrinter com Manuals ...
Страница 834: ...The machine is ready to print 㻤㻟㻠㻌㻛㻌㻥㻢㻠 Downloaded from ManualsPrinter com Manuals ...
Страница 861: ...0FR4 0L4 Sending Problems Receiving Problems Fax Problems 㻤㻢㻝㻌㻛㻌㻥㻢㻠 Downloaded from ManualsPrinter com Manuals ...
Страница 943: ...0FR4 0S6 Basic Windows Operations For Macintosh Users Appendix 㻥㻠㻟㻌㻛㻌㻥㻢㻠 Downloaded from ManualsPrinter com Manuals ...
Страница 959: ... 15 Office Locations Display the contact information for inquiries 㻥㻡㻥㻌㻛㻌㻥㻢㻠 Downloaded from ManualsPrinter com Manuals ...
Страница 965: ...㻝㻌㻛㻌㻣㻢 Downloaded from ManualsPrinter com Manuals ...
Страница 1004: ...8 Close the dialog box 㻠㻜㻌㻛㻌㻣㻢 Downloaded from ManualsPrinter com Manuals ...
Страница 1013: ...The icon is added to the printer folder 㻠㻥㻌㻛㻌㻣㻢 Downloaded from ManualsPrinter com Manuals ...
Страница 1018: ...㻡㻠㻌㻛㻌㻣㻢 Downloaded from ManualsPrinter com Manuals ...
Страница 1020: ...㻡㻢㻌㻛㻌㻣㻢 Downloaded from ManualsPrinter com Manuals ...
Страница 1031: ... Installing the MF Drivers and MF Toolbox 㻢㻣㻌㻛㻌㻣㻢 Downloaded from ManualsPrinter com Manuals ...


