background image

Introduction

16

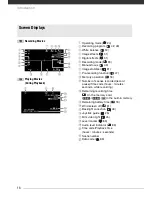
 Recording Movies

Playing Movies 
(During Playback)

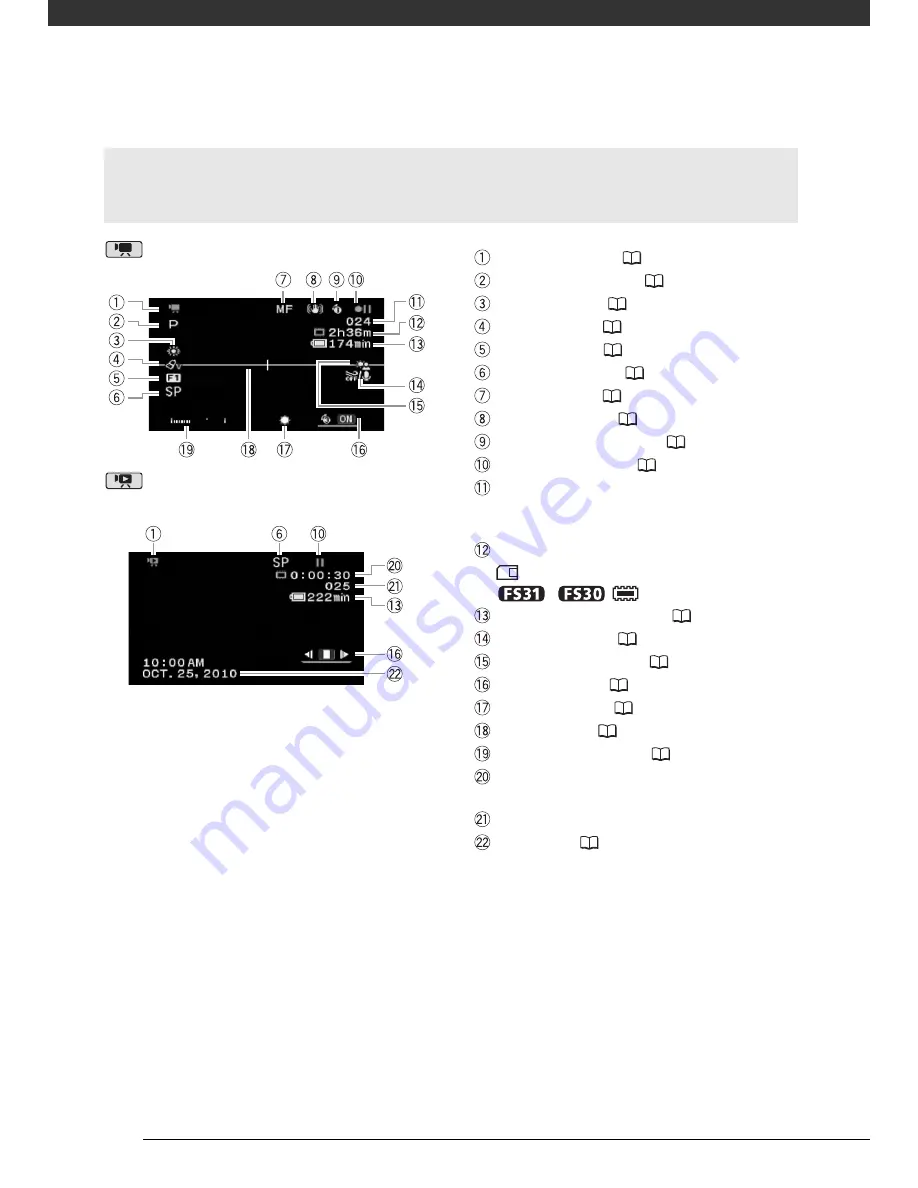
Screen Displays

Operating mode (

24)

Recording program (

42, 43)

White balance (

50)

Image effects (

51)

Digital effects (

51)

Recording mode (

33)

Manual focus (

49)

Image stabilizer (

81)

Pre-recording function (

47)

Memory operation (

18)

Number of scenes recorded (record 
pause)/Time code (hours : minutes : 
seconds, while recording)

Remaining recording time

 On the memory card

/

In the built-in memory

Remaining battery time (

18)

Wind screen off (

81)

Backlight correction (

48)

Joystick guide (

25)

Mini video light (

45)

Level marker (

83)

Audio level indicator (

83)

Time code/Playback time 
(hours : minutes : seconds) 

Scene number

Data code (

83)

Содержание FS30

Страница 1: ......

Страница 2: ...s equipment generates uses and can radiate radio frequency energy and if not installed and use in accordance with the instructions may cause harmful interference to radio communications However there is no guarantee that interference will not occur in a particular installation If this equipment does cause harmful interference to radio or television reception which can be determined by turning the ...

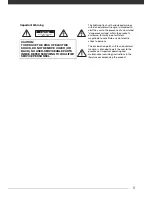
Страница 3: ...irect sunlight fire etc Important Warning CAUTION RISt Of ELECTRIC SHOCII 1 0 NOT OPEN CAUTION TO REDUCE THE RISK OF ELECTRIC SHOCK DO NOT REMOVE COVER OR BACK NO USER SERVICEABLE PARTS INSIDE REFER SERVICING TO QUALIFIED SERVICE PERSONNEL The lightning flash with arrowhead symbol within an equilateral triangle is intended to alert the user to the presence of uninsulated dangerous voltage within t...

Страница 4: ... when the apparatus has been damaged in any way such as power supply cord or plug is damaged liquid has been spilled or objects have fallen into the apparatus the apparatus has been exposed to rain or moisture does not operate normally or has been dropped 13 Read Instructions All the safety and operating instructions should be read before the pro U 1 i op rat j 14 Retain Instructions The safety an...

Страница 5: ...ttery power refer to instructions in this manual 23 Polarization The CA 570 Compact Power Adapter is equipped with apolarized 2 prong plug a plug having one blade wider than the other The 2 prong polarized plug will fit into the power outlet oniy one way This is asafety feature If you are unable to insert the plug fully into the outlet try reversing the plug If the plug still fails to fit contact ...

Страница 6: ...on instructions Improper adjustment of other controls may result in damage and will often require extensive work by aqualified technician to restore the product to its normal operation e If the product has been dropped or the cabinet has been damaged f When the product exhibits adistinct change in performance This indicates aneed for service 31 Replacement Parts When replacement parts are required...

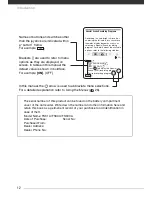
Страница 7: ...ound at the battery attachment unit of the camcorder Write down the number and other information here and retain this book as a permanent record of your purchase to aid identification in case of theft Model Name FS31 NFS30 NFS300 A Date of Purchase Serial No Purchase From Dealer Address Dealer Phone No 7 ...

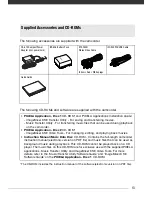
Страница 8: ...if c CD C o o CD Q o aJ 0 8 CA 570 Compact Adapter incl LlLlV 1 BP 808 Battery Pack IFC 300PCU USB Cable STV 250N Stereo Video Cable ...

Страница 9: ...d playing back movies Instruction Manual Music Data Disc CD ROM Contains the full version Instruction Manual of the camcorder and music files that can be used as background music during playback This CD ROM cannot be played back on a CD player The music files on this CD ROM are for exclusive use with the supplied PIXELA applications Music Transfer Utility and ImageMixer 3 SE Video Tools For more d...

Страница 10: ...rror message is displayed be sure to read the full instruction manual included as a PDF file in the Instruction Manual Music Data CD ROM 1 Turn on the computer 2 Insert the Instruction Manual Music Data CD ROM into the computer s disc drive 3 Open My Computer Windows 7 and Windows Vista users Open Computer instead 4 Right click the drive in which you inserted the CD ROM and select Open 5 Open the ...

Страница 11: ...ent the basic operating procedures Gf POINTS TO CHECK Restrictions or requirements regarding the function described QJ Reference page number in this manual Reference page number in the camcorder s full version Instruction Manual PDF file Inn Text that applies only to the model shown in the icon Brackets are used to refer to menu options as they are displayed on screen Names of buttons and switches...

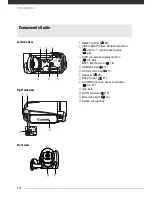
Страница 12: ...hare button Print your photos with the press of a single button i t 66 3 DISP on screen display button Change the camcorder s onscreen displays Jlilt 52 BAIT INFO button Press when the camcorder is off to check the battery pack s charge status and its remaining recording time 4 USB terminal Connect the camcorder to a computer or printer t 71 S AV OUT terminal ill t 71 6 Speaker CD 45 Strap mount A...

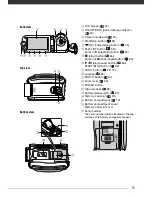
Страница 13: ...5 Start Stop button CD 32 1 1EJ camera play button CD 24 41 PLAYLIST button Edit the playlist to play back only your favorite scenes in the order of your choice M 53 Zoom in T telephoto button CD 35 stop button CD 41 Zoom out W wide angle button CD 35 11 play pause button CD 41 START STOP button CD 32 FUNC button In the flexible recording modes you can access the FUNC menu and setup menus 1Rf 26 7...

Страница 14: ...OWER button Tripod socket Mount the camcorder on a tripod for steadier shots 11I1 99 Serial number Battery compartment cover Memory card slot cover Memory card slot aJ 28 Battery compartment II 20 Q Battery release latch II 20 Grip belt Adjust for a comfortable and secure grip Oil 21 ...

Страница 15: ...rdings Bt 51 Digital effects The camcorder offers various transition effects faders for movies and digital effects to add some flavor to your recordings 51 Recording mode II 39 Manual focus tB 49 Image stabilizer The stabilizer is activated by default and will compensate for varying degrees of camcorder shake so you can get beautiful steady recordings OM 81 The image stabilizer may not be able to ...

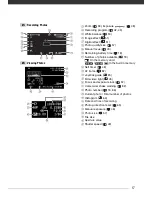
Страница 16: ... pack The Intelligent System will display the charge status as a percentage and the remaining recording time in minutes for 5 seconds If the battery pack is exhausted the battery information may not be displayed 14i Wind screen off Wind screen removes the background sound of wind when recording outdoors You may want to turn it off when recording indoors in very quiet surroundings 8t 81 C 5i Backli...

Страница 17: ...plays and Icons Playback time hours minutes seconds Scene number Data code In addition to the date and time of recording you can choose to display information related to the camcorder settings like the shutter speed or aperture value used 83 f w 17 ...

Страница 18: ...t in memory g in red Cannot record any more photos in red No memory card in the camcorder 32 Self timer ME 48 33 AF framfl You can change whether to let the camcorder detect the sublect and select where to focus 9 point AiAF system or have it focus only on the frame at the center of the screen illf t 82 i 34 Joystick guide gt 25 35 Mini video light mEt 45 6 Focus and exposure lock II 33 37 Camcord...

Страница 19: ...e and time of recording Photo protection mark Protect your favorite photos to prevent erasing them by mistake _ 63 Manual exposure Correct the exposure manually for a picture darker brighter than the one obtained using the automatic exposure set by the camcorder _ 48 Photo size OJ 40 File size Aperture value Shutter speed Control the shutter speed manually to change the appearance of moving object...

Страница 20: ...r of the battery pack will not be consumed Charge the battery pack before use 1 _ _ _ Connect the compact power adapter 2 Connect the camcorder U Connect to the adapter 2 1 Plug into a power outlet 3 Insert the battery pack CD Plug into the DC IN terminal i Slide in the direction of the arrow and open 2 Push the battery pack into the compartment Securely close the cover 20 Click ...

Страница 21: ...ed battery pack will allow for the following operations About 1 hour 40 minutes of typical recording recording movies in XP mode on a memory card fill IBID About 1 hour 45 minutes of typical recording recording movies in XP mode in the built in memory About 4 hours 45 minutes of playback movies recorded in XP mode on a memory card All given times are approximate and vary according to recording mod...

Страница 22: ...rical equipment that is not expressly recommended for use with this camcorder 00 not connect the supplied compact power adapter to voltage converters or special power sources such as those on aircraft DC AC inverters etc r NOTES If remaining battery time is an issue you can power the camcorder using the compact power adapter so the battery pack will not be consumed Charged battery packs continue t...

Страница 23: ...Charging the Battery Pack 23 ...

Страница 24: ...ing camera mode dial set to l Play backmovies and photos Press the button when the camcorder is off to turn it on directly in playback mode Use the joystick to change the index screen and to J select individual recordings CD Select Ii T the tabs at the top of the screen D Select the desired tab Return JJ T to the index screen to select ascene or photo ...

Страница 25: ...e i camcorder I Press ISlart Slopl to shoot movies or press I I IPHOTOI to take photos I I I PHOTO button Recording movies I I Recording photos I Use the flexible recording modes to access the I I menus and advanced functions and to change various settings up to your preferences I iI Ilf See AdvancedFunctions 42 AdditionalFunctions 63 for details I I I I I I I I I I I I I I I I I I I I I I I I _ _...

Страница 26: ... so after changing the language to your preference PDF See Changing the Time Zone 28 DATE FORMAT 86 for details 1 Set the camcorder to I ll I recording movies mode l Set to 2 Press em Appears automatically when the internal clock is not set IlQ fl9 DATE T IME I 1 1 AM 12 00 EI3 2 Use the joystick to change the date time fields i1 Change J the gglgctgd figld 2 Move between field5 IQ fl9 DATe TJ t _...

Страница 27: ...order s menus and on screen displays Select the language of your preference using the DISPLAY SETUP menu See Using the Menus 26 for details about selecting an option from the setup menus FUNC C Gil DISPLAY SETUP E LANGUAGE l E Desired language C FUNG English is the default language CD NOTES If you changed the language by mistake look for the menu option with the mark 27 ...

Страница 28: ... record photos on almost all types of memory cards depending on the type and Speed Class of the memory card used you may not be able to record movies on the memory card R See Memory Cards Compatible for Use with the Camcorder 29 for details 1 Turn off the camcorder 2 Open the memory card cover 28 1 Make sure the indicator is off 1 Slide in the direction of the arrow and open ...

Страница 29: ...in memory or on the memory card The built in memory is the default media for recording both but you can select the recording media independently for movies and for photos See Selecting the Memory for the Recordings 30 for details o IMPORTANT Memory cards have front and back sides that are not interchangeable Im lGl lino aMemory card facing the wrong direction can cause a malfunction of the camcord...

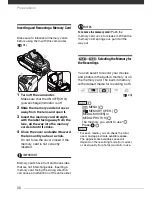
Страница 30: ...30 Using a Memory Card CD NOTES To remove the memory card Push the memory card once to release it When the memory card springs out pull it all the way out ...

Страница 31: ... Preparing the Accessories 21 Adjusting the Position and Brightness of the LCD Screen 22 BRIGHTNESS 83 for details 1 Fasten the grip belt Adjust it so you can reach the zoom lever with your index finger and the Start Stop button with your thumb You can replace the grip belt with a wrist strap CD or use it together with an extra shoulder strap 2 Open the LCD panel and adjust the angle CD Rotate it ...

Страница 32: ...ptions the camcorder will select the most appropriate settings automatically 1 Set the camcorder to Dual Shot 1 Set to iJ 2 Press laiD i ll LfiJ y i H l m I 2 Start recording movies 1 Press to start recording Press again to pause the recording 2 Flashes while recording and while the scene is being recorded on the memory iJ J 32 CD START STOR I o ACCESS r ...

Страница 33: ...Do not open the memory card slot cover Do not disconnect the power source or turn off the camcorder Do not change the operating mode do not press the E button and do not change the position of the camera mode dial CD NOTES About the flexible recording modes Use the flexible recording modes to access the menus and advanced functions and to change various settings up to your preferences Set the came...

Страница 34: ...he camcorder cannot focus on the subject automatically 0 turns yellow In flexible recording mode you can focus manually eof See Manual Focus Adjustn7ent 49 for details I When you have finished recording ffi __ _ Make sure the camcorder has finished writing the scenes or photos on the memory before turning it off 1 Check that the indicator is off C Press 1m l I m 3 Close the LCD panel 1 0 0 ACCESS ...

Страница 35: ...tally to obtain a zoom range beyond that of the optical zoom but without any deterioration in image quality See About the Zoom Types 34 for details eD Set to p Press 1tlIil 1 Set the camcorder to Dual Shot 2 Zoom in or out eD Zoom out Zoom toward the W wide angle end Zoom in Zoom toward the T telephoto end Ways to operate the zoom CD Push the zoom lever Use the buttons on the LCD panel PHOTO w W 3...

Страница 36: ...r press gently for slower zooms press harder for faster zooms You can also change the zoom speed to one of three constant speeds lP11t See Using the Zoom 34 ZOOM SPEED 81 for details When ZOOM SPEED is set to mTIJ VARIABLE the default setting the zoom speed will be faster in record pause mode than when actually recording In most situations keep at least 1 m 3 3 ft away from the subject The minimum...

Страница 37: ... used when recording saving energy when you are using a battery pack Additionally when you open the LCD panel the camcorder is ready to start recording in approximately 1 second allowing you to start recording right away The actual time required varies depending on the shooting conditions 1 In record pause en close the LCD panel I belPI CD Changes to orange to indicate the camcorder is in standby ...

Страница 38: ...menu is being displayed in flexible recording mode while the battery charge is low or while the memory card slot cover is open the camcorder may not enter the standby mode Check that the indicator changes to orange The camcorder will shut off if left in standby mode for 10 minutes In that case press Im lID to turn on the camcorder You can select the length of time until shut off or turn off the Qu...

Страница 39: ...ed to access the FUNC menu to select the recording mode but the recording mode selected will apply also when the camcorder is set to Dual Shot _ See Using the Menus 26 for details about selecting an option from the FUNC menu 1 Set the camcorder to r I I 1 recording movies mode CD Set to Press BID 2 Select the recording mode FUNC E CD f STANDARD PLAY 6 Mbps E Desired recording mode E FUNC Default r...

Страница 40: ...print size recommended for each photo size You need to access the FUNC menu to select the photo size and quality but the settings selected will apply also when the camcorder is set to Dual Shot PDf t See Using the Menus 26 for details about selecting an option from the FUNC menu Select the photo size and quality J 0 1 l 1024x768 0 cg Desired photo size 0 Press to select the desired photo quality 0...

Страница 41: ... index screen you can select what recordings to playback movies or photos and what memory to play back built in memory or memory card DB IDE only See Playing Back the Video 36 Viewing Photos 59 for details about advanced playback modes CD Set to iJ 1 Set the camcorder to Dual Shot 2 Press to set the camcorder to playback mode 41 ...

Страница 42: ...tos 3 Select the tab of the recordings you wish to play back 1 Select the tabs at the top of the screen 2 Select the desired tab 3 Return to the index screen to select a scene or photo 4 Select the scene or photo you wish to play back 42 ...

Страница 43: ...ayback continues until the end of the last scene recorded WPress to pause the playback Press again to resume Press to stop the playback and return to the index screen Photos The selected photo is displayed Move to the previous next photo Select T the index icon and press to return to the index screen 43 ...

Страница 44: ...be able to play back with this camcorder movies recorded using another device When playing back photos the following images may not be displayed correctly Images that were not recorded with this camcorder Images edited on or uploaded from a computer Images whose file names have been changed 1 NOTES v _ When playing back movies depending on the recording conditions you may notice brief stops in vid...

Страница 45: ...s necessary To turn the volume off completely keep the joystick pressed until the volume bars disappear I Photo Jump When you have recorded a large number of photos you may find it easier to jump 10 or 100 images at a time instead of browsing them one by one From single photo view CD Select T the tC photo jump icon and press Select T to jump 10 photos or 100 photos Jump the number of photos select...

Страница 46: ...d Viewing Photos I Browsing Index Pages When you have a large number of recordings you can browse through whole index pages instead of single recordings CD Extend T the orange frame to the whole page 2 Move between index pages ...

Страница 47: ... Video Cable supplied Connect the cable to the AV OUT terminal Use the audio video input terminals on the lV The illustration below is for reference only The layout of terminals on your lV may be different Yellow III te 3 iO Open the LCD panel to access 3 Turn on the camcorder CD Press to turn on the Q mQOrQer Qire tly in playbaGk mode 4 Play back your movies or photos as described in the previous...

Страница 48: ...ile the STV 250N Stereo Cable is connected to the camcorder Adjust the volume using the TV When you play back 16 9 movies on standard TV sets with a 4 3 aspect ratio the 1V set will switch automatically to widescreen mode if it is compatible with the Video 10 1 system Otherwise change the aspect ratio of the TV manually lilt See TV TYPE 85 for details ...

Страница 49: ...ation Guide For details on using the software refer to the instruction manual PDF file See External Connections 71 for details about connecting the camcorder to a computer I Saving your Recordings Without a Computer If you prefer to save your recordings without having to use a computer you can use the optional OW 100 DVD Burner to create DVD discs of your movies and Photo DVDs of your photos You c...

Страница 50: ...B InID 8 GB Maximum recording time IDD Built in memory 16 GB XP 3 hr 40 min SP 5 hr 30 min LP 10 hr 25 min InID Built in memory 8 GB XP 1 hr 50 min SP 2 hr 45 min LP 5 hr 10 min 4 GB memory card XP 55 min SP 1 hr 20 min LP 2 hr 35 min Power supply rated 7 4 V DC battery pack 8 4 V DC compact power adapter Power consumption SP mode AF on 1 8 W LCD screen normal brightness Operating temperature o 40...

Страница 51: ...any damage to this product and or accidents such as fire etc caused by the malfunction of non genuine Canon accessories e g a leakage and or explosion of a battery pack Please note that this warranty does not apply to repairs arising out of the malfunction of non genuine Canon accessories although you may request such repairs on a chargeable basis This mark identifies genuine Canon video accessori...

Страница 52: ...d under license from Dolby Laboratories Dolby and the double D symbol are trademarks of Dolby Laboratories Other names and products not mentioned above may be trademarks or registered trademarks of their respective companies ANY USE OF THIS PRODUCT OTHER THAN CONSUMER PERSONAL USE IN ANY MANNER THAT COMPLIES WITH THE MPEG 2 STANDARD FOR ENCODING VIDEO INFORMATION FOR PACKAGED MEDIA IS EXPRESSLY PR...

Страница 53: ...espect to such non Canon brand items is given by the manufacturer or producer thereof W the Equipment contains a hard disk drive Canon USA recommends that data stored on that drive be duplicated or backed up to prevent its loss in the event of failure or other maWunclion of such drive Canon USA shall have no responsibility under this limited warranty for use of the Equipment in conjunction with in...

Страница 54: ...O USE THE EQUIPMENT REGARDLESS OF THE LEGAL THEORY ON WHICH THE CLAM IS BASED AND EVEN IF CANON USA HAS BEEN ADVISED OF THE POSSIBILITY OF SUCH DAMAGES NOR SHALL RECOVERY OF ANY KIND AGAINST CANON USA BE GREATER THAN THE PURCHASE PRICE OF THE EQUIPMENT SOLD BY CANON USA AND CAUSING THE ALLEGED DAMAGE WITHOUT L1MmNG THE FOREGOING YOU ASSUME ALL RISK AND LIABILITY FOR LOSS DAMAGE OR INJURY TO YOU AN...

Страница 55: ...erior finish of the Equipment media nor does it apply to Equipment purchased outside canada If the Equipment contains a hard disk drive Canon Canada recommends that data stored on that drive be duplicated or backed up 10 prevent its loss in the event of a failure or other malfunction of such drive TO OBTAIN WARRANTY SERVICE Ship your Equipment in its original carton box or equivalent properly pack...

Страница 56: ......

Страница 57: ...PUB DIE 0348 000 Digital Video Camcorder Instruction Manual ...

Страница 58: ...lation If this equipment does cause harmful interference to radio or television reception which can be determined by turning the equipment off and on the user is encouraged to try to correct the interference by one or more of the following measures Reorient or relocate the receiving antenna Increase the separation between the equipment and receiver Connect the equipment into an outlet on a circuit...

Страница 59: ...owhead symbol within an equilateral triangle is intended to alert the user to the presence of uninsulated dangerous voltage within the product s enclosure that may be of sufficient magnitude to constitute a risk of electric shock to persons The exclamation point within an equilateral triangle is intended to alert the user to the presence of important operating and maintenance servicing instruction...

Страница 60: ...ns should be followed 17 Cleaning Unplug this product from the wall outlet before cleaning Do not use liquid or aerosol cleaners The product should be cleaned only as recommended in this manual 18 Accessories Do not use accessories not recommended in this manual as they may be hazardous 19 Avoid magnetic or electric fields Do not use the camera close to TV transmitters portable communication devic...

Страница 61: ...t has been exposed to rain or water d If the product does not operate normally even if you follow the operating instructions Adjust only those controls that are covered by the operation instructions Improper adjustment of other controls may result in damage and will often require extensive work by a qualified technician to restore the product to its normal operation e If the product has been dropp...

Страница 62: ... that can enrich your shooting experience Dual Shot 24 With Dual Shot mode recording is as simple as pressing a single button and using the zoom lever The camcorder will take care of the rest Image Stabilization 81 Dynamic IS compensates for camcorder shake when shooting video while walking This gives you more freedom and mobility when recording movies Special Scene recording programs 42 When reco...

Страница 63: ...aring the Accessories 22 Adjusting the Position and Brightness of the LCD Screen 24 Basic Operation of the Camcorder 24 Operating Modes 25 Joystick and Joystick Guide 26 Using the Menus 27 First Time Settings 27 Setting the Date and Time 28 Changing the Language 28 Changing the Time Zone 29 Using a Memory Card 29 Memory Cards Compatible for Use with the Camcorder 30 Inserting and Removing a Memory...

Страница 64: ...40 Pre selecting Recordings from the Index Screen 41 Deleting Scenes 42 Advanced Functions 42 Special Scene Recording Programs 43 Controlling Shutter Speed and Other Functions while Shooting 45 Mini Video Light 45 Video Snapshot 47 Pre recording Function 48 Self Timer 48 Automatic Backlight Correction and Manual Exposure Adjustment 49 Manual Focus Adjustment 50 White Balance 51 Image Effects 51 Di...

Страница 65: ... 63 Protecting Photos 64 Copying Photos 65 Other Functions You Can Use When Taking Photos 65 Printing Photos 65 Printing Photos 66 Selecting the Print Settings 68 Print Orders External Connections _______________________ 71 Terminals on the Camcorder 71 Connection Diagrams 72 Playback on a TV Screen 72 Saving Your Recordings 72 Saving Your Recordings on a Computer 73 Authoring DVD Discs and Photo ...

Страница 66: ... 81 Setup Menus 87 Trouble 87 Troubleshooting 91 List of Messages 99 Do s and Don ts 99 Handling Precautions 102 Maintenance Others 102 Using the Camcorder Abroad 103 Music Files 104 General Information 104 System Diagram 105 Optional Accessories 107 Product Codes 108 Specifications 111 Index ...

Страница 67: ...xt that applies only to the model shown in the icon The following terms are used in this manual When not specified as memory card or built in memory the term memory by itself refers to both only Scene refers to one movie unit from the point you press the button to start recording until you press again to pause the recording The photos included in this manual are simulated pictures taken with a sti...

Страница 68: ...g programs Desired recording program 25 FUNC FUNC Recording in a very bright ski resort or capturing the full colors of a sunset or a fireworks display becomes as easy as selecting a Special Scene recording program For details about the available options refer to the following sidebar Brackets are used to refer to menu options as they are displayed on screen In tables in this manual the default va...

Страница 69: ...s Music Transfer Utility For transferring music files that can be used during playback on the camcorder PIXELA Application Disc 2 CD ROM ImageMixer 3 SE Video Tools For managing editing and playing back movies Instruction Manual Music Data Disc CD ROM Contains the full length camcorder instruction manual electronic version on PDF file and music files that can be used as background music during pla...

Страница 70: ...tton 90 VIDEO SNAP Video Snapshot button 45 print share button 66 DISP on screen display button 52 63 BATT INFO button 18 USB terminal 71 AV OUT terminal 71 Speaker 36 Strap mount 21 ACCESS memory access indicator 32 57 Grip belt DC IN terminal 19 Mini video light 45 Stereo microphone ...

Страница 71: ... stop button 36 Zoom out W wide angle button 33 play pause button 36 START STOP button 32 FUNC button 26 79 Joystick 25 PHOTO button 57 Zoom lever 33 POWER button Tripod socket 99 Battery release latch 20 Memory card slot 30 Battery compartment 19 Battery compartment cover Memory card slot cover Serial number The serial number label is located on the top surface of the battery compartment cover ...

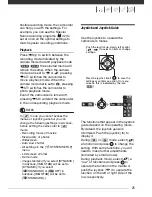
Страница 72: ...er 81 Pre recording function 47 Memory operation 18 Number of scenes recorded record pause Time code hours minutes seconds while recording Remaining recording time On the memory card In the built in memory Remaining battery time 18 Wind screen off 81 Backlight correction 48 Joystick guide 25 Mini video light 45 Level marker 83 Audio level indicator 83 Time code Playback time hours minutes seconds ...

Страница 73: ...e 18 Number of photos available 18 On the memory card In the built in memory Self timer 48 AF frame 82 Joystick guide 25 Mini video light 45 Focus and exposure lock 57 Camcorder shake warning 82 Photo number 18 86 Current photo Total number of photos Histogram 63 Date and time of recording Photo protection mark 63 Manual exposure 48 Photo size 57 File size Aperture value Shutter speed 43 ...

Страница 74: ...that the remaining recording time will be displayed accurately Depending on the conditions under which the camcorder and the battery pack are used the actual battery charge may not be indicated accurately When the camcorder is off press to display the charge status of a battery pack The Intelligent System will display the charge status as a percentage and the remaining recording time in minutes fo...

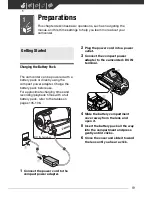
Страница 75: ...ging times and recording playback times with a full battery pack refer to the tables on pages 105 106 1 Connect the power cord to the compact power adapter 2 Plug the power cord into a power outlet 3 Connect the compact power adapter to the camcorder s DC IN terminal 4 Slide the battery compartment cover away from the lens and open it 5 Insert the battery pack all the way into the compartment and ...

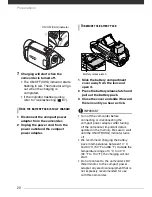
Страница 76: ... slide it toward the lens until you hear a click IMPORTANT Turn off the camcorder before connecting or disconnecting the compact power adapter After turning off the camcorder important data is updated in the memory Be sure to wait until the ON OFF CHG indicator turns off We recommend charging the battery pack in temperatures between 10 C and 30 C 50 F and 86 F Outside the temperature range of 0 C ...

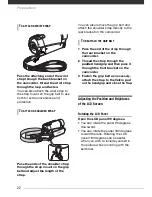
Страница 77: ... the day of use or the day before to ensure a full charge We recommend that you prepare battery packs to last 2 to 3 times longer than you think you might need USA and Canada only The Lithium ion polymer battery that powers the product is recyclable Please call 1 800 8 BATTERY for information on how to recycle this battery Preparing the Accessories Fasten the grip belt Adjust the grip belt so that...

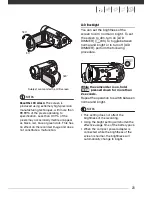
Страница 78: ...Pass the end of the strap through the rear bracket on the camcorder 2 Thread the strap through the padded handgrip and then pass it through the front bracket on the camcorder 3 Fasten the grip belt as necessary attach the strap to the Velcro pad on the handgrip and close the flap Adjusting the Position and Brightness of the LCD Screen Rotating the LCD Panel Open the LCD panel 90 degrees You can ro...

Страница 79: ...r bright To set the screen to dim turn on LCD DIMMER s 83 To toggle between normal and bright or to turn off LCD DIMMER perform the following procedure While the camcorder is on hold pressed down for more than 2 seconds Repeat the operation to switch between normal and bright NOTES This setting does not affect the brightness of the recording Using the bright setting will shorten the effective usag...

Страница 80: ...to your preference Turn the camera mode dial to to set the camcorder to mode You do not need to worry about any settings and can shoot video using just or take photos using just You can also use the zoom lever Quick Start 35 and Video Snapshot 45 To set the camcorder to flexible recording mode turn the camera mode dial to for movies or for photos You can access the menus and change settings to you...

Страница 81: ...f photos Widescreen Auto slow shutter All settings in the SYSTEM SETUP menu LCD screen dimmer Demo mode Image stabilizer If you select DYNAMIC in advance IMG STAB will be set to DYNAMIC if you select STANDARD or OFF in advance IMG STAB will be set to STANDARD Joystick and Joystick Guide Use the joystick to operate the camcorder s menus The functions that appear in the joystick guide depend on the ...

Страница 82: ...nu options and settings refer to the appendix Menu Options Lists 79 Selecting a FUNC Menu Option in Recording Mode 1 Press 2 Select the icon of the function you want to change from the left side column Menu items not available will appear grayed out 3 Select the desired setting from the available options at the bottom bar The selected option will be highlighted in orange With some settings you wil...

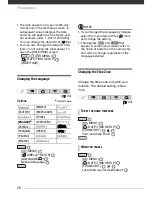
Страница 83: ...ose the menu at any time Setting the Date and Time You will need to set the date and time of the camcorder before you can start using it The DATE TIME screen will appear automatically when the camcorder s clock is not set When the DATE TIME screen appears the year will be displayed in orange and indicated with up down arrows 1 Change the year and move to the month 2 Change the rest of the fields m...

Страница 84: ...ed language NOTES If you changed the language by mistake select the menu item with the mark and change the setting The displays and that appear in some menu screens refer to the name of buttons on the camcorder and will not change regardless of the language selected Changing the Time Zone Change the time zone to match your location The default setting is New York MENU DATE TIME SETUP T ZONE DST Yo...

Страница 85: ...recording function has been tested using SD SDHC memory cards made by Panasonic SanDisk and Toshiba NOTES About the SD Speed Class The SD Speed Class is a standard that indicates the minimum guaranteed data transfer speed of SD SDHC memory cards When you buy a new memory card look for the Speed Class logo on the package FUNC Using a Memory Card Memory cards usable for recording movies Depending on...

Страница 86: ... Memory cards have front and back sides that are not interchangeable Inserting a memory card facing the wrong direction can cause a malfunction of the camcorder NOTES To remove the memory card Push the memory card once to release it When the memory card springs out pull it all the way out Selecting the Memory for the Recordings You can select to record your movies and photos in the built in memory...

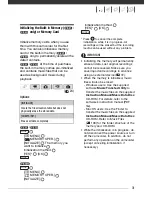
Страница 87: ...rase all data Lost original recordings cannot be recovered Make sure you save important recordings in advance using an external device 72 When the memory is initialized music files will also be erased Windows users Use the supplied software Music Transfer Utility to transfer the music files on the supplied Instruction Manual Music Data Disc CD ROM For details refer to the software s instruction ma...

Страница 88: ...g Failing to do so may result in permanent data loss or damage to the memory Do not open the memory card slot cover Do not disconnect the power source or turn off the camcorder Do not change the operating mode NOTES About the Power Save mode To save power when the camcorder is powered by a battery pack the camcorder will automatically shut off if left without any operations for 5 minutes 85 Press ...

Страница 89: ...ng Optical Advanced and Digital Zoom The camcorder offers three types of zoom optical 37x advanced 41x and digital 2000x In mode all three types are available In mode the advanced zoom and optical zoom are 24 FUNC FUNC Approximate recording times for movies Default value When a recording exceeds 4 GB it will be divided and saved as scenes smaller than 4 GB The camcorder comes pre installed with ab...

Страница 90: ...lly recording 24 About the Zoom Types Optical The zoom range is limited to the optical magnification ratio of the lens Advanced In addition to the optical zoom range the camcorder processes the image digitally to obtain a larger zoom range without any deterioration in image quality In mode advanced zoom is used except when IMG STAB is set to DYNAMIC or when WIDESCREEN is set to OFF In mode advance...

Страница 91: ...nge to orange to indicate the camcorder entered the standby mode 2 When you wish to resume recording open the LCD panel The ON OFF CHG indicator will return to green and the camcorder will be ready to record IMPORTANT Do not disconnect the power source during standby mode while the ON OFF CHG indicator is lit in orange NOTES The camcorder will not enter standby mode if the LCD panel is closed whil...

Страница 92: ...in to pause the playback Press to stop the playback and return to the index screen 1 Push the joystick to display the joystick guide 2 Push the joystick to select the top row 3 Adjust the volume To turn off the volume keep the joystick pressed toward until the volume bars disappear IMPORTANT Observe the following precautions while the ACCESS indicator is on or flashing Failing to do so may result ...

Страница 93: ...the joystick guide Select the middle row Push the joystick toward or Skipping scenes To skip to the next scene Display the joystick guide Select the bottom row Push the joystick toward To return to the beginning of the current scene or skip to the previous scene Display the joystick guide Select the bottom row Push the joystick toward Repeat to skip to the beginning of the previous scene Ending sp...

Страница 94: ...also press to open the index screen for Video Snapshot scenes You can select the scenes in the built in memory or on the memory card 37 2 Open the list of recordings SCENE SEARCH SELECT DATE The list of recordings displays all dates in which recordings were made An orange selection frame appears on the day The thumbnail shows a photo from the first scene recorded on that day Below it will appear t...

Страница 95: ...ame day You can select the year or month field and change the year or month to move faster between calendar months 4 Press to return to the index screen The orange selection frame will appear on the first scene recorded on the selected date NOTES You can change on what day to start the week for the calendar display 84 You can press to return to the index screen at any time Selecting the Playback S...

Страница 96: ...the selected photos or mark all of them with print orders 68 or transfer orders 75 1 Select the movies or the photo index screen From the movies index screen you can also press to open the index screen for Video Snapshot scenes You can select the recordings in the built in memory or on the memory card 37 2 Open the selection screen SELECT INDIVIDUAL SCENES or INDIVIDUAL PHOTOS The selection screen...

Страница 97: ... delete This step is not necessary to delete all scenes or previously selected scenes 2 Delete the scene s DELETE Desired option YES OK If you selected any option other than ONE SCENE you can press to interrupt the operation while it is in progress Some scenes will be deleted nevertheless IMPORTANT Be careful when deleting original recordings Once deleted an original scene cannot be recovered Save...

Страница 98: ...ing Programs Recording in a very bright ski resort or capturing the full colors of a sunset or a fireworks display becomes as easy as selecting a Special Scene recording program For details about the available options refer to the following sidebar PROGRAM AE PORTRAIT Press to display the Special Scene SCN recording programs Desired recording program NOTES NIGHT Moving subjects may leave a trailin...

Страница 99: ...record subjects moving quickly use slower shutter speeds to add motion blur emphasizing the feel of movement 24 PORTRAIT The camcorder uses a large aperture achieving a focus on the subject while blurring other distracting details BEACH Use this mode to record on a sunny beach It prevents the subject from being underexposed SPORTS Use this mode to record sports scenes such as tennis or golf SUNSET...

Страница 100: ...e but image quality may be lower and autofocus may not work well The image may flicker when recording with fast shutter speeds Recording movies under fluorescent lights If the screen starts to flicker select SHUTTER PRIO AE and set the shutter speed to 1 100 PROGRAM AE The camcorder automatically adjusts the aperture and shutter speed to obtain the optimal exposure for the subject SHUTTER PRIO AE ...

Страница 101: ...r scenes an entirely new feel You can also add to the playlist 53 just the scenes you want to watch and change their order Recording Scenes 1 Press The button s light illuminates A blue border appears on the screen 2 Press The camcorder records for about 4 seconds and then automatically switches to record pause mode The blue border changes to black and roughly indicates how much time has passed Wh...

Страница 102: ...nes During playback the selected background music will play instead of the scene s original audio Playing Back the Scenes Select a scene from which to start playback and press There is no sound during fast playback 1 In the track selection screen select a track to delete 2 Select and press 3 Select YES and press Press twice to return to the index screen IMPORTANT Music files transferred to the mem...

Страница 103: ...ansfer the files again Pre recording Function The camcorder will start recording 3 seconds before you press ensuring you do not miss important shooting opportunities This is especially useful when it is difficult to predict when to start recording 1 Push the joystick to display the joystick guide 2 Select Pre REC and press appears Press again to turn pre recording off 3 Press to begin recording Th...

Страница 104: ...once the countdown has begun Turning off the camcorder Changing the operating mode Setting the camcorder to standby mode Automatic Backlight Correction and Manual Exposure Adjustment At times backlit subjects may appear too dark underexposed or subjects under very strong lights may appear too bright or glaring overexposed To correct this you can manually adjust the exposure or use the automatic ba...

Страница 105: ...ell on the following subjects In such case focus manually Reflective surfaces Subjects with low contrast or without vertical lines Fast moving subjects Through wet windows Night scenes POINTS TO CHECK Adjust the zoom before you start the procedure 1 Push the joystick to display the joystick guide 2 Select FOCUS and press MF appears on the screen 3 Adjust the focus as necessary The focus will be lo...

Страница 106: ...e menu NOTES When you select the custom white balance Set the custom white balance in a sufficiently illuminated place Set D ZOOM to OFF Reset the white balance when the lighting conditions change Depending on the light source may keep flashing The result will still be better than with AUTO Custom white balance may provide better results in the following cases Changing lighting conditions Close up...

Страница 107: ... enhancing effects VIVID Emphasizes the contrast and color saturation NEUTRAL Tones down the contrast and color saturation SOFT SKIN DETAIL Softens the details in the skin tone area for a more complimentary appearance To obtain the best effect use this setting when recording a person in close up Note that areas similar to the skin color may lack in detail FUNC FUNC 24 D EFFECT OFF Select this sett...

Страница 108: ...sound will fade in or out When you apply an effect the sound will be recorded normally The camcorder retains the last setting used even if you turn off the digital effects or change the recording program On Screen Displays and Data Code With every scene or photo recorded the camcorder keeps a data code that includes the date time and information about the camera setup at the time of recording Whil...

Страница 109: ...out the best parts and later cut out the rest 1 Open the original movies index screen You can select the movies in the built in memory or on the memory card 37 2 Select the scene you want to divide 3 Open the scene division screen DIVIDE The scene selected will start playing back 4 Select the icon and press where you want to divide the scene You can use the following icons to bring the scene to a ...

Страница 110: ... only the scenes you prefer and in the order of your choice and even set them to music in the same way you can set Video Snapshot scenes to music 45 You can also create a playlist that contains only Video Snapshot scenes 45 Moving or deleting scenes in the playlist will not affect the original recordings Adding Scenes to the Playlist Options 1 Open the original movies index screen From the this in...

Страница 111: ...lete the scene s DELETE Desired option YES OK Moving Scenes in the Playlist Move the scenes in the playlist to play them back in the order of your choice 1 Open the playlist index screen In the original movies index screen press 2 Select the scene you want to move 3 Open the screen to move scenes MOVE 4 Move the orange marker to the desired position of the scene and press The original position of ...

Страница 112: ...tions while the ACCESS indicator is on or flashing Failing to do so may result in permanent data loss Do not open the memory card slot cover Do not disconnect the power source or turn off the camcorder Do not change the operating mode NOTES If the memory card does not have enough free space you will not be able to copy movies If the memory card slot cover is open or the LOCK switch on the memory c...

Страница 113: ... following precautions while the ACCESS indicator is on or flashing Failing to do so may result in permanent data loss Do not open the memory card slot cover Do not disconnect the power source or turn off the camcorder Do not change the operating mode NOTES If the subject is not suitable for autofocus turns yellow Adjust the focus manually 49 Selecting Photo Size and Quality Photos are recorded as...

Страница 114: ...ely after recording it if REVIEW is set to OFF While reviewing the photo immediately after recording 1 Push the joystick to display the joystick guide 2 Press 3 Select YES and press Photo size Recommended use L 1024x768 To print photos up to L size 9 x 13 cm 3 5 x 5 in or postcard size 10 x 14 8 cm 4 x 6 in S 640x480 To send photos as e mail attachments or to post on the Web FUNC FUNC Approximate ...

Страница 115: ...e selection frame to the photo you want to view Push the joystick to extend the selection frame and browse through whole index pages Push the joystick to return to the index screen 6 Press The index screen closes and the selected photo is displayed 7 Push the joystick to move between images Push the joystick and hold it down to run quickly through the photos When the camera mode dial is set to 1 P...

Страница 116: ...r another Press to stop the slideshow POINTS TO CHECK only Windows users Use the supplied software Music Transfer Utility to transfer the music files on the supplied Instruction Manual Music Data Disc CD ROM For details refer to the software s instruction manual PDF file Mac OS users Use the Finder to transfer the music files on the supplied Instruction Manual Music Data Disc CD ROM Refer to Music...

Страница 117: ...ck photos can be magnified up to 5 times 1 Move the zoom lever toward T The photo is magnified by 2 times and a frame appears indicating the position of the magnified area To further enlarge the photo move the zoom lever toward T To reduce the magnification to less than 2 times move it toward W will appear for photos that cannot be enlarged 2 Move the frame to the part of the photo you want to see...

Страница 118: ...otos 3 Delete the photo s DELETE Desired option YES OK If you selected an option other than ONE PHOTO you can press to interrupt the operation while it is in progress Some photos will be deleted nevertheless IMPORTANT Be careful when deleting photos Deleted photos cannot be recovered NOTES Protected photos cannot be deleted ALL PHOTOS Deletes all the photos ONE PHOTO Deletes only the photo marked ...

Страница 119: ...rotect photos from accidental erasure Protecting Single Photos 1 Open the photo selection screen PROTECT PROTECT appears on the screen 2 Select the photo you want to protect 3 Press to protect the photo appears on the bottom bar and the photo cannot be deleted Press again to remove the protection 4 Repeat steps 2 3 to protect additional photos or press twice to close the menu Protecting Photos fro...

Страница 120: ... option YES OK If you selected SELECTED PHOTOS or ALL PHOTOS you can press to interrupt the operation while it is in progress This step is not required when copying a single photo IMPORTANT Observe the following precautions while the ACCESS indicator is on or flashing Failing to do so may result in permanent data loss Do not open the memory card slot cover Do not disconnect the power source or tur...

Страница 121: ...ble Connection Refer to Connection Diagrams 71 If the device selection screen appears select PC PRINTER and press Select in advance the memory from which you want to print the photos 37 If the photo index screen is displayed move the zoom lever toward T to display a photo You can also use the following functions The following functions and features of the camcorder can be used either for shooting ...

Страница 122: ...Refer also to the printer s instruction manual If you have no intention to use the optional DW 100 DVD Burner you can set USB SETTING to PC PRINTER 85 so the device selection screen does not appear every time you connect the camcorder to a printer Connection to a PictBridge compatible printer will not work when the memory card contains 1 800 photos or more For best performance we recommend keeping...

Страница 123: ...om the camcorder and printer and turn off the camcorder PAPER PAPER SIZE Available paper sizes vary depending on the printer model PAPER TYPE Select PHOTO FAST PHOTO PLAIN or DEFAULT PAGE LAYOUT Select DEFAULT BORDERED or one of the following page layouts BORDERLESS The photo is enlarged and may be slightly cropped at the edges to fit the paper 2 UP 4 UP 8 UP 9 UP 16 UP Refer to the sidebar on pag...

Страница 124: ...any device other than this camcorder If BUSY does not disappear disconnect the USB cable and restore the connection after a short while Print Orders You can mark in advance the photos you want to print and set the desired number of copies as a print order Later you can easily print out the print orders by connecting the camcorder to a PictBridge compatible printer 65 You can set print orders for u...

Страница 125: ...e Index Screen Options PRINT ORDER Desired option YES OK Printing the Photos Marked with Print Orders 1 Connect the camcorder to the printer using the supplied USB cable Connection Refer to Connection Diagrams 71 2 Open the print settings menu MENU PRINT The print settings menu appears If there are no photos marked with print orders SET PRINT ORDER appears 3 Select PRINT and press FUNC FUNC INDIVI...

Страница 126: ...fer to page 67 Restarting Printing Open the print settings menu as explained in step 2 In the print settings menu select RESUME and press The remaining photos will be printed Printing cannot be restarted when the print order settings have been changed or if you deleted a photo with print order settings In case the print order was interrupted after the first photo this menu option will appear as PR...

Страница 127: ...rminal Access Open the LCD panel Connection Type Analog Output only Connect to a TV or VCR with audio video input terminals If the TV cannot automatically detect and change the aspect ratio 85 change TV TYPE according to the TV set widescreen or 4 3 Connection Type Digital data connection Connect to a computer to transfer and save your recordings to the optional DW 100 DVD Burner to create DVD dis...

Страница 128: ...is compatible with the Video ID 1 system Otherwise change the aspect ratio of the TV manually Saving Your Recordings on a Computer Movies recorded with this camcorder are saved on the memory card or in the built in memory only Because space on the memory is limited make sure to save your movies onto a computer on a regular basis PIXELA ImageMixer 3 SE With the supplied software ImageMixer 3 SE Tra...

Страница 129: ...r to create DVD discs from your movies or Photo DVD discs from your photos For details about the connection and operation refer to the instruction manual of the DW 100 Refer to this section along with the relevant sections in the instruction manual of the DW 100 Options for creating DVD discs mode Options for creating Photo DVDs mode Preparations on the Camcorder 1 Set the camcorder to mode to cre...

Страница 130: ...HE DISC CONTAINS DATA will be displayed To overwrite the data erasing the previous content of the disc press select YES and press again 4 Press the start button on the DVD burner A progress bar will be displayed on the screen After pressing the start button while the current disc is being written the operation cannot be canceled When the disc or the last disc if the data requires multiple discs is...

Страница 131: ...ch scenes use the ALL SCENES or REM SCENES option For important information on handling your discs refer to Cautions on handling NOTES If the LOCK switch on the memory card is set to prevent writing you will not be able to create a disc with movies on the memory card The FUNC menu and setup menus cannot be accessed while the camcorder is connected to the DVD burner Disconnect the USB cable before ...

Страница 132: ...isc and set the device to record pause mode 2 Camcorder Locate the scene you wish to copy and pause playback shortly before the scene 3 Camcorder Resume the movie playback 4 External device Begin recording when the scene you wish to copy appears Stop recording when copying is complete 5 Camcorder Stop playback NOTES We recommend powering the camcorder using the compact power adapter By default on ...

Страница 133: ... the desired photos The displayed text varies depending on your camcorder model 3 Open Macintosh HD and then open the Applications folder 4 Start the Image Capture program 5 Transfer the desired photos IMPORTANT While the camcorder is connected to the computer do not open the memory card slot cover and do not remove the memory card Observe the following precautions while the ACCESS indicator is on...

Страница 134: ...also to the computer s instruction manual If you have no intention to use the optional DW 100 DVD Burner you can set USB SETTING to PC PRINTER 85 so the selection screen does not appear every time you connect the camcorder to a computer Depending on the number of photos on the memory card Windows 1 800 photos or more Macintosh 1 000 photos or more you may not be able to transfer photos to a comput...

Страница 135: ... are explained below the tables FUNC Menu Recording Modes Appendix Menu Options Lists Menu item Setting options Recording programs PROGRAM AE SHUTTER PRIO AE z z 43 PORTRAIT SPORTS NIGHT SNOW BEACH SUNSET SPOTLIGHT FIREWORKS z z 42 White balance AUTO DAYLIGHT TUNGSTEN SET z z 50 Image effects IMAGE EFFECT OFF VIVID NEUTRAL SOFT SKIN DETAIL z z 51 Digital effects D EFFECT OFF FADE T WIPE BLK WHT SE...

Страница 136: ...ingle photo view NO YES z 64 From the index screen ALL PHOTOS ONE PHOTO SELECTED PHOTOS CANCEL z 64 ADD TO PLAYLIST ALL SCENES THIS DATE ONE SCENE SELECTED SCENES CANCEL z2 53 DIVIDE z4 53 MOVE z3 55 PROTECT From single photo view From the index screen INDIVIDUAL PHOTOS SELECTED PHOTOS REMOVE ALL SELECTIONS CANCEL z 63 PRINT ORDER From single photo view 0 99 copies From the index screen INDIVIDUAL...

Страница 137: ...proaches full wide angle STANDARD This setting compensates for a lower degree for camcorder shake such as when shooting while remaining stationary and is suitable for shooting natural looking scenes The picture angle will be wider at full wide angle DELETE ALL SCENES ALL SCENES THIS DATE ONE SCENE SELECTED SCENES CANCEL z2 41 ALL SCENES ONE SCENE CANCEL z3 55 From single photo view NO YES From the...

Страница 138: ...u can also select which AF frames to use ON AiAF One or more AF frames out of the nine frames available are automatically selected and the focus is fixed on them ON CENTER A single focusing frame appears in the center of the screen and the focus is automatically fixed on it OFF No AF frame will appear and the photo will be recorded immediately after you press When the recording program is set to F...

Страница 139: ...ttings currently in use The total space for the built in memory may be less than the capacity listed in Specifications 108 In the CARD INFO screen you can also verify the Speed Class of the memory card The maximum number of remaining photos displayed on the screen is 99999 DISPLAY SETUP Menu item Setting options MEMORY INFO z z z z CARD INFO z z z z MEDIA MOVIES BUILT IN MEM CARD z z 30 MEDIA PHOT...

Страница 140: ...ator on the LCD screen so you can check the audio recording level while recording TV SCREEN When set to ON the camcorder s on screen displays will appear also on the screen of a TV or monitor connected using the STV 250N Stereo Video Cable DATA CODE Displays the date and or time when the scene was recorded CAMERA DATA Displays the aperture f stop and shutter speed used when recording MARKERS You c...

Страница 141: ...t any operation for 5 minutes Approximately 30 seconds before the camcorder shuts off AUTO POWER OFF will appear In standby mode the camcorder will shut off after the time selected for the QUICK START setting The Power Save mode cannot be set while the compact power adapter is connected to the camcorder QUICK START Select whether to activate the Quick Start function 35 when you close the LCD panel...

Страница 142: ...NOS Select the photo numbering method to be used on a new memory card Photos are automatically assigned consecutive photo numbers from 0101 to 9900 and stored in folders containing up to 100 photos Folders are numbered from 101 to 998 RESET Photo numbers will restart from 101 0101 every time you insert a new memory card CONTINUOUS Photo numbers will continue from the number following that of the l...

Страница 143: ...s too hot let it cool down until its temperature is below 40 C 100 F Charge the battery pack in temperatures between 0 C and 40 C 32 F and 104 F The battery pack is damaged Use a different battery pack The camcorder cannot communicate with the battery pack attached Such battery packs cannot be charged using this camcorder A noise can be heard from the compact power adapter A faint sound can be hea...

Страница 144: ...f the scene will differ from when was pressed The camcorder will not focus Autofocus does not work on the subject Focus manually 49 Lens is dirty Clean the lens with a soft lens cleaning cloth 102 Never use tissue paper to clean the lens When a subject flits across in front of the lens the image appears slightly bent This is a phenomenon typical of CMOS image sensors When a subject crosses very qu...

Страница 145: ...in When playing a slideshow it takes longer than usual for the photos to advance or there are brief stops in the audio This may occur when using a memory card with no Speed Class rating or playing back photos recorded with another device Play back photos taken with this camcorder from a memory card rated Speed Class 2 or higher Indicators and Onscreen Displays lights up in red Battery pack is exha...

Страница 146: ... camcorder and these devices Sound is distorted or is recorded at lower levels When recording near loud sounds such as fireworks shows or concerts sound may become distorted or it may not be recorded at the actual levels This is not a malfunction The picture is displayed correctly but there is no sound from the built in speaker Speaker volume is turned off Adjust the volume 36 If the STV 250N Ster...

Страница 147: ...onnection The camcorder doesn t recognize the DW 100 DVD Burner even though it is connected correctly USB SETTING is set to PC PRINTER Set it to DVD BURNER or to CONNECT SET 85 List of Messages Following the list of messages for the camcorder you can find separate lists for printing related messages 97 and for messages that appear only when using the optional DW 100 DVD Burner 96 ACCESSING THE CAR...

Страница 148: ...ded because data could not be added to the camcorder s file management data Save the recordings 72 and initialize the memory 31 Write back the backup files and try dividing the scene again Use the supplied supplied software ImageMixer 3 SE Transfer Utility to transfer the scene to a computer and divide it CANNOT EDIT Cannot move or delete original scenes or scenes in the playlist CANNOT EDIT CHECK...

Страница 149: ...full Erase some recordings 41 61 to free some space or replace the memory card CARD REACHED THE MAXIMUM NUMBER OF SCENES The memory card already contains 3 999 scenes the maximum number of scenes no further scenes can be copied onto the memory card Delete some recordings 41 to free some space CARD INITIALIZE USING ONLY THE CAMCORDER There is a problem that prevents accessing the memory card Initia...

Страница 150: ...interrupted while the camcorder was writing to the memory card and later the position of the card s LOCK switch was changed to prevent erasure Change the position of the LOCK switch NO CARD There is no memory card in the camcorder NO PHOTOS There are no photos to play back NO SCENES There are no scenes recorded in the memory selected NOT AVAILABLE IN DUAL SHOT You pressed a button that cannot be u...

Страница 151: ...s set to THE CAMCORDER IS SET TO PHOTO MODE You pressed while the camera mode dial was set to THE CARD IS SET FOR ERASURE PREVENTION The LOCK switch on the SD or SDHC memory card is set to prevent accidental erasure Change the position of the LOCK switch THE MEMORY CARD COVER IS OPEN After inserting a memory card close the memory card slot cover 30 THIS PHOTO COULD NOT BE DELETED Protected photos ...

Страница 152: ...VD disc or a brand new DVD disc is inserted CLOSE THE MEMORY CARD SLOT COVER The memory card slot cover is open Close the cover after correctly inserting the memory card 30 CONNECT THE COMPACT POWER ADAPTER The camcorder is being powered by the battery pack Connect the compact power adapter to the camcorder DISC ACCESS FAILURE CHECK THE DISC There was an error when reading the disc or attempting t...

Страница 153: ...large number of photos Reduce the number of photos COULD NOT PRINT X PHOTOS You attempted to use the print order settings to print X photos that were recorded with another camcorder with a different compression or were edited on a computer FILE ERROR You attempted to print a photo that was recorded with another camcorder has a different compression or was edited on a computer HARDWARE ERROR Cancel...

Страница 154: ... status When you are printing using the button check the print settings PRINTER COVER OPEN Close the printer cover securely PRINTER ERROR A malfunction has occurred that may require repairs Canon PIXMA printers the printer s green power lamp and orange error lamp flash alternately Disconnect the USB cable and turn off the printer Unplug the printer s power cord from the power outlet and contact th...

Страница 155: ...in dusty or sandy places The camcorder is not waterproof avoid also water mud or salt If any of the above should get into the camcorder it may damage the camcorder and or the lens Be careful of heat generated by lighting equipment Do not disassemble the camcorder If the camcorder does not function properly consult qualified service personnel Handle the camcorder with care Do not subject the camcor...

Страница 156: ...t be charged even if you attach them to this camcorder or to the optional CG 800 Battery Charger If you use with the camcorder battery packs that are not genuine Canon battery packs will appear and the remaining battery time will not be displayed Memory Card We recommend saving the recordings on the memory card onto your computer Data may be corrupted or lost due to memory card defects or exposure...

Страница 157: ...ever it will become totally discharged if you do not use the camcorder for about 3 months To recharge the built in lithium battery Connect the compact power adapter to the camcorder and leave it connected for about 24 hours with the camcorder off Disposal When you delete movies or initialize the built in memory only or memory card only the file allocation table is altered and stored data is not ph...

Страница 158: ...ontinued use may damage the camcorder Condensation may form in the following cases When the camcorder is moved quickly from cold to warm places When the camcorder is left in a humid room When a cold room is heated rapidly Do not expose the camcorder to sudden or extreme changes in temperature Place the camcorder in an airtight plastic bag and let it adjust to temperature changes slowly before remo...

Страница 159: ...ry The supplied Instruction Manual Music Data Disc CD ROM contains a folder called MUSIC Windows users This folder contains two folders called MUSIC 1 and MUSIC 2 MUSIC 1 contains the tracks that are pre installed in the built in memory of the FS31 FS30 MUSIC 2 contains tracks different from those in MUSIC 1 Use tracks from both folders to your liking or to restore the pre installed tracks if the ...

Страница 160: ...ger STV 250N Stereo Video Cable CA 570 Compact Power Adapter SC 2000 Soft Carrying Case WS 20 Wrist Strap SS 600 SS 650 Shoulder Strap SD SDHC memory card BP 808 Battery Pack Computer TV Card reader writer PictBridge compatible printers IFC 300PCU USB Cable VCR DVD recorder DW 100 DVD Burner DVD discs ...

Страница 161: ...pproximate and vary according to charging conditions and initial charge of the battery pack When the camcorder charges an exhausted battery pack for the first 20 minutes it can be used for 3 times longer than it was charged In other words you can record with the camcorder for 60 minutes after a 20 minute charge Optional Accessories Use of genuine Canon accessories is recommended This product is de...

Страница 162: ...power on off Shoulder Strap You can attach a shoulder strap for more security and portability SC 2000 Soft Carrying Case A handy camcorder bag with padded compartments and plenty of space for accessories Recording mode XP SP LP Usage time Maximum recording time 210 min 210 min 210 min Typical recording time 105 min 105 min 105 min Playback time 295 min 295 min 295 min Recording mode XP SP LP Usage...

Страница 163: ...ery Pack 2740B002AA STV 250N Stereo Video Cable 3067A002AA D82 0590 002 IFC 300PCU USB Cable 6906A001AA Optional Accessories CG 800 Battery Charger 2590B002AA SS 650 Shoulder Strap 3123A001AA SS 600 Shoulder Strap 3122A001AA SC 2000 Soft Carrying Case 9389A001AA WS 20 Wrist Strap 3118A002AA ...

Страница 164: ...min SP 1 hr 20 min LP 2 hr 35 min Image Sensor 1 6 inch CCD approx 680 000 pixels Effective pixels2 all figures are approximate values 16 9 Movies advanced zoom IMG STAB set to OFF or STANDARD 360 000 T 450 000 W pixels optical zoom IMG STAB set to DYNAMIC 360 000 pixels 4 3 Movies optical zoom 340 000 pixels Photos 450 000 pixels LCD Screen 2 7 in wide TFT color approx 123 000 dots Microphone Ste...

Страница 165: ...ts 2 When two values are given the first indicates the value at full telephoto T and the second indicates the value at full wide angle W Terminals AV OUT Terminal 3 5 mm minijack Output only Video 1 Vp p 75 Ω unbalanced Audio 10 dBV 47 kΩ load 3 kΩ or less USB Terminal mini B USB 2 0 Hi Speed USB Power Others Power supply rated 7 4 V DC battery pack 8 4 V DC compact power adapter Power consumption...

Страница 166: ...information in this manual is verified as of January 2010 Subject to change without notice Battery type Rechargeable lithium ion battery compatible with Intelligent System Rated voltage 7 4 V DC Operating temperature 0 40 C 32 104 F Battery capacity 890 mAh Dimensions 30 7 23 3 40 2 mm 1 2 0 9 1 6 in Weight 46 g 1 6 oz ...

Страница 167: ... external devices 71 Copying Movies 55 Photos 64 D Data code 84 Date and time 27 Date format 86 Daylight saving time 28 Time zone 28 Deleting Erasing Movies 41 55 Photos 58 61 Digital effects 51 Direct print 65 Dividing scenes 53 Dual Shot 24 DVD authoring 73 E Error messages 91 Exposure 48 F Fireworks recording program 43 Focus Focus priority 81 Manual 49 FUNC menu 26 79 H Histogram 63 I Image ef...

Страница 168: ...ording mode 33 Recording programs 42 43 Recording time 33 RESET 90 Reviewing photos 82 S Screen icons 16 SD SDHC memory card 29 Searching scenes by date 38 Selecting the media for playback 37 for recording 30 Self timer 48 Serial number 15 Setup menus 26 82 Shutter speed 43 Slideshow 60 Snow recording program 43 Special Scene recording programs 42 Sports recording program 43 Spotlight recording pr...

Страница 169: ...ries Manufactured under license from Dolby Laboratories Dolby and the double D symbol are trademarks of Dolby Laboratories Other names and products not mentioned above may be trademarks or registered trademarks of their respective companies ANY USE OF THIS PRODUCT OTHER THAN CONSUMER PERSONAL USE IN ANY MANNER THAT COMPLIES WITH THE MPEG 2 STANDARD FOR ENCODING VIDEO INFORMATION FOR PACKAGED MEDIA...

Страница 170: ...ishandling accident improper maintenance or failure to follow operating instructions B If the Equipment is defective as a result of leaking batteries sand dirt or water damage C If defects or damages are caused by the use of unauthorized parts or by service other than by Canon USA s factory service centers or authorized service facilities D If the Equipment is used for commercial or industrial use...

Страница 171: ... finish of the Equipment media nor does it apply to Equipment purchased outside Canada If the Equipment contains a hard disk drive Canon Canada recommends that data stored on that drive be duplicated or backed up to prevent its loss in the event of a failure or other malfunction of such drive TO OBTAIN WARRANTY SERVICE Ship your Equipment in its original carton box or equivalent properly packed fu...

Страница 172: ...PUB DIE 0348 000 CANON INC 2010 ...

Страница 173: ......

Страница 174: ...puter Transfer the movies you recorded from the camcorder to the computer You can use the computer to edit them or as a place to store them Organize your movies with ease On the computer you can organize your video library rate your favorite videos and use the albums created automatically by recording date or other criteria or create albums of your own Play back your video files from the computer ...

Страница 175: ...the camcorder is powered using the compact power adapter I Preparations This software is contained on the two supplied discs PIXELA Application Disc 1 and Disc 2 Depending on the tasks you want to perform install the software on either Disc 1 only or both Disc 1 and Disc 2 In either case the software on Disc 1 must be installed Saving movies to the computer Organizing movies on the computer Playin...

Страница 176: ... the amount of data to be written on the disc Transferring music At least the same amount on the C drive as the music files to be transferred 1024 x 768 resolution 16 bit color high color v __ _ ______ _ _ M r v_ _ _ Sound card compatible with DirectSound Preinstalled USB 2 0 Hi Speed USB port For the software on Disc 2 Internet connection during installation system that can run DirectX 9 0c prein...

Страница 177: ...terms of the license agreement to continue You cannot install the software otherwise 5 Check the destination folder for the installation files and click Next If you want to change the destination folder click Change and select a different folder J g r tr J i mlkIl j Choo1Cl Selup l lJrl9lHge e ec llhr IoI he V tlomt d o u boelo w Disc 1 contains ImageMixer 3 SE Transfer Utility and Music Transfer ...

Страница 178: ..._ 3 i Ver45TlanalflIUtiky CkkFlI cilbeJoLthlolQ d 8 Click Next W_ _ I the l eIS VIZ OIMueic Tr d Utilily Va l 5 Thelr t llaldwl w mcTlar 1hl Uhlity Veo 1 Sonyouo T cor rll luI c6ck Ne lI 9 Read the license agreement and click Next Select I accept the terms of the license agreement to 6 continue You cannot install the software otherwise 10 Check the destination folder for the installation files and...

Страница 179: ...ion Disc 2 CD ROM into the computer s CD or DVD drive The installation wizard will start automatically If the User Account Control window opens select Yes for Windows 7 or Continue for Windows Vista 3 Select the language for the installation and click Next JAAt f r B iWMgFJ f e11 W i r O _ S cJIhe i flho orutolor orolhe e below w __ 1 1 i I J ese I O e l i J l _ f f l I 4 Click Next J tm iMWfLJ S ...

Страница 180: ... t 1 ttitt a 1llIliW W tol _Ac tinhan l1ifbilb M hlfttErit q q t TU eftarl UlDMlf it nle netPicitlitt lt iM 8 Enter the serial number of your camcorder and click Next Enter the serial number starting with the top row of 4 digits as 12 digits with no spaces or hyphens In the case of the example shown in S JIMI Selecrltoe el wethalbesl lihl OU needs 9 If an Internet connection is not detected you wi...

Страница 181: ... Guide I included as PDF files on Disc 1 oIMPORTANT IViewing the Software Guides 7 cs4 I f f i J I 11 Once the installation is completed select yes I want to restart my computer now and click Finish IConnectingthe Camcorderto the Computer 1 Power the camcorder using the compact power adapter 2 Set the camera mode dial to and press E 3 Connect the camcorder to the computer using the USB cable Refer...

Страница 182: ...2 4865 toll free gebOhrenfrei numero vert appel gratuit lIamada gratuita iii English Deutsch Fran ais Espanol Other Countries in Europe 44 1489 564 764 iii English Deutsch Fran ais Espanol Italiano Nederlands Asia Philippines a 63 2 438 0090 iii English PUB DIM 0963 000 0110Ni8 0 CANON INC 2010 PRINTED IN JAPAN IMPRIME AU JAPaN IMPRESO EN JAP6N ...

Страница 183: ......

Страница 184: ......

Страница 185: ...canon o FS31 FS300 ...

Страница 186: ... Dealer NEED TECHNICAL ASSISTANCE Register Your Camcorder Now And Receive Exclusive Benefits From Canon Includes Registration Information for USA and Canadian Residents For service and technical assistance on this product please call 8OO QK cANON 1 800 652 2666 Of log onto www usa uonon comlsupport There is no charge to register for the benl fiu offered Product regiWation and benetiu are limited t...

Страница 187: ...strez votre camescope maintenant Rendez vous sur www anon uJenreglstrementou omposezle 800 0K C non 1 800 652 2666 PROFITEZ DES AVANTAGES DE L ENREGISTREMENT DE VOTRE PRODUIT Soyez inform4i automaliquement des mises niveau de pilote S micrologiejels et logiciels ReceVf z des renseignements aduatises sur les produits et les promotions de Canon Canada Inc Voos faites partie de nosdients privill ogit...

Страница 188: ...e of Purchase MODELE NQ DE SERlE Date d achat Purchaser s Name Nom d acheteur FS300 A KIT Address Adresse Dealer s Name Nom de marchand Address Adresse Model DIGITAL VIDEO CAMCORDER Modele CAMESCOPE ET LECTEUR VIDEO DIGITAL Warranty coverage is subject to the country where the unit was purchased Please read all warranty information carefully La garantie en vigueur dans Ie pays ou I achat a ete eff...

Страница 189: ...Purchaser s NAME CITY ADDRESS STATE ZiP CODE l l PRINTED IN JAPAN ...

Отзывы: