background image

3-34

Saving Images

This section explains how to save images stored on a CF card in the camera via the interface
cable onto your computer and how to save multiple images as an index file on your computer.

Saving Images from the Camera to Your Computer

You should save the images you have shot on your computer.

1

Select images to be saved. (

3-12)

2

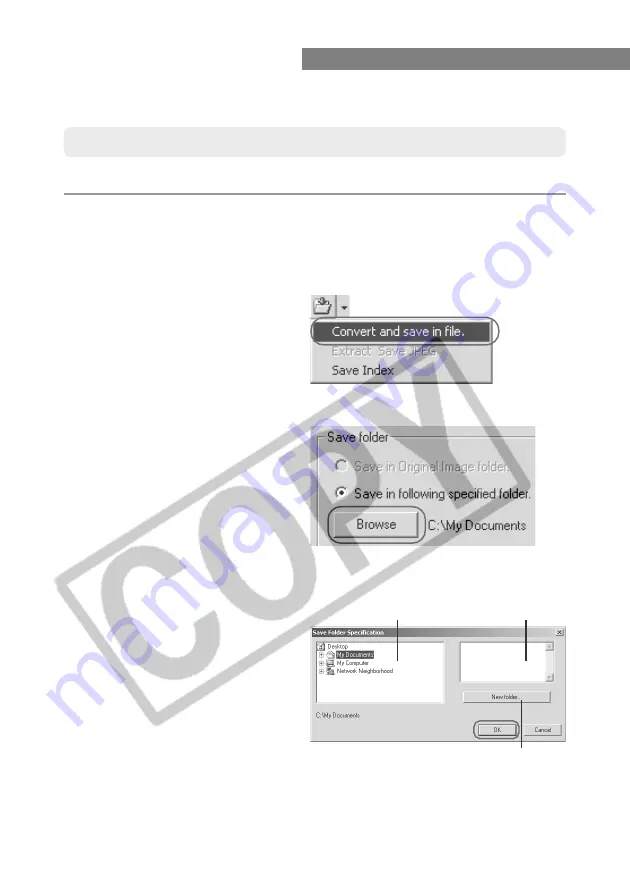
Click the [Save File] button and select [Convert and save in file]
from the menu that appears.

\

The [Save File] dialog box appears.

4

Select a folder.

Select the folder that the images
will be saved in from the folder
display area and click the [OK]
button.

\

The image files in the selected
folder are displayed in the file
display area.

File display area

Folder display area

New folder button

3

Click the [Browse] button.

\

The [Save Folder Specification]
dialog box appears.

Save Folder Specification dialog box

Содержание EOS-1Ds Mark III

Страница 1: ...lease read these instructions carefully before using the EOS 1Ds software This guide should be kept in a safe place so that it can be used for future reference INSTRUCTIONS English Edition Windows CT1...

Страница 2: ...urposes or copy the SOFTWARE onto the permanent storage device e g a hard disk of your computer and retain the original for back up purposes Any other copying of the SOFTWARE is a violation of this Ag...

Страница 3: ...provision of this Agreement is declared or found to be illegal by any court or tribunal of competent jurisdiction such provision shall be null and void with respect to the jurisdiction of that court o...

Страница 4: ...ages 3 12 Selecting Images with the Mouse 3 12 Selecting Images from the Control Panel 3 12 Working with Selected Images 3 13 Operations that Can Be Used with Images 3 13 Protecting Images 3 14 Select...

Страница 5: ...s 7 2 Downloading with the Scanner and Camera Wizard 7 2 Downloading with Windows Explorer 7 3 Downloading with the WIA TWAIN 7 5 8 Working with Images in ZoomBrowser EX 8 1 Starting ZoomBrowser EX 8...

Страница 6: ...omissions Canon reserves the right to change the specifications of the hardware and software described herein at any time without prior notice No part of these instructions may be reproduced transmit...

Страница 7: ...p 5 0 LE Marks information that should be read before use to prevent damage to the camera camera malfunction or problems that would interfere with the functioning of software and computer Marks additi...

Страница 8: ...a timer shooting or interval timer shooting function in addition to single frame shooting TWAIN Driver This is a driver for Windows 98 SE and Windows 2000 that allows you to connect the camera to your...

Страница 9: ...using the images saved on your computer and on the camera This program can output your original photo cards or labels 8 label sheets to Card Photo Printer CP 10 optional connected to the computer by...

Страница 10: ...00 MHz Pentium or better Windows 98 SE Windows Me Windows 2000 Windows XP Minimum 256 MB required IEEE1394 File Viewer Utility 100 MB or more RemoteCapture 20 MB or more TWAIN Driver 25 MB or more WIA...

Страница 11: ...1 This chapter describes the procedure for installing the software for the camera and Photoshop 5 0 LE Installing the Software...

Страница 12: ...er shown below appropriate to your operating system Windows 98 SE Windows 2000 TWAIN Driver Windows Me Windows XP WIA Driver Do not connect the camera to your computer before you have installed the so...

Страница 13: ...utton 6 Select the folder in which the software will be installed and then click the Next button 7 Select the software to be installed Click the checkboxes for the software to be installed and then cl...

Страница 14: ...drive 2 Double click My Computer on the desktop to open Windows XP users should click the Start button and then My Computer 3 Double click the Photosle CD ROM icon s the English folder s the Photosle...

Страница 15: ...For the limitations of the WIA Driver please click the Start button and select Programs All Programs on Windows XP s Canon Utilities s EOS 1DS WIA Driver s WIA Driver Readme 1 Connect the camera to yo...

Страница 16: ...in OHCI compatible IEEE1394 port and it comes with Windows 98 SE Windows Me Windows 2000 or Windows XP preinstalled The IEEE1394 interface is not supported for systems not complying with the above con...

Страница 17: ...2 This chapter explains how to connect the camera to your computer and how to use a card reader third party product Getting Ready to Work with Images...

Страница 18: ...ove be sure to end the software being used 1 Plug the interface cable into the computer Plug the cable into the IEEE1394 port on the computer You can plug either end of the cable into the IEEE1394 por...

Страница 19: ...amera is terminated If you are using a household power source no message is displayed and the connection is not terminated To re establish the connection press the shutter button down halfway or set t...

Страница 20: ...Card Folder Structure and File Names The images on a CF card are stored in sub folders named XXXEOS1D where the XXX represents a number from 100 to 999 within the DCIM folder The in the file names rep...

Страница 21: ...ity to display and save images stored on a CF card loaded in the camera and also explains how to perform image processing including processing RAW images and how to transfer images to the retouching s...

Страница 22: ...lected camera model is added to the Model specific processing mode list box 3 7 as a model specific processing mode to be used when you perform processing that is unique to each camera Starting File V...

Страница 23: ...fer mode list box 3 44 Image display area Status bar Comment input box 3 15 Image information display area 3 15 Tree View Area 3 5 RGB value display When you move the cursor over an image the coordina...

Страница 24: ...ous Image button 3 12 About button Select Next Image button 3 12 Play sound button 3 16 Protect button 3 14 Digital Exposure Compensation button 3 21 Save White Balance Settings button 3 28 White Bala...

Страница 25: ...displayed in File Viewer Utility JPEG image RAW image shot on a Canon digital camera TIFF image saved in File Viewer Utility 3 34 For either displaying images stored on a CF card in a third party car...

Страница 26: ...n window Click the Refresh button The information displayed in the main window is updated Showing Hiding Image Information You can hide the histogram and image information display area to display more...

Страница 27: ...bar is displayed and when you select the RAW images shot on the EOS 1Ds you can process them When a JPEG image is selected however the RAW image process tool bar is grayed out and disabled If any imag...

Страница 28: ...ral Settings tab sheet of the Preferences dialog box 3 39 are displayed Protect mark 3 14 This mark is displayed for protected images The available display modes are Thumbnail display Preview and JPEG...

Страница 29: ...hen you select the RAW JPEG image the JPEG image is displayed as a single image When you select the RAW image the JPEG image for the thumbnail display is shown When you select the JPEG image it is dis...

Страница 30: ...3 8 2 Click the Display AF Point button The AF point of the camera used when the shot was taken is displayed Click the button again to hide the AF point For images taken with One Shot AF the focused...

Страница 31: ...ay from the Display Mode list box 3 8 2 Click the Show Hide Thumbnail Frames button The information display frame of the thumbnail image is hidden Click the button again to display the information dis...

Страница 32: ...Image button Selects the first thumbnail image displayed Select Previous Image button Selects the image before the currently selected image Enter Image Number input box Selects the image with the spec...

Страница 33: ...age Processing settings tab sheet 3 40 in the Preferences dialog box Operations Protect Erase Display AF Point Play Sound Comment Input Transfer Image Save File Rotate Image Color Matrix Sharpness Dig...

Страница 34: ...ly displayed for images that were protected on the camera Protection only prevents images from being erased Other types of image processing can still be performed for protected images A range of opera...

Страница 35: ...data The number of items displayed differs depending on the camera settings Use the scroll buttons to display parts of the information that are not visible When you select multiple images the informa...

Страница 36: ...e by selecting the image pressing the right mouse button and selecting an option from the menu that appears Playing Back Sound Use the procedure below to play back sound that was recorded with an imag...

Страница 37: ...to be erased Take particular care when you have just finished a task involving the selection of multiple images When you erase the RAW JPEG image the JPEG image is also erased When you erase an image...

Страница 38: ...commended that you use the Preview mode to check the processed image 3 9 2 Change the parameter settings Change parameter settings See the pages that follow for information on how to set the parameter...

Страница 39: ...olor Matrix 3 Color Matrix 4 Color Matrix 5 Settings Select this option to apply the color matrix used when the shot was taken Reproduces the hues and chroma for natural color tones Select this option...

Страница 40: ...Select the desired level from the Sharpness Level list box Higher values give higher levels of edge sharpening The selected level is applied in the image Adjusting the Pattern Sharpness Select the des...

Страница 41: ...ag the slider left or right with the mouse the image brightness can be adjusted The Preview button appears in the Preview mode When you click the Preview button the image brightness changes according...

Страница 42: ...ad the adjusted tone curve on your computer as tone curve data In addition you can register the tone curve data saved on your computer as parameters in the camera 4 24 1 Click the Adjust Tone Curve bu...

Страница 43: ...ne curve settings list box Windows Macintosh compatibility for tone curve data Tone curve data saved on your computer is compatible between Windows and Macintosh 4 Press the Preview button The adjuste...

Страница 44: ...ction The tone curve adjustment options include RGB which adjusts the input and output for the entire image in a single operation as well as the Rch Gch and Bch settings that adjust each color individ...

Страница 45: ...temp Details Select this option to apply the white balance setting used when the shot was taken File Viewer Utility automatically adjusts the white balance Select this setting for shots taken outdoor...

Страница 46: ...to a value between 2800K and 10000K in 100K increments 1 Select color temp from the White Balance list box 2 Enter a color temperature Enter the color temperature in the Color Temp input box You can e...

Страница 47: ...Click White Balance button When you move the cursor over the image it changes to the shape of a filler 2 Click in a white area in the image The white balance is adjusted so that the area clicked appe...

Страница 48: ...29 1 Click the Save White Balance Settings button The Save As dialog box appears 2 Enter the settings a name and click the Save button Select the destination folder and then save the white balance da...

Страница 49: ...which the IPTC information is set 3 12 2 Click the IPTC information button The IPTC information dialog box appears 3 Select an item and specify the information Click the desired IPTC information tab t...

Страница 50: ...y sending the image You can enter up to 32 characters 4 Type in a description of the photographed image You can enter up to 2000 characters 5 Type in the name of the person who wrote the caption You c...

Страница 51: ...priority level from the list box 1 Highest Priority 5 Normal or 8 Low Priority 10 Type in any instructions required for editing You can enter up to 256 characters 11 The date on which the image was ph...

Страница 52: ...enter up to 32 characters 16 Enter a search keyword for each company You can enter up to 32 characters 17 Enter the image subtitle You can enter up to 256 characters 18 Enter the credits for a photog...

Страница 53: ...he image thumbnails 24 When multiple images are selected this button displays the IPTC information for the previous image 25 When multiple images are selected this button displays the IPTC information...

Страница 54: ...images to be saved 3 12 2 Click the Save File button and select Convert and save in file from the menu that appears The Save File dialog box appears 4 Select a folder Select the folder that the images...

Страница 55: ...able for images saved on your computer or on a CF card in a card reader 2 Use this button when you want to specify the folder in which the image will be saved 3 When the Save in following specified fo...

Страница 56: ...os 4 Highest Image Quality to 1 High Compression Ratio The higher the value the higher the quality of the JPEG image 7 Click this checkbox when you want to save the image without changing the name 8 T...

Страница 57: ...dialog box appears 3 Enter the settings and click the OK button Index Sheet Options dialog box 1 Enter the width of the index sheet to be created 2 Enter the height of the index sheet to be created 3...

Страница 58: ...r in which the image will be saved 3 When the Save in following specified folder radio button is selected this button specifies the folder in which the image will be saved 4 Shows the folder in which...

Страница 59: ...3 7 You can add the model specific processing mode if you click the checkbox of the camera to be added and click the OK button on the Select model specific processing mode dialog box displayed by clic...

Страница 60: ...he tone curve adjustment 3 22 cannot be performed Since the linear processing is performed on the tone curve adjustment there is little image degradation as a result and you can make your own fine adj...

Страница 61: ...eets They function in the same way in each sheet 11 Restores the default settings for all the parameters in the currently displayed tab sheet 12 Applies the specified parameters closes the Preferences...

Страница 62: ...ng images it is necessary to specify the retouching software to which images will be transferred and the folder for saving the images to be transferred The descriptions given here show how to transfer...

Страница 63: ...ansferred images and then click the OK button The folder is specified and then the General Settings tab sheet appears 6 Click the OK button The settings are applied the Preferences dialog box closes a...

Страница 64: ...r 3 42 1 Select images to be transferred 3 12 2 Select the transfer mode from the Image transfer mode list box There are 2 available transfer modes Single Frame Transfer The selected images are transf...

Страница 65: ...tings and click the OK button Photoshop 5 0 LE starts and the image is transferred The transferred image is saved in the image transfer folder that you have set Display an image transferred with Singl...

Страница 66: ...3 46 MEMO...

Страница 67: ...apter describes basic settings such as Owner s Name and Date Time as well as detailed settings such as the Personal Functions Parameters and Personal White Balance Specifying Camera Settings from Your...

Страница 68: ...card Display the Camera Settings dialog box To display this dialog box from File Viewer Utility click the Camera Settings button in the main window To display this dialog box from the WIA Driver sele...

Страница 69: ...d in the camera along with the available space on the card and its total capacity You can also format a CF card from this box Applies the specified settings closes the Camera Settings dialog box and e...

Страница 70: ...e Date and Time or you can enter the desired date or time from the keyboard Clicking the From PC button imports the Date and Time data from your computer 3 Click the Apply button The owner s name date...

Страница 71: ...the settings for each function on your computer 1 Click the Detailed Settings tab The Detailed Settings tab sheet appears 2 Click the desired settings button Sets the processing parameters and stores...

Страница 72: ...ombination tab sheet in which you can check the Personal Functions that are currently set up In the Combination tab sheet you can also save and load the Personal Function settings on your computer Set...

Страница 73: ...ssist beam from being emitted 4 15 Enables automatic shooting when focus is achieved at the fixed point of focus while the shutter button is pressed fully 4 16 Disables automatic AF point selection 4...

Страница 74: ...a 4 Repeat steps 2 and 3 to set up additional Personal Functions 5 Apply the Personal Function Settings to the camera Clicking the OK button applies the specified settings to the camera and closes the...

Страница 75: ...g modes can be skipped while you are selecting the shooting mode This makes selecting the desired shooting mode faster At least one checkbox must be left unchecked Disables the metering modes Click th...

Страница 76: ...and 1 60 sec as the slowest the shutter speed range will be 1 2000 to 1 60 sec This makes shutter speed selection faster and prevents a slow speed sync in aperture priority AE mode with the flash If y...

Страница 77: ...maximum and or minimum aperture to one that is not a full stop increment such as f 6 3 If the largest aperture of the attached lens is smaller than the largest aperture you set with P Fn 05 the large...

Страница 78: ...from the one specified with P Fn 03 you can select the metering mode specified with P Fn 03 by pressing the button If P Fn 04 and or P Fn 05 has been set set the shutter speed and aperture within the...

Страница 79: ...ots is 2 1 0 1 and 2 If you select 5 frame white balance bracketing the frames are shot at 10 5 0 5 and 10 mireds This function is useful for adjusting the range of bracketing Even when the setting is...

Страница 80: ...shift the standard program line so that priority is given to the shutter speed or to the aperture By shifting the program you can change the shutter speed or aperture and still retain the same exposur...

Страница 81: ...lens driving operation can result in grossly inaccurate focus This subsequent lens driving operation is turned off P Fn 14 is especially suited for super telephoto lenses If autofocusing is attempted...

Страница 82: ...ble to charge in time for successive shots and will not fire at full charge If you set the drive mode to continuous shooting set the number of shots in P Fn 20 If you do not use P Fn 20 once the camer...

Страница 83: ...n 17 will override P Fn 18 to disable automatic AF point selection Sets the continuous shooting speed You can select the number of continuous shots during continuous shooting By reducing the maximum c...

Страница 84: ...for a specific number of seconds You can change this number of seconds as necessary The function s activation time can be set from 0 to 3600 sec 1 hour If the standard activation time is too short or...

Страница 85: ...ts the default settings when the CLEAR QUALITY WB button is ON You can use this function to select the default mode selected when you press the CLEAR button QUALITY WB Convenient when you want to inst...

Страница 86: ...back Especially the image shot on the camera without setting P Fn 30 to ON cannot be enlarged The image shot on any camera other than the EOS 1Ds cannot be enlarged Add original decision data The data...

Страница 87: ...You can use this tab sheet to check the Personal Function parameters currently set on your computer and check whether they have been applied to the camera 2 If the data has not been applied click eith...

Страница 88: ...ettings Click the Save As button or Save button The specified Personal Function settings are saved When you click the Save As button the Save As dialog box appears Enter the file name and select the d...

Страница 89: ...box appears 2 Load the settings Open the folder containing the settings select the file and click the Open button The Personal Function settings data saved in that file are loaded into the computer Wi...

Страница 90: ...formation on setting the parameters on the camera see Setting the Processing Parameters in the EOS 1Ds Instructions Setting the Parameters 1 Click the Parameters button The Parameters Settings dialog...

Страница 91: ...ser Defined Tone Curve dialog box appears If you do not wish to specify the user defined tone curve in the camera proceed to step 9 4 Click the Open button The Open dialog box appears 5 Load the tone...

Страница 92: ...be displayed from the Color Channel list box and check the colors You cannot adjust the tone curve at this point Use the procedure in Adjusting the Color and Brightness Adjust Tone Curve 3 22 to adjus...

Страница 93: ...e applied to JPEG images The available Intensity settings are 0 1 2 3 4 and 5 Higher values give higher levels of edge sharpening The available Object settings are Fine Medium Fine Standard Medium Rou...

Страница 94: ...Confirm Settings dialog box appears 11 Check the settings and click the Apply to Camera button The settings are registered on the camera and the Confirm Settings dialog box closes 12Click the Close bu...

Страница 95: ...ption for the loaded white balance data Up to 3 personal white balance settings consisting of the white balance data saved in the Saving the White Balance procedure 3 28 can be registered on the camer...

Страница 96: ...r the data to be registered from the Select Personal White Balance list 3 Click the Browse button The Open dialog box appears 4 Load the white balance data Open the folder containing the saved white b...

Страница 97: ...camera To register another personal white balance setting repeat steps 2 to 5 You can register up to 3 settings PC1 PC2 and PC3 To delete a registered PC setting select the PC number from the Select P...

Страница 98: ...4 32 MEMO...

Страница 99: ...This chapter describes the operations using the RemoteCapture software such as remote shooting timer shooting and interval timer shooting Operating the Camera from Your Computer 5...

Страница 100: ...he File menu If you use RemoteCapture to take pictures while you are using the WIA Driver Windows Explorer to display images on the camera RemoteCapture may not operate correctly When you are using mi...

Страница 101: ...mages are completely removed from your computer Check images carefully before deleting them View button Displays the image selected in thumbnail view enlarged in a separate window Disconnect button Cu...

Страница 102: ...r computer Rotation list box Rotates the image to be shot 90 degrees left or right Shooting window Size Quality list box Allows you to select the recorded quality of images Detail setting button Displ...

Страница 103: ...t attached etc you cannot perform the operation as shown below Taking Shots from Your Computer 1 Set the camera up ready to shoot 2 Make various settings For information on how to set the size image q...

Страница 104: ...leted To load an image rotated select 90 degree Right or 90 degree Left in the Rotation list box before clicking the Release button To rotate a downloaded image select the image and then select Rotate...

Страница 105: ...cond increments You can set up to a maximum of 9999 shots Interval timer shooting is performed using the specified interval between shots and the specified number of shots On some types of computer if...

Страница 106: ...a number of seconds and click the Start button You can set a value between 2 and 30 seconds in 1 second increments Timer shooting are taken after the specified number of seconds Printing Images You ca...

Страница 107: ...se the procedure below to select the folder in which images will be saved and to specify the file names 1 Select Preferences in the File menu in the Save window The Preferences dialog box appears 2 Se...

Страница 108: ...ters 4 Select the folder in which images will be saved Select the drive and then the folder to be used for saved images The path for the selected folder appears in the Folder to which Images are Downl...

Страница 109: ...make detailed settings be sure to confirm that the camera is ready for shooting If the camera is not ready for shooting the lens is not attached etc you cannot make some of the settings 1 Display the...

Страница 110: ...the shooting mode 3 Allows you to specify Metering Mode 4 Allows you to specify ISO Speed 5 Allows you to specify Color Temperature 6 Allows you to specify Parameters 7 Allows you to specify Color Mat...

Страница 111: ...ter explains how to start the TWAIN Driver and how to display JPEG images stored on a CF card in the camera You cannot display or process RAW images with the TWAIN driver Use File Viewer Utility descr...

Страница 112: ...a TWAIN devices You cannot display or process RAW images with the TWAIN driver Use File Viewer Utility described in Chapter 3 to display or process RAW images 1 Connect the camera to your computer 2 2...

Страница 113: ...e CF card in the camera is displayed Menu bar Displays the File and Help menus Thumbnail Image display area TWAIN Driver main window To close the TWAIN driver select Exit from the File menu on the men...

Страница 114: ...images to the TWAIN compatible application Photoshop etc 1 Select an image to be transferred 2 Select Transfer Images from the File menu on the menu bar The image transferred to Photoshop 5 0 LE is di...

Страница 115: ...s with the WIA Driver A number of restrictions apply to the WIA Driver including restrictions on image deletion and protection For more information refer to click the Start button s Programs All Progr...

Страница 116: ...ner and Camera Wizard and then click the OK button The Scanner and Camera Wizard dialog box appears 2 Click the Next button The image selection window in the Scanner and Camera Wizard dialog box appea...

Страница 117: ...lect EOS 1DS You can start Windows Explorer by right clicking the Start button and selecting Explorer from the menu that appears The camera s images will be displayed as thumbnails in the Explorer win...

Страница 118: ...ly If you start File Viewer Utility from Windows Explorer the functions of File Viewer Utility that you can use are limited In addition to that Tree View Area is not displayed the functions such as th...

Страница 119: ...Windows Me the Scanner and Camera Wizard dialog box appears If you are using Windows XP the EOS 1DS dialog box appears 2 Click the Cancel button 3 Start Photoshop Click the Start button and select Pr...

Страница 120: ...be displayed in the WIA TWAIN Accordingly RAW images cannot be downloaded with this method To download RAW images use Windows Explorer See Downloading with Windows Explorer 7 3 The methods for starti...

Страница 121: ...This chapter explains how to use ZoomBrowser EX to perform a range of operations from downloading the camera s images to printing them Working with Images in ZoomBrowser EX 8...

Страница 122: ...wse Download Images This will display the Camera window The images on the CF card will display in the Camera window as thumbnails If multiple PC card readers loaded with CF cards are connected or if a...

Страница 123: ...u or PDF manual ZoomBrowser EX Software User Guide Main Window ZoomBrowser EX s main window features various buttons and an image display area This section introduces the names and functions of the va...

Страница 124: ...ch as View as a Slide Show Process RAW Images Edit Image and Stitch Photos Internet Button Use this button to attach an image to an e mail message Clicking this button opens the menu with the Email Im...

Страница 125: ...Size Button Scroll mode only Selects the size at which images are displayed in the Browser Area View Image Button Displays the selected image in the Viewer window Properties Button Displays informatio...

Страница 126: ...you wish to carry out from those below Download Image Button Downloads selected images to the computer Print Button Automatically starts the printing process after downloading the selected images to...

Страница 127: ...on the selected images Set Button Adjusts the settings for connecting to cameras Select Button Selects images Deselect Button Deselects images Rotate Button Rotates selected images Delete Button Delet...

Страница 128: ...yed When you download JPEG images that have been rotated automatically if the Auto Rotate function is set to On or manually by the camera or that have been rotated in the Camera window two images are...

Страница 129: ...lect them You can select multiple images by clicking on successive images To deselect an image click it again A Download Settings dialog allowing you to select the image destination folder will displa...

Страница 130: ...appear in the main window Printing Images 1 Select the image s you wish to print Click images to select them You can select multiple images by clicking on successive images To deselect an image click...

Страница 131: ...he ZoomBrowser EX window selecting Properties and typing a comment The PhotoRecord printing program will start and display the PhotoRecord Print Modes dialog 4 Select a print mode and click Next For t...

Страница 132: ...layout set the printing settings in the PhotoRecord window 8Click the PhotoRecord Print button The Print dialog will display 9 Click Print to start printing When you click the Print button after havin...

Страница 133: ...ically selects optimal image correction settings to produce better prints 1 Right click an image you wish to print and select Clip Correct Photo 2 Place a check mark beside Exif Print or Auto Photo Pe...

Страница 134: ...Images in the displayed menu File Viewer Utility starts and the thumbnail displayed RAW image appears in the File Viewer Utility main window If you start File Viewer Utility from ZoomBrowser EX the f...

Страница 135: ...age Select the JPEG images in the Browser Area click View Modify s StitchPhotos PhotoStitch starts up Follow the instructions in the guidance window to merge the images Please refer to the PhotoStitch...

Страница 136: ...8 16 MEMO...

Страница 137: ...9 This chapter provides a troubleshooting manual and describes the software uninstallation procedures Troubleshooting and Uninstallation...

Страница 138: ...Ds TWAIN Driver or EOS 1Ds WIA Driver Is the cable firmly plugged into its socket Ensure that the plug on the interface cable is securely plugged into the IEEE1394 port on your computer 2 2 Is your PC...

Страница 139: ...supported for systems not complying with the above conditions Are the camera and computer connected correctly Connect the camera to your computer correctly using the interface cable 2 2 Is there suff...

Страница 140: ...able and uninstall the driver 9 7 3 Re install the driver 1 2 4 After installation ends restart your computer 5 Following the restart connect the camera to your computer using the interface cable 2 2...

Страница 141: ...Properties dialog box and select the Device Manager tab Windows 2000 Click the Start button and select Settings s Control Panel Then double click the System icon to open the System Properties dialog b...

Страница 142: ...ows XP Professional users should log on with Administrator privileges To prevent computer malfunctions always restart your computer after you have uninstalled the software Re installing the software w...

Страница 143: ...ities s EOS 1DS TWAIN Driver s TWAIN Driver Uninstall If you are using Windows Me or Windows XP click the Start button and then select Programs All Programs on Windows XP s Canon Utilities s EOS 1DS W...

Страница 144: ...ears click the Yes button Once EOS 1DS is no longer displayed in the Scanners and Cameras Properties dialog box or the Scanners and Cameras dialog box close the dialog box and proceed as follows If dr...

Страница 145: ...anon Digital Camera is displayed when you click the plus symbol to the left of Imaging devices or Other devices select and right click EOS 1DS or Canon Digital Camera and select Uninstall from the men...

Страница 146: ...Start button and select Settings s Control Panel Then double click the Folder Options icon The Folder Options dialog box appears 2 Select the View tab The View tab sheet appears 3 Select the Show all...

Страница 147: ...Drvidx bin 7 Double click the Other folder in the Inf folder to open 8Delete the Canon IncCAP_1DS inf file if it exists The Inf folder contains a large number of files Deleting the wrong files could a...

Страница 148: ...ows 2000 users 1 Click the Start button and select Settings s Control Panel 2 Double click the Folder Options icon The Folder Options dialog box appears 3 Select the View tab The View tab sheet appear...

Страница 149: ...der may contain multiple pairs of Oem files 8Check the contents of the Oem files Double click an Oem file to display the file contents Check that Canon Camera Driver Setup File appears on the first li...

Страница 150: ...e Folder Options dialog box appears 2 Select the View tab The View tab sheet appears 3 Select the Show hidden files and folders radio button in Hidden files and folders If you have already selected th...

Страница 151: ...nf The Inf folder may contain multiple pairs of Oem files 8Check the contents of the Oem files Double click an Oem file to display the file contents Check that Canon Camera Driver Setup File appears o...

Страница 152: ...onnect the interface cable from your computer Uninstall Photoshop 5 0 LE as follows Click the Start button and select Programs All Programs on Windows XP s Adobe s Photoshop 5 0 Limited Edition s Unin...

Страница 153: ...ay Size list box 3 3 3 11 E Erase Image button 3 4 3 17 F File Viewer Utility VII File Viewer Utility main window 3 3 I Image information display area 3 3 3 15 Image recording formats and image proces...

Страница 154: ...Balance Settings button 3 4 3 28 Saving Personal Function Settings 4 22 Scroll Mode 8 5 Select Image button 3 4 3 15 Select the White Balance 3 25 Setting the Color Temperature 3 26 Setting the Owner...

Страница 155: ...le click the My Computer icon on the Windows desktop followed by the Photosle CD ROM icon The window will show folders with language names Double click the appropriate language folder and the Support...

Страница 156: ...MEMO...

Страница 157: ...France CANON UK LTD Woodhatch Reigate Surrey RH2 8BF United Kingdom CANON DEUTSCHLAND GmbH Europark Fichtenhain A10 47807 Krefeld Germany CANON ITALIA S p A Palazzo L Strada 6 20089 Rozzano Milanofio...

Отзывы: