background image

22

Loading Paper

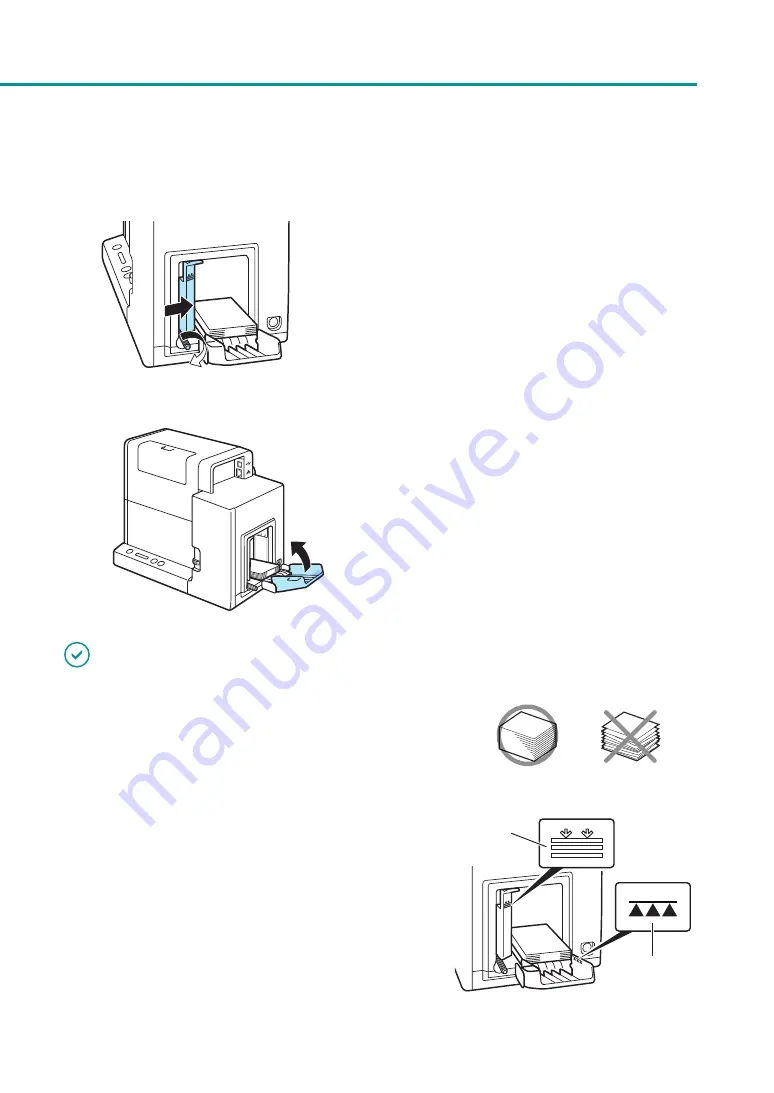
4.  Adjust the side guides to the paper edge, 

and secure them in place with the screw.

5.  Close the auxiliary tray.


For long sheets of paper (paper length of  
157 mm (6.18 inch) or longer):
You do not need to close the auxiliary tray.

IMPORTANT

•  Align the edges before loading. Not doing so can cause paper 

jams.

•  Check that the height of the paper stack is not exceeding the 

load limit mark.
Paper length of 91 (3.58 inch) mm or less (business card, etc.): 
Can be set up to the load limit mark (arrow) (B).
Paper length of 157 mm (6.18 inch) or longer: 
Can be set up to the load limit mark (line) (C).

B

C

Содержание CX-G2400

Страница 1: ...Basic Operation Guide COLOR CARD PRINTER CX G2400 Please read this guide before operating this product When finished reading store it in a safe place for future reference...

Страница 2: ...prior to using this product This manual contains troubleshooting procedures as well as steps on how to print and change paper User s Guide This manual is available in PDF format and provides a detail...

Страница 3: ...Operation Panel 13 Turning the Printer On Off 15 Turning the Printer On 15 Turning the Printer Off 16 Loading Paper 17 How to Print 28 Making Prints 28 Cancel Printing 34 How to Check the Printer Sta...

Страница 4: ...o read these indications NOTE Instructions including notes for operation and additional explanations Indicates an operation that must not be performed Read these items carefully and make sure not to p...

Страница 5: ...omissions or mistakes in this manual We can accept no responsibility for loss or damages resulting from the use of this printer or its software please accept this before you use the printer Legal Not...

Страница 6: ...RNING Do not place the following objects on the printer Necklaces and other metal objects Cups vases flowerpots and other containers filled with water or liquids If such an object is brought into cont...

Страница 7: ...15 to 30 degrees Celsius 59 to 86 degrees Fahrenheit RH 10 to 80 with no condensation If the printer is carried into a warm room on a cold day this could cause condensation inside the printer If this...

Страница 8: ...amage to the printer CAUTION To avoid damaging the power plug which could cause a short circuit and cause a fire or electrical shock do not pull on the power cord to unplug the cord from the power sup...

Страница 9: ...mable spray near the printer If the sprayed gas is brought into contact with the electric parts inside the printer a fire or electric shock could result CAUTION If the printer is dropped and damaged t...

Страница 10: ...ately Turn the printer on again before performing any operation Pulling out the transport unit forcibly without turning the printer on again could cause a printer failure Do not place the printer clos...

Страница 11: ...r Shipping The Printer from the printer driver Moving or Shipping the printer without taking necessary measures could cause ink leak inside the printer resulting in a fire electric shock or printer fa...

Страница 12: ...fore cleaning the printer be sure to turn it off and remove the power plug from the power outlet Otherwise a fire or electric shock could result Ink Tank and the Maintenance Cartridge CAUTION Always s...

Страница 13: ...4 Ink Tank Cover Open this cover when replacing ink tanks 5 Paper Switch Lever Switch the lever position according to the thickness of the paper to be set 6 USB Connector Connect a USB cable to this...

Страница 14: ...ntact customer support or require any sort of printer repairs 12 Power Socket Connect the supplied AC adapter to this socket IMPORTANT While the printer is operating do not open the ink tank cover or...

Страница 15: ...slot 3 Transport Belt Transports paper here Clean the transport area when stained with paper dust and ink For how to clean refer to Cleaning the Printer User s Guide 4 Paper Guide This guide holds th...

Страница 16: ...eaning etc Lit orange An operator call error has occurred Blink orange A service call error has occurred Off Instructions and print data cannot be received from the computer offline mode 3 Ink Lamps B...

Страница 17: ...ing this key stops printing temporarily Pressing this key again resumes printing 6 Tray Key Use this key to move the feeder lift tray upward downward NOTE When the printer is in the sleep mode the Sta...

Страница 18: ...s the Power key The status lamp will blink green and then light up NOTE About the Sleep Timer The printer will automatically enter sleep mode when a predetermined amount of time elapses without printi...

Страница 19: ...hold the Power key for at least 1 second When the Power lamp stops blinking the printer is turned off IMPORTANT After powering the printer down make sure the power lamp is off prior to unplugging the...

Страница 20: ...rchase for paper specifications and availability 1 Make sure the Power lamp is lit If the Power lamp is off press the Power key to turn the printer on P 15 2 Set the paper switch lever Extra Thick Pap...

Страница 21: ...t tray is already lowered proceed to step 4 1 Press the Tray key Wait for the feeder lift tray to stop CAUTION Do not touch the feeder lift tray when it is moving Do not insert your hand or place obje...

Страница 22: ...d at once printing surface printing surface Fig 1 0 2 mm 0 0 08 inch Fig 2 2 Check the paper curl As shown in the figure if the paper is placed with the printing surface facing up and the paper is cur...

Страница 23: ...the card do not touch the printing surface with your fingers Flip through the two short edges of the card thoroughly If you have difficulty flipping through the cards flip through small numbers of ca...

Страница 24: ...note if the screw its turned too much it will come off 3 Load the paper so that the furthest edge touches the back of the feeder lift tray Align the paper neatly before loading If the paper has front...

Страница 25: ...r You do not need to close the auxiliary tray IMPORTANT Align the edges before loading Not doing so can cause paper jams Check that the height of the paper stack is not exceeding the load limit mark P...

Страница 26: ...ng paper close the auxiliary tray When loading longer paper paper length of 157 mm 6 18 inch or longer there is no need to close the auxiliary tray When printing on longer paper paper length of 157 mm...

Страница 27: ...Paper 7 Check the paper guide positions 1 Remove the stacker if it is used 2 Raise the transport unit lever and pull the transport unit out 3 Pull the transport unit out with both hands as shown in t...

Страница 28: ...igure check that the paper guides are set to the MM position While holding the paper guides D and E with your fingers adjust them to the paper width indexes F and G For example the figure on the left...

Страница 29: ...ION When returning the transport unit back inside the printer be careful not to get your fingers caught between the transport unit and the inside of the printer 6 Push the transport unit lever until i...

Страница 30: ...of different type or size change the printer driver setting Printing on paper of a wrong size could make the stain on the transport belt paper guides or other areas If the stain occurs clean the tran...

Страница 31: ...omputer returns from a resting or sleep state to an operating state Selecting Never in the Microsoft Windows Power Saver or Power Option settings will prevent the computer from entering a sleep state...

Страница 32: ...0 03 inch wider than the actual width Transport direction Paper width 51 0mm 58 0mm 2 01 inch 2 28 inch Document paper width Paper width 0 7mm 0 03inch 0 35mm 0 01inch 0 35mm 0 01inch Document paper l...

Страница 33: ...1 7mm 0 07inch 0 85mm 0 04inch 0 85mm 0 04inch Transport direction 2 To the paper size create a document IMPORTANT Printing does not take place in the region outside the printing area which is by defa...

Страница 34: ...ide position To prevent this message from being displayed check the Do not show this message again check box and then click OK To allow this message to be displayed again you need to reinstall the pri...

Страница 35: ...or AC adapter is disconnected or a blackout occurs do not draw out the transport unit immediately Turn the printer on again before performing any operation Drawing out the transport unit forcibly with...

Страница 36: ...The total number of copies which have been printed by the current job is displayed Automatic Speed Whether the automatic speed function is turned ON or OFF is displayed Print Speed The currently set p...

Страница 37: ...NOTE Stop Printing Temporarily To stop printing temporarily press the Pause key on the operation panel Besides the status monitor you can cancel printing from the Print Queue window a window in which...

Страница 38: ...al screen will open allowing you to know details of the message and how to handle the error For details of the error and warning messages displayed on the status monitor refer to List of Error Message...

Страница 39: ...printer that requires attention the Status Lamp on the Operation Panel will light up orange operator call error The error details and actions required can be confirmed with the Status Monitor After s...

Страница 40: ...s the pause key and bring it online If multiple errors occur simultaneously the errors will be shown in order from the importance Handle all of the errors Status Lamp Is Flashing Orange When an error...

Страница 41: ...orrectly with the interface cable Is the correct printer selected Select the printer to be used with the Printing dialog box Are you printing a large image If the Status Lamp green is flashing the dat...

Страница 42: ...w For Windows 10 Right click on start and then select Control Panel Hardware and Sound Devices and printers For Windows 8 1 From the Desktop charms select Settings Control Panel Hardware and Sound Dev...

Страница 43: ...8 1 From the Desktop charms select Settings and enter cmd For Windows 7 Enter cmd in the Search programs and files of the Start menu 2 In the window started enter ipconfig all 3 After confirming the...

Страница 44: ...printer uses for communication are set as follows Use these settings as references Port number Protocol 50000 TCP 50001 TCP UDP 50002 UDP Paper Does not Feed Properly Points to Confirm Solution Is the...

Страница 45: ...on Solution Streaks appear on the print Confirm that the paper set size shape and type matches the paper size shape and type configured by the application software or printer driver Set the resolution...

Страница 46: ...printhead Refer to Adjusting the Printhead Position User s Guide Set the resolution to Input resolution 1200dpi prioritize image quality and then print Refer to Changing the Print Quality and Adjusti...

Страница 47: ...application software or printer driver Set the resolution to Input resolution 1200dpi prioritize image quality and then print Refer to Changing the Print Quality and Adjusting the Color User s Guide...

Страница 48: ...at the size of the set paper and the Paper Size configured by the application software or printer driver are the same If the transport belt paper guides or other areas are stained clean the transport...

Страница 49: ...on the edge of the paper are missing Decrease the Paper Length and adjust the image according to the paper size changed Also if images on the edge of the paper are missing verify that the transport a...

Страница 50: ...s below to remove the paper jam IMPORTANT Use the dedicated paper When paper that is not compatible is used blurring or bleeding may occur and it may adversely affect the printer causing a malfunction...

Страница 51: ...ands so it does not fall Do not put your hands inside the printer Failures or physical injury could result Ink adhered inside of the printer could stain clothes or hands IMPORTANT When pulling the tra...

Страница 52: ...leshooting 4 Remove the jammed paper from the transport unit Check that the paper is not jammed further in the transport unit If paper is jammed remove it 2 Check the feeder slot If paper is jammed re...

Страница 53: ...sensor lever A 3 Set the transport unit in the printer 1 Slowly insert the transport unit as far as it will go As you do this be careful not to touch the paper guides doing so will change their positi...

Страница 54: ...micro margin printing is not possible MM G 58 MM 51 54 55 1 While holding the paper guide A with your fingers adjust it to G of the index C When setting paper guide B to a position other than MM adjus...

Страница 55: ...aper guide to the position shown in Table 1 Guide positions of paper Table 1 Guide positions of paper Paper name Guide position mm Business Card 55 0 x 91 0 mm 2 17 inch 3 58 inch 54 55 Card CR80 Plas...

Страница 56: ...000BASE T 100BASE TX 10BASE T Ethernet Operating noise Approx 58 dB A or less Installation environment Temperature 15 to 30 degrees Celsius 59 to 86 degrees Fahrenheit Humidity 10 to 80 no condensatio...

Страница 57: ...s Sheets 0 21 mm 0 76 mm 8 27 mil 29 9 mil Thick plastic card About 0 7 mm 27 5 mil Thin plastic card About 0 4 mm 15 7 mil Tray capacity Business Card 250 sheets thickness 0 245 mm 9 64 mil or less E...

Страница 58: ...CH NISCA INC 2017 2021 PRINTED IN JAPAN 4Y8 8145 020 CANON U S A INC One Canon Park Melville NY 11747 U S A www usa canon com CANON SINGAPORE PTE LTD 1 Fusionopolis Place 14 10 Galaxis Singapore 13852...

Отзывы: