background image

Tiled photo printing (Borderless printing)

94

8

Specify paper margins (the space around the printed matter on a 
page) if necessary. 

9

Click the OK button to exit the layout selection wizard.

The Print window appears where the selected photo images are arranged so that 
they fit the page size you specified. 

Page Artwork

When the Tiled photo printing option is selected, you cannot change the location 
and size of the images although the image cropping and text insertion features are 
available.

Starting printing

Click the PRINT button to begin printing.

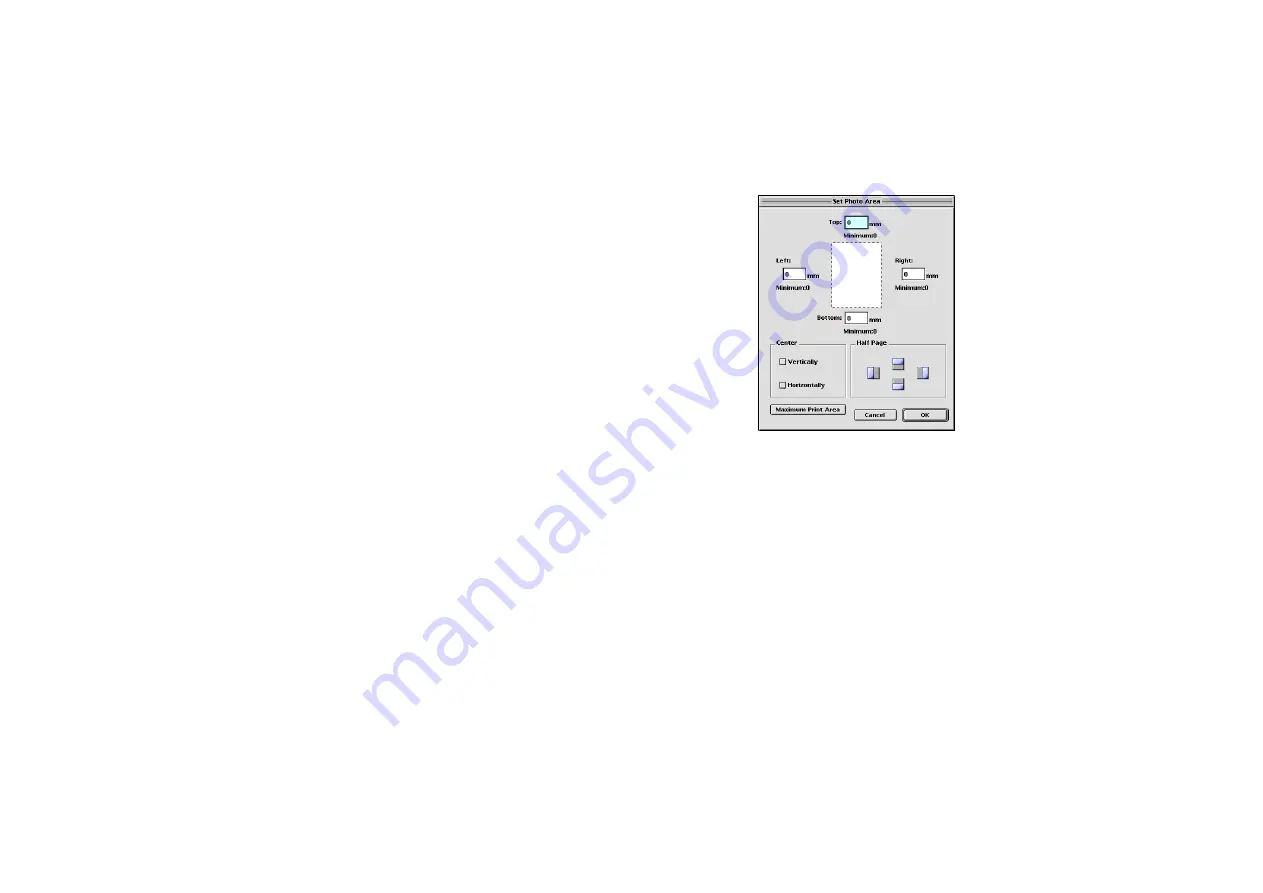
Click the Set Photo Area button to open the Set Photo 
Area
 dialog box. In this dialog box, you can specify the top, 
bottom, right, and left margins. However, since the margins 
will be automatically calculated and set to appropriate 
values by the printer driver, in most cases you do not have to 
specify manually. You should specify the margins only when 
desired outputs are not produced. 

Click the OK button to make the settings take effect.

Содержание 820D - S Color Inkjet Printer

Страница 1: ...Photo Application Guide V1...

Страница 2: ...2 Editing Image Using Image Viewer 26 Slide show 30 Time Tunnel 36 Adding Sound to Image 37 Creating Image Files Attached to E mail 40 Creating Panoramic Photo Using PhotoStitch 44 Opening Image Selec...

Страница 3: ...g 84 Tiled photo printing Borderless printing 89 Canon perforated paper printing 95 About Canon perforated paper 102 Starting printing 103 Index printing 107 Page Artwork 115 Editing the layout format...

Страница 4: ...y fashion Using ImageBrowser with a Canon BJ printer and a scanner or digital camera you can enjoy superb quality photo prints Custom layout printing You can quickly reorganize the selected images The...

Страница 5: ...rint images with no margins around each image so that a single image is printed borderless along the paper edges and multiple images are arranged like tiles with no space between them available with B...

Страница 6: ...6 Printing with ImageBrowser Canon perforated paper printing You can easily make your images fit in a sheet of Canon perforated paper...

Страница 7: ...on Procedure The basic operation steps to capture import edit and print photo images are summarized below 1 Acquiring images with a camera or scanner Capture your favorite images with your digital cam...

Страница 8: ...e Automation wizard provides easy means of importing images Start ImageBrowser Import images stored in the memory card or or the digital camera into the Camera window ImageBrowser supports some simple...

Страница 9: ...dows shown above are from BJ S900 Select a layout you want to use and specify the type orientation and size of paper The wizard allows you to easily choose the free layout option the image index list...

Страница 10: ...work Changing the image size trimming and inserting of text are also easy tasks Remember however you can rearrange the images or change the image size only when you have selected the Custom layout pri...

Страница 11: ...an be printed on Canon perforated paper such as Photo Paper Pro PR 101S or Glossy Photo Cards FM 101 Borderless printing is also supported Some features and paper sizes may not be supported depending...

Страница 12: ...mputer and print them in photo quality using the BJ printer With ImageBrowser you can easily display edit and manage images stored in your computer s hard disk as well PhotoStitch PhotoStitch is an ut...

Страница 13: ...ts when it detects a digital camera connected to your computer At the same time the Automation wizard starts Note The Canon ImageBrowser Auto Launch control panel allows you to specify whether ImageBr...

Страница 14: ...cking the Canon ImageBrowser icon alias on the desktop will start ImageBrowser and the initial window is displayed as shown below Then the Browser window appears When the Canon ImageBrowser alias icon...

Страница 15: ...hanging Display Options Organizing Images Deleting Image Updating Information in the Browser Area Editing Image Using Image Viewer Cropping Image Adjusting Image Colors Saving Image after Processing S...

Страница 16: ...ribes the names and functions of the areas and buttons in the Browser window the main window of ImageBrowser 1 Explorer View 2 Browser area 3 Control panel 4 CANON CAMERA button 6 The number of images...

Страница 17: ...d and the display mode Refer to Changing the appearance of the Browser area 3 Control panel This area contains several buttons to manipulate the images in the Browser window 4 CANON CAMERA button Clic...

Страница 18: ...this button to increase the size of thumbnails displayed in the Browser area You can also use the Reduce and Enlarge commands in the View menu to change the size of thumbnails displayed in the Browse...

Страница 19: ...nts the images and their associated information contained in the selected folder in the Explorer View The information on the image appears The display format can be changed Refer to Changing Display O...

Страница 20: ...n be previewed In this mode the image is sized and displayed so that it fits in the Browser area Select the View Mode from the View menu and then select the Preview from the submenu that appears The m...

Страница 21: ...area 21 Changing Display Options You can control what information about an image is displayed below the thumbnail Select the View Settings from the View menu and then select the information you want t...

Страница 22: ...different folder simply drag and drop it its thumbnail in the Browser area onto another folder in the Explorer View The figure below shows the steps to create a new folder You can copy an image to a...

Страница 23: ...g and drop it onto another folder You can copy a folder to a different location by dragging it while pressing the Option key 1 Select the folder in which you want to create a new folder 2 Select the N...

Страница 24: ...n image that has not been imported but is just displayed in the Browser area the image is deleted from the memory card of the camera Even if you delete an image by clicking the SEND TO TRASH button it...

Страница 25: ...lder or move copy or delete an existing folder in the Finder these changes are not reflected immediately in ImageBrowser In cases where you have managed files or folders in the Finder or other applica...

Страница 26: ...ewer Use the ENLARGE button or the REDUCE button to magnify or reduce the size of the image The size of the image is displayed The display scale of the image appears The Image viewer is also invoked b...

Страница 27: ...g Image Select the portion of the image you want to keep by mouse dragging over it and then click the CROP button Area outside the selection is trimmed away CROP button Clicking this button will trim...

Страница 28: ...ge displayed in the Image viewer Clicking the ADJUST COLOR button opens the Adjust Color dialog box which allows you to make color adjustments Click the OK button to make the changes take effect The h...

Страница 29: ...Image after Processing The modified image file can be saved with a new name Type in a file name and specify the file type and click the Save button The iamge is saved as a new file SAVE button Clicki...

Страница 30: ...show You can review sequentially the selected images in the Browser area as a slide show in full screen mode Steps 1 Choose the Slide Show Options from the View menu The window containing options for...

Страница 31: ...ide show Click the button to choose from the following effects Random Images are randomly selected and arranged to be displayed on the screen Fade The current image fades out to be replaced with the n...

Страница 32: ...Slide show 32 5 Select images in the Browser area you want to display as a slide show...

Страница 33: ...Slide show 33 6 Select the Slide Show from the View menu The selected images are sequentially displayed in full screen mode The slide show terminates when the last image has been processed...

Страница 34: ...es for printing If you want to print the current image click this button while it is being displayed When the slide show ends the program automatically proceeds to the layout printing Click again to d...

Страница 35: ...s button to suspend the slide show Click again to resume the slide show Displays next image The next image is displayed Displays last image The last image is displayed Closes slide show Exits the slid...

Страница 36: ...right of the Time Tunnel window to show older or newer images The Tool Pallet allows you to change the appearance of the Time Tunnel window When you select a different folder in the Explorer View the...

Страница 37: ...input device selected in the Sound Panel is used for recording Steps for Recording 1 Select the image to which you want to add sound 2 Select the Record from the Sound menu The Record panel is display...

Страница 38: ...file A mark appears in the bottom left corner of the selected image thumbnail indicating that sound data is attached to that image file The created sound file is stored in the same folder as the image...

Страница 39: ...When you select the Sound Panel from the View Settings submenu in the View menu the Sound Panel is displayed The buttons on the Sound Panel provide convenient access to the commands in the Sound menu...

Страница 40: ...ect the image you want to attach to your Email in the Browser area Choose the Create image for Email command from the Internet menu to open the Create image for Email dialog box At the same time the w...

Страница 41: ...ail 41 2 In the next wizard dialog box specify the Resize rate and the quality of JPEG data When you click the Compress button the calculated file size after compression is displayed at the bottom of...

Страница 42: ...action after data compression If you select the Start email application after closing check box your E mail application will automatically start upon completion of data compression Click the Preview b...

Страница 43: ...il 43 4 A new folder called Email Images is created in which the compressed image is stored To attach the compressed image to your E mail message drag and drop the thumbnail in the Browser area onto y...

Страница 44: ...ic Photo Using PhotoStitch PhotoStitch is an utility program for quickly creating a panoramic photo by merging multiple images captured wth your digital camera 1 Select multiple images thumbnails in t...

Страница 45: ...h PhotoStitch you can merge any number of images vertically or horizontally producing unique posters or other photo prints The wide mode merging feature is also useful when you want to create a wide p...

Страница 46: ...Applications ImageBrowser allows you to register other application programs You can start the registered application programs from ImageBrowser and open the images displayed in the Browser area using...

Страница 47: ...K button to complete the registration Starting a registered application program To run a registered application program select an image in the Browser area and then select the name of the application...

Страница 48: ...ribes the functionality of ImageBrowser to import download images from your digital camera Importing images with the Automation wizard Importing images using the Camera window Using the Camera window...

Страница 49: ...tomatic execution feature When you turn on your Canon digital camera con nected to your computer while ImageBrowser is not running ImageBrowser starts and then the Automation wiz ard is invoked When y...

Страница 50: ...izard starts When the Automation wizard starts the following dialog box containing several options is displayed Select Download images if you prefer the automated image downloading with the Automated...

Страница 51: ...time the Automation wizard starts the ImageBrowser Automation wizard dialog box shows the previous settings as shown below Click the Start button to use the saved sequence of actions If you do not wan...

Страница 52: ...active 2 Click the Next button to proceed The dialog box shows the following options The downloaded images are saved to the folder displayed here To change the destination folder click the Change butt...

Страница 53: ...ected images and saving them in the selected folder When downloading is complete the following message appears Select the next action to do on the downloaded images from the following options Option A...

Страница 54: ...the Browser window with no action performed When the Automation wizard terminates it saves the selected settings so that the ImageBrowser Automation wizard dialog box shows the settings the next time...

Страница 55: ...ton or the Canon Camera icon Condition Data displayed in the Camera window When you select the Display Images option in the Automation wizard All the images stored in your device that can be rec ogniz...

Страница 56: ...window for more information on this window 2 Select the folder where to save the images in the Explorer View Refer to Changing the location of images for more information on dealing with folders inclu...

Страница 57: ...sired thumbnails while pressing the Shift key 4 Click the DOWNLOAD button in the Camera window The selected image s is imported to your computer and displayed in the Browser area 5 Click the close box...

Страница 58: ...he border is displayed around the selected image You can select multiple images by clicking each image while pressing the Shift key Images thumbnails in the memory card are displayed Thumbnails The th...

Страница 59: ...LECT button Click the SELECT button to open a menu containing two items Select All and Deselect All Click Select All to select all the images displayed in the Camera window Click Deselect All to desel...

Страница 60: ...the OK button to completely delete the image from the device Click the Cancel button to cancel the deletion The deleted image is not recoverable 5 DOWNLOAD button Click the DOWNLOAD button to copy the...

Страница 61: ...his button works the same as the PRINT button in the Browser window This button allows you to start custom layout printing or index printing directly from the device images are not imported to your co...

Страница 62: ...in the Camera window the original image stored in the device is not rotated However when you import the image of a rotated thumbnail it is automatically rotated according to the rotation option and d...

Страница 63: ...n select an image file When you select an image to upload in the dialog box the following dialog box appears Specify uploading options such as image size and resizing options and then click the Save t...

Страница 64: ...w 64 9 IMAGE INFO button This button enables you to view the information on an image selected in the Camera window Select an image in the Camera window and then click the IMAGE INFO button The followi...

Страница 65: ...button to open the Edit Slide DPOF window Using this window you can modify the settings for slide shows or DPOF for your Canon Digital Camera and write the modified information to your camera Note Onl...

Страница 66: ...xplorer View displays the Camera window Communication settings Select the Communication Settings option from the Settings submenu in the Canon Camera menu to display the following dialog box Note When...

Страница 67: ...ows you to specify the action when a Canon camera is detected 1 Double click the Canon ImageBrowser Auto Launch control panel located in the Control Panels folder The Settings for USB connection dialo...

Страница 68: ...selected in the Program Selection Options group box a dialog box that allows you to select an application program will open when a digital camera is detected 2 Click the close box at the upper left ha...

Страница 69: ...ated paper printing About Canon perforated paper Starting printing Index printing This section describes ImageBrowser s printing features These features can be accessed by displaying the Browser windo...

Страница 70: ...t Page artwork Selecting a layout The layout selection wizard lets you quickly select a desired layout for printing Steps 1 Select the image you want to print in the Browser area and select Layout pri...

Страница 71: ...rinting 71 The Layout Options window appears and at the same time the layout selection wizard starts Select the Custom layout printing radio button 2 Click the Next button to proceed to the next page...

Страница 72: ...g 72 3 Click the Page setup button The Page Setup dialog box for the printer selected in the Chooser appears Specify the paper size and orientation Select the Borderless Printing check box to print im...

Страница 73: ...Print dialog boxes shown here are of BJ F900 5 Click the OK button to exit the layout selection wizard The Print window appears where the selected images are arranged so that they fit the page size yo...

Страница 74: ...Custom layout printing 74 Canon perforated paper printing Click the PRINT button to start printing...

Страница 75: ...out printing 75 Page artwork When the Custom layout printing option is selected you can change the size and position of the images as well as perform image cropping You can also add text information t...

Страница 76: ...an image 1 Select the image you want to delete A frame appears around the selected image 2 Press the Delete key on the keyboard You can also delete the selected image by selecting Clear from the Edit...

Страница 77: ...age you want to crop A frame appears around the selected image 2 Double click the selected image The Clipping window appears in which the selected image is displayed You can also open the Clipping win...

Страница 78: ...ng area 4 Click the close box at the upper left corner of the window to close the Clipping window The image after cropping is displayed in the Print window Refer to Cropping an image for more informat...

Страница 79: ...oving an image changing the position of an image 1 Select the image you want to move A frame appears around the selected image 2 Drag the image with the mouse to move to a different location Image mov...

Страница 80: ...1 Select the image you want to enlarge or reduce A frame appears around the selected image 2 Place the mouse cursor over the border of the selected image and drag the mouse to enlarge or reduce the i...

Страница 81: ...the Edit menu The Add Text window appears Specify the font style Available styles and effects are from left to right bold italic underlined outline shadow wide space narrow space and color Select the...

Страница 82: ...g 82 2 Enter text in the text box You can specify text attributes such as font font style color and justification The entered text is inserted into the Print window according to the format specified i...

Страница 83: ...layout printing 83 3 Click the OK button The entered text is displayed on the Print window Page headers and image titles can also be added Refer to Inserting text for more information on headers and...

Страница 84: ...en performing fixed photo size printing Steps 1 In the Browser area select the image s to print with the fixed photo size printing option Then select Layout printing from the submenu that appears when...

Страница 85: ...Fixed photo size printing 85 2 Select the Fixed photo size printing option in the Layout Options window 3 Click the Next button to proceed to the next page...

Страница 86: ...up dialog box for the printer selected in the Chooser appears Specify the paper size and orientation 5 Click the OK button to close the Page Setup dialog box and return to the Layout Options window Th...

Страница 87: ...the size of photos from the Photo Size pulldown menu The Preview area on the right side of the window shows how the selected images are arranged under the current settings The figure below illustrates...

Страница 88: ...ected images are arranged so that they fit the paper size you specified Page Artwork When printing using the fixed photo size printing option you cannot change the location and size of the images alth...

Страница 89: ...w the steps below when performing tiled photo printing Steps 1 In the Browser area select the image s to print with the Tiled photo printing option Then select Layout printing from the submenu that ap...

Страница 90: ...Tiled photo printing Borderless printing 90 2 Select Tiled photo printing option in the Layout Options window 3 Click the Next button to proceed to the next page...

Страница 91: ...x for the printer selected in the Chooser appears Specify the paper size With the tiled photo printing the types of paper that can be selected are limited to those shown below To specify settings for...

Страница 92: ...up displaying the information about printing 6 Read the message and click the OK button You will be returned to the Layout Options window The size of paper you specified in the Page Setup dialog box i...

Страница 93: ...e No of images pulldown menu The Preview area on the right side of the window shows how the selected photos are arranged under the current settings For example select 1 1x1 to print only one photo on...

Страница 94: ...tion and size of the images although the image cropping and text insertion features are available Starting printing Click the PRINT button to begin printing Click the Set Photo Area button to open the...

Страница 95: ...rforated paper printing feature allows you to quickly print images on Canon perforated paper Refer to About Canon perforated paper for more information on the types of Canon perforated paper Note Some...

Страница 96: ...n the Browser area select the image s to print with the Canon perforated paper printing option Then select Layout printing from the submenu that appears when clicking the print button The Layout Optio...

Страница 97: ...ype of Canon perforated paper When you select the type of Canon perforated paper the Preview area on the right side of the window shows how the photos are arranged under the current settings The figur...

Страница 98: ...ered in the Page Setup dialog box that appears in the next step 6 Click the OK button on the message box The Page Setup dialog box for the printer selected in the Chooser appears 7 Select the Custom1...

Страница 99: ...his check box is selected the Custom1 option in the Paper Size pulldown menu is disabled 8 Click the Custom button A dialog box for paper registration appears 9 Enter the size of the custom paper by f...

Страница 100: ...izard terminates The Print window appears where the selected photos are arranged so that they fit the paper size you specified Page Artwork When the Canon perforated paper printing option is selected...

Страница 101: ...Canon perforated paper printing 101 Starting printing Click the PRINT button to start printing The perforated line is displayed...

Страница 102: ...forated paper can easily be cut apart by along the perforated lines This relatively thick high glossy paper lets you print photo quality images without blank portions around them Types of Canon perfor...

Страница 103: ...Starting printing Once you have completed all necessary steps for the page layout follow the steps below to start printing Steps 1 Click the PRINT button The Print dialog box of the printer selected i...

Страница 104: ...for printing Select the type of paper you specified in the Page Setup dialog box from the Media Type pulldown menu For example select Photo Paper Pro when printing on the Pro Photo Card and select Glo...

Страница 105: ...os If you click the Manual button the Details button becomes active as shown below Click the Details button to display the Detailed Setting dialog box In this dialog box click the Special Effects butt...

Страница 106: ...imizer PRO If the Photo Optimizer PRO check box is selected the color data captured by a digital camera is corrected based on the colors and tones This may be useful when correcting unnatural tones ca...

Страница 107: ...the page layout before printing ImageBrowser s index printing feature allows you to quickly print an index a list of thumbnails of the selected images You can specify the size of the thumbnails All o...

Страница 108: ...nique Then select Index printing from the submenu that appears when clicking the PRINT button The Index printing window appears 2 Click the Page setup button The Page Setup dialog box for the printer...

Страница 109: ...of pages used for printing depends on the number of selected images the size of thumbnails specified in the Index printing window and the size of paper specified in the Page Setup dialog box 5 Click...

Страница 110: ...before printing an index of the selected images Steps 1 In the Browser area select the image s to print with the index printing Then select the Layout printing from the submenu that appears when click...

Страница 111: ...Index printing 111 2 Select the Index printing option 3 Click the Next button to proceed to the next page...

Страница 112: ...alog box for the printer selected in the Chooser appears Specify the paper size and orientation 5 Click the OK button to close the Page Setup dialog box and return to the Layout Options window The siz...

Страница 113: ...he window shows how the thumbnails are arranged under the current settings 7 Click the OK button to exit the layout selection wizard The Print window appears showing the thumbnails that are arranged a...

Страница 114: ...of paper you specified in the Page Setup dialog box from the Media Type pulldown menu When printing photos usually select the Photo option for the Print Mode Select the Text option for the Print Mode...

Страница 115: ...115 Page Artwork Editing the layout format Inserting text Cropping an image...

Страница 116: ...layout format Moving an image Changing the size of an image Rotating an image Deleting an image When you select the Custom layout printing option in the Layout Options dialog box you can move reduce...

Страница 117: ...move an image to a different location When you select the Custom layout printing option in the Layout Options dialog box you can move an image by dragging it in the Print window 1 Select the image yo...

Страница 118: ...o move to a different location Note When you select one of the options other than the Custom layout printing you cannot move images in the Print window However the display order can be changed by drag...

Страница 119: ...yout Options dialog box you can enlarge or reduce the selected image by dragging its frame blue line When the mouse cursor is positioned over the image frame the cursor changes into Then drag the mous...

Страница 120: ...he image and drag the mouse to enlarge or reduce it When the mouse cursor is positioned over the image frame the cursor changes into Note When you select one of the options other than the Custom layou...

Страница 121: ...age You can rotate the selected image by selecting the 90 degrees right 90 degrees left or 180 degrees option from the submenu that appears when clicking the ROTATE button 1 Select the image you want...

Страница 122: ...0 degrees left and 180 degrees as needed 3 According to the option you selected the image is rotated Note When you select one of the options other than the Custom layout printing only the 180 degrees...

Страница 123: ...ou can delete a selected image in the Print window However note that the deleted image is only excluded from printing and the original image file remains intact 1 Select the image you want to delete T...

Страница 124: ...Editing the layout format 124 2 Press the Delete key on the keyboard The selected image is cleared The image disappears You can also delete the selected image by selecting Clear from the Edit menu...

Страница 125: ...t anywhere in the page displayed in the Print window The text entered in the Add Text window is displayed in the center of the Print window within the frame blue outline rectangle indicating the text...

Страница 126: ...e font font style color and alignment Specify text s justification Select the font size Select the font Specify the font style Available styles and effects are from left to right bold italic underline...

Страница 127: ...Inserting text 127 3 Click the OK button The entered text is displayed in the Print window within the frame blue The text can be moved by dragging with the mouse...

Страница 128: ...ither the Custom layout printing nor the Index printing the entered caption is displayed in the location specified in the Edit Caption window the alignment setting for text Double clicking the entered...

Страница 129: ...osition specified in the Edit Header window the justification setting for text that is left center or right Double clicking the entered header in the Print window displays the Edit Header window in wh...

Страница 130: ...data Steps 1 Select the image you want to crop and select Clipping from the Edit menu The Clipping window appears The current display percentage appears ENLAEGE button Enlarges the size of the image T...

Страница 131: ...elect the area to be cropped Click outside the selected area to deselect it 3 Click the close box at the upper left corner of the Clipping window The Clipping window is closed and the cropped image is...

Страница 132: ...ent layout is the Tiled photo printing Fixed photo size printing or Canon perforated paper printing cropping is restricted to the vertical clipping or horizontal clipping This is because the height wi...

Страница 133: ...e Online Help ImageBrowser provides you Online Help with information about functions and operations It contains a brief description of operational steps that you can read on the screen while operating...

Страница 134: ...o data 37 Auto Launch control panel 67 Automatic Clipping 87 Automatic Clipping check box 92 Automation wizard 8 13 49 52 55 66 Automation wizard dialog box 51 B Borderless printing 91 Browser area 19...

Страница 135: ...54 Creating image files attached to Email 40 Creating panoramic photos in PhotoStitch 44 Cropping an image 130 Cropping image 77 Custom layout printing 10 71 75 custom layout printing 61 custom paper...

Страница 136: ...125 Explorer View 17 19 36 56 export 63 F Fixed Photo Size Printing 5 Fixed photo size printing 85 I image cropping 94 100 130 132 IMAGE INFO button 64 image size 10 63 Importing Images 48 Importing i...

Страница 137: ...ow 84 85 89 90 92 96 98 110 112 Layout printing 70 layout selection wizard 70 71 88 89 96 100 M Media Type 114 memory card 8 55 58 Moving an image 79 117 O Online Help 133 Opening the image 46 P Page...

Страница 138: ...preview display 20 Previewing the page layout 110 PRINT button 61 Print button 61 Print dialog box 103 113 Print Mode 114 Print window 73 128 Printing 69 printing 61 95 103 R resizing 63 ROTATE button...

Страница 139: ...39 Sound panel 39 T text insertion 94 100 thumbnail area 63 Thumbnails 17 thumbnails 4 44 58 109 113 tiled photo 89 91 Tiled Photo Printing 5 Tiled photo printing 89 90 94 Time Tunnel 36 trimming 4 1...

Страница 140: ...140 Index W wizard 9...

Отзывы: