background image

T H U N D E R   B A Y   S E

Installation: Adding your spa cover

ATTACHING YOUR SPA COVER

The Spa Cover is an important accessory to help preserve the spa’s temperature. The Spa Cover also serves as a safety device, preventing 

unauthorised users from entering the spa. Proper installation of the Spa Cover is an important addition in the spa installation.
1.   Remove Spa Cover from packaging.
2.   Place Spa Cover on spa in order to allow easy access to the topside console when opening the cover.
3.   Line up attaching straps and secure with mounting hardware.

4.   Use locking mechanism to lock Spa Cover in place.

IMPORTANT:

•   Always lock Spa Cover in place when not using the spa.

•   Do not walk or sit on Spa Cover.

•   Remove snow build-up to avoid breaking the foam inner core.

•   Do not drag Spa Cover on rough surfaces.

Like any luxury item, a boat, car or recreational vehicle, care and maintenance is critical to the lasting quality and enjoyment of a spa. The 

spa has been designed to provide years of health and relaxation benefits. Proper care and maintenance outlined in this section is necessary 

to ensure the longevity of the spa. Damage caused by not following care and maintenance guidelines in this section is not covered by the 

manufacturer’s warranty.

BOTTOM MOUNT” HOT TUB 

COVER LIFTER. 

Fully compatible with Canadian Spas; this Cover Lifter is the ideal 

choice to complement your hot tub or spa, making cover removal and 

replacement a quick, one-handed operation while reducing wear and 

tear on your hot tub cover. 

•   Mounts directly to the spa 

•   Can be mounted with optional under-spa brackets without the    


need for drilling holes in the skirt. 

•   Made of black powder-coated Aluminum 

•   Requires 31cm - 46 cm rear clearance 

TOP MOUNT”HOT TUB COVER LIFTER 

Fully compatible with ALL our Canadian Spa hot tubs and spas and 

most other brands; this Cover Lifter is the ideal choice to 

complement your Hot Tub, making cover removal and replacement a 

quick, one-handed operation and reducing wear and tear.

•   Low-profile design

•   Virtually zero clearance 


required behind spa – great for tight spaces (particularly if your  


spa is located in a gazebo)

•   Mounts directly to the spa

•   Fits up to 2.4m Spas

•   Made of Aluminium

(12)

Содержание KH-10030

Страница 1: ...T H U N D E R B A Y S E Thunder Bay SE Spa Owners Manual 218x 218 x 82cm 86 x 86 x 33 KH 10030 For Service Support please contact us anytime support canadianspacompany com canadianspacompany com...

Страница 2: ...s product yourself as opening or removing audio covers may expose you to dangerous voltage or other risk of injury Refer all servicing to qualified service personnel 12 CAUTION Risk of Electrical Shoc...

Страница 3: ...mation Cancellation Policy We require a 48 hour cancellation notice in writing or email prior to your scheduled delivery If we are notified later then a reasonable cancellation charge will be applied...

Страница 4: ...in conjunction with the air control system to create an aromatic experience 8 AUDIO VOLUME CONTROL Allows control of MP3 functions from within the hot tub 9 TOPSIDE CONSOLE Button pad and temperature...

Страница 5: ...tes ozone to aid in maintaining water quality Ozone helps eliminate organic material such as body oils dead skin cells and hair DRAIN VALVE Valve located on the outside of spa cabinet used to drain wa...

Страница 6: ...check with your local council Installation and Ground surface requirements Ground preparation is not included in the sale of any spa or gazebo The location where you are planning to put your spa and o...

Страница 7: ...n using the hosepipe which conveniently fits onto the drain valve situated at the base of your spa Ideally you should empty the water to a nearby drain You may wish to purchase a suitable submersible...

Страница 8: ...tly into filter housing Push hose pipe into filter housing until it stops Fill up to middle of the skimmer Secure hose placement and turn on water Filling the spa through the filter housing prevents a...

Страница 9: ...livery might cause a leak Remember to pay particular attention to barrel unions adjoining the heater Contact your Canadian Spa dealer directly if there is a problem If your new spa pump does not prime...

Страница 10: ...wever you have insufficient Amps you will need to use other connection see below 2 Single Phase connection B is used in circumstances where the power supply is limited and where you need more Amps 3 P...

Страница 11: ...e Heater is on another service Everything else is on the remaining service For 3 phase connection 1 Completely remove jumper on J51 and J88 2 Completely remove jumper on J52 and J62 3 Make a connectio...

Страница 12: ...d relaxation benefits Proper care and maintenance outlined in this section is necessary to ensure the longevity of the spa Damage caused by not following care and maintenance guidelines in this sectio...

Страница 13: ...levels using pH Up or decrease with pH Down The granules are dosed directly into the spa water pH Up KA 10051 pH Down KA 10050 FREE Water Test App Chemical Guide Starter Chemical Kit KA 10122 Deluxe...

Страница 14: ...inants combined chlorine Chlorine level too high A pH too low B combined chlorine due to high concentration of organic contaminants A high concentration of organic contaminants using up sanitizers B t...

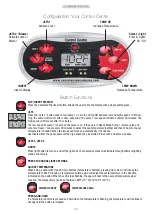
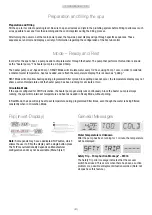
Страница 15: ...nge the temperature in the opposite direction e g DOWN The temperature can be set between 16 C and 40 C 60 F and 104 F Press and Hold If a Temperature button is pressed and held when the temperature i...

Страница 16: ...use operate Burned out UV bulb Replace unit Component failure Contact dealer No water Flow from Jets Air lock See air lock procedure Adjustable jets turned off Turn jets on Faulty pump or motor Contac...

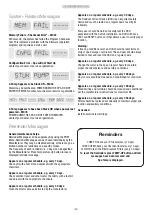
Страница 17: ...every 30 minutes to detect the spa temperature polling and then to heat to the set temperature if needed When the low speed turns on automatically it cannot be deactivated from the panel however the h...

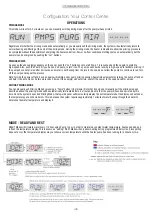
Страница 18: ...he control panel will be disabled until power is re established Based on the spa controller configuration will return to the Factory Default Settings After the Pump has been running for 2 minutes the...

Страница 19: ...again will initiate a new pump priming session Sometimes momentarily turning the pump off and on will help it to prime Do not do this more than 5 times If the pump s will not prime shut off the power...

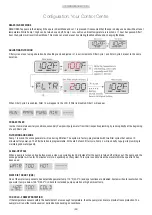
Страница 20: ...0 minutes after the pump is turned off or times out The pump and the ozone generator will run for 30 minutes or more depending on the system This cycle is used to clean the water within the spa after...

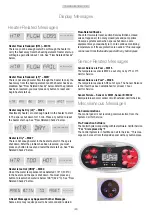
Страница 21: ...ng during programmed filter cycles Since polling does not occur the temperature display may not show a current temperature until the heater pump has been running for a minute or two Circulation Mode I...

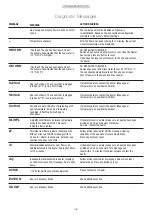
Страница 22: ...o reset when water is below 108 f 42 2 C See Flow Related Checks below A Reset Message may Appear with other Messages Some errors may require power to be removed and restored Flow Related Checks Check...

Страница 23: ...gular schedule e g every 30 days Clean the filter media as instructed by the manufacturer Appears on a regular schedule e g every 30 days The Residual Current Device RCD is an important safety device...

Страница 24: ...anty becomes void if the spa is placed in commercial application Guarantee of the insulating cover Canadian Spa Co guarantees that the cover the purchase is free from defects in materials and workmans...

Отзывы: