Camtek CAM1095 Скачать руководство пользователя страница 6

6

Inspection Camera Kit 22mm

CAM1095

OPERATING & ASSEMBLY INSTRUCTIONS 

Always wear eye protection to protect your eyes 

against dirt and other foreign objects.

•  When inspecting drains that might contain haz-

ardous chemicals or bacteria, wear appropriate 

protective equipment, such as latex gloves, gog-

gles, face shields or respirators to prevent burns 

and infections.

•  Do not operate this equipment if operator or ma-

chine is standing in water. 

•  Operating machine while in water increases the 

risk of electrical shock. Rubber soled, non-slip 

shoes can help prevent slipping and electric 

shock, especially on wet surfaces. 

•  Follow operating instructions to reduce the risk 

of injury from electrical shock and other causes.

Basic Assembly Instructions

Make sure all equipment is properly set up 

and the battery is fully charged. Fully charged 

battery will have all five red LEDS illuminated.

•  Put the Fuse into the jack located at the side of 

the Battery Box.

•  Plug the Power Adapter Cord into the wall AC 

socket and the other end into the DC 12V-Input 

Jack on Monitor.

•  If you choose to use the charged battery, plug 

the power output cord of the battery to the DC 

12V-Input Jack of the Monitor, then press the 

button on the battery. 

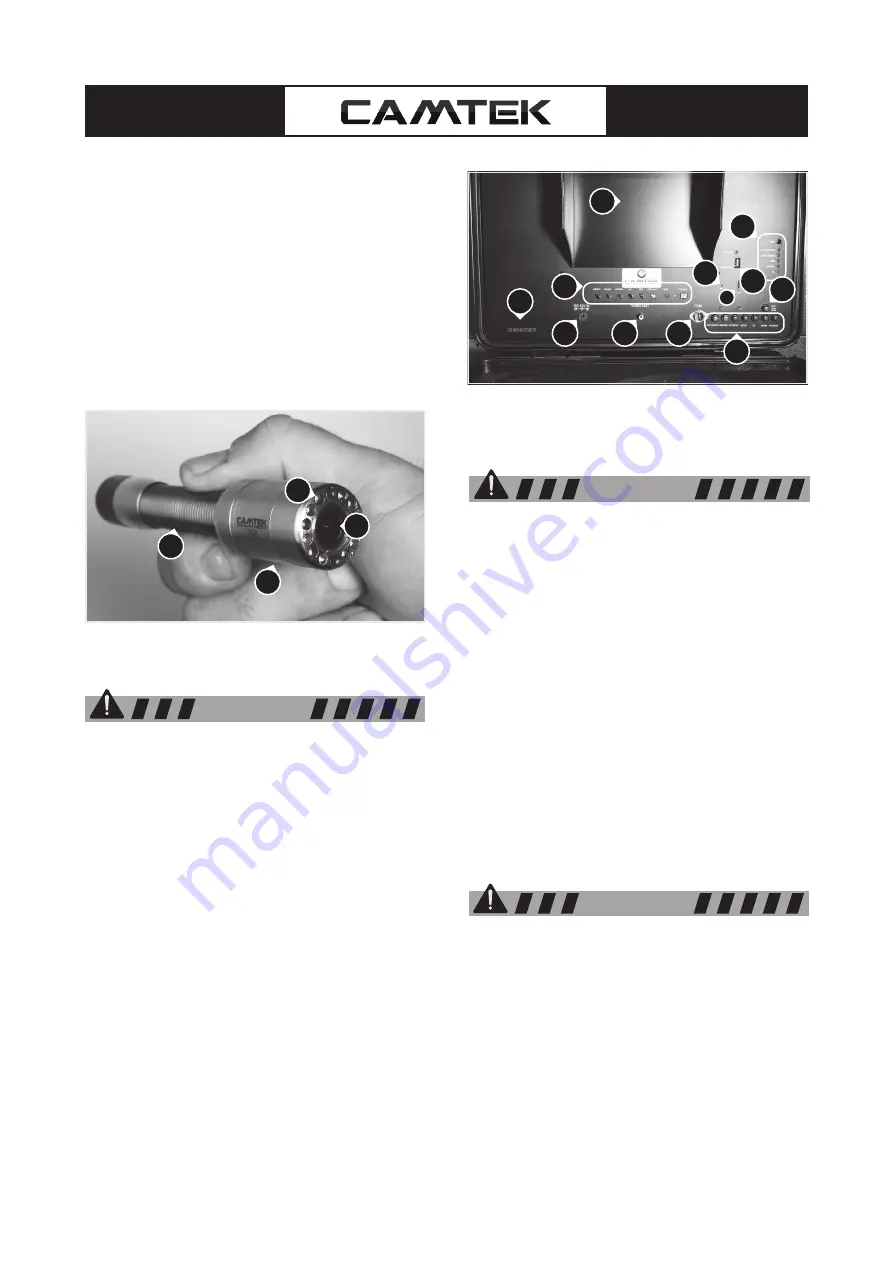
Monitor Control Unit & Recorder 

Be sure you are familiar with the camera system 

unit and have read its operator’s manual carefully.

The Monitor Control Unit provides power to the 

camera reel and system accessories. It also pro-

vides a control that adjusts the camera’s lighting 

and  DVR  (digital  video  recorder).  Monitor  Control 

Units may be powered by a 220-volt AC source 

or the supplied 12VDC Lithium  powered  battery. 

1.  10” Monitor 
2.  Monitor Control functions
3.  DC 12V Input 
4.  Video Output
5.  Cable reel connection point
6.  Microphone
7. 

Microphone On/Off Button

8.  USB Stick Input
9. 

SD card slot (not used) firmware upgrades only

10. 

DVR (digital video recorder) LEDS

11. DVR control Functions
12. Item Serial Number 

Camera Head 

The camera head has adjustable LEDS and an ad-

vanced-design, scratch-resistant sapphire Lens.


This, coupled with the stainless-steel housing al-

lows the camera to withstand repeated stresses 

and impacts in normal operating environments. 

1.  Camera housing
2.  Sapphire lens
3.  LEDS
4.  Spring Assembly


Monitor Control Unit Functions

Monitor Control Unit Functions

1

2

3

4

12

1

3

4

5

11

6

9

10

8

7

2

WARNING

WARNING

WARNING

Содержание CAM1095

Страница 1: ...OPERATOR S MANUAL Please read these instructions completely before operating this system Inspection Camera Kit 22mm Inspection Camera Kit 22mm CAM1095...

Страница 2: ..._______________________________________________ 8 Spring Assembly_______________________________________________________ 8 Removing Camera Head from the Reel_____________________________________ 9 Han...

Страница 3: ...erating equipment Do not use equipment while you are tired or under the influence of drugs alcohol or medication Use personal protective equipment Always wear eye protection gloves while operating Ele...

Страница 4: ...act with corrosive drain cleaners Drain cleaning chemicals can cause serious burns as well as damage the cable Neutralize or remove corro sive drain cleaners in the drain before starting the job Prote...

Страница 5: ...control SYSTEM COMPONENTS Inspection Camera Kit 22mm includes The Camera Head the Cable Reel and Frame and the Monitor Control Unit Cable Reel The pushrod is housed in a handheld metal drum which is l...

Страница 6: ...the charged battery plug the power output cord of the battery to the DC 12V Input Jack of the Monitor then press the button on the battery Monitor Control Unit Recorder Be sure you are familiar with...

Страница 7: ...see an image on the monitor check to make sure its power is turned ON Video 1 on the monitor is live view mode Video 2 on the monitor is the DVR digital video re corder mode Note Don t misuse the pow...

Страница 8: ...his system zero point at any time with a press on the Zero Key It is good practice to do this for example at the entrance to a pipe Retrieving the Camera Once the inspection has been completed pull th...

Страница 9: ...ns to the pipe When inspecting a pipe it is usually necessary to give a little extra push in the bends Back the camera head approximately 7 from the bend if necessary and give it a quick push pop ping...

Страница 10: ...USB micro SD device has error 6 IR It blinks when the remote control is in use for Recording Video 7 The recorded video files will be found in a di rectory of USB devices 8 You can use the on screen...

Страница 11: ...cket on the wall and insert the other end into the DC Jack on the battery box The battery can be charged while the battery box is on and the device is being used Howev er once the power in the battery...

Страница 12: ...contact the Camtek service department Picture BUT No Lights Check if Main Power switch is ON and in cor rect position Check to see if the LIGHT power switch is ON and intensity control is turned up C...

Страница 13: ...e and contact Camtek service department Please note USB Drives might need to be for matted on a computers prior to use please fol lowing the instruction on how to do this below Plug USB into Computer...

Страница 14: ...repaid and you will be compensated for these charges if it is determined that the part is defective If repairs are necessary due to conditions beyond our control or if the item is out of warranty we w...

Страница 15: ...15 Inspection Camera Kit 22mm CAM1095 Notes...

Страница 16: ...08 8122 0469 sales camtek net au www camtek net au...

Отзывы: